The vast majority of floors in both private and apartment buildings are made of wood. The support for a multi-layer, pie-like wood structure is most often logs. Logs are long bars made of wood (less often metal and reinforced concrete) laid transversely to the finishing flooring, serving as its solid foundation. This structure is installed both on a monolithic concrete floor and on supporting posts and beams. Installing floors on wooden joists is very profitable due to the relatively low price of materials and ease of installation.
Conditions for long-term use of wooden floor planks.
Since plank floors and joists are often susceptible to damage by pests and disease, all wooden elements require proper treatment with protective agents and an antiseptic. To maintain service life for a long time.
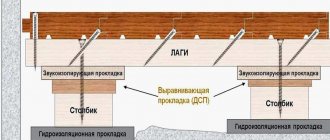
If a wooden floor made of planks along joists is made on the ground floor and rests on brick or concrete pillars (columns), then the air under the floor should circulate freely in the warm season. It is imperative to put waterproofing under the joists on the pillars.
If there is damp soil or a floor slab, it is necessary to lay a hydro-vapor barrier material under the logs. For example, thick polyethylene, the overlaps should be at least 10 cm, glue with tape.
Lag function
Despite the large number of different methods for leveling the floor, joists remain one of the most effective types of construction. Their main function is to create a perfectly flat surface. It will allow subsequent work on the interior decoration of the premises.
It is also worth emphasizing that this type of coating makes it possible to maintain a certain distance between the embankment and the floor surface. It is this distance that will provide excellent ventilation and prevent the process of rotting of materials.
The biggest danger occurs when the logs are laid on the ground. In this case, the wood may fail too early. Therefore, professionals always raise the floor level a little to ensure proper ventilation. There are also several other main functions that logs perform:
- load distribution throughout the foundation;
- the ability to lay various types of communications that are undesirable to be placed above the floor;
- the appearance of free space makes it possible to use thermal insulation materials. There are a large number of them. Therefore, you can choose the most suitable one - sawdust, expanded clay, mineral wool and many other types.
If the owners of the room are not satisfied with the height of the floor, it can be adjusted to optimal levels using logs. The use of high-quality materials guarantees the reliability and immobility of the structure. Special support points provide a strong foundation for a durable floor. Simple and inexpensive materials allow anyone to install them; no specific knowledge is required for this.
Boards for laying wooden floors on joists.
Simple carpentry floors should be laid from dry pine boards 4 cm thick. If the distance between the beams is 50 cm, their thickness can be 3 cm.
The width should be no more than 13-15 cm, since wide boards warp greatly, as a result of which the floor becomes uneven.
For all residential buildings, the recommended thickness of floor boards for flooring is at least 0.28 cm.
Significantly denser wooden floors are obtained by using tongue and groove boards, which, when laid well and correctly, do not create cracks.
In addition, tongue-and-groove ones have a small recess in the bottom middle, a recess. This ensures a tighter connection between each floorboard and joists or beams.
Floorboards of greater thickness are intended for flooring in rooms where the load on the floor is significant.
Installing a wooden floor using planks along joists with your own hands is quite simple if you follow the installation instructions.
Mounting methods
Depending on the location of the logs, there are several methods for attaching them. Previously, when installing this floor on a concrete screed or reinforced concrete beams, the logs were attached using simple long nails, but this method was not distinguished by its durability.
Currently, more reliable devices are used for fastening - U-shaped fasteners or galvanized metal corners. The corners, on the one hand, are fixed with self-tapping screws to a wooden beam , and on the second - to the base with dowels. The depth of insertion of the fastening into the beam is 3-5 cm. If you arrange the floor on the ground for brick pillars, then the algorithm of actions is similar.
Sometimes the logs are not long enough, so many are interested in how to build up the timber so that it is as strong as solid material. The logs can be joined end-to-end or by notching , and in both cases the length of the extended element is at least one meter. And if you need to increase several of them at once, you need to shift the joining points by 50 cm or more so that the load is uniform.
The logs are fixed to the wooden floor beams using screws . The length of the fasteners must be 2.5 times greater than the width of the joist, and the diameter must be at least 6 mm. To protect the wood from splitting, before installing the fasteners, the joists and beams should be drilled in the required location. And the diameter of the hole should be 2.5 mm less than the mounting diameter.
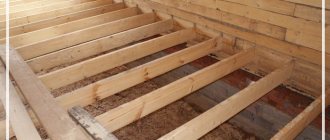
Installing joists for laying wooden floors from boards with your own hands.
The logs should be made of durable wood, but not poplar or linden. Under the logs, either 50x50 mm timber is used. or boards 50×100 or 50×150 mm.
The lags are laid on concrete floor slabs, brick or monolithic columns (columns) according to the level. If necessary, to maintain the level, planks and bars of the required thickness are placed under them for leveling. You can use the corners for leveling, attaching them on both sides to the joists in increments of no more than 50 cm. You will get a kind of adjustable floors.
The logs are attached in different ways, using special anchors measuring 8x200 or 10x250 mm, with corners, on threaded studs and nuts (adjustable floors). In some cases, the logs are not secured at all, they are simply placed on the base.
Laying the floor boards is done across the joists, so when installing the joists on the base, they need to be laid so that when laying the floor boards, they are long enough to cover the entire width of the room.
If the length of the flooring boards is not sufficient, then they are laid in a “running motion”. First long, then short, the next one from the same edge short, then long. The logs are also laid with a “running start”
If the logs rest on pillars, then they must be laid on edge. This way they will hardly sag under heavy weight. When laying wooden logs on a flat concrete base without using leveling pads, you can lay them lying down or on their edges.
Before installing logs for a wooden floor made of boards with your own hands, it is recommended to apply a layer of waterproofing to a concrete or brick base; you can use roofing felt.
The distance between the lags is 50-60 cm - this is the best option, in this case the structure will not sag. If in the future it is planned to insulate wooden floors from planks, then the logs are usually installed to match the width of the insulation, for example mineral wool.
How to independently calculate the required distance between lags?
When you install a floor on logs, use the rule: the thicker the floor board, the wider the installation and the farther apart the logs are located.
For example, for a board whose size is 5 cm, you can make a step (the distance between the lags) of one and a half meters.
If you use thin boards, you can take small steps so that the board does not sag. The most common step length between joists is 50-70 cm.
The distance between the lags is most often 50-70 cm
Also keep in mind that you will need additional space to make it convenient to lay the insulation inside. If the size of the base does not correspond to the values in the table, then it is calculated upward.
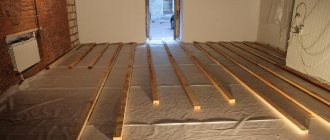
Installation of wooden flooring from boards along joists with your own hands.
When laying a wooden floor along joists with your own hands, place the first board with a groove against the wall, from which you need to retreat 10-15 mm. At the same time, it should be aligned as accurately as possible using a tape measure, because the entire row will go from it. And if the first board goes crooked, then the entire row will be like this, respectively, at the opposite wall you will get a wedge (triangle).
Floor boards are laid from one edge, gradually moving towards the other wall. Each board is laid in this way, after securing the first one.
But first you just need to lay them out on logs to see what happens in the end, like with laying floor tiles. Tighten them with temporary wedges, hammering them against the walls and leave them like that for two or three days for acclimatization.
The material should be adjusted carefully, without leaving gaps.
To avoid gaps between the boards, they should be pressed together with a hammer.
However, only tongue and groove boards can be pressed tightly against each other. If you tightly tighten the floorboards from a simple edged board, then at best your wooden floor will creak and no additional tightening will get rid of the creaking, and at worst, the floorboards will begin to warp. Since wood absorbs moisture well, increasing the size of the floorboards cannot be avoided.
When laying wooden floors with your own hands, the annual layers should be directed in opposite directions, as in the picture. This method provides a more even flooring, while the floors will practically not warp.
Wedges are driven between the last floor board and the wall to press the floor boards tightly together for driving nails.
If it is not possible to pull together all the boards without gaps in this way, you will have to pull them together one at a time. To do this, you can use a special tool that you probably have, an ax or a mounting tool.
The ax is slightly driven into the joist at an angle of 45 degrees and pulled towards the adjacent board.
To tighten the installation, you need to remove one or two floorboards from the previously laid out floor and placing the installation in this gap, resting it on the flooring, pull together the floor boards one by one, but placing the cuttings of the boards on both sides of the installation, so as not to spoil the flooring.
At each intersection of the joist with the floorboard, nails are nailed, two at each intersection with the joist, the heads of which must be completely buried in the wood.
They need to be driven in at an angle so that they press each board against the previous one.
When nailing wood flooring, nails are used that are 3 times the thickness of the board. Using a hammer, it is recommended to recess the caps a couple of millimeters. This way it will not interfere with planing.
Instead of nails, it is more effective to use self-tapping screws; they hold the boards better, preventing them from tearing away from the beams. Pre-drill holes, but not in the joists. This way the flooring will be pressed tighter.
Do not use black self-tapping screws; they are overheated and may burst under load or may tear off the cap when tightened.
Important! In order to bring a wooden floor as close as possible to the parquet look, you need to purchase a special material - boards made using the glued method.
Do not forget to leave gaps between the walls and floorboards, which will be covered with baseboards.
Floor on poles
When installing a wooden floor on pillars, there is a subfloor. It may be insulated or not. The floor can also be cold or insulated in any of the options.
Floor posts
Floor columns are made of brick, small concrete blocks, or ready-made concrete blocks of the “FL” type are used. You can use bitumen-impregnated wooden blocks as posts. Some people place boulders of suitable size with a flat top on the base. Boulders are good support, but attaching logs to them is problematic.
Each column has its own foundation. The size of the base is 2-10 cm larger than the column. The depth of the foundation depends on the type of soil, but usually 10 cm is enough.
If groundwater is located close, the logs are raised. They make supports for them - brick pillars
There are two options for making bases for posts: make formwork for each separately, or fill it with a single tape. The first method is more economical in terms of material consumption, but the second takes less time: making one or two general formworks is faster than making many small ones.
The location of the supports is marked with a pencil on the foundation or on the lower crown (on the element to which the logs will be attached). Then the threads are stretched between the marks, and the formwork for the posts is already knocked down along them. There are other marking methods, but this one is the fastest and most accurate.
The dimensions of the formwork for the posts are 2-10 cm larger than the post itself, the height is 10 cm. Several bars of smooth reinforcement are laid inside, on the compacted soil, and they are filled with standard cement-sand mortar. Wait for the solution to set for at least 3 days, then you can lay out columns on the base.
The dimensions of the supports for the logs can be approximately as follows
When pouring, it is necessary to monitor the height of the foundations: it must be the same. In principle, it can then be corrected by adding a solution, but again you will have to wait 3 days. Therefore, try to immediately make them the same height.
Ruberoid is laid on the finished base, possibly in two layers. Then the columns are folded. It is recommended to put roofing felt on top of them, and then also a three-centimeter wooden board impregnated with antibacterial compounds. The logs will already be laid on it.
As you can see, it takes a long time to make floor posts. If you need to speed up the process, you can put ready-made concrete blocks or beams, or you can lay asbestos-cement pipes on a well-compacted bedding. Some people put up boulders or tarred logs. There is another option - drive pieces of metal or asbestos-cement pipes into the ground, stick several bars of reinforcement into them and fill them with concrete. There is probably more than one option, because our craftsmen are famous for their ingenuity.
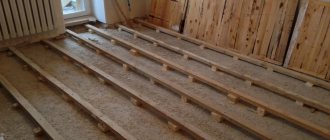
This is what the finished joists look like
By the way, there is another option, but without support: hanging logs. Such arrangement of a wooden floor is possible in narrow rooms, which is not always the case (take the step of laying the joists a little more often than in versions with supports).
Hanging logs - a super fast option
Warm and cold underground
If the logs are raised above the ground, there is free space underneath them. There are two ways out. Leave the subfloor uninsulated or insulate it. Moreover, in each of the options it is still possible to insulate the floor structure or not, and it itself can be single or double. So there are a lot of options here.
An uninsulated subfloor can be made with a single or double plank floor. Some options are shown in the figure. Moreover, the insulated floor is only available in one version - at the bottom right.
Floor options for joists with subfloor
You can insulate the subfloor very simply: lay any non-hygroscopic insulation on a layer of waterproofing (roofing felt, roofing felt, film, etc.). Expanded clay is often used; among modern materials, slab foam propylene has performed very well; polystyrene foam behaves a little worse, but it costs less, so it is also used often. Sometimes the space is filled with foamed polyethylene - all the insulation takes several hours, but they do this only with special devices, so you either have to rent them or pay a specialist for the work.
When using any of these insulation materials for ventilation of a wooden floor, it is necessary to leave a gap of at least 5 cm to the rough or finishing coating.
Scheme of a heated floor on pillars in combination with a cold subfloor
Warm and cold floor
Cold plank flooring with joists can be single or double. Warm - only double: the insulation needs to be laid on something. One of the options is shown in the photo.
A cranial block is attached to the joists on the sides below, and boards of the rough (skull) floor are laid on it. The bars should be thick enough to easily nail the decking. You can use an unedged board on the subfloor, but just be sure to remove the bark and soak it well with antiseptics: woodworm larvae often nest under the bark.
Next, waterproofing (membrane or film) is laid, and insulation is placed on top. Here you can use all the same materials as for subfloor insulation, plus mineral wool (if you are satisfied with their ecology). But in the case of laying mineral wool, they must also be covered with waterproofing on top - they really do not like water, and when wet they lose their properties. The entire cake should take up so much space that there is 5 cm left to the floor boards.
What material is used for joists?
Often, wooden logs are used for residential buildings, since they are cheaper and much easier to install. However, in industrial and commercial construction, logs made of metal or reinforced concrete are quite actively used.
Remember that logs can be made not only from solid timber, but also from two layers of boards of the same size. Such logs are installed edgewise. It is important to figure out which floor joists are best for your particular case.
In log houses, in order to save money, logs planed on three sides are widely used as logs. The only thing you should not forget about is that the wood must be absolutely dry, that is, it must first lie in a dry place for at least a year.
↑ Wood selection
Laying plank flooring requires knowledge and ability to choose the right wood. The quality of the materials used directly affects the result of the work. To create a beautiful and warm plank floor, coniferous wood is suitable - pine, spruce, larch, cedar. You can also use oak or ash. These breeds will delight you with their durability and strength, as well as their exquisite appearance. When choosing a particular type of wood, you should adhere to certain rules:
- Wood moisture content should be about 12%. The tree’s ability to maintain its shape directly depends on this indicator;
- boards must be free of cracks, chips or other damage. Such boards must be immediately rejected, otherwise the floor section will have to be replaced or frequently repaired;
- selected boards should be treated with fire retardants and antiseptics. These measures are necessary to protect them from pathogenic flora and bark beetles, as well as to reduce the fire hazard of the tree;
- To create a durable and strong plank floor, you should choose hardwood or at least hardwood such as oak or ash.
Selection of material and preparation of the base
The key to a beautiful and high-quality floor is the use of good material. Floor boards should not have various defects - for example, knots, cracks, etc. Also, if the floor will be varnished and will serve as a finishing coating, it is important to pay attention to the beauty of the wood texture.
The boards are varnished
To install the floor, in addition to the boards, you may need the following tools and materials:
- bars for logs;
- insulation;
- waterproofing material;
- fasteners - nails or screws;
- jigsaw with wood blades;
- hammer;
- baseboard;
- finishing coating;
- drill;
- building level (preference should be given to the longest option);
- protective composition for wood.
Preparing tools
Types of boards and their choice
Floor boards are usually made of larch or pine - these are the most affordable, but at the same time high-quality and reliable types of wood. Sometimes there are floors made of ash, oak, maple, and alder.
On a note! Boards made from aspen or alder are considered the most environmentally friendly and are recommended for use by home owners who care about their health.
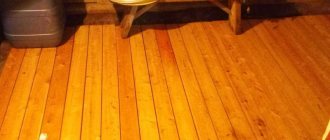
Plank floor in a private house
If the final finishing layer is varnish, then the choice should be made in favor of light wood species with a pronounced, beautiful pattern. Oak boards, as well as walnut or mahogany, will look best as a floor. Among the listed options, oak wood is the cheapest.
Table. Floor boards depending on the wood used.
| Board type | Description and characteristics |
| Pine or spruce | The Brinell strength index for spruce is 1.5, and for pine – 1.6, which indicates some softness of the board. The moisture resistance of coniferous wood is low; these materials are also most susceptible to insects and parasites; they deteriorate faster than other boards. For such floors, it is necessary to treat the boards with antiparasitic compounds. The main advantage of spruce/pine boards is their low cost, since the average cost of the material is only 520 rubles/sq. m. |
| Berezovaya | Strength on the Brinell scale is 2.5. The texture of birch is very beautiful and pleasant, and if it is additionally tinted, the floor will turn out very beautiful. Price per 1 sq.m. is approximately 660 rubles. |
| Larch | Such a board does not tend to absorb moisture, and therefore can be used where the humidity level is quite high, that is, even in a sauna or bathhouse. Larch almost does not rot, and its Brinell strength is 3.1 - it is not even necessary to varnish the material. The color of this wood is very beautiful and noble. Cost of 1 sq. m. boards can vary from 600 to 1620 rubles. |
| Ash and oak boards | The Brinell strength is 4 and 3.7 - the material is very durable. Resistance to humidity is moderate, but lower than that of larch. Such floors look very noble and rich. The cost of this material is high - from 1800 to 4400 rubles / sq. m. |
| Exotic breeds (wenge, kempas, merabou) | The strength of these rocks is maximum – 4-5 points on the Brinell scale. The materials are moisture resistant and almost resistant to parasites. The floors are unique and very beautiful. Such boards are expensive - up to 6,000 rubles / sq. m. |
Prices for construction floor boards
floor boards
Brinell wood hardness chart
Pine wood floor
Floor boards come in several types, the main ones are:
- regular board with straight ridge;
- tongue and groove;
- and a quarter.
Grooved floorboard
When choosing a material, the thickness of the boards is often determined by the distance between the logs, and vice versa - the distance between the logs may depend on how thick the boards are used.
Table. The ratio of the distance between the logs and the thickness of the boards.
| Board thickness, mm | Distance between lags, cm |
| 20 | 30 |
| 24 | 40 |
| 30 | 50 |
| 35 | 60 |
| 40 | 70 |
To create the finishing floor covering, it is recommended to use boards with a tongue-and-groove connection type. The most commonly used material is 28 mm thick - this is the most common board size. If the floors will experience significant loads, it is recommended to use boards with a thickness of at least 36 mm. On average, the width of this building material varies from 68 to 138 mm.
Floor board
Installation of adjustable subfloors
When installing a subfloor, you also need to take into account several features. Be sure to pay attention to whether your screed requires repair. Assess what kind of repairs need to be made. If the soil under the screed has subsided and it is skewed, it is accordingly necessary to install logs that will be adjustable.
You can also make a plywood floor as a rough flooring, which can also be used to adjust the level. These methods are used in old buildings where it is not possible to pour a screed, since the floors are not reliable and may not withstand heavy loads.