The most reliable and durable base for installing underfloor heating and decorative coverings is a concrete screed.
Due to its high performance characteristics - strength, wear resistance, resistance to mechanical stress - it is successfully used in the construction of residential and industrial facilities.
Creating a concrete foundation requires an integrated approach, the necessary knowledge, professional working tools and materials.
Floor screed - what is it?
A cement floor screed is a solid foundation that is placed on a concrete interfloor slab or a multilayer structure built on the ground.
The concrete screed device provides:
- creating a perfectly flat surface for laying decorative coatings;
- creating a solid foundation that can withstand extreme mechanical loads;
- wear resistance of the floor structure.
To create a concrete screed, cement-sand mortar, porous concrete based on binding materials, and dry self-leveling mixtures are used.
The choice of suitable material is determined by the type of decorative floor covering and the method of its installation.
Types of concrete screeds
A concrete base is a durable and flat surface, which differs in type of construction, laying method and operational parameters. Floor screeds are made on a bonded, separating, insulating and reinforced base.
Screed on a bound base
The screed is poured onto a previously prepared base treated with a special primer mixture. Therefore, it has better adhesion to the base and is able to withstand extreme mechanical loads. The performance characteristics of the top layer of the floor will depend on the degree of humidity of the base. This screed is installed on dry floor slabs.
Screed on a dividing base
This pouring technology involves preliminary installation of waterproofing on the base. For this purpose, roll, painting and coating protective materials (roofing felt, film, bitumen mastic) are used, which prevent moisture from penetrating into the top layer of the floor structure. In this case, the thickness of the concrete layer should be 32 mm. The finished base will have high waterproofing characteristics with reduced strength and wear resistance.
This type of screed is used for arranging floors in outbuildings and technical rooms with high humidity.
Screed on an insulating base
Screed is used to create high performance floors. For example, when installing a heated floor, when preliminary thermal and waterproofing of the base is required. In this case, the solution is poured onto a previously laid layer of thermal insulation, and the screed becomes an independent layer. The thickness of the concrete layer ranges from 48 to 55 mm and requires additional reinforcement.
Similar screeds are intended for ground and first floors in residential buildings and outbuildings.
Screed on a reinforced base
To create a strong and wear-resistant concrete screed, metal mesh and fiber material are used.
- Metal grid. This type of screed is constructed using a fine mesh mesh (mesh size from 4 to 5 cm), which is mounted on special supporting elements along the entire base of the floor. The mesh helps improve the performance characteristics of the floor, but at the same time has significant disadvantages. It does not prevent the possible formation of cracks during shrinkage and is susceptible to oxidation and destruction.
- Fiber fiber. The building material is successfully used to create reliable concrete foundations. Thin microfiber, made from polymer granules by extrusion and modification, has high ductility and resistance to damage and deformation. In addition, it is affordable and easy to install.
Concrete screeds differ in the number of individual layers:
- Single layer. Filling is carried out over the entire area of the base to the required height. Such screeds are used for arranging floors in warehouses, utility and industrial premises.
- Multilayer. The base has a complex structure consisting of several separate layers. Screeds are intended for laying floors in residential, office and commercial premises.
Damper
Damper tape is glued around the perimeter of the room. This move compensates for the expansion of the structure, which will help avoid cracking and deformation. Moreover, the screed should not have contact with vertical enclosing structures (columns, partitions, walls).
The damper tape is glued only to a completely finished and cleaned separation layer
If the screed is to be laid on a separating layer, first lay a 0.2 mm polyethylene film on the surface . The material is laid with a 100 mm overlap and the joints are insulated with waterproof tape. Laying in corners is controlled. There should be no air pockets, folds, or creases. The waterproofing should extend onto the walls 5-10 mm above the planned thickness of the screed. Then all the excess can be trimmed off. Only after this the damper is glued.
Selection of materials and preparation of screed mortar
According to established SNiP, the strength of a standard screed should be 150 kg/sq. cm., for this it is enough to use concrete grade from 150 to 200.
To obtain grades of ready-made mortars, cement and sand are used in the following proportions:
- M 300 – part cement M 600 to 3 parts sand;
- M 200 – part cement M 600 to 4 parts sand;
- M 300 – part cement M 500 to 2 parts sand;
- M 200 – part cement M 500 to 3 parts sand;
- M 300 – part of cement M 400 to 1 part of sand;
- M 150 – part cement M 400 to 3 parts sand;
- M 200 – part cement M 300 to 1 part sand;
- M 100 – part cement M 300 to 3 parts sand.
Scope of application of concrete mortar:
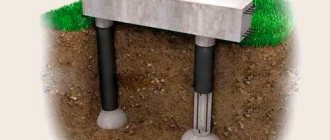
- M 100 – for arranging the subfloor and block pillows;
- M 150 – for constructing a block foundation;
- M 200 – for organizing concrete floor screed in premises of various types;
- M 250 – for street roads, paths and concrete fence structures;
- M 300 – for pouring the foundation and supporting walls;
- M 400 – for pouring complex concrete structures and foundations.
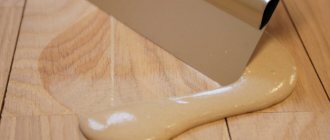
To prepare a standard solution, cement (M 400) and construction sand are used.
- Cement and sand are pre-mixed (1:3) until smooth.
- Water is poured into the container at the rate of 5 kg of dry mixture per liter of water. The mixture is poured into the water and mixed thoroughly.
- The finished mixture is stirred with a metal spatula to increase the density of the solution and eliminate existing lumps.
- Mix for 5 minutes with a mixer at high speed.
- The composition is left to stand and mixed again for 2 minutes.
Important! To check the thickness, place part of the mixture in the palm of your hand and squeeze it. If the composition remains a dense and viscous lump, but does not spread, then such a consistency is considered suitable.
No less important is the issue of determining the thickness of the floor screed, which depends on the type of floor covering, strength and thermal insulation characteristics.
The required parameters are often included in the working design, so it is enough to be guided by them when performing the necessary calculations.
The permissible thickness of the screed for the floor base is from 2.5 to 8 cm.
Preparing the base before pouring the screed
How to make a concrete floor screed yourself? The initial stage involves basic preparation of the base, laying thermal and waterproofing.
Surface preparation
Concrete screed is poured onto a new or old base, as well as onto a wooden floor.
The old screed is dismantled and the concrete slab is cleaned of dirt. The base is treated with a deep penetration primer mixture and left to dry completely for 3–5 hours.
Expanded clay or sand is placed on the primer surface in a layer of 12 cm and carefully compacted. For better compaction, the layer is moistened with water. Using an expanded clay cushion will remove uneven floors and reduce the consumption of concrete mixture when pouring.
If necessary, installation of pipes for heating, sewerage or drainage is carried out.
Thermal and waterproofing is installed after installation of the main communications.
Laying thermal insulation and waterproofing
Expanded clay or expanded polystyrene sheets are used to create thermal insulation. They are durable, practical and safe. Insulation of the soil base is mandatory, and insulation of concrete interfloor slabs is at the request of the owner.
It is recommended to use polyethylene or roofing felt as waterproofing. The material is laid with an overlap of 10 cm and an indentation of 15 cm on the wall surfaces. To increase the strength of the base, the joints are additionally treated with heat-insulating sealant.
Padding
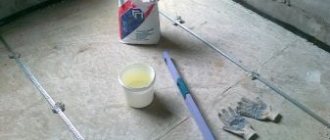
The surface is coated with deep penetration primers. This will improve adhesion, additionally remove dust, and bind the surface. The base will stop absorbing the moisture contained in the solution, which is important. If moisture escapes from the concrete mixture into the slab, this will cause incomplete maturation of the cement stone. The finished screed will begin to collapse and peel off even under the slightest load.
The selected primer composition is distributed over the slab in strips and spread evenly with short-haired rollers . If there are hard-to-reach areas, go over them with a brush. The primer is applied in 2-3 working approaches, observing the norms of layer-by-layer drying.
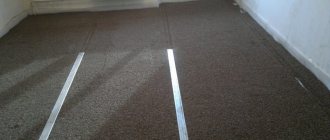
Determining the zero level and placing beacons
The correct placement of the guides is carried out at the zero level with preliminary marking using a building level (water or laser).
It is easier and faster to work with a laser level, so it is recommended to use it:
- The level is installed on the floor, and the laser beam is directed at one of the walls.
- At the selected height (for example, 150 cm) a mark is placed with a construction marker.
- The device moves a short distance, after which the next mark is placed.
- Marks are applied in a similar way to all walls around the perimeter and connected by a solid line.
After applying the markings, you can determine the zero level. The work is carried out as follows:
- The distance from the base of the floor to the solid line around the perimeter is measured. On each section of the wall, the values may be different.
- From the large value, the minimum value is subtracted to determine the required screed thickness.
- The values obtained in step 2 are subtracted from the height. For example, 5 cm is subtracted from 150 cm (height).
- The value obtained during the calculation is plotted down from the existing line and a mark is placed. The markings around the perimeter are done in the same way.
- The marks are connected by a single line, which is the zero level for placing beacons.
Beacons are used to obtain an even screed. They are made from a T-shaped metal profile.
The guides are installed in a perpendicular position with respect to the door and in a parallel position with respect to the walls. All beacons are laid out on the surface and pressed against the top with wooden planks set at zero level.
For self-tapping screws, marks are made in the floor and holes are made along all the guides. Self-tapping screws are screwed in half the length, and guide beacons are placed on top.
The building level checks the same height for all guides. To secure the beacons, a thick cement mixture is used, which is applied at equal distances along the guides.
Reinforcement
Reinforcement is a mandatory stage of work, especially for structures of large thickness. Typically, a ready-made metal mesh made of galvanized wire is used. The optimal cell size is 50-100 mm.
The mesh is installed on special stands, so it will be in the body of the screed. Laying directly on the base is not permitted . Reinforcement is implemented before the guides are placed. However, in practice, installation of beacons and grids is often carried out simultaneously.
In some cases, it is permissible to use a metal rod instead of a finished mesh. This will increase the labor intensity of the work, but can help out in a number of situations. The rod is laid like a net and tied with wire.