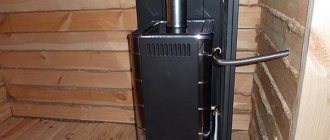
The bathhouse is part of the culture of our people, and every good owner during construction thinks about the issue of providing hot water. Of course, there are modern heating systems and automatic supply of hot water, but they are expensive and sometimes such time-tested options as a tank on a pipe for a bathhouse turn out to be more affordable and, most importantly, economical.
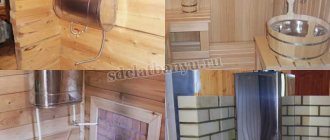
Photo of the factory version of the tank.
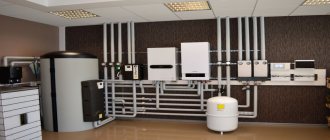
Traditional heating systems
In search of a universal solution, craftsmen tried many options and each of them is good in its own way.
It cannot be clearly said that there is a universal option, so the choice should be made depending on the conditions existing at a particular site.
- In the process of building a bathhouse, many modern owners prefer to take the easiest route and purchase an electric boiler . The option is undoubtedly worthy, but it requires a constant supply of water, plus for a large capacity the energy costs will be sensitive.
- A water heating tank built into the stove is considered a classic . Such containers heat up quickly, the installation instructions for such heaters are the simplest; in the most affordable option, it is enough to place the tank on the stove. But it will be located low and, being in the steam room, will become a source of wet steam, which is not always good.
System with built-in heat exchanger.
- Remote tanks have proven themselves well when the main tank is mounted at a comfortable height in a dressing room or shower, and heating is carried out through a heat exchanger installed in the firebox . They work thanks to the elementary laws of physics: cold water enters the heat exchanger through the lower pipe and, when heated, returns back through the upper conduit.
- But the most profitable and convenient to use are containers mounted directly on the chimney , and we will talk about them further.
Types of heat exchangers for sauna stoves
Structurally, the heat exchanger can be a coil or a tank with a maximum volume of 5 liters and two pipes for connecting a water tank/radiator.
According to the mounting method, heat exchangers are divided into two types:
- internal. Such products are fixed on one of the side walls of the furnace or mounted on its bottom. It is also possible to install a water jacket, which literally encircles the fuel chamber from the inside or is located in the space between the stove casing and the walls of the firebox;
- external. Heat exchangers of this type are fixed to the chimney or attached to the wall of the furnace.
Prices for different types of heat exchangers
Internal type heat exchangers have the best heat saving indicators. The water in them will heat up until the stove cools down completely down to its last brick or stone.
The fastest heating of water is provided by internal heat exchangers and external ones installed on the chimney. At the same time, the first products often imply the need to make design changes/additions to the sauna stove, while the second cannot be called a decoration for the steam room (a wide tank does not fit well into the interior).
Example of an internal steel heat exchanger in a brick kiln
If we compare products in terms of ease of installation, the palm is occupied by heat exchangers that are hung on the outer walls of the furnace. Such products have a long service life and do not spoil the appearance of the stove, but the water in them takes longer to heat up and cools much faster.
Heating containers on the chimney
A tank for heating water on a tube has been installed since ancient times; just remember the legendary Russian samovar, a kind of symbol of our people. This principle was used for the first time; for this reason, such systems are also called samovars.
Tank with side valve.
Advantages of samovar designs
- When the stove in the bathhouse is heated, the pipe in it will heat up in any case; not using this energy is stupid and it can safely be considered completely free.
- Depending on the type of fuel, the temperature of this part of the structure ranges from 300 to 700 ºС. Moreover, a significant advantage is that the pipe heats up evenly over the entire contact area.
- The volume of such a tank can be quite large, because the distance from the firebox to the ceiling will be at least one and a half meters and such a heater can be installed along the entire length of the pipe.
Square heater.
- In most cases, such a heater does not need an additional pump, heat exchanger or electric heating element.
- A normal stove for a small steam room has an average pipe cross-section of about 115 mm. Taking into account the thickness of the container, the transverse dimensions of the entire structure will be within half a meter. This allows it to be placed in any, even small, steam room.
- Installation does not require fundamental knowledge of heating engineering or being a super mechanic. Almost any owner can install such a container on a pipe with his own hands.
- And finally, when compared with a boiler, the price of such a miracle will be quite affordable, and the investment will be a one-time one.
Diagram of a heat exchanger on a pipe.
Disadvantages of this type of heaters
- The most significant disadvantage is that the tank for heating water on a pipe can only be installed on metal structures. Ceramics or pipe bricks do not have this level of heat transfer.
- Designs in which water is poured through the top, directly into the steam room, will increase the level of humidity in the room.
- Hot metal walls of the tank are a source of danger; careless touching can lead to injury.
Selecting the right container
Tank with hatch.
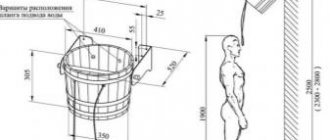
Traditionally, it is assumed that one person needs at least 10 liters of water for bath procedures. To this should be added another 10 - 20 liters for steaming brooms and related procedures. Hence, the minimum capacity of a tank for recreation for two people should be around 50 liters, and such a tank will easily fit on a small stove.
But if you expect to steam with a larger group, then it makes sense to mount a larger container, right up to the ceiling. But this option has a significant disadvantage; such a structure, when filled, will be quite heavy and a reinforced foundation will be required for such a stove.
The most acceptable option is in which the tank for heating water on a pipe works exclusively as a heat exchanger. Here you do not need a large and heavy container; 20 - 30 liters is quite enough. Any oven can withstand this weight, plus structures of this type are made airtight. Of these, 2 outputs are mounted leading to a remote tank, which can be as large as desired.
Heat exchanger on the chimney.
Important: the connecting pipelines between the heat exchanger and the working tank should not be more than 3 m. For more distant lines, you need to install a forced water injection system, in other words, a pump.
There is an option to use the inner surface of the tank directly as a pipe; in this case, the heating rate increases significantly. But experts advise choosing a tank so that the container fits tightly onto the pipe. This option is advantageous in that it does not require large wall thicknesses and if the chimney burns out, it will be easier to replace it.
Bath tank: what volume to choose?
Having estimated with a small margin how many people will steam and wash at the same time, based on 20 -25 liters per adult (on average), it is easy to calculate the desired smallest volume of a tank for a bath. Usually, for 3-4 people, they choose tanks with a capacity of 85 liters; this is a fairly convenient volume that will allow all participants to wash themselves. Of course, you can use bath tanks with a volume of 50 or 65 liters, but then, most likely, you will have to add water to the tank as it is consumed and wait until it reheats.
Material for container
In the old days, the most popular material was cast iron. Of course, it will take a little longer to heat up, but the temperature will be maintained better. An important factor is the resistance of cast iron to corrosion and its long service life. But cast iron is a heavy material and such a container will need powerful support.
Cast iron stove with tank.
Ferrous metal is now practically not used for these purposes due to its tendency to corrosion and the high probability of deformation due to sudden temperature changes.
Stainless steel is deservedly considered a universal material. This metal is not afraid of corrosion and is relatively lightweight. In order to weld a large-capacity tank, a sheet 1.5 - 2 mm thick is enough. During temperature changes, such containers do not deform.
Important: during operation, any heating system for a bath must be constantly filled to avoid overheating. In winter, the water is drained to prevent frost from breaking the pipes.
The video in this article shows the opinion of a specialist.
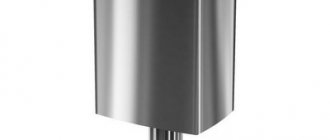
Assortment of tanks.
Stainless steel tank AISI 430 or AISI 304?
The water tank is not installed for one day and therefore the material of its body should not rust quickly, in an ideal case it should not oxidize at all, and the thickness of its walls ensures the rigidity and strength of the entire structure. It is best to purchase a tank made of AISI 304 stainless steel, which, in addition to classic chrome, contains nickel to enhance durability and reliability. Of course, you can purchase a tank made of AISI 430 stainless steel, but how it will react to your water and how long such a tank will last is difficult to say.
I want to buy a serial tank "Steel-Master"
I want to calculate a tank for a sauna to order
Conclusion
Our country is rich in craftsmen, but the bathhouse is considered a highly dangerous object. Based on this, we do not recommend installing homemade tanks. There are now enough certified products on the market, the price of which is quite affordable.
Serial model of a small capacity heater.
Did you like the article? Subscribe to our Yandex.Zen channel
Options for homemade stoves
Self-made sauna stoves with a water tank differ from store-bought products in size, type of heater, shape, material and location of the tank, if any.
To assemble the stove, you need to prepare in advance:
- Sheet steel 5 mm thick for the frame.
- Pipes for supplying water and heat exchanger.
- Grate.
- A mesh for the heater and firebox, as well as a door.
- Connecting taps and couplings.
- Chimney, corner.
- Bulgarian.
- Welding machine and electrodes.
Features of installation and connection step by step
It is not difficult to install a water tank with your own hands.
Let's look at each stage separately:
- If the stove is already installed, remove the section of pipe that extends from the stove into the ceiling,
- We weld a piece of pipe 8-10cm long to the outlet of the furnace.
- If the pipe built into the tank does not match the diameter of the chimney, an adapter is mounted on the installed pipe section,
- We install the tank. The distance between the top cover and the ceiling should be 20-25cm,
- If necessary, an adapter is also installed in the upper part,
Important! Pipe connections are made using crimp clamps, but the joints should be additionally treated with a special sealant. Otherwise, if gases penetrate through cracks in pipe joints and there is insufficient ventilation, a person may suffocate.
A few important operating rules:
- The bathhouse is not only a recreation area, but also a place of increased danger, especially for children. Therefore, if possible, it is better to install the tank on the pipe as high as possible, optimally in the attic. You need to pour boiling water extremely carefully.
- The system should be filled with water until it is flooded; heat without water will destroy the welds.
- Do not leave water in cold weather. If the water in the system freezes, deformation is inevitable.
The simplest water level
The device consists of two equal-volume flasks connected to each other by a flexible thin hose. It is used in marking horizontal lines if the layout needs to be done in different rooms or over long distances. Those. where the use of a laser level is impossible, unprofitable or pointless.
The principle of operation of an elementary device is based on the law of communicating vessels. The water level in both communicating vessels will always be at the same absolute level, for fixing which on the flasks there are risks.
The use of a water device allows you to correctly mark horizontal lines regardless of the actual position of the surfaces of the floor, ceiling, parapet, etc. No digital device has yet been able to replace it. Note that the water level sets off a reference horizon, from which the heights designated by the project are then laid off. It is not used to directly mark future planes formed by a suspended ceiling, joists or screed with finishing, installation points for plumbing fixtures, etc.
To mark the water level, we will invite an assistant, we will proceed as follows:
- We mark an arbitrary point on the wall at a distance from the floor convenient for marking;
- We apply one of the flasks to the point, fix and remember at what point the water level is established;
- We send an assistant to the desired point. By moving his flask up/down along the wall, he must find a position in which the water level will be at the same level.
Significant advantages of the device: low cost, simple operation and accuracy. Disadvantages: inability to carry out breakdown at subzero temperatures, limited use, need to wait until the level is established in both flasks.
How to install?
The work is carried out in several stages:
- It is necessary to select a location for installation. It is not recommended to hang the hot water tank directly on a wooden wall surface. First you need to secure a layer of thermal insulation. You can glue a sheet of foam plastic and on top of it, marking the places where the screws are attached, drill holes with a smaller drill.
- We secure the container and begin marking and drilling holes for supplying pipes from the heat exchanger. You will need a large drill, but it is better to drill in several passes, starting with a small size, gradually bringing the hole to the required diameter.
- We connect pipes with taps. The hot water supply pipe should come from the top of the heat exchanger, and the chilled water pipe should be located below. You can use metal-plastic pipes, although experts recommend installing a copper pipe, but it is very expensive.
After all these operations, you can perform a test run of the water heating system, but it is better not to use the first boiling water for washing. And then gather all your family and friends and go to the steam room to enjoy hot steam in the steam room and hot water in your washroom or shower.