A wooden floor in a house is always beautiful, aesthetically pleasing, environmentally friendly and healthy for all household members. However, the installation of the floorboard must be done correctly, otherwise the floor may soon fail, namely:
- Change the geometry of the flooring;
- To dry out or rot;
- Make the room cold and uncomfortable.
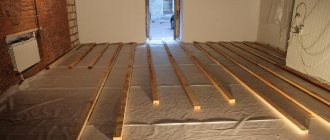
Therefore, professionals recommend not just laying the board on the floor, but attaching it to the mounted joists. What it is and how to carry out the work correctly will be discussed below.
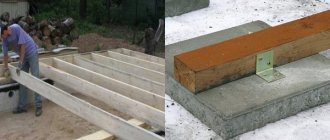
Floor joists: dimensions, installation
As a floor joist, you can use timber of grade 2 or 3.
Joists are long beams of a certain cross-section and made of various materials. In construction, you can use a support made of metal, plastic, reinforced concrete or a compound containing synthetic resin. However, most often craftsmen use wood logs due to their reasonable cost and fairly good technical characteristics.
Wooden floor joists can be made from various softwoods or from more moisture-resistant larch. The latter is considered the strongest and most durable material for making timber.
Important: grade 2 or 3 timber can be used as a floor joist. This will not affect the quality of the wood floor lathing in any way. But you need to pay special attention to the moisture content of the board. Since material with a moisture content above 20% is at risk of shrinking and drying out during its service life. Is it necessary to talk about what will happen to the floor then?
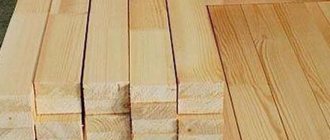
Selection of wooden blocks
Why is the spacing between floor joists so important? The distance chosen between natural wood blocks directly affects the strength of the future structure.
When choosing a timber, such as in the photo, take into account the following points:
Before use, the wood is treated with an antiseptic that protects it from fungi, mold and harmful insects. On the bottom side, the composition should be applied 2 times, but before placing the second layer, you need to give the first 4-5 hours to dry.
What are they needed for?
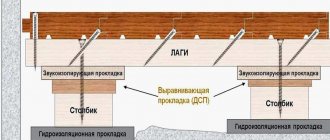
Properly installed beams and the distance between them ensure sufficient ventilation of the underground space of the house.
Laying wooden beams as lathing under the future floor allows you to strengthen the entire floor structure as a whole. In addition, noise and heat insulation materials are placed in the distance between the joists, which greatly improves the characteristics of the floor.
What methods are there for joining floor boards together?
Properly installed beams and the distance between them ensure sufficient ventilation of the underground space of the house, which means that the wood will not rot over time. Especially if the building is located on an area with high groundwater. How to properly install logs and calculate the optimal distance between the sheathing beams is discussed below.
What to consider when making calculations: initial data
To correctly calculate the required number of lags, the following values will be required:
Attention! This data is sufficient to calculate the maximum pitch between the logs and the cross-sectional dimensions of each element.
PHOTO: smetadoma.com Room dimensions - initial data
Calculations of log installation parameters
The cross-section of the wooden beam should be larger, the wider the span of the room for laying the floor.
First, you should choose the right section of the log. Since they will be the supporting structure on which the subsequent load will be placed. Thus, it is worth making sure in advance that the finished floor can withstand both the weight of the furniture in the house and the weight of all household members. Therefore, the fastening of floor boards must be done exclusively correctly.
The cross-section of the wooden beam should be larger, the wider the span of the room for laying the floor. Thus, it has the most common relationship among craftsmen between the thickness of the lag and the width of the span (that is, the distance from wall to wall along which the lag beam will be laid):
- For 2 m, a beam with a section of 110x60 mm will be sufficient;
- For 3 m - 150x80 mm;
- For 4 m - 180x100 mm;
- For 5 m - 200x150 mm;
- For 6 m - 220x180 mm.
Thus, we see that the longer the lag is, the larger its cross-section should be. This will strengthen the entire floor structure made of wooden planks.
As for the length of the logs, it is best to order solid beams in such a way that at the ends they recede 3-5 mm from the wall when laying. This approach to laying the lathing will prevent possible deformation of the floor during its operation.
Device for pulling or joining floor boards
The beams must be laid exclusively on the edge. This way, the stability of the sheathing under load on the floor will be maximum.
If it is not possible to obtain solid logs of the same length, then when laying the beams they resort to splicing them. To do this, it is necessary to install a brick (cement) pedestal or other type of support under the splice points. In this case, the place of splicing should be strictly at the fulcrum point, and the edges of both beams should overlap each other by at least half a meter. If necessary, you can use galvanized strips to fasten and splice the joists.
The beams must be laid exclusively on the edge. This way the stability of the sheathing under load on the floor will be maximum.
Important: logs must be attached exclusively to the waterproofing layer. This way you can further protect the boards from rotting. And in the distances between the beams you can lay thermal insulation material. And for your information: it is not prohibited to use logs of larger cross-section. This will only enhance the technical characteristics of the finished floor.
Lathing materials
Various materials that have a sufficient level of strength under load, a low deformation coefficient, and must be smooth can be used to construct the sheathing.
The choice is most often made in favor of:
Mostly coniferous wood is used for lathing. Beams made of pine, spruce, and fir are cheaper than elements made of larch. But the latter has higher strength and resistance to rotting processes.
PHOTO: s.sakh.com The tree is most widespread
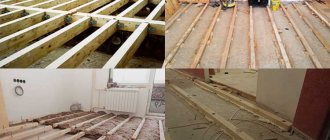
How to install logs?
An example of installing adjustable joists
If you decide to install the sheathing and floor boards yourself, then prepare in advance. Namely, in addition to beams and floor boards, prepare the necessary tools and adjustable support elements. They are the best option because they allow you to install logs on a cement base with perfect evenness.
Do not forget to additionally secure the beams against the walls during installation using a hammer drill and galvanized corners. If the logs will be laid on wooden beams, they must first be treated with an antiseptic, and holes for fasteners must be drilled in advance. This simple action will prevent the timber from splitting when connecting it to the beam using a dowel.
Wood moisture content
Dry wood is the key to high quality and long-term operation of a wooden structure. Therefore, builders recommend using bars with a humidity of no more than 20%, preferably within 12%, for the construction of a joist structure. In construction stores, all lumber is sorted according to this indicator. But there is no guarantee that this is true, because storage conditions in stores are sometimes violated. This means that the actual humidity of the purchased timber may not coincide with the passport value.
You can accurately determine the moisture content of lumber using a special device called an electric moisture meter. This is a device with two pins protruding from the body. They need to be stuck into the wood being tested. The display shows the humidity values. Everything is quite simple if you have this device in stock.
There is another way. To do this, a piece is cut from the block with a saw, which must be weighed. Then it is placed in an oven preheated to +100C and dried for an hour. The dried piece is weighed again. Now we need to do some math:
- The second value is subtracted from the first weight.
- The result obtained must be divided by the final (second) weight.
- The resulting number is multiplied by 100%.
- This results in the moisture content of the lumber.
All this, of course, is accurate, but difficult. Therefore, craftsmen have long used purely visual criteria for determining the moisture content of wood. For example, you can run a chemical pencil along the cut. If the line turns bright purple, then the humidity is high. And vice versa.
Humidity is also determined by chips. In dry wood it is brittle, in wet wood it is elastic, bends well and does not break. You can knock on the beam with a metal object. If the sound is dull, it means the humidity is high. If it is sonorous, then it is low. Coniferous wood releases resin when processed. If you press it with your finger and it crumbles under pressure, then you can talk about dry lumber.
Attaching the floor board
An example of laying a tongue and groove board using a clamp and wedges.
So, all you have to do is attach the floor board to the joists. Here you need to follow some recommendations and then your wooden floor will be reliable, strong and stable under maximum load.
- Boards are attached to wooden beams using nails, the length of which is twice the width of the board.
- Before you start laying the boards, you need to prepare holes for fasteners by drilling. It is important to make the holes 1-2 mm smaller than the thickness of the nail. This will prevent the floorboard from splitting.
- Ideally, the length of the boards will clearly fit into the parameters of your room and you will not have to splice the floorboards. But if, nevertheless, it was not possible to find a board of the required length, then the two boards need to be joined directly on one of the floors. This will prevent the floorboard from bending over time.
- It is necessary to attach floor boards to all joists.
- The finished floor covering must be treated with a special varnish or drying oil.
- We cover the joints between the wall and the floor with a beautiful wooden plinth or batten.
Important: the boards can be secured to the beams with self-tapping screws either at an angle of 45 degrees, or with subsequent treatment of the caps with a special sealant. And when laying floor boards, do not forget to leave 1 cm between the walls and the floor covering.
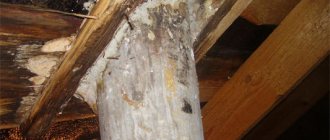
Mistakes made when calculating logs for plywood and their consequences
Typical mistakes that are made when calculating lags for plywood include too wide a pitch, insufficient number of lags, and incorrect section dimensions.
The negative consequences of such errors include:
PHOTO: e-stroy.pro If there are errors during operation, problems will arise
Types of control systems
Adjustable logs are mounted using various fasteners, which we will discuss in more detail.
Plastic bolts
Adjustable plastic supports for joists are sold complete with fasteners. It contains plastic bolts and fasteners. Assembling joist structures using these adjusting fasteners is surprisingly simple:
- Holes are made in the joists for installing adjusting screws in half-meter increments.
- Bolt threads are cut into these holes.
- Bolts are screwed into the prepared threaded holes.
- The logs are installed with a distance of 50-60 cm from each other.
- The holes on the joists must correspond to the holes on the concrete base, onto which special fasteners are installed.
- Rotation of the polymer bolt adjusts the joists and levels the base. After obtaining a flat surface, excess parts of the bolts are removed with a chisel.
The plastic support allows them to be installed both with joists and under plywood floors, which are laid directly on concrete without the use of wooden joists. Fasteners are mounted into plywood and onto the surface of the base in the same way.
Holes are made on the plywood in 50 cm increments into which the flanges are secured.
A threaded flange regulates the height of the slabs.
Using plastic bolts is convenient, but not all hardware stores can find such fasteners, so anchors are used.
Adjustment with anchors
If wedge anchors are used to change the height of the base under the logs, then it contains a couple more washers and nuts. In such logs with a cross-section of 50x50 mm, holes are made for fasteners with a distance of 50 cm.
Washers are inserted into the anchors inserted into the prepared holes and nuts are screwed on.
The holes made on the bars must have a secret niche with a diameter of 20 mm and a depth of 10 mm, into which fasteners are driven so that they do not touch the flooring over the subfloor joists made of plywood.
After this, the logs are placed on the anchors so that the prepared nuts with a washer on the log are on the side of the concrete base. Rotating the nut will allow you to adjust the height of the joist. The upper fastening nut is designed to secure the lag.
After installation is completed, excess parts of the anchors are cut off. To do this, use a grinder or a hacksaw.
In a similar way, anchors are used to adjust the plywood base without the use of joists. The technology has some differences. For example, support nuts are embedded at the required level before laying the plywood sheets.
Adjustment with studs
Installation of an adjustable floor on studs is similar to installation of anchor adjustment systems. A stud is added to the anchor set. A pin is used with a diameter of 8 mm. The remaining fasteners (anchor, nuts and washers) are selected to match the size of the stud.
Holes are drilled in the base and anchors are installed in them. A pin is screwed into the anchor. A nut is installed on the stud and a washer is put on it. The upper nut serves as a clamp for the beam. As in other cases, excess pins are trimmed.
The use of the stud is made difficult by the use of anchors. Installing anchors takes the most time because it is the most difficult part of the job. Due to the hollow structure of the floor slab, the sleeve may fall into it. Therefore, it is advised not to push it too far into the floor slab. In addition, the reinforced floor slab system can also become problematic areas for anchor installation.
Adjustment by corners
The use of corner fasteners is possible. They are fixed to the concrete base with dowels. Corners are selected as necessary to raise the floor above the concrete base, but with a cross-section of at least 50x50 mm. It is more profitable to use corners if the anchor system holds less well due to a weak base.
Fasteners are installed along the line with an interval of half a meter. A block with a previously checked and set level is fixed into the installed corners. At least a couple of people are needed for installation.
To give strength, similar corners are installed on the other side of the wooden blocks.
Reviews
Oleg, 34 years old, Novosibirsk
When building the bathhouse, I first used pine logs. At the beginning of construction, we had to save every penny; the family budget did not allow us to splurge on quality material. The savings turned out to be imaginary. Firstly, I forgot to treat the logs with an antiseptic, which ultimately led to the formation of mold. Although ventilation was installed in the floor. Secondly, as it turned out, the moisture content of the wood was high. The masters explained this to me later. That's why there were lags. Three years later, a hand fit into the gap. I had to lift the floors completely and throw out both the boards and joists. After which I purchased timber from Siberian larch. It is difficult to work with, it is very durable, nails cannot be driven in, but the structure is durable. So it is not recommended to save on lags. It’s better to invest a little more money, but be sure that the bathhouse will last a long time.
Alexander Surkov, 28 years old, Izhevsk
I got an apartment in a new building and decided to install plank floors in it. This is where I had to suffer, because the construction of the logs is directly related to the selection of the beam according to its cross-section. Due to inexperience, I purchased 100x50 mm bars and installed them at a height of 100. As it turned out, I did it wrong, and the ceiling height decreased sharply. Then I placed them on edge 50. The height became normal, but why did I need such a width of the joists, since the expected loads in the room were small. It turns out I just overpaid. So think first and then buy.
Maria Sergeevna, 52 years old, Nizhny Tagil
During the construction of the dacha, we chose a project where the floors are installed along joists. The project specified floors made of 50 mm boards. We decided to use OSB. And here we miscalculated the distance between the lags. We used a design value of 85 cm, but the slab bent under the weight of a person. Therefore, I had to add lags between those already installed.
Thickness of the floor board. Choosing the thickness and width of the floorboard
There are several parameters by which wood flooring is selected. The dimensions of the floorboard are not the last thing to choose. This characteristic depends on the following factors:
- place of use (residential premises, outbuildings, street, verandas);
- what kind of coating it is (rough or finishing);
- load on the planned floor layer.
The length is selected based on the parameters of the premises so that there is a minimum number of joints and waste. Fortunately, the building materials market allows this to be done. The existing size range is 2, 3, 4, 6 m.
The choice of floorboard thickness depends on the intensity of use and the distance between the joists. The higher it is, the thicker the board will be required. For example, if the distance is up to 700 mm, then it is better to choose a board thickness of 35–40 mm, above this size – 40–50 mm.
The width of the board is selected taking into account the design idea. Large canvases are more susceptible to shrinkage, which will subsequently affect the quality of the floor covering. Types of sizes from 85 mm to 140 mm.
The most popular board size: length – 2–3 m, width – 105 mm, thickness – 20-35 mm.
Which board is best for the floor?
Building and renovating a home is not a cheap project. Therefore, “Which board is best to use for the floor?” " - actual question. Correct selection of material will allow you to significantly save money without losing the quality of the floor:
- For roughing, slabs and unedged blades are used. Quality, low price. An edged board should be used for the subfloor if it is planned to have a finishing coating that requires a flat base (laminate, parquet, linoleum). Coniferous rough board is the most popular type. It has sufficient strength at a low price.
- Deciduous tree species such as linden and aspen are used for the bath. These coatings are resistant to high temperatures and high humidity and will not release resin when heated. Making a floor in a bathhouse from untreated material is a big mistake (this is fraught with splinters during operation). The presence of resin will cause burns.
- For homes and apartments, the finishing flooring is made from different types of wood. The choice depends on financial capabilities and stylistic decisions. Coniferous fabrics are often used. But there is also a place for expensive tree species: larch, oak, cedar. It all depends on the planned design, load, and intensity of walking. The board used is processed. The best option is tongue and groove. This material forms a smooth, durable coating. Ventilation grooves must be made along the inside. This allows the flooring to “breathe” regardless of the base.
- Larch and oak are used on the open veranda. These materials have high strength data and are also not susceptible to rotting or fungus formation. For open verandas, the board goes on the floor with a corrugated pattern. This coating does not allow moisture to accumulate; it flows down the grooves. This terrace floor has a pleasant roughness. In winter, the corrugated larch surface will prevent you from slipping.
General recommendations
Make sure the wood is dried and treated with antiseptic or bitumen.
This will significantly extend the service life of the structure. When the humidity is more than 20%, the tree can become warped, compromising the integrity of the structure. Boards brought from a warehouse should lie at room temperature for several days. This is especially true during the winter season. It is not recommended to lay the floor when the air humidity is less than 60%. You should not saw or plane boards in the room where the floor is being installed. Sawdust can cause rot.
Use the rule after installation. Lay it across the beams, remove gaps, leveling the height. This is easy to do with the help of special modern adjustable fasteners that have appeared on the construction market. The floor is laid only after all leveling procedures.
The smaller the pitch, the longer the floor will last. However, the main indicator of durability is the material of the coating and base. The most durable wood is larch.
The installation of beams is usually carried out along the window, i.e. across the room. The floor boards are then placed along the length of the room, i.e. from the window. However, this is just a recommendation and a matter of taste.
A board is attached to each beam. Holes for screws should be drilled in advance to avoid delamination.
The most common option for the space between the joists is from 50 to 56 cm. As a rule, it does not exceed a distance of 69 cm.
Removing joists and wooden floors is quite simple. It is necessary to remove all the furniture from the room, remove the baseboards, and open the boards or sheets of chipboard. After inspection, the old boards are replaced with new ones. The logs themselves can be partially replaced. Simply cut out a piece of rotten wood and install a new one.
Don't forget to use a protective impregnation on new boards. Check the ends of the beams for rot, and inspect the base insulation, if any. Repairing the floor can be a reason to insulate your home.
Features of insulation
The frame structure of logs is found not only in wooden houses, but also in many buildings built in the first half or mid-20th century. At that time, this was the most affordable way to quickly build a residential building. Characteristic features of such coatings are good thermal insulation properties. But they also require periodic repair and updating - much more often than concrete floors. Therefore, experts recommend making an additional layer of insulation when planning these works.
In addition, installing joists is one of the effective options for creating a warm base in modern residential buildings, however, due to the reduction in the overall height in the room, it is not always acceptable for standard apartments and houses.
To analyze the feasibility of insulation between joists, let’s consider the features of this technology:
- In most cases, logs are installed on a rough wooden base, thereby forming several separate cells on the surface. Those. the insulation will not be evenly distributed over the entire surface, but will fill only these zones. The difference between the heat transfer coefficients of the beams and the heat insulator can cause uneven temperature distribution on the surface.
- The insulation material should not negatively affect the wooden structural elements. To a greater extent, this relates to its hydrophobicity - moisture absorption. Therefore, the technology of floor insulation using joists provides for increased waterproofing measures.
- Mandatory air gap. It is necessary for the timely removal of water vapor released by wood. To do this, provide for ventilation gaps between the insulation and the upper base of the floor.
Taking into account this specificity, you can begin to select the optimal insulation scheme. To do this, we will consider various design options for the heat-insulating layer.
Advice from construction experts
It is necessary to build a support at the boundaries of the joints of the boards
It is recommended that the installed type of structure be solid and not consist of many sections, due to this the load-bearing capacity of the entire floor as a whole increases. It is necessary to build a support at the junction point. In general, it is best to secure the support in the form of a pillar. Usually the logs are connected using galvanized plates.
It is imperative to take into account the distance between the floor joists. Among experienced builders, the space used between two or more beams is designated as a pitch. Typically, the pitch size is directly related to the thickness of the black decking. The smaller the sectional size of the floor covering, the narrower the step between all the beams.
Using a special table located above, you can follow a certain sequence. If you use boards of increased thickness, then the distance will also increase proportionally.
Since a coating such as plywood is a resistant material, in this case the step must be increased. With a thickness of 20 mm, the step will be 42 cm. Each laid sheet should be secured to different logs. Do not forget about securing the edges and the center; in this case, you can extend to half the board. For all the details and useful tips on laying wooden floors, watch this video:
Everyone knows that logs are made from coniferous trees, because their resin content provides protection from moisture penetration and service life.
In order for the flooring on joists to be installed correctly in complex operational areas, it is necessary to use trees such as larch, because this type of wood has high moisture resistance.