Due to the emergence of new flooring materials on the market, the requirements for the base have also increased. If earlier you could easily get by with joists and put boards on them, now an extremely flat and durable surface is required to lay some types of floor coverings.
The floor screed serves as the basis for the floor covering. This is the approach to making the base that is most often used. It is performed to level the surface or give it rigidity for the purpose of further laying complex flooring systems that require a smooth and durable base. This type of coating includes, for example, parquet, laminate, cork flooring, etc. In order not to make mistakes, it is necessary to consider in detail how to pour a floor screed technically correctly. First, let's look at the types of ties so that you can understand which one is suitable in your case.
Calculation of the number of beacons
To purchase the required number of beacons, you need to calculate the required number for the floor. The calculations are easy to do.
Installation of beacons is carried out from the door to the opposite side of the room, guides are placed parallel to each other. The floor screed along the beacons is done with a certain step; it should be 10 centimeters less in length than the rule used. If the length of the room is 6.4 meters, and the rule is 1.5 meters long.
Then the calculations will look like this:
- 6.4-(1.3 * 2)= 3.8. 0.8 is the length of the rule minus the part of its length that goes to the adjacent section when aligned;
- 3.8 / 1.3 = 2.9, the result is the number of beacons that are needed for installation without taking into account the outer guides taking up 0.3 m;
- (6-0.6)/5= 1.08 m. At this distance, parallel profiles will have to be installed, placed after the first guides installed from the wall in increments of 30 centimeters. The number five means the required number of all beacons, including guides.
Installation of beacons is carried out from the door to the opposite side of the room, guides are placed parallel to each other.
Definition of zero level
In order for the beacons to be installed evenly, before starting work you need to determine the zero level and carry out markings. A laser or regular hydraulic level will help you with this. The first option is preferable - it will make the work faster and easier.
It is more convenient to mark using a laser level
Stepping 1 m up from the floor, place a starting point on the wall. Retreating a similar distance from the base, place points at a meter height, walking along each wall of the room.
Align the markings to the highest point and connect the marks with a solid straight line, thereby setting the base level. Step back 1 m from the created line and draw a new solid line parallel to it along the entire perimeter. This is how you get level zero. To set the required thickness of the screed, simply step back up from the zero level to the required height (usually from 3 cm) and draw a new line.
Definition of zero level
You will place the beacons along the last of the created lines - the upper part of these landmarks should be at the same height as the markings on the wall.
Preparing the floor for installation of beacons
Pouring floors on lighthouses with your own hands begins with preparatory work. First, the condition of the floor covering is assessed. If there is an old screed on the floor, it should be removed. The old coating can ruin the new one over time.
If the floors of the house are made of concrete material, then all holes and joints are covered and covered with a cement composition. A good option for this purpose would be to use tile adhesive, whose adhesion to different materials is high.
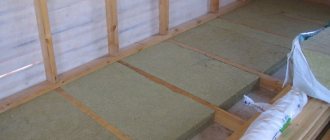
It is necessary to get rid of any flaws, all cracks are sealed. And also skirting boards and other structures that may interfere with the floor screed are removed. Next, the surface is cleaned from all types of contaminants. If necessary, insulation and reinforcement of the surface can be carried out.
For better adhesion, the floor surface should be coated with a primer layer.
For better adhesion, the floor surface should be coated with a primer layer.
What are they needed for?
In order to install a modern coating efficiently, you must first level the surface with your own hands. After all, reinforced concrete slabs, which often serve as the base of the floor and are installed on the ceiling, have too many irregularities and differences . Moreover, for their manufacture, some manufacturers use concrete with high-frequency filler, which also does not contribute to the smoothness of the floor. It is the screed that helps to remove such flaws, which can be:
- semi-dry;
- wet;
- dry.
The main goal when leveling the base for the finishing coating is to create a smooth and reliable surface. Beacons installed strictly according to the level will help achieve this. For the master, such guide rails act as a guide, facilitating the process of screeding the floor.
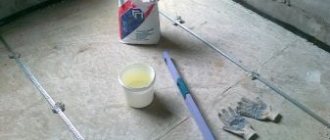
Required tools and materials
To carry out the work you will need a number of tools and materials, in order to successfully cope with this task you need to prepare:
- The solution with which the coating will be poured;
- Construction level or laser;
- Rule;
- Graters, graters;
- Drill with mixing attachment;
- Knife;
- Chalk or pencil;
- Roulette and ruler;
- Containers for mixing the solution.
To carry out the work you will need a number of tools and materials.
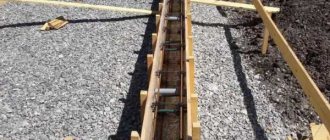
Selection and installation of beacons for semi-dry and wet screeds
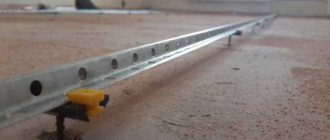
To fill the floor screed using beacons, you can choose several types of these products. Beacons can use those used for drywall. They are laid with the sides facing down and secured with the applied mortar.
Special metal profiles are also attached to the solution itself; it is convenient to cut them into the required sizes. It is better to choose gypsum as a solution; it dries much faster than the cement-lime composition. Also, profiles can be attached to self-tapping screws; their level can be easily adjusted by screwing in and out. They are twisted into dowels, which are installed at intervals of 20-30 centimeters.
You can combine two methods: several self-tapping screws are screwed in, and a mortar composition is carefully applied between them. The self-tapping screws should be screwed in at a distance of about a meter; their caps will indicate how high the mortar fixer should be.
Beacons can be made from the mortar itself, then a rope is pulled along the measured level under the screed onto self-tapping screws. Cement is laid along its height in the form of a lighthouse. The distance between such profiles is also approximately 100-120 cm. With a semi-dry screed, the mixture is poured out in two places and evenly distributed along the pouring level. The room is divided into small zones in order to gradually cover these areas with the mixture.
The step of the platforms is no longer than the rule.
Special metal profiles are also attached to the solution itself; it is convenient to cut them into the required sizes.
Self-tapping screws as beacons
When creating a self-leveling floor, self-tapping screws can be used instead of guides. The technology consists of screwing screws into the base, they are connected using a thread and serve as a guide when pouring the self-leveling solution. When the work is completely completed, the screws are simply unscrewed from the base.
When creating a self-leveling floor, self-tapping screws can be used instead of guides.
How to find the highest point on the surface of the base?
The normal level breaks through the horizontal. Markers are made on the walls of the room at a suitable height. A noticeable line is drawn along the points. You can use regular dyeing thread for this. Then there is the lowest and highest point of the genital surface. It's easy enough to do. From the marked horizontal line with a level and a tape measure, you need to measure the distance to the floor in many places. In the place where it is smallest there is the highest point, so here the thickness of the screed should be minimal (3 cm). Using methodical measurements, the required level of screed is determined.
The normal level breaks through the horizontal
The highest current point can also be located in the central part of the floor of the room. This can be checked just as easily using a paint cord. It is enough to stretch it across the width of the room and view it along the length of the stretch. If a new maximum high place is found, another zero level is drawn. If the area of the detected point is small, it is better to simply remove the protruding area. A hammer drill will be just right here.
In order for the floor to become as level as possible, beacons are necessary for anyone who is involved in leveling work, regardless of whether an experienced master takes up the task or an amateur.
Set to the zero level, they guide the rule and serve as a kind of guideline. Such work may seem tedious and drawn-out, but the final result will depend on the correctness of its implementation.
Even the most knowledgeable craftsman, in order to obtain a surface without flaws, requires pointers, which are actually guides set at the initial (0) level. By advancing the rule along these peculiar signs, you can level the entire solution to an ideal surface.
It is much more convenient to move the rule according to beacons
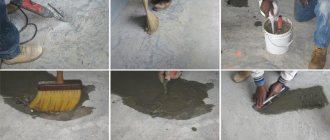
How to fill the screed with beacons yourself
Before pouring the floor screed along the beacons, you need to prepare the solution itself, and only then proceed to introducing it onto the surface.
Preparing the solution manually
This process includes the following steps:
- First, cement and sand are mixed in the selected proportions; it is difficult to do this mixing manually; you need to ensure that the components are thoroughly mixed. You can use a drill or mixer for this purpose.
- In another container, the plasticizer is mixed with water, in the instructions for the plasticizer you can see the required ratio, you can add reinforcing fiber there.
- The dry mixture is added to the liquid components and they are gradually mixed together. Water cannot be added directly to the dry mixture.
The dry mixture is added to the liquid components and they are gradually mixed together.
Pouring technology
You need to start pouring the screed from the corner opposite the door. The solution is poured between the beacons, the filling is done just above them, the rule is kept at a slight slope, moving in a zigzag manner, leveling is done, and the excess is removed. A solution is added to the existing unevenness. This works over the entire surface.
The screed must be carried out in one room of the apartment in one day, then the formation of cracks and joints can be avoided.
You need to start pouring the screed from the corner opposite the door.
Floor screed care
On average, it takes 4 weeks for the surface to dry completely. The surface should be covered with film for about 7 days. For the first 4-5 days, it is necessary to moisten the screed, but you should not add too much water.
After a week, the surface should dry naturally, the temperature should not be lower than +5 degrees.
You can walk on the floor after 24 hours, but the weight is above 100 kg. can create a load only after 5 days.
On average, it takes 4 weeks for the surface to dry completely.
Carrying out this type of work is suitable for beginners as well. It is important to carefully prepare the solution and monitor the level so that the surface is smooth. If the beacons are installed correctly, then filling will be easy.