- 1 Where will you need to fill on a slope?
- 2 How to make a mixture?
- 3 What will you need for work?
- 4 Installation of beacons for concreting
- 5 Reinforcement
- 6 Fill
- 7 How to improve the quality of the mixture?
- 8 Conclusion
Concrete is used at any stage of construction as the main building material. It is endowed with an optimal set of characteristics, therefore it is used to strengthen structures, lay blind areas, create screeds, floors and paths. Often there is a need to lay concrete on a slope. This process has its nuances. If you do not follow the rules and technology of the process, the finished concrete surface will lose strength, durability and will have an unaesthetic appearance.
Why is tilt necessary?
If the degree of inclination is too small, not all the water accumulating on the surface will enter the drainage system.
Tilt of the base towards the drain allows you to quickly remove water from the washing room or steam room in the bathhouse. A rather complex design performs several tasks:
- Prevents fluid accumulation;
- Prevents damage to floor materials;
- Provides quick drying of floors;
- Significantly reduces the chances of developing fungus and mold.
The design of a rough foundation with a slope must be carried out taking into account many technological nuances. If the degree of inclination is too small, not all the water accumulating on the surface will enter the drainage system. If you make the floor slope too large, this will affect the material component of the issue, since it will lead to unnecessary expenses.
Drainage well
This system can only be installed in an area where groundwater flows at great depths. Otherwise, due to its design, such a well will always be filled with groundwater, which will make it impossible to collect wastewater in it.
First you need to decide on the location of the well; it’s good if the gap between it and the bathhouse is about 2 meters. At large distances, problems may arise when creating the desired slope of the drain pipe. At the same time, placing the well too close will lead to the foundation getting wet and subsiding in the future.
Now you can decide on the material for installation. This will usually be affected by the type of soil, because if the soil is crumbling, the walls will need to be reinforced, and this is a fairly common occurrence.
You can strengthen walls using the following methods:
Sequence of construction work:
The drainage well is now ready.
Features of concrete floors
Installing a sewer system before creating a floor
In the process of arranging an inclined base in a bathhouse, in most cases concrete is poured. This material has good frost resistance and pliability, so it is the easiest way to fill floors with a slope. How to pour the solution correctly?
- First, a pit and a sewer pipe are installed, with the help of which waste water will be removed from the bathhouse;
- Then the concrete solution is poured in two layers, controlling the horizontal level of the screed;
- The thickness of the bottom layer of the mortar must be at least 50 mm;
- After this, a layer of expanded clay is laid on the dried concrete floor and a second layer of mortar is poured;
- Then the reinforcing mesh is installed and the finishing screed is made.
As a rule, laying the mortar is not the final step in the construction of sloped floors. When arranging such a covering in a sink, it is advisable to cover the base with tiles, otherwise it will very quickly become unusable due to the influence of moisture. Laying wooden floors will be no less profitable.
How to make a mixture
In order to correctly pour concrete at an angle, the composition must be properly prepared. The choice of brand of solution depends on the operating conditions of the finished structure. Here you can take into account the following recommendations from a specialist:
- M400 - the mixture is intended for indoor use;
- M500 - for the manufacture of recreation areas, pedestrian paths, blind areas around houses;
- M600 - used in work when pouring driveways, as well as those places that will be subject to constant regular load.
To fill the floor at an angle, concrete is made from cement (1 part), fine filler (4 parts), sifted river sand (4 parts) and water. There must be enough binder to ensure the strength of the finished structure. First, combine the dry ingredients and mix thoroughly. After this, liquid is gradually added until the consistency of thick sour cream is achieved.
Non-leakage floors
Layout of a leak-proof floor with a slope
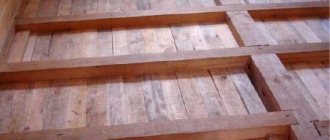
Laying wooden floors with a slope is required only if a leak-proof base is installed. How to lay floorboards at a certain angle to the drain?
- The rough coating is cleaned of dirt and a drainage system is installed;
- Then the concrete screed is supposed to be poured, which is done using the technology described below;
- After the screed hardens, the tongue and groove board is laid;
- The finished floorboards are positioned at a slight angle to the drainage system due to the previously formed screed slope.
Unlike pure concrete, wooden floors can be installed in a sink, steam room or shower, as they are not prone to dust formation.
Waterproofing
As I already wrote in the article on waterproofing a shower, it is very advisable to keep the pan flooded for at least a couple of weeks. With the semi-dry finishing screed method, the time can be reduced. This statement is not an axiom, but just logic: often cracks in the screed do not appear in the first days after pouring.
On the other hand, if the waterproofing is sufficiently elastic after drying, then hairline cracks in the base will not damage it.
In any case, you need to choose a coating waterproofing that has the ability to stretch. There are a lot of cheap compounds that have no elasticity at all. Such a layer will crack along with the base - it is better not to use such compounds.
If there are sinkholes and recesses on the screed, the pallet can be puttied with tile adhesive. This will reduce the consumption of waterproofing and eliminate untreated areas.
Regarding the question of the height of the waterproofing layer: the main thing is to provide a “bowl” with edges of 10-15 centimeters, and higher - according to desire and finances.
Options for installing inclined floors
An example of a floor arrangement with an Envelope type drain.
Designing a base with a ramp always begins with choosing the type of slope, which can be of two types:
How to properly make floors in a bathhouse on a pile foundation?
- “Envelope” is a special type of base cladding in which the drainage system is located in the center of the room. For normal water drainage, the base is conventionally divided into 4 parts in the form of an envelope, making a slight slope towards the ladder;
- From two planes - a design in which the base is divided into two parts and made with a slight inclination relative to each other. At the lowest point of such a system, a drain is installed into which liquid from the floor covering flows by gravity.
The first type of base slope is used quite rarely nowadays, while structures with a slope from two planes are at the peak of popularity. Designing a second type of floor is much more profitable financially. In addition, during the installation of a water drain, you can install point drains or make a single elongated drain pit.
Tools and materials for work:
- Rule and trowel;
- Beacons for forming a slope and thread;
- Tape measure, ruler and level for measurements;
- Buckets with strong handles (which you don’t mind), a shovel;
- Tool for compacting the “pillow” (vibrating plate, etc.);
- A hammer drill with a special attachment or a construction mixer;
- Concrete mixer (and if it is not there, then a container in which the solution will be mixed). Or, as an option, purchase ready-made mortar from a concrete unit.
Features of coatings with ramps
An example of laying beacons for pouring a floor
The degree of deviation of the horizontal base is largely determined by the type of room and the concentration of water in it. The SNiP standard defines the average value of this indicator as 1 cm per meter of length. Designing floors involves placing the drain either in the center of the room or closer to the entrance to the bathhouse.
The center drain system involves constructing the floors as an “envelope”. In order to carry out the work efficiently and ensure normal flow of water into the sewer, the following points should be taken into account:
- The first step is to pour the cement screed along the pre-installed beacons;
- When tiling a floor with a slope, it is better to use small-caliber tiles;
- The minimum slope of the base towards the drain should be 1 cm per meter of length.
Reinforcement
Additional strengthening of cement through reinforcement is an important process, since the use of steel rods prevents cracking and destruction of concrete over time. The simplest and most practical option for increasing the strength of a cement screed is to lay reinforcement in concrete between the beacons. Instead of steel rods, you can use a metal mesh. The reinforcement stage is mandatory for dosed concreting.
Return to contents
Pouring concrete floors
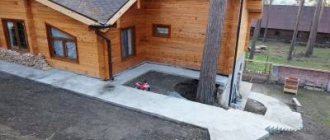
To make a base with a slight slope, you need to do the following:
- Clean the rough base from dirt and dust;
- Waterproof the base using coating or pasting materials: bitumen mastic, self-adhesive film, etc.;
- Choose a place to organize the drain: the distance from the walls to the drain must be chosen as a multiple of its size;
- After installing the drain, the drain hole is covered with a film to prevent cement mortar from entering the sewer;
- After this, beacons are placed on the coating to control the inclination of the screed;
- Pouring concrete is done so that the solution fills the entire space of the base to the top points of the exposed beacons;
- Using the rule, the mortar mixture is leveled, after which it is “rolled” with a roller with needles to eliminate air bubbles;
- After the screed has hardened, install the siphon cup.
Preparation of the solution
To fill formwork at an angle, mixing individual ingredients such as cement, sand and crushed stone is most often used. But experienced experts recommend adhering to the following rules:
- To prepare the solution, use ready-mixed concrete. This building material is sold in construction stores, packaged in paper bags.
- To finish the entrances to the garage, choose the M600 grade of cement; for objects with less load, such as bathhouses, use material marked M400 or M500.
- The amount of ingredients in the solution is most often determined by the experience of the master, but the proportion of cement, sand and crushed stone is approximately 1:3:5.
- It is best to mix dry components using an electric concrete mixer. This contributes to a more uniform distribution of all ingredients relative to the total mass.
- At the end, water is added in small portions until the concrete for pouring at an angle acquires a consistency similar to slurry.
In frosty weather, the solution is heated to a temperature, but not higher than 30 °C.
Additional Additives
Concreting work does not always take place in the summer. Therefore, there is often a need to make the material more resistant to low temperatures. For these purposes, additional additives and additives are used. There are the following types:
- Plasticizers. Provide an increase in the strength of concrete after hardening. When plasticizers are added, the concrete mixture becomes elastic.
- Modifiers. Prevents delamination of the material and the appearance of cracks in it. In addition, they provide resistance to moisture and reduce material consumption.
- Antifreeze. They allow concrete to be poured at an angle even at sub-zero temperatures without losing the strength characteristics of the building material.
- Hardeners. They increase the strength of the material and reduce the hardening time of concrete, which is important when pouring at an angle.
Tiling
Tiling a floor with an “envelope” type drain is a complex procedure.
Laying tiles on a concrete floor using the “envelope” technique should take into account some nuances, namely:
- First, a decorative frieze is laid around the perimeter of the walls;
- Then beacons are installed near the ladder to control the horizontal level of the laid tiles;
- After this, lay the tiles so that they converge in triangles towards the drain hole;
- First you need to make a hanging row, which should go from the drain to the decorative frieze;
- The tiles are laid in such a way that the seams are oriented parallel to the decorative frieze;
- During the ramp lining process, the concrete floor will consist of tile triangles;
- Then the tiles are laid along the left and right sheets of the “envelope”.
The described option for installing tiles in a bathhouse is quite complex and therefore is not often used. It is much easier to make floors with a drain between two inclined planes. In this case, design comes down to a simple choice of the slope of the planes, which should be 1-1.5 cm per 1 m. The fracture line of the planes will lie exactly at the level of the ladder, which contributes to the effective outflow of water from the bathhouse.
Installation of beacons for concreting
Lighthouse installation diagram: 1 - frieze lighthouse row;
2 — intermediate auxiliary beacons; 3 — reference beacon on the wall; 4 — lighthouse rows; 5 - mooring cord for laying the lighthouse row. To facilitate the process of laying at an angle, it is recommended to use auxiliary beacons. With their help, the required angles of inclination of the surface are indicated. For example, to arrange a blind area around the house you will need four beacons in the form of pins. They need to be installed in the corners of the poured area. In this case, two pins should be located above the other two. The maximum and minimum height of the flooded area is determined by the size of the beacons.
The strings tied to the beacons form the required angle of inclination of the future surface. These threads need to be pulled tight so that the other two transverse threads can move along them. In this way, the plane for filling with concrete is designated. To accurately determine the geometry of the future surface, a special level is used. It is fixed to one of the strings, and then, in the process of raising and lowering, the required position of the beacons is achieved. After adjustment, you can begin installing the formwork. Plywood boards and profiles for plasterboard sheets are used as forms.
The distance between the sides of the formwork should be equal to the length of the rule, that is, a vibrating screed or mop. Profiles for plasterboard can be fixed with a solution previously laid out under the string around the perimeter.
Return to contents
What to consider?
Sloped floors in the bathhouse allow you to quickly dry the surface of the floor materials. To properly organize your work, you need to adhere to the following recommendations:
- First of all, you need to calculate the height difference between the drain and the contour coverage area;
- To ensure the correct degree of inclination of the ramp, cords are pulled from the corners of the room to the ladder;
- The tiles are laid according to the following principle: its perpendicular side must correspond to the direction specified by the cord, and the horizontal side must be parallel to the ladder.
Pit
A pit is nothing more than a container for wastewater, installed directly under the washing room. It is worth considering that the use of this system is rational only for small baths that are rarely used.
The construction of the pit must be carried out in the following sequence:
Alternatively, the floor board does not need to be nailed to the joists, so that they can be removed at any time and taken outside the bathhouse for faster drying.
The pit can be arranged in another way, in which the wastewater, having reached a certain height, would be discharged into the sewer or septic tank. This system is usually installed under “leaking” floors.
To install such a system, you will need to perform a number of works:
Pipeline slope calculation
Scheme for calculating the slope of the pipeline depending on the diameter of the pipe
To achieve normal drainage of water from the room, it is not enough to lay the tiles at an angle to the drain hole. Designing floors with a ramp also involves calculating the optimal slope of the water supply system. This parameter determines whether the water will flow into the sewer by gravity or not.
How to raise a bathtub above floor level and make a slope?
During the construction of a bathhouse, the degree of inclination of the sewer pipe is often determined by the values recommended in SNiP. However, in some cases, the standard proposed by SNiP is not suitable for arranging floors. In such situations, additional calculation and design of the pipeline slope is required.
The required parameter is determined using the following formula:
D*√L/H ≥ M, where:
- M – slope coefficient;
- D – speed of water movement through the pipe;
- L – liquid filling level of the pipeline;
- H is the diameter of the sewer pipe.
The ratio of the speed of water outflow from the pipe to the level of its filling cannot be greater than the value M. The SNiP standard determines the minimum slope of a pipeline with a diameter of 0.5 m, which is 30 mm per 1 m of length. To make a high-quality drain, it should be taken into account that the speed of water outflow cannot be less than 0.7 m/sec.
Example
Let's calculate what the sewer slope should be for shower pipes in a bathroom measuring 1.7 by 1.7 meters.
- Given: The base floor of the bathroom is considered zero;
- The riser level d=50 is raised above the base by 30 mm (we count the bottom of the pipe);
- The distance from the riser to the ladder is 1500 mm;
- This means that at the place where the drain is installed, the sewer pipe should be raised by: 1500 × 0.03 + 30 = 75 mm.
- If this is critically high, you can reduce it by 1500×0.02+30=60 mm.
- This means that the screed in the shower tray will be around 6-8 cm, which is quite acceptable.
What is affected by the slope of the pipe and floor?
Designing the base with a slope towards the drain allows you to create a gravity-flow sewer system. To prevent the pipeline from becoming clogged over time, you need to pay special attention to the choice of this parameter. The slope of the sewer pipes and the floor base should not be small or very large, as this affects the performance of the pipeline.
The standard specified in SNiP determines the following parameters of this value:
- For pipes with a diameter of 50-60 mm, the slope should be approximately 2-3.5 cm per 1 linear meter;
- It is advisable to lay the tile covering with a slope of 2% per meter of length;
- You can vary the level of horizontality of the base in a bathhouse due to the underlying layer, but only if its thickness does not exceed 4-5 cm.
Pouring
For pouring thin layers of 1-2 centimeters (we start from the thinnest ones), a regular cement-sand mortar will not work. We need special mixtures that allow such thin layers; there are currently a great variety of such mixtures. Both tile adhesive and special floor levelers, allowing a layer of 0-5 mm, are suitable.
As a rule, you can use a section of the PN profile, placed with sharp edges on the beacons. The convenience lies in the fact that at any time the rule can be shortened with minimal effort, but this will definitely have to be done.
An improvised rule from the profile is taken with a small margin in length, so only the first plane or half of the entire screed is leveled (in the first method). In order not to damage the already formed adjacent plane, the rule should be cut almost “end-to-end” in width between the beacons, with a margin of only 1-2 centimeters. When pouring with the second method, the rule is shortened many times as you move from the edge to the drain.
When it is not possible to level some places with the rule, for example, near the ladder in the first method or there is a protruding pipe on the way, a solution with a reserve is applied to the inaccessible area on the “eye”, after the mixture has set, the tubercle is removed with a sharp spatula. When removing the influx, you need to focus on the adjacent planes aligned with the rule. It is important not to delay cleaning the deposits; this must be done no later than the next day, otherwise it will be problematic to clean off the excess later.
On this note we end our publication. We received a ready-made screed with slopes for drainage, and in the next publication we will tell you how to tile our creation.
Laying tiles
Whatever the shape of the shower, there will be a lot of trimming. How to make a high-quality cut of tiles or porcelain stoneware is described here.
One of the frequently asked questions: How to join the tiles to the drain
. I will not pretend to be true, but I will say what I think: the tiles should be 2-3 millimeters higher than the grating. The same applies to mosaics.
In fact, this question needs to be asked while pouring the pallet in order to lay the tiles without layers, on a fine comb.
I would also like to recommend choosing porcelain tiles or mosaics that are as less slippery as possible, although this is quite difficult.
Any cement-based grout for tiles is suitable, preferably hydrophobic. There is an opinion that epoxy grout is necessary in the shower. Of course, such grout is good, durable and can provide additional waterproofing. However, grouts on cement binders also perform well.
That's all. Later I plan to add higher quality photos, which are not yet available.
Source