Before you begin laying any type of flooring, you should consider carrying out a high-quality leveling of the base. This is precisely why the technology of screeding in an apartment was created. It involves the implementation of sequential activities, the quality of which will determine the final result. After completing the installation work, you should think about installing expansion joints, which can be of various types. Each of them performs specific functions.
Preparation
All work on installing floors in an apartment must begin with preparatory activities. After a thorough inspection, all points must be completed on the surface so that you can begin installing the floor screed.
First of all, it concerns the removal of excess debris and dust. This is carried out in parallel with the removal of irregularities and protruding elements that may interfere with the pouring of the solution.
If there are cracks, potholes, holes, they all must be sealed with a specially prepared mixture. Large defects in the base are filled with a solution of sand and cement, which are prepared in strict proportions of the components.
Preparatory activities
The initial measures include setting the “zero” level and all other points relative to the horizontal line. The quality of this work will affect the evenness of the future concrete floor. At the same time, the technology for installing floors in the apartment must be fully observed. Any deviations will have a negative impact on the outcome. The installation of a concrete floor in an apartment requires sequential work.
A certain set of tools and materials will be useful in the work. Everything will depend on the specific situation of installing the concrete floor, as well as on the desired quality and strength of the solution. Each of the items can be purchased without any problems at a hardware store. If desired, you can use the services of special construction equipment, which is rented for a certain period together with the contractor.
Mixture proportions
It is necessary to understand that the quality of the screed and the proportions depend on the cement you have. Here is the dependency table:
| Cement brand | Brand of solution | Proportion (cement to sand) |
| 600 | M300 | 1/3 |
| 600 | M200 | 1/4 |
| 500 | M300 | 1/2 |
| 500 | M200 | 1/3 |
| 400 | M300 | 1/1 |
| 400 | M150 | 1/3 |
| 300 | M200 | 1/1 |
| 300 | M100 | 1/3 |
It is recommended to use the M200 brand for the floor (in extreme cases, M150).
Waterproofing
Before you prepare the solution for pouring the floor, you must complete the main step - installing a waterproofing layer. This is especially true for premises in private households, when flowing groundwater is very close. Waterproofing will prevent water from getting from the soil into the poured solution, which can cause oversaturation with moisture and uneven drying. The same applies to the rapid release of water from the fill into the lower floors and rooms. If this layer is not completed before the concrete floor is installed, this will negatively affect the drying process of the solution, the final quality and reliability of the surface of the future floor.
The technology of floor screeding in an apartment involves the use of a certain set of materials for the waterproofing layer. These include:
- Roll waterproofing. The most common of them is roofing felt. But it has a vulnerable area, which is the joint of the sheets. This means that they should not be joined, but should have an overlap of at least 15 cm. Some commercially available rolls have a special fastening element along the edge that allows individual sections to be fully and reliably connected to each other.
- Liquid waterproofing. Bitumen mastic is one of the most expensive. But in the end, they provide an excellent result that almost nothing can compare with. Ideal for rooms with high humidity, such as bathrooms.
- Film for waterproofing. It is not uncommon to use conventional polymer film. It only needs to have a certain thickness in order to meet all the qualities of the layer being arranged.
The choice of a specific option will depend on the size of the wallet, the desired items, as well as the specific case and condition of the room as a whole.
Features of pouring the base for heated floors
If until recently a heated floor was a curiosity, today owners of premises equipped with individual heating often reconstruct old floor coverings and then install a heated floor. This type of heating is becoming increasingly popular due to ease of use, saving space, and a comfortable room climate.
Regardless of the type of heating element (water, electricity) used when installing a heated floor, the base for it must be made correctly in order to avoid unforeseen moments during operation.
The method of preparing the solution, the ingredients used, and the order of work do not differ much from generally accepted rules. But since the underfloor heating needs to provide additional reliability, there are some nuances. Before preparing a solution for screeding a warm coating, tidy up the base on which the heating elements will be laid. Remove cracks, chips, and level the base of the floor horizontally. Place the heating elements and secure them carefully to avoid movement during subsequent pouring.
The technology for preparing concrete or sand-cement screed is labor-intensive and painstaking work, requiring strict adherence to the ratios of components and instructions
There are three types of screeds used when installing heated floors:
- Liquid.
It is chosen most often, since due to unhindered penetration into all voids, a homogeneous, dense layer is created that protects coolants from damage. The cement for the screed is selected based on the functional tasks assigned to the base. The higher the grade of cement, the stronger the mass into which the coolants are placed. - Semi-dry.
The name itself indicates the minimum amount of water in the mixture. Strength characteristics are increased by adding special construction additives (fiber, plasticizers, hardening catalysts). - Dry.
Finely crushed expanded clay, less often sand, is used as filler. Customers choose this option quite rarely, since construction activities require additional financial investments for the purchase of special fiberboards, and installation work is also more complicated.
Having decided on the question of how to make a solution for pouring, you need to decide what thickness is optimal in your particular case. Its size is determined by adding the diameter of the pipes and the height of the layer above the communications (30-50 mm).
Once the work is completed, be patient and do not plan to continue the repairs for a month. The composition should dry evenly without additional loads, which could lead to the formation of cracks.
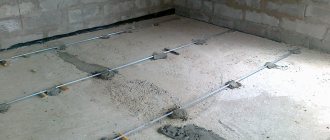
Display of beacons
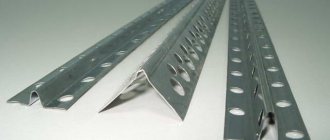
Certain floor screed methods require additional measures to level the base using cement-sand mortar. This includes beacons for filling the floor. There are a huge number of options: profiles, concrete embankments, self-tapping screws, tensioned threads, etc.
In this case, it is worth paying attention to the fact that they are firmly and reliably fixed to the base before pouring, and can also successfully withstand the load of the volume of mortar on the site.
If the beacon for pouring the floor is made from a beacon profile, then it is fixed on the surface, on an embankment of concrete mortar. Beacons must be located in exact accordance with the marked horizontal lines relative to the floor level, and also depending on the height and thickness of the poured area. It will be necessary to run a rule or other tool along the top of the exposed beacons to level the cement mixture.
"People's" technology
Approximate ratio of cement and sand for the most common grades of cement.
Many people don’t really think about what kind of solution is needed to screed the floor. ...And the poured floor fulfills its functions. For this:
- Mix the mixture in any way (concrete mixer, drill with a mixer attachment, manually in a bath, etc.). Take approximately 1 to 3 parts of any sand (construction sand, screenings or ordinary river sand), add 1 part cement (the most common is M-400 or strength class B30). Mix dry first.
Mixing the solution.
- Then add water (about 1 - 2 parts) and stir until a homogeneous mass with the consistency of thick sour cream is obtained. Water is added according to situation. The fact is that it is only possible to accurately determine the amount of water using the sampling method. It depends on what kind of sand is used (humidity, fraction, composition), the microclimate where the work is carried out (temperature, humidity). Also, depending on the microclimate and the speed of use of the resulting solution, it is recommended to prepare the consistency - thicker or more liquid. To be more precise, the final result is influenced by the water-cement ratio in the solution, but in “folk” technology such nuances are usually neglected.
The sooner you use the solution, the better.
- Pour the resulting mixture into place and level it.
- Leave the tie to tighten. There is at least a day before moving along it, although this is often neglected and people begin to walk carefully after a few hours. Sometimes, in hot weather, the screed is additionally moistened so that the concrete hardens well.
However, such an approximate technology does not guarantee the strength of the floor, the absence of cracking, etc. With a large amount of cement, the mortar is stronger, but it dries faster and is more difficult to level, and the final quality deteriorates. By increasing the amount of sand, the setting time increases, but the final strength decreases. Thus, by varying “by eye” you can make a significant mistake. It is better to follow the recommendations given by experts. But this is a “folk” technology without special requirements.
Reinforcement
The construction of a screed in an apartment cannot be done without a reinforcing layer. It allows you to create a strong structure that can withstand maximum loads. But here it is worth paying attention to the choice of specific material for work. Most often, a steel mesh is used, which fits into the thickness of the future screed layer.
A large amount of reinforcing substance in the solution can lead to increased load on floor slabs or other base materials. This is especially true for old buildings. There are acceptable load standards that should be adhered to.
When choosing the thickness of the floor, as well as the quantitative composition of the reinforcement layer, it is worth taking a closer look at the old screed. When it is destroyed and dismantled, the layer, the reinforcement material used and other points are approximately calculated. But these are only indicative figures.
To ensure that the installation for pouring the floor along with the reinforcement is durable and at the same time suitable for use in accordance with building codes, together with metal elements (rods, mesh), a more modern material is used - fiberglass. It gives the solution plasticity and better qualities during the drying process. You can practically forget about the process of shrinkage of the fill and the appearance of even microcracks. Fiber can eliminate these defects and at the same time create an excellent reinforcing layer. There are several options and types of this material. When choosing each of them, the amount (mass) in work per square meter of room area will depend. But in any case, the cost of fiber fiber will be slightly lower than purchasing steel mesh or other metal products.
If it comes to metal structures as a reinforcing layer, then they should not be located immediately on the base. This will not bring any effect. The mesh or rods must be fixed using special elements at some distance from the lower section in order to be located in the middle part of the future concrete floor. This is all provided by the technology of pouring floor screed in an apartment.
It doesn’t matter what mortar you use to screed the floor, the main thing is to correctly apply the reinforcement layer. It will give the whole “pie” reliability and increased service life.
Features of screeding for different types of coatings
Only after laying the cement floor screed is it possible to create a self-leveling layer of polymers. This symbiosis produces a durable and decorative floor covering that is resistant to most possible influences. It is not afraid of moisture and temperature changes, aggressive chemical environments and various types of loads. Before laying self-leveling polymer or epoxy floors, the concrete surface is sanded until a perfectly flat floor is obtained. This is done to avoid the additional costs of filling cavities in uneven concrete with expensive polymers.
Careful leveling of the surface is practiced not only for the installation of self-leveling floors; such a coating is necessary for laying:
- highly aesthetic laminate;
- elite parquet;
- modern PVC tiles;
- traditional linoleum.
Any materials that require a perfectly level base are laid on the surface of polished concrete. Only after such processing is it possible to perform high-quality work.
Screed as a clean floor is used only in utility rooms, warehouses, garages, and basements. Bearing in mind the properties of the top layer of concrete to deteriorate under the influence of external circumstances, the surface of the screed is painted with special paints or impregnated with reinforcing compounds. A floor whose top layer is protected lasts much longer and does not generate dust or break down.
Solution components
Many people probably know how to make a floor screed solution. But still, this should be done efficiently and the proportions for the floor screed should be observed. The filling must evenly combine all the components used, as well as possible impurities and additives. Only this will ultimately bring the desired result and the strength of the entire layer of concrete floor.
Floor screed mortar has certain requirements. The binding elements in it are cement, and sand acts as a filler. The basis of everything is water. It is for this reason that it is required to take it clean, not contaminated (without acid and oil impurities).
There should be no other rocks in the sand. The same applies to clay, which will only bring negativity into the future solution being prepared. The brand of floor screed mortar will depend on the brand of cement used. It is recommended to use it at least M400 for the best strength. When choosing cement, you should pay attention to its production and shelf life. It is not uncommon for bags of cement that was purchased a long time ago to be laid out on the shelves. After all, it has the ability to cake, losing its properties and qualities. The brand of floor screed must match.
When preparing a solution for pouring a floor, proportions play a significant role. The best option would be 1 proportion of cement to 3 proportions of sand. Water is added in the required quantity. The solution should not be too liquid or too thick. All this will create problems when installing a concrete floor.
When mixing particularly large volumes of mortar, it is best to use a concrete mixer. It allows you to mix all the components evenly without unnecessary labor. Various additives can be added to the floor screed solution to give it certain properties. In the same way, you can change the color of the solution if necessary.
When preparing cement mortar for floor screed, the proportions of each component must comply with the requirements and established standards. Much will depend on the cement used and its brand.
How much sand do you need for 1 cubic meter of screed?
It is quite difficult to accurately calculate the consumption of sand, because unlike cement, it is stored in far from ideal conditions and already contains moisture. The numbers in the regulatory documents indicate the consumption of sand with minimal humidity, which is extremely rare in life. Experienced builders determine the viscosity of the solution by eye - the thickness of sour cream, without lumps or impurities. To calculate sand consumption, you need to know the thickness of the coating, the area of the room and the consumption per 1 m2. As a rule, the numbers vary between 20 - 25 kg of mixture per 1 m2 with a solution thickness of 1 cm.
One of the important criteria for calculations is the thickness of the screed and the area of the room.
First of all, you need to find out the volume of the solution in cubic meters. We multiply the estimated area (30 m) by the thickness (4 cm) - 30 * 0.04 = 1.2 m3 of mixture volume.
If you need to make M150 concrete from M400 cement, knowing the rate of cement consumption, we calculate - 1.2 m3 * 400 = 480 kg. The amount of sand is calculated at the rate of 1/3, i.e. for a solution of grade M150, it will be necessary - 480 * 3 = 1440 kg of sand.
Sand for private houses and apartments is purchased from river sand; for industrial premises, quarry-sown sand is chosen.
Fill rules
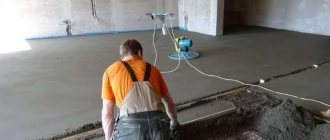
After the solution for pouring the floor has been prepared, you can begin directly pouring the future subfloor. All work begins from the far (opposite) corner from the entrance to the room. The finished mixture is poured and then leveled using special means. This may be a common rule.
It is worth paying attention so that the cement mortar for floor screed is not overexposed. The usual time during which it retains 100 percent of its qualities is only 20 minutes. Subsequently, the cement solution for floor screed begins to gradually lose its properties.
Installation of a concrete floor should be done immediately after the mixture is prepared. Only in this case will the filling technology be followed and the desired result will be obtained. After the entire area in the room is filled with the solution, without missing a single crack, it must be given time to harden. This usually occurs within the first 12-18 hours. Next, you can smooth out all possible defects, rub them, remove the beacons, filling the voids with the prepared mixture.
Features and Benefits
The weight of one square meter of cement screed 1 centimeter thick averages from 16 to 20 kilograms. Screeds using expanded clay or polystyrene weigh a maximum of 18 kilograms, self-leveling mixtures show a figure of 16 kilograms.
In cases where differences in the subfloor reach 3 centimeters or more, a cement-sand floor screed is the best option. The screed can be tied and firmly adhered to the base, or unbound (floating), when the layer is placed on an additional layer (usually a mixture of sand and expanded clay), which acts as thermal insulation and protects against moisture.
The thickness of the cement-sand screed can be different. On average, the area can support a weight of up to 300 kilograms. If you need to increase the strength and ability to withstand different loads, the screed is reinforced with steel rods or mesh. The frame is placed on top of the expanded clay layer or attached to special fasteners or sheets of plasterboard.
Sand-cement screed has a porous structure, due to which it can absorb moisture. Therefore, the layer inside the building must be insulated with a special membrane, or waterproofed with bitumen mastic.
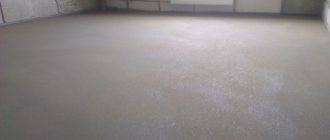
It is quite possible to carry out all the work on arranging a floor screed with your own hands. The main thing is to do everything according to the rules and preliminary calculations. When the screed has hardened and gained full strength, it acquires a rich gray tint.
The layer should be even and dense. If cracks or chips appear on the surface, it means that the proportion of the components was violated or the pouring technology was not followed, or the rules for drying the screed were ignored.
The main advantages of cement-sand screed:
- High-quality leveling - for any type of decorative coating.
- Durability – the service life of a concrete floor is on average 50 years.
- The ability to disguise communications inside the screed - sewer, water pipes, wires, underfloor heating systems, etc.
- Strength - the screed can withstand any load from furniture, equipment, etc.
- Good sound insulation - the screed almost does not conduct sound, and if it is also accompanied by a layer of sound insulation, the effect is magnificent.
- Thermal insulation - the minimum thickness of the screed and itself retains heat well, but if necessary, you can lay a layer of thermal insulation, ensuring the best characteristics.
- Minimal shrinkage - provided that the cement for the screed has been chosen of high quality, and the mixing is done correctly with the correct proportions.
- Quite a low price when compared with alternative methods of flooring.
Among the disadvantages that sand-cement screed may have are the following: large weight (depending on the thickness of the layer) and considerable pressure on the floor, long drying time (during which no further work can be performed - and this is about a month), the difficulty of creating a perfectly flat surface with your own by hand (but you can pour a self-leveling mixture on top), a long and labor-intensive pouring process.
Carrying out preliminary calculations and a properly executed screed allows you to eliminate most of the shortcomings and achieve an excellent result in the form of a strong, durable, even floor that is ready for further finishing.
Types of expansion joints
During the operation of buildings, it shrinks due to temperature fluctuations, different thicknesses of the concrete floor and other operational errors. The same applies to a poured concrete floor, which may also begin to crack during the drying process. To avoid all this on a concrete floor, expansion joints must be present. Although this is not provided for or stated in the building codes and regulations.
The following types of expansion joints in concrete floors are distinguished:
- Insulating. They are performed along walls, possible decorative elements in the room (columns), around foundation protrusions for equipment. These seams are designed to prevent the transfer of deformations to the screed from the structure itself.
- Structural. They are issued in those places where the day's work of pouring the solution has been completed.
- Installation of shrinkage joints for concrete floors. Allows you to avoid the appearance of chaotic cracks on the screed during the drying process. If cracks appear, they appear only in a given direction. This is achieved by creating straight planes of slack.
Construction of deformation layers
Inexpensive and high quality
Among the advantages of a concrete floor, not least is its cost. Today this is one of the most budget-friendly coverings; it can be arranged even with the most modest income. Therefore, for this type of flooring, despite the availability of new materials that are super durable and easy to install, such as epoxy or polymer compounds, there is a stable level of demand. Indeed, due to the high cost of modern new products and the peculiarities of laying technology, it is almost impossible to make a screed with a thickness of more than 10 mm from them.
Proportions of concrete for screed in buckets
At home, it is more convenient to measure the ingredients of a concrete mixture by volume rather than by weight. A convenient measurement is a regular 10-liter bucket.
To prepare a concrete mixture of class B15 from cement grades CEM I 32.5–CEM I 42.5 (M400–M500), you will need:
- cement - 1 bucket;
- sand - 2.5–3.2 buckets;
- crushed stone - 4–5 buckets.
The volume of concrete mixture obtained from 1 bucket of cement will be 5.4–6.2 buckets.
For a concrete mixture of class B12.5 from cement grade M400–M500 you need:
- cement - 1 bucket;
- sand - 3-4 buckets;
- crushed stone - 5-6 buckets.
One bucket of cement will yield 6.5–7 buckets of concrete mixture.
Wet floor screed: cement, concrete, self-leveling mixtures
To level the floor surface or form the base of the floor, a screed is performed on the ground surface. Depending on the type of surface, its condition, the need for heat and sound insulation or the placement of additional structures, the surface preparation process and the characteristics of the screed, as well as the choice of materials, differ. Having chosen the right technology and materials for yourself, it’s quite easy to screed the floor yourself. Now we will analyze all types of wet screed and how to form it step by step. You can find out how to form a dry screed in another publication.
Types of “wet” screeds
The floor screed device can be divided into four main types according to the characteristics of the surface preparation, its type and the formation of the final screed layer:
- Knitted. The most common option for an apartment where the screed is performed on top of the floor slabs.
- With a waterproofing layer . This type is necessary in the bathroom or kitchen, where there is constantly high humidity and there is a possibility of a large volume of water getting on the floor. A layer of screed is formed on top of the laid waterproofing material.
- With a layer of thermal insulation. By default, a layer of thermal insulation is required when forming a screed on top of the ground. Also, if necessary, it can be used in apartments and houses for fencing from the basement or other unheated rooms.
- With final self-leveling coating. In this case, after completing the main screed, a thin layer of liquid mortar is used, which independently forms a perfectly flat surface. This is necessary to level the floor under laminate or linoleum, which are sensitive to any, even small, irregularities. You can also form self-leveling floors with your own hands, using a more liquid solution, which, under the force of gravity, will independently distribute over the entire surface. However, it is not recommended to use self-leveling floors alone without forming the main screed.
Example of a standard floor screed:
What thickness should the “correct” screed be?
In any case, you should decide on the overall thickness of the screed and, specifically, the use of cement or concrete screed that needs to be formed on the floor. All this depends on the type of floor or the required value of thermal insulation and strength. The limitation can be both the load of the screed on the floors, since it is the main technological part of the structure, and the resulting load on the screed itself. In case of construction of a new building, the instructions of the construction project must be followed. If you need to make a floor screed with your own hands to replace the old one, then you should comply with the characteristics of the old one and, within acceptable standards, improve it by adding thermal insulation or installing heated floors if necessary.
The thickness of the mortar layer can vary from 25 to 80 mm, but no less, otherwise the screed will subsequently turn out to be fragile and weak.
At this stage, it is important to correctly calculate the amount of materials required. For a layer over 30 mm, it is better to use concrete based on sand, gravel, crushed stone, etc., only it can form such a thick layer without cracking. In any case, it is better to familiarize yourself with the step-by-step implementation of the screed using all types for a more complete understanding of the process.
Stages of preparation for the main work
Basic surface preparation
The old screed is dismantled, especially if it already has cracks or damaged areas. Floor slabs are cleaned of dirt and dust and primed. The primer is poured directly onto the floor and leveled over the entire surface with a roller or brushes. After this, it will take up to 5 hours for the primer to dry.
For soil bases, a layer of expanded clay or sand is formed on a base cleared of vegetation. Expanded clay is still subsequently covered with a layer of sand. The thickness of the sand layer must be at least 10 cm. The entire surface is compacted. If necessary, the layers of the embankment are moistened with water for normal shrinkage. Using an expanded clay mound, screeding an uneven floor will also be significantly cheaper and easier, because less mortar will be used.
At the same stage, the installation and distribution of sewer drain pipes or water supply pipes is carried out if the work is carried out in the bathroom or toilet. Subsequent layers of thermal insulation and waterproofing are laid bypassing all communications.
Thermal insulation
To do this, use either a mound of expanded clay or dense slabs of expanded polystyrene. The main thing is that the insulation is rigid. Expanded clay has slightly worse heat and sound insulation parameters, but is more durable and reliable. In most cases it is quite enough. To form a screed on a ground surface, insulation is mandatory. For floor slabs in an apartment - only if necessary.
Waterproofing
The waterproofing layer can be laid strips of thick film or roofing felt rolls. Strips of material are laid overlapping approximately 10-15 cm and overlapping the walls by 10 cm, including the outgoing water supply pipes and sewer drains, if any. In the latter case, it is necessary to additionally coat the pipes and thermal insulation material with sealant or mastic to a level higher than the solution will be poured. Waterproofing is necessary for rooms such as baths, toilets and kitchens. In other rooms it can be formed only to protect the apartment on the first floors from the cold and dampness of the basement.