Which side should the vapor barrier be laid to the insulation?
Knowing which side to lay the vapor barrier against the insulation on the ceiling, wall or floor is very important when working on insulation.
It only at first glance seems that which side to lay the vapor barrier against the wall insulation does not matter, but in reality this is not the case. In this material we will tell you why a vapor barrier is needed and its purpose. Watch the video - which side to lay the vapor barrier on, how to distinguish the inside of the vapor barrier film from the outside. The need for high-quality thermal insulation of premises arises very often. If you plan to insulate a wooden house with your own hands, then many questions arise about how to do it correctly. And one of the important questions concerns the need to use a vapor barrier, the place of the film in the thermal insulation “pie” and which side to lay the vapor barrier against the insulation on the wall.
Features of laying floor vapor barrier
The construction of a house or major renovation of an apartment is carried out in compliance with all requirements; the main criterion for the work performed is quality. The main task of all stages of work is to create a high-quality base for all surfaces (walls, floors, ceilings, roofs). Each stage of construction work must be carried out so that the surfaces are smooth, insulated and not damp (condensation does not form on them, and as a result, mold). This quality is achieved in different ways: the surfaces of walls, floors or ceilings are treated with antiseptics, and a multi-layer leveling is done, which includes a layer of hydro- and vapor barrier. Waterproofing is needed to prevent moisture from entering the room. And the vapor barrier prevents the formation of condensation.
Why do you need a vapor barrier for insulation?
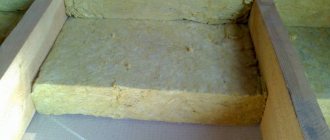
Vapor barrier is always necessary when using moisture-absorbing insulation. The fact is that the characteristics of mineral wool are such that the material installed on the inside of the wall comes into contact with warm air, which contains water vapor. In the absence of a water barrier, moisture penetrates into the thermal insulation layer on the floor, where it condenses, turning into water.
As a result of moistening, the thermal insulation properties of mineral wool material are reduced; in addition, mold and mildew may appear in a humid environment. If the vapor barrier under the insulation on the wall is correctly laid, then it becomes an obstacle to moisture. Therefore, thermal insulation requires the installation of a vapor barrier between the warm air of the room and the insulation.
Types of vapor barriers for insulation
Among the modern materials for hydro- and vapor barriers presented on the construction market today, three main types can be distinguished:
The film is a blind vapor barrier that does not allow moisture to pass through. The main advantage of polyethylene film is its low price. Two-layer vapor condensate films are also produced - these are smooth on the inside and rough on the outside. Drops of water do not pass through the film, but are retained.
A diffusion membrane is a vapor barrier with limited vapor permeability, consisting of non-woven polypropylene and polymer film. It has an outer and inner side (see video), which allows steam to pass through it in an optimal amount. Water vapor does not linger in the insulation, but quickly evaporates.
The vapor barrier membrane (energy-saving) film has a metallized outer layer that is resistant to high temperatures. The material is more often used when insulating the walls of baths and saunas, because the material additionally reflects infrared radiation (works like foil penofol).
If glass wool is not protected with a vapor barrier during installation, then as moisture is absorbed, the thermal conductivity of the material will increase.
Roll waterproofing - used to protect building structures from moisture. When using this material, it does not depend on which side the waterproofing is laid to the insulation, since TechnoNIKOL roll and coating waterproofing does not allow moisture to pass in both directions.
Choose a vapor barrier for a metal roof
To choose a vapor barrier film, you should evaluate your needs and capabilities.
Vapor barrier film of the Yutafol brand combines high efficiency with an affordable price. Production is localized in Russia, this allows the company to maintain low prices. Yutafol is offered in regular and high density, as well as foil for hot rooms with high humidity.
Tyvek products are imported, which results in high prices for membranes. It is characterized by consistently stable quality. This is a good choice for those who don't want to skimp on small things.
The Izospan brand is widely popular among amateurs due to its low price and easy installation.
Professional builders prefer membranes produced by Folder and Delta for stable performance and long service life. They also supply a wide range of related materials such as adhesive tapes and mastics.
Which side should the vapor barrier be laid against the insulation?
At first glance, it seems that there is nothing complicated - attach the waterproofing film over the insulation on the side of the warm room and you're done. However, there are some important nuances in this matter that you need to be aware of. It is also important to take into account which side the vapor barrier is laid to the insulation on the ceiling and what the installation features are. This is where previously acquired knowledge about the types of film used comes in handy.
How to distinguish the inside from the outside
If the manufacturer’s instructions are missing or do not contain the necessary information about which side of the film is considered internal, then you should independently determine this based on external factors. Please pay attention to the following points:
1 . If the waterproofing film has a different color on both sides, then the light side of the isospan is laid against the insulation ; 2 . The side of the waterproofing that faces the floor when rolled out is considered internal and should face the insulation; 3 . The outer side is made fleecy so as not to allow moisture to pass through, and the inner side is smooth and is laid towards the insulation.
Which side should the vapor barrier be placed on the insulation?
The polyethylene film is laid on either side, because they are no different from each other. The diffusion membrane (vapour-condensate film) is correctly laid with the smooth side on the insulation, and the rough side towards the warm room. Thus, it prevents the insulation on the ceiling or wall from getting wet, and excess moisture from the material can freely pass through the smooth side.
Also, diffusion membranes are mounted on the floor or wall with the smooth side facing the insulation. Vapor barriers with a foil side are attached with the reflective side facing outwards, as it reflects heat back towards the warm room. And it should be remembered that laying vapor-tight materials, for example, isospan, requires the installation of a ventilation gap to remove excess moisture.
If the internal cladding (false wall) is made closely without a gap, then it will be exposed to the influence of moisture settling on the film. If there is a gap, air movement will facilitate the unhindered evaporation of excess condensate from the surface of the film. It is important not only to know which side to put the isospan towards the insulation, but also to maintain the integrity of the vapor barrier itself.
Variety of materials
To protect surfaces and insulation from moisture use:
- reinforced polyethylene film;
- aluminum coated film;
- film made of propylene fibers;
- membrane vapor barrier.
What where When?
The main role of a vapor barrier material is to protect wooden structures and insulating material from moisture, rotting and, as a result, premature destruction.
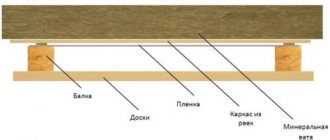
It is extremely important to use it on lower floors, above basements and basements, and especially above bathrooms and kitchens. It is also necessary to remember that the insulation protection must be double-sided, since wet mineral or glass wool almost completely loses its thermal insulation qualities. That is, the film is placed between the finished floor and the insulation material, as well as between the insulation and the subfloor
However, often the bottom layer is replaced with waterproofing
That is, the film is placed between the finished floor and the insulation material, as well as between the insulation and the subfloor. However, often the bottom layer is replaced with waterproofing.
Which side should I lay?
You need to know which side to lay the vapor barrier on the floor. An extremely important nuance, since the wrong technology for installing the material will negate all its properties.
A man lays vapor barrier material on the floor
Here are the instructions:
- The double-sided film is placed with the smooth side facing the insulation and the corrugated side on top. The rough surface acts as a filter for steam and even the smallest drops of water.
- It is customary to lay polypropylene with the wicker side away from the insulation, and the smooth side inside.
- Installation of foil vapor barrier is carried out with the aluminum side facing the room, as it tends to reflect infrared radiation.
- Individual installation technology is possible for individual brands and types of vapor barrier materials.
- Before use, be sure to read which side to place the vapor barrier on the subfloor and insulation.
Laying algorithm
It's not complicated:
- First, the old flooring is dismantled down to the subfloor. Then the base is prepared: debris is removed, cleaned, leveled, treated with antiseptic and primer. Old floor beams or joists that have begun to collapse must be replaced with new ones.
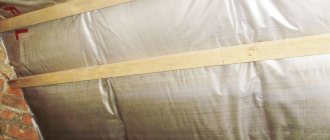
- Hydro and vapor barrier of the subfloor is carried out, preventing moisture from entering the insulation from the ground or lower rooms. The film strips are laid with the correct side (see above) overlapping by 15-20 cm. The edges must be glued with reinforced or double-sided tape. Also, the vapor barrier should extend 10-15 cm onto the walls and joists. It can be attached to beams and joists with metal brackets.
- A layer of insulation is laid on top of the film with the seams staggered and a thickness of at least 20-30 cm.
- A second layer of vapor barrier is laid on top of the insulation, also with an overlap and gluing the joints. If installation is carried out on wooden floor joists, it is necessary to lay the film so that it sag slightly: this way a ventilation gap is created between it and the finished floor. However, it is also recommended to put counter-battens on the logs on top of the vapor barrier, which will prevent the film from coming into contact with the finished floor.
- The finished floor is filled and then finished with the finishing floor covering.
Now you know how to install a vapor barrier on the floor and will not make the mistake of doing your own repairs.
We recommend looking at what happens if the vapor barrier is not installed correctly. Condensation fills the ceiling with water, the insulation gets wet and mold spreads. Don't make these mistakes.
In winter, when it’s frosty outside but the inside of the house is cozy and warm, unnoticeable steam forms in the rooms. And this steam must leave the room freely. To accomplish this task, a vapor barrier is installed. You need to know which side to lay the vapor barrier on the floor, walls or ceiling.
Installation instructions for hydro-wind protection
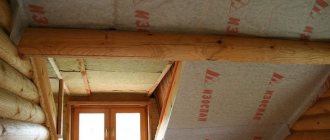
A hydro-windproof membrane is laid on the outside of the insulation under the outer skin of the building. Spunlight AM is laid with the white side facing the insulation; the side of laying Spunlight A does not matter. Installation is carried out from bottom to top, with horizontal sheets, overlapping (the width of horizontal and vertical overlaps is at least 10 cm). The material is fixed to the frame using a construction stapler or another method. The lower edge of the material is laid on the drainage drain of the building's basement and glued to it using double-sided connecting tape Izospan KL+ . If the remainder of the roll is not enough to cover the entire width of the wall, then the vertical overlap of the material sheets is performed on the frame beam. The junction of the hydro-windproof membrane sheets with wooden, concrete and other surfaces must be glued with Izospan ML proff or Izospan KL+ . Finally, the hydro-windproof membrane is secured to the frame with vertical antiseptic wooden counter-battens on nails or self-tapping screws. A ventilated gap must be provided between the hydro-windproof, vapor-permeable membrane and the outer cladding to the thickness of the counter-batten (at least 4–5 cm).
Video description
About the membrane installation technology in the following video:
- The main condition for installation is that the film is fixed without tension , with a sag of approximately 2 cm. The reserve is created due to the ability of the wooden frame to change its dimensions with the change of seasons (with changes in humidity); otherwise there is a risk of the film tearing.
- For horizontal installation, installation is carried out from above (from the ridge). The strips are laid with a reverse overlap (the lower strip overlaps the upper), for additional protection of the insulation; they are connected with tape and secured to the structure with galvanized nails or a stapler.
- If the thermal insulation layer is not dense, the rolled sheet is fixed using slats , which must be antiseptic.
- Particular attention is paid to junction points (attics, windows, hatches, pipes, ventilation ducts); they are isolated especially carefully.
Fixing the film Source pro-uteplenie.ru
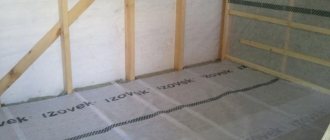
Installation instructions for vapor barrier
The vapor barrier is installed on the inside of the insulation. Spunlight B (Spunlight AR ) is laid with the smooth side facing the insulation and the rough side towards the room. Installation is carried out from bottom to top, with horizontal sheets, overlapping (the width of horizontal and vertical overlaps is at least 15 cm). The material is attached to the elements of the supporting frame (beams, racks) or along the rough sheathing using a construction stapler or galvanized nails with a wide head. To ensure the tightness of the vapor barrier layer, the overlaps of the vapor barrier sheets must be glued with connecting tapes Izospan KL , Izospan KL+ or Izospan SL ; the junctions of the vapor barrier with wooden, concrete and other surfaces must be glued with connecting tape Izospan ML proff or Izospan KL+ . Finally, Spunlight B (Spunlight AR ) is fixed to the supporting frame or rough sheathing with vertical antiseptic wooden slats 4x5 cm (when finishing the room with clapboard, plywood, decorative panels, etc.) or galvanized profiles (when finishing with plasterboard). The interior finishing of the room is attached to a slatted frame or galvanized profiles with a gap of 4–5 cm between the vapor barrier and the finishing.
Also, in the structures of frame walls of low-rise buildings, reflective vapor-waterproofing Spunlight FS can be used. Reflective vapor-waterproofing Spunlight FS is laid on the inside of the insulation, with the metallized surface facing the room. Installation is carried out from the bottom up, with horizontal sheets, overlapping, the width of horizontal and vertical overlaps is at least 15 cm. The material is attached to the elements of the supporting frame or along the rough sheathing using a construction stapler or galvanized nails with a wide head. To ensure the tightness of the vapor barrier layer, overlaps of reflective vapor-waterproofing sheets must be glued with metallized connecting tape Izospan FL ; the junctions of reflective vapor-waterproofing with wooden, concrete and other surfaces must be glued with connecting tape Izospan ML proff or Izospan KL+ . Finally, Spunlight FS is fixed to the supporting frame or rough sheathing with vertical antiseptic wooden slats 4 × 5 cm (when finishing the room with clapboard, plywood, decorative panels, etc.) or galvanized profiles (when finishing with plasterboard). The interior decoration of the room is attached to a slatted frame or galvanized profiles with a gap of 4–5 cm between the reflective vapor-waterproofing and the finish. It is necessary to maintain a gap of 4–5 cm between the reflective surface of Spunlight FS and the interior finishing material to ensure conditions for thermal reflection.
To reduce construction risks associated with exposure to direct and reflected sunlight, excessive moisture, and mechanical damage, it is recommended to install the outer cladding immediately after installing the Spunlight AM / Spunlight A .
SPUNLITE materials under prolonged exposure to direct and reflected sunlight.
Chemicals for treating wooden elements can lead to the destruction of SPUNLITE , therefore, installation of SPUNLITE must be carried out only after the treated wooden structural elements have completely dried.
The appearance of materials, presence and location of logos may differ from the original.
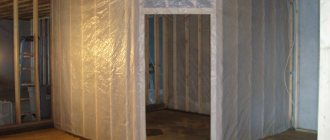
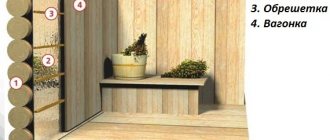
Vapor barrier of walls from inside a wooden house
The vapor permeability of a wooden base largely depends on the tightness of the sealing of seams, grooves, and the absence of cracks in the wood.
Therefore, the walls of a wooden house often require auxiliary protection - the installation of a vapor barrier layer during their insulation.
Vapor barrier can be done on the inner surface of the tree, but such a solution will not be entirely correct. The best option is to install a sheathing, which will later serve as a frame for the internal cladding.
To do this, wooden planks are placed on the base surface in a vertical direction, which are leveled (wedges are placed along the depressions, and the material is removed on the protrusions). First, the outer slats are set, along which the intermediate slats are aligned using a thread.
The insulating material is stretched onto the sheathing from the bottom up and secured using a construction stapler.
It is necessary to lay the insulation in such a way that the matte rough side is directed inward, this reduces the formation of condensation. There is no need to stretch the film very tightly, since after a while the wood will dry out, the tension may increase and the vapor barrier will simply break.
The canvases are overlapped and taped with moisture-proof adhesive tape.
A canvas with a self-adhesive strip along the edge will help speed up the process, thanks to which the joints are reliably glued without additional time spent on their subsequent gluing.
To install a vapor barrier indoors, the following materials are used:
- polyethylene film, the thickness of which is more than 0.1 mm;
- membrane film;
- mastic (excellent for plasterboard bases, the material perfectly allows air to pass through while retaining moisture);
- aluminum foil, at least 1.02 mm thick.
The foil is laid with a reflective surface towards the air space, this ensures a decrease in the degree of heat transfer.
Estimated cost of the material (depending on the manufacturer), the price is for 1 roll:
- aluminum foil – 800–6300 rubles;
- connecting tape – 150–500 rubles.
To effectively install a vapor barrier layer, you must adhere to certain rules:
- Inside the house, vapor barrier materials are mounted on the walls, which divide the living space into zones. These areas are often insulated with mineral wool, which, accumulating moisture, loses its positive properties. Therefore, it is recommended to lay a vapor barrier on top of the insulation.
- It is best to secure the film on the inside of the base with wooden planks pre-treated with an antiseptic. It is laid on both sides of the partition bases. At the junction, an overlap of approximately 2.5–3 cm should form between the panels, while the edges on both sides should not coincide with each other, and the distance between them should exceed half a meter.
- For effective ventilation of the walls and an optimal environment, the insulation is mounted on the inside of the thermal insulation layer.
Types of vapor barrier
Let's first understand what a vapor barrier is. This is a material that belongs to two types - preventing moisture from heated air from penetrating further or allowing it to pass through. In fact, the first type is a film, the second is a membrane. However, these concepts are often confused due to a lack of understanding of the difference, and due to the difficulty of translating instructions from foreign manufacturers
A one-way membrane is a layered material with special properties. It allows water molecules to pass through only in one direction; its thickness is comparable to the size of the molecule. Of course, they are attached so that the steam-permeable layer faces the warmer room - inside the house. In such cases, manufacturers ALWAYS indicate which side to place the membrane during installation and mark the required surface.
Double-sided membranes allow steam to pass through on both sides, so the mounting side is not important. The whole “trick” is in the special structure of the material.
At the same time, the membrane itself has low strength, therefore, to improve performance characteristics, it is supplemented with a layer of textile or non-woven material on one or both sides. The structure may also have a reinforcing layer in the form of a mesh, a reflective layer of aluminum foil. This type of vapor barrier is called “reflective”.
As for films, they DO NOT allow steam to pass through on either side, so it also doesn’t matter which side you attach them to. An exception is films with a thermal insulating layer. It is always turned towards a warmer room.
Also, materials for the vapor barrier are divided according to the degree of vapor permeability. For example, data from the popular brand “Izospan” is given.
Taking into account the permeability of the vapor barrier, installation is selected close to the insulation (for membranes with high permeability) or at a certain distance for ventilation (non-permeable) films.
Film types
Izospan is presented in several options, which were developed for specific needs. The differences lie in a number of changes in the parameters of the scope of application, some characteristics and properties. At the moment, manufacturers produce materials that are divided into 4 groups, they include several types:
- A – used outside buildings;
- B – used only inside;
- C - for the roof, but provided that there is no insulation in it;
- D – designed specifically for concrete surfaces;
- AM – used at high humidity, has a reinforced structure;
- FB – high level of protection, for buildings with high humidity and temperature.
Izospan FB series Source teplotek24.ru
It should be noted that two-layer materials differ in structure and density, and have differences in purpose and application. A characteristic feature of such materials is heat retention and resistance to high temperatures.
How to lay a vapor barrier correctly
The question of which side to place the vapor barrier against the insulation depends on the manufacturer’s recommendations. If the packaging clearly indicates which side should be facing towards the structure and which should be facing inside the room, you must follow the instructions. If there is no marking or the packaging is damaged, it is worth considering the general installation rules.
First of all, the position of the “dew point” is taken into account.
Warm air from inside a building tends to escape into the cooler outdoor atmosphere (most of the year), with interior structures transferring heat relatively easily. Reaching the insulation, the heat flow gradually dissipates; the heat is absorbed by the loose mass of the insulating material. If the outside of the insulation is protected from atmospheric moisture by a waterproofing film, then the question of which side to place the vapor barrier on the roof is decided as shown in the illustration above - between the rafters and the insulation, the rough or reflective surface inside the house. For materials with identical sides (both smooth), the manufacturer does not give any advice regarding installation - the film can be turned towards the rafters with either side. Usually, in this case, it is customary to nail the film directly to the rafters with staples; accordingly, it is better to choose a material of increased strength. It will not sag in the spaces between the rafters and will not tear under the weight of the insulation.
When deciding which side to lay the vapor barrier in the attic from the inside, you should take into account information about whether the room is heated or not. For heating, the film is laid on the inside of the rafters so that there is a gap of 10...15 mm between the insulation and the film, with the reflective side facing the inside of the room. If the roof gets very hot and moisture condenses on the outside, you can turn the film the other way around. In this case, it is convenient to use a material with a rough surface for moisture condensation.
In the case of installing a vapor barrier in a room, the question of which side to place the vapor barrier on the ceiling is solved as follows: for ordinary rooms, the reflective or rough side turns into the room, for rooms above hot and humid rooms (for example, a relaxation room above a steam room) - vice versa. The same goes for gender. Vapor-impermeable films can be installed arbitrarily.
For walls, the general principle is used - you need to retain heat inside the room. Therefore, the vapor barrier is installed from the inside and usually with the help of dense, vapor-impervious, reinforced polyethylene films. Here, the question of which side to attach the vapor barrier to the wall is not fundamental - the films retain heat and moisture equally, regardless of the mounting side.
How to check if the vapor barrier is working
There is a very simple way to check the effectiveness of a vapor barrier. You need a small piece of material and two glasses of the same diameter. Pour boiling water into one glass, cover it with a piece of the material being tested, and place the second glass upside down on top. If the material works as it should, the second glass remains dry.
If drops form on the walls, “fog” appears, the material conducts steam. Perhaps you have a vapor barrier with one-way conductivity, then you need to turn it over and repeat the tests. The situation has not changed? This is a vapor-permeable material with two-way vapor conductivity.
General installation principles
Regardless of what type of vapor barrier is used and what structures it is mounted on, the general operating principles are followed:
- it is necessary to ensure the unity of the barrier, so the film or membrane is laid overlapping and glued with a special tape or tape;
- any punctures, cuts and other through defects on the surface of the vapor barrier must be repaired with mounting tape;
- for all types of barriers, except for double-sided membranes (with a smooth and rough side) and superdiffusion membranes, it is necessary to leave an air gap between the vapor barrier and the insulation;
- The location of the “dew point”, that is, the place of moisture condensation due to temperature differences, must be taken into account.
Brands of materials for creating vapor barriers
There is a wide variety of different brands of vapor barrier materials on the materials market. They have a lot of differences and may differ in price, quality and other factors.
Table. Brands of materials.
| Brand | Information | Manufacturer | Price |
| Tyvek | Well protects against steam and moisture | Denmark | 5500 rub./50 sq. m. |
| Izospan | Protects from moisture, wind, steam | Russia | 13 rubles/sq.m. |
| Brane | Excellent protection against steam, moisture, wind | Russia | 1100 rub./70 sq. m. |
| Domizol | Excellent protection against steam, moisture, wind | Russia | 13 rubles/sq.m. |
| Polyethylene | It breaks, but protects well from steam | Russia | No more than 10 rubles/sq.m. |
"Izospan B"
Izospan is especially popular. There are several subtypes of it, and for floors it is recommended to purchase Izospan V. It is a two-layer version of the membrane. On one side it is smooth, and on the other it is slightly rough. The rough side holds capillary moisture well, absorbing it.
Application of Spunlight: Insulated pitched roofs
- Roofing covering.
- Wind-waterproof membrane Spunlight AM.
- Counterrail.
- Insulation.
- Vapor barrier Spunlight V.
- Rafter.
- Interior decoration.
- Lathing.
- Self-adhesive sealing tape
Hydro-wind protection
Spunlight AM as waterproofing and wind protection
. Spunlight AM materials are laid directly on the insulation without a ventilation gap, which avoids the cost of additional sheathing between the insulation and the membrane.
Installation instructions
When installing an insulated pitched roof
hydro-windproof vapor-permeable membrane Spunlight AM is used to protect insulation and load-bearing structural elements from under-roof condensation and as additional protection from wind, snow and atmospheric moisture during slanting rain in places of loose laying and defects of the roofing covering. The material helps remove moisture from the insulation. It is used in insulated roofs with different types of covering with an angle of inclination in accordance with the installation instructions and the area of application of the roofing material.
Spunlight AM is rolled out and cut directly on top of the insulation. Installation is carried out with horizontal panels overlapping, starting from the bottom of the roof, with the white side facing the insulation. The overlap of the panels at horizontal and vertical joints is at least 15 cm. The stretched material can be additionally reinforced on the rafters with a construction stapler. On top of the material, wooden antiseptic counter-battens 4x5 cm are attached vertically along the rafters with nails or self-tapping screws. The place of vertical overlap or junction of two horizontal panels must be pressed against the rafters with a counter batten.
Lathing or continuous plank flooring is mounted along the counter-battens, depending on the type of roofing. To ventilate water vapor and under-roof condensation, a ventilated gap must be provided between the outer side of the Spunlight AM material and the roof covering to a counter-batten thickness of 4-5 cm. In addition, to ensure ventilation of the under-roof space, ventilation holes for air circulation are provided in the lower part of the roof and in the ridge area .
The Spunlight AM material is attached with slight sagging. The lower edge should ensure natural drainage of moisture from the surface of the membrane into the gutter. The joints of the laid panels are fastened together with connecting tape (for example, Izospan KL or KL+). buildings.
To seal the mounting points of the counter rail, it is necessary to use Self-adhesive Sealing Tape
. When installing the counter-batten along the rafters in the places where it is attached, self-tapping screws (nails) damage the integrity of the Spunlight panels. Through these fastening points, moisture generated in the under-roof space can penetrate into the insulation and wooden structures. Therefore, it is necessary to use Self-Adhesive Sealing Tape to seal the mounting points of the counter rail.
It is recommended to seal the junctions of Spunlight materials with pipes and roof windows with adhesive tape (for example, Izospan ML proff).
Vapor barrier
Spunlight B is used as a vapor barrier in insulated pitched roofs of exploited attics with various types of roofing. The material serves to protect the thermal insulation layer from the penetration of vapors from inside the room, and also protects the living space from the penetration of insulation particles.
Is a layer required for ventilation?
At the bottom of the membrane vapor barrier there is a 5-centimeter ventilation gap, which helps prevent the formation of condensation on surfaces and the heat insulator.
Diffusion membranes can be attached to insulation, plywood sheets or OSB. In a membrane with an anti-condensation layer, gaps up to 6 cm wide are located on both sides.
To create a gap for ventilation when insulating the roof structure, a counter-lattice is used. In the process of fastening a ventilated facade, a technological gap is created when installing racks located perpendicular to the vapor barrier.