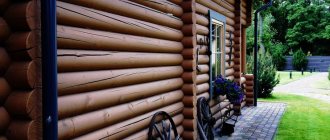
Steaming in a bathhouse is an original Russian tradition. But in order for the steam room to be truly cozy, and to spend time in it pleasant and comfortable, it is necessary not only to build it correctly, but also to protect it from heat leakage, moisture, wind, and cold air. Traditionally, the bathhouse was insulated with caulk, but nowadays this outdated method of insulation is used less and less. Today, many people prefer modern technologies for sealing wooden houses using special sealants. However, a bathhouse is a room with a special microclimate, and not every product can be used in extreme temperatures. In this review we will talk about how to choose a sealant for a bathhouse and how to apply it.
Acrylic sealants for baths: choosing the best
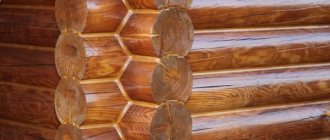
When it comes to finishing the seams between beams or logs, literature alone will not be enough, since a dozen books will provide the same number of caulking options for your consideration.
Of course, deliberately false information rarely appears on the pages of reference books, but it still happens, and identifying it among other data is quite difficult. The most reliable advice on how to seal cracks between logs will only be given by an experienced craftsman, or at least a person who has actually tried what he is talking about. And, interestingly, many agree that moss is one of the most effective materials for caulking. Often on the outskirts of swamps you can see a whole carpet of sphagnum, which, while still wet, easily packs into the joints between the crowns.
Only the kind of caulk that can be called high-quality is one in which a sharp awl fits into the gap between the logs no less hard than into the wood.
Article on the topic: How many barbecues for a gazebo or summer kitchen
A more common and equally environmentally friendly way to seal cracks is to fill them with tow, coated with plaster or cement mortar, or simply compact this consumable material, which is accessible to everyone, without any additives. You can use hemp or jute fiber instead. The difference between hemp and tow is insignificant - the first is a derivative of flax, less often hemp, the second is obtained only from hemp.
Recommendations from experts
Numerous experts in the field of wooden house construction recommend using decorative jute rope (ropes) produced in the Republic of Bangladesh or India for finishing the seams between logs. These products from Southeast Asia are considered the best in quality and the best in terms of service life. Currently, every third owner of a log house uses this technology in the decorative finishing of logs inside the house.
As for fastening this product in the seams of a wooden frame, the best way is to fasten it using special thin stainless nails. To speed things up, it is better to buy an automatic nail gun. Fastening is carried out using cross technology into the lower and upper logs - driving nails cross x to cross.
Features of sealants for steam rooms
Despite the huge offer of all kinds of sealing compounds, choosing a sealant for a wooden bath is not so easy. Many of the products presented on the construction market are not suitable for a bathhouse, because... do not meet the requirements for such compositions.
General requirements for sealing compounds for baths
Criteria for choosing a sealant for a steam room:
- Environmentally friendly and safe, contains natural ingredients. The product should be odorless and emit no harmful substances. This is a particularly important condition when sealing indoors. At the extremely high temperatures found in saunas, volatile chemical compounds are released into the atmosphere and can cause serious poisoning.
- Vapor permeability. It is necessary that natural air circulation be maintained in the bathhouse, since in its absence the room will not dry out well, which threatens the formation of mold.
- Moisture resistant. The sealant should repel moisture and protect the joints from water penetration.
- Must be heat-resistant and resistant to large temperature changes.
- High elasticity. The sealant must have the ability to stretch to at least 25% of its original length.
- UV resistance. This property is important for all types of sealants used outside the house.
What sealants can be used in a bath
The following products are best suited for sealing the steam room:
- Butyl rubber tape. It has good adhesion and ease of use. However, its price is quite high, and in addition, under the influence of high temperature the material can be deformed.
- Thiokol sealants are in the form of a paste or putty, consisting of several components and requiring dilution. To apply the composition correctly, you need to have certain skills, and mixing the ingredients is also difficult.
- Acrylic sealants. They best meet the requirements for sealants for steam rooms and saunas. They are produced on the basis of acrylic dispersion, which is safe for health. They are characterized by high elasticity, do not interfere with the air exchange of wood, and withstand high temperatures well.
Article on the topic: Is it possible for pregnant women to go to the bathhouse in the early stages of pregnancy?
What materials are undesirable to use in a steam room?
Construction layout
To properly perform insulation, it is necessary to take into account factors such as the location and layout of the bathhouse . If all this is taken into account at the bathhouse design stage, then it will be possible to avoid unnecessary costs when performing thermal insulation of the steam room. Thus, when choosing a bathhouse layout option, you need to take into account the following:
- When choosing the size of the steam room, you need to take into account how many people will be indoors at the same time, as well as how many rooms you plan to make. Will it be just a dressing room, a locker room and a steam room, or will you decide to add others. Most often, an area of 4-6 m2 is selected for the dressing room, and 6 m2 for the steam room.
- When drawing up a bathhouse design, it is necessary to take into account possible heat losses and take measures to minimize them. This means that the locker room should be located as close to the entrance as possible. Then it will help to better protect the steam room from drafts and cold air entering it.
- When preparing to insulate the steam room, the design should include an entrance from the washing room or dressing room to the steam room not in the traditional version, but in the form of a vestibule.
- Attention should also be paid to the doorway, which should not be too wide, but at the same time should have a high threshold.
- It is best to make the steam room square, and build a stove in the corner, and it should be as close to the door as possible.
Preventive measures
Method #1. Long natural drying
The best prevention is long-term natural drying of the logs before placing them in the log house. The more uniformly the logs dry across the entire thickness of the fibers, the less likely it is for cracks to appear. The drying rate in the inner and outer layers should be approximately the same. Then moisture from the inner layers will move to the outer ones, and they, in turn, will evaporate it into the environment.
This balance can be maintained if the drying period is at least two years. Dry the logs in a shady, dry and cool place. As a result, wood moisture content should decrease to 18-20%.
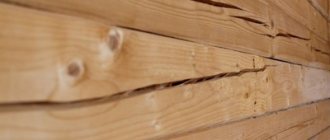
For comparison: when drying logs for one year, the width of the resulting cracks is no more than 6-10 mm, over two years - no more than 1-2 mm. If the logs have been dried for less than a year, the width of the cracks may exceed 10-20 mm.
Method #2. Compensation cut
A cut in the upper or lower part of the log (timber) helps reduce stress in the wood fibers. This type of cut is called compensation or unloading. It is performed along the axis of the log, often on the upper surface. Some craftsmen make cuts along the entire surface, while others do not cut the groove to the ends.
In a log house, the cut is covered with a lying log on top, so moisture does not get into it. When dried, the cut expands. But, at the same time, the number of natural cracks formed is reduced, their depth and width are reduced.
The cut is an even groove 7-10 mm thick, 1/3-1/4 deep from the diameter of the log. The cut can be made using a chainsaw, a router, or a rounding machine.
Method #3. Sealing the ends of logs
The ends of the logs (cutting areas) dry several times faster than the rest of the outer surface. Therefore, during intensive drying, the ends become cracked first. To prevent this process, you need to close the moisture exit through the ends. That is, cover them with sealant. Then the ends will stop quickly evaporating moisture. It will go into the outer layers of the log and from there it will evaporate, but evenly.
Article on the topic: Why is there a barbecue smoking in a closed gazebo?
To cover the ends, you can use drying oil, oil paint, oil varnish, and wax solutions. Previously, the ends were coated with lime to seal.
The need to protect the ends of logs is discussed in the following video:
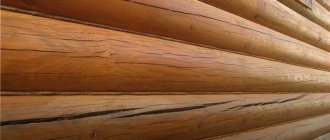
How to properly seal cracks in a wooden frame
Let's consider the process of sealing using modern methods, since few houses have a forest and a swamp near them in order to bring in moss. While the same polyurethane sealant and polyethylene foam cord can be purchased at any retail outlets.
- First of all, we place a cord in the hole between the logs, trying to drive it there as tightly as possible;
- We glue the edges of the logs with masking tape so as not to stain them during the process of applying the sealant;
- It is best to apply the coating with your fingers. However, if you do not have enough experience in this matter, then it is better to use a rubber spatula, which will help make the insulation more beautiful.
Natural materials
Caulking with moss does not spoil the appearance of the building; the material is environmentally friendly and safe for health. Sphagnum is rot-resistant, has antibacterial properties, and retains heat well. Before starting work, dry moss is soaked in water for 30 minutes, then wrung out and rolled into a roller. Fill the cracks with a wooden spatula and compact with a hammer or mallet. When drying, the moss increases in size and completely clogs the cracks; the long hanging ends are cut off.
Other natural sealants used to seal cracks:
- jute fiber in rolls - the material is pushed into the cracks with a spatula, secured with a stapler;
- jute tow with a fiber length of at least 2 cm;
- flax-jute tow in a ratio of 50:50 - the material is hard and not elastic enough, it is difficult to work with.
Flax and jute fibers are prone to rotting and require antiseptic treatment and protection from insects. Birds use natural materials to build nests.
Note! Sealing of cracks with moss or tow is carried out twice: six months after putting the bathhouse into operation, repeated treatment - after a year and a half.
When is it needed for a log house?
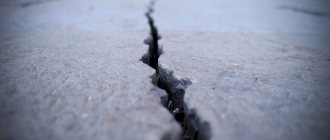
Log structures are susceptible to destruction over time. The initial stage manifests itself in:
- The appearance of cracks in the material.
This happens when under-dried logs are used. The wood shrinks unevenly. Remaining moisture accumulates inside, cracks and crevices begin to form. Water gets into the cracks and stagnates inside. This leads to rotting and destruction of the log. - Age-related changes in the material. Over time, wood loses its technical properties.
- Formation of gaps between the cylinders. If gaps appear between the logs, this leads to heat loss in the room.
Features of caulking using different materials
If you are using moss, the material must first be completely dried and re-moistened before use. To do this, soak the material for 30-60 minutes and squeeze thoroughly. The soaked moss is laid out between the crowns in an even layer so that the ends of the material stick out on both sides of the log or timber. After this, the too protruding and long parts of the material are trimmed and tucked into the cracks of the log house. After a year, re-caulk must be done.
When using tow, it is better to choose rolled tow, as it is easier to use. If you choose tow in blocks, a strip of material is pulled out of the block and a rope is twisted, which is then placed into the seam. Take jute with a fiber length of more than two centimeters. Short fibers fall out easily and are blown out.
Article on the topic: Is it possible to spend maternity capital on building a bathhouse?
Caulking with natural materials is carried out using two methods. The “stretching” method assumes that the material is divided into separate strips and placed in the gaps between the rims. The insulation remaining outside is rolled into a roller and driven into the groove. The “set” method means that the fibers are separated into strands and wound into a ball, and then pushed into the spaces between the logs or beams.
When choosing a sealant, first lay a heat-insulating cord made of polyethylene or jute fiber in the cracks. This will reduce the consumption of the main product and increase the thermal insulation properties of wood. And then sealant is applied over the cord in a wet state with a layer thickness of 4-6 mm.
Then the layer is leveled with a spatula or spatula, and the remains are cleaned with a rag. The sealant is left to dry for two days, while it is important to protect the seam from moisture. You will find detailed instructions for use on the packaging of each product.
Rules of application
Modern building materials are easy to use and can be handled without any experience. The work is carried out in the warm season, when there is no precipitation.
- To seal the joints of logs in wooden log houses, the surface is first cleaned of dirt.
- Next, you need to look at the condition of the wood. If the material has been treated with impregnations or dirt has become embedded in the top layer, it can be removed using any abrasive method.
- The logs are treated with a fungicidal solution to prevent rotting.
- Slots with a diameter of more than 0.5 cm are paved with polystyrene foam. It will protect against moisture getting inside the crack.
- If the mixture is in a tube, then it is filled into the mounting gun. The compositions in large packages are drawn into a gun, like a syringe, and squeezed out in an even layer onto joints or cracks.
- Then the seam is leveled with an elongated thin spatula.
- While the sealant has not set, remove excess with a clean cloth.
- Leave to dry completely for 2-3 days.
Is it possible to minimize the risk of splits?
The only condition that guarantees minimal cracking is prolonged drying of the logs under natural conditions.
Long-term drying of wood:
- Increases the strength of the log.
- Significantly extends its service life.
When drying logs naturally, it is important to ensure their uniform drying, that is, the same drying rate for both the outer and inner layers of the log house.
This can be achieved by creating certain conditions for complete drying. This is a cool and completely dry place in which the logs are allowed to dry out for at least 2 years.
From the appearance of the cracks we can deduce how long the wood has been drying:
- 1.5-2 years: crack size up to 2-2.5 mm.
- 1-1.5 years: the splits are already expanding to a width of 7-12 mm.
- Several months: the cracks become larger and occupy a distance of 12-25 mm.
To minimize the risk of faults, a compensation (unloading) cut is sometimes formed on raw logs. This measure relieves the growing stress on the wood fibers and ensures they dry out faster.
Article on the topic: How to treat a window in a bathhouse
The cut is carried out according to special standards:
- it is performed along the log;
- has the appearance of a neat, even groove;
- has a thickness of 7-10 mm;
- it is made with a depth of no more than 1/4 of the diameter of the log itself.
Choice of insulation
It is important to eliminate the presence of cracks and gaps
What is important to consider when insulating bathhouse ceilings. It is necessary to eliminate the presence of cracks and gaps, perform a vapor barrier, and select the right material for thermal insulation. All this is necessary to create a reliable barrier to heat loss and prevent the formation of condensation.
Important ! Condensation formed in the insulation layer destroys it, significantly reduces its service life, the quality of interior finishing and the service life of the entire structure. Properly selected vapor barrier materials will eliminate such phenomena. Insulation is useless without proper ventilation and vapor barrier.
The use of natural insulation is the main condition for safety and environmental safety, not to mention the discomfort that occurs when chemicals evaporate.
Polystyrene foam, polystyrene, and phenol-based mineral wool are not suitable for insulating baths. But mineral wool made from dolomite fibers is quite suitable for these purposes. We choose from those materials that can withstand heating within 100°. The best choice:
- glass wool, without any impurities, pure glass wool, the kind that is used on heating mains, is not suitable;
- vermiculite made by high-temperature processing of crystals;
- felt, natural, not synthetic, without binding threads, its resistance to high temperatures is record-breaking;
- expanded clay, bulk material, its disadvantage is its impressive weight.
- linen material is one of the most environmentally friendly, is a natural antiseptic, is particularly strong and durable;
- ecowool, a material made from recycled cellulose and wood fiber, to which antiseptic materials are added, is absolutely non-flammable.
- basalt wool, it does not burn, goes to the chimney lining.
The list would not be complete without mentioning the good old grandfather’s methods, including:
- sawdust, clean, free of debris and rot, of medium size fractions; to prevent rotting, it is useful to mix them with ash;
- clay, environmentally impeccable, not subject to rotting, mixed with straw is an ideal option for thermal insulation, the only drawback is that perhaps in a month or a month and a half, cracks may form in it, and the coating will have to be restored;
- Moss is an ideal option, except that it’s a bit difficult to find such material.
It is better to build a bathhouse with an attic room, it is convenient to install a ceiling pie below and above, there is natural ventilation, and finally, in the summer there is no better room for drying brooms; a bathhouse with a flat roof is devoid of all this.
Spacious functional attic
It is important when installing a brick bath that special attention should be paid to sealing the beams; no matter how the ceiling pie is mounted, residual condensation will occur; to preserve the beams, good sealing is needed.
Stages of floor installation in a bathhouse
The bathhouse is usually located on the ground floor; a concrete screed is poured under the flooring. It and the layers of the floor “pie” above must be protected from groundwater. For these purposes, a cushion of compacted sand and crushed stone is poured under the screed; the crushed stone is impregnated with bitumen on top or covered in several layers with rolled (sheet) waterproofing - roofing felt, high-density film. If the floors in the bathhouse are insulated, the insulation must be protected from the penetration of groundwater from below and moisture leaks from above. Even before installing the floor, you need to think about the drainage system. Usually the floors are given a slight slope towards one of the walls or towards the center and a drain hole is made in this place, installing a ladder through which the water will flow into a pipe (gutter) and be discharged into the sewer, septic tank, filter well.
In summer baths, standing on loose and well-absorbing soil, leaky floors are made. Water flows through the cracks between the floorboards or specially made holes and is absorbed into the soil. Under the floor there is usually a backfill made of filter material; it is advisable to additionally lay drainage. If the soil is heavy, drainage is required. Such floors do not require sealing, are well ventilated, their main drawback is the impossibility of insulation.
Here is one of the schemes for installing a non-leakage floor in a bathhouse:
- A rough screed is poured (it is advisable to use concrete with water-repellent additives). The formwork is installed to form a hole for drainage. The ladder is tried on to determine where to make holes for it in subsequent layers.
- After the screed has dried, it is impregnated, coated or glued with waterproofing and applied to the walls.
- A layer of insulation is laid (high-density mineral wool, extruded polystyrene foam) or expanded clay is poured.
- Rolled waterproofing is laid on top, and a drain is installed in the right place.
- A finishing screed is performed, preferably reinforced (for the last layer of waterproofing it is necessary to use dense and durable materials so that the reinforcing mesh does not damage them). The beacons are placed in such a way as to form a slope to the ladder of about 1 cm per 1 m.
- Tiles and porcelain tiles are laid on top with glue. You can install a floor heating system under the tiles in the screed.
Article on the topic: How to insulate the floor in a wooden house with penoplex
Sometimes the bathhouse has wooden floors. This option is more suitable for rooms with a normal level of humidity, where water does not pour onto the floor - a dressing room, a rest room. Wooden floors must be ventilated, so they are laid on joists or sheathing on top of the joists. A ventilation gap is left between the top layer of waterproofing and the wooden covering.
In a wooden bathhouse, it is important to protect the walls from contact with water. To do this, you can make a ventilated box around the perimeter of the floor from timber treated with antiseptics and gypsum fiber sheet. Bars of small cross-section (for example, 20x40 mm) and about 20 cm high are screwed vertically with self-tapping screws to the walls above the floor at a distance of 30-40 cm from each other; the upper ends must first be cut down at a slight angle. GVL strips in two layers are attached parallel to the walls to the front vertical surface of the bars. The upper edge of the strips should be approximately 2 cm below the end of the beam. Wooden planks of such a width as to cover the gypsum plasterboard strips are laid on the ends cut at an angle and secured with self-tapping screws. The result is an inclined surface - a dropper.
At what stages is sealing needed?
Sealing the floor in the bathhouse is an addition to the complex of waterproofing measures:
- if glued waterproofing is performed, the joints of rolled or sheet materials must be sealed so that the waterproofing is continuous;
- if a ventilated box is made, the places where it joins the floor, the joints of the drip elements and the places where it joins the walls are sealed. For ventilation, only a gap is left between the drip line and the vertical gypsum plasterboard sheathing - it does not directly contact either the walls or the floor;
- cracks, seams in the finishing coating, and joints between the floor and walls are sealed to protect the insulation and concrete screed from leaks and water vapor. Due to dampness, concrete gradually deteriorates, the insulation loses its resistance to heat transfer, and fungus may appear under the coating;
- they also need to seal the outlet of communications, in particular the drainage ladder.
If roofing felt or other bitumen-based materials are used for waterproofing, the sealant is molten bitumen mastic, which is used to glue the overlaps at the joints. Film joints are usually sealed with construction tape; some materials at the joints are welded using a special soldering iron.
The lower part of the ventilated box in the corners and at the junction with the floor is sealed with butyl rubber sealing tape. The joints of the drip elements with each other and with the walls are sealed with a paste-like sealant; it is best to use acrylic, for example Accent 136 wood sealant, which is also suitable for sealing seams and cracks in wooden floors. The junctions of ceramic tiles, porcelain tiles and walls and the outlets of communications are usually sealed with silicone sealant. The seams between the tiles are filled not with sealant, but with a special grout.
Finish ceramic tile flooring
Consequences of wood delamination
Small cracks are not capable of causing serious damage to the finished building. But deep defects and damage can cause uneven shrinkage of wood and deformation of the entire structure of the log house.
When eliminating defects, you should not ignore the smallest grooves and cracks, which, under the influence of high humidity, can become a breeding ground for mold, fungal formations and rot.
All this can lead to the destruction of the log house itself and a decrease in its performance characteristics.
How to properly insulate the space around a pipe?
Wooden ceilings are highly flammable, so the pipe should be placed between the beams, preferably in the middle. It’s a good idea to familiarize yourself with fire safety standards when starting to install a chimney. The distance from the pipe to the tree must be at least 380mm.
To ensure that the chimney opening is not too large, an element such as a ceiling assembly is used, which creates an air gap between the heat-insulating material and the iron of the pipe.
Chimney opening
Next, a heat-reflecting screen is installed, this is a stainless steel sheet, in the inner part of which there is a layer of fire-resistant insulation, stone basalt wool. The whole thing looks like a box around a pipe. The box is made from non-flammable materials, heat-resistant magnesite plates.
After installing the box, the space around the chimney is filled with basalt wool. Then a sandwich pipe is installed, the part of the chimney that goes out onto the roof.
Important! Use a sandwich pipe equipped with a spark arrester. This design is somewhat more expensive, but it guarantees a wooden bathhouse from fire.
Correct installation of the chimney
Arbogypsum for sealing cracks in wood
Not long ago, a new material, arbogypsum, appeared on the market, which is not only low cost, but also highly effective in eliminating cracks in wood. Initially, the material was created as a means of filling damaged timber and logs by cracks.
Article on the topic: When will the bathhouse open in Lomonosov
If you decide to use this material to seal cracks and cut zones, then keep in mind that the best treatment for the cracks must be sealed along the entire perimeter of the log house.
- First of all, you need to prepare the tree, and for this you need to treat the cracks with lime and copper sulfate.
- Having completed the preparation, you can move on to the next step - you need to take straw, sawdust and gypsum, mix them in the correct proportions to create a product for sealing cracks and crevices.
- The dry mass must be filled with water to achieve the consistency of a thick paste. After this, the product is ready for use and you can begin to seal the cracks in the wood.
- To make it more convenient for you to process seams and crevices, we recommend that you also prepare a spatula. With its help, you need to treat all problem areas, and then let them harden thoroughly.
- If everything is done correctly, the fillings will not lose their strength for many years and will hold perfectly inside the wood.
Using ready-made sealants to seal cracks in wood
Most often, owners choose ready-made sealants to seal cracks, which can be explained by their ease of use.
They do not need to be specially prepared for processing, so you can immediately begin sealing cut points and cracks in the logs. However, the owner will have to seriously fork out money to purchase ready-made products for repairing the log house. Moreover, their cost will be several times higher than the aforementioned arbogypsum. Typically, one kilogram of finished sealant is enough to process 7 linear meters of wood. After sealing, the seams should be no more than 10 mm wide.
To make it easier to work with sealants, use special tools - construction syringes . This helps speed up the process of sealing cracks in wood, saw cuts and seams between logs and avoid many difficulties.
Article on the topic: How to make a hatch to the attic in a bathhouse
Sealants are very popular as a means for sealing joints, since such work requires a minimum of time and provides a very high-quality result . The fillings not only adhere securely to the wood, but also maintain a presentable appearance.
In order for you to be completely satisfied with the sealant, you need to choose the right one for sealing the seams. The frost resistance, composition and color of the material deserve special attention here.
It is best to purchase silicone-based products . This is due to their greater elasticity. Then you won't have to make any additional efforts to fill all the voids inside the crack.
How and with what to effectively solve the problem
But what to do when cracks have already appeared? There are many ways to help quickly and efficiently deal with this problem.
Sealing with putty
Of course, it will not be possible to completely get rid of the cracks that have appeared. But it is possible to completely seal them and prevent the risk of growth.
You can use one of the following sealing options:
Sawdust and PVA mass
This is a homemade sealing impregnation, which is the most affordable. Its components are mixed in the proportions necessary to form a thick base, similar to putty. The mixture is used to completely fill the cracks (if after drying part of the mixture falls off, this place is re-filled with homemade putty). For convenience, use a regular spatula.
wood chips
It is used to seal very deep and large cracks. It is better to select chips of the same length as the logs. The pieces of wood are first sharpened with a wedge and hammered tightly into the splits. The top is additionally reinforced with ready-made putty or homemade PVC putty.
Gypsum with sawdust or crushed bark
This mass is also called “arbogypsum”. This method of sealing provides the log with durability and reliability. To make the mass, dry gypsum powder is mixed with bark or sawdust. The mixture is thoroughly kneaded and diluted with water (the volume of liquid is equal to 1/2 of the gypsum mass). The finished putty is dense and very elastic; it must be mixed to destroy lumps. To enhance penetration, add a little regular shampoo. The crevices are covered immediately after the mass is made (it hardens instantly).
Moss
For larger splits, use moss caulk. Moss is an environmentally friendly and completely safe raw material. It will cover the cracks perfectly. It will also additionally retain heat in cold weather, blocking the access of cold air. Dried moss is used for putty. Before use, it is soaked for 20-30 minutes in clean water, squeezed out and rolled into strong rollers, which are placed in the cracks. Using a mallet, hammer it in more tightly until the layer springs back. After 3-4 days (during this time the moss dries out), the excess material is carefully trimmed off.
All these methods from folk craftsmen will ensure quick and reliable sealing of cracks using readily available means. But don’t forget about ready-made drugs.
Choosing putty
To carry out work on the surface of logs, it is necessary to use products that, in addition to reliable sealing of seams, will protect the surface of the log from frost and rain.
Expert opinion
Levin Dmitry Konstantinovich
Water-based putty, which is thick, will adhere much better and stronger to wood than liquid compounds that contain solvents. Such (liquid) putties are best used for sealing faults that are too large and deep.
There are three types of putties for processing log houses:
. With no odor and good environmental performance. It is easy to apply and dries instantly without allowing moisture to pass through. At the same time, acrylic putties also level the surface and, after drying, do not shrink (dry without cracks). They are best used for sealing small cracks.
Acrylic- Water resistant . It is famous for its high resistance to aggressive manifestations of the external environment (rain, snow, high humidity and temperature changes). Waterproof products are prepared on an adhesive, polymer or oil base, which guarantees good application and quick drying. They are best used when subsequent coating of logs with varnish or paint is planned.
- Plaster . It provides a good microclimate, is environmentally friendly and easy to use, it is better for sealing cracks in logs inside a building. After application and drying, the seam can be further sanded and painted.
- Non-shrinkable . The most durable and high quality of all other types. It is worth working with when sealing serious, deep cracks. By the way, you can choose the color of the non-shrink putty to match the wood being processed - it is available in a variety of colors.
Additionally, it is worth studying the rating of the best manufacturing companies producing putties for sealing cracks in log logs:
| Brand | Advantages | Flaws |
| Tikkurila (Finland) | resistant to temperature changes and humidity, cold-resistant, | high cost, |
| Extra (Russia) | allowed to be used to close faults, both internal and external | Almost all types of putties are acrylic, and they are not suitable for sealing deep cracks |
| Eurotex (Russia) | Nice packaging and packing, it’s easy to work with, the mixture fits perfectly and dries quickly | shrinks after drying, poor color palette |
| Parade (Russia-Sweden joint company) | increased water resistance, easy to apply, after drying can be sanded and sanded | excessively liquid composition, which is inconvenient when sealing cracks, spreads |
| Rainbow (Russia) | dries quickly, is moisture resistant and has low shrinkage | You can work with it only at a temperature of +15⁰С |
Choosing a sealant
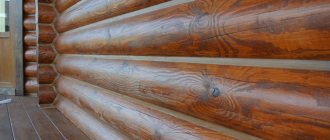
Sealants are another common substance that helps to properly seal log cracks. They will additionally insulate the building and are guaranteed to stop the occurrence of new chips in the logs.
When applying sealant, pay special attention to the processing of the ends (they dry out faster than other areas). The ends can also be sealed using drying oil, varnish, oil paint or wax.
The main advantage of this material is the ease of application and the speed of filling cracks. When selecting a suitable sealant, take into account the composition, its technical parameters and color palette.
The following types are used to close splits:
. Resistant to temperature fluctuations and high humidity. This product is environmentally friendly and odorless. It is better to use it for filling internal cracks.
Acrylic- Silicone . A universal substance created for work both inside and outside buildings. Resistant to temperature changes and aggressive external environments. But they are not designed for subsequent painting, although this is not a problem, since manufacturers offer silicone sealants in an expanded range of colors, including transparent ones.
- Bituminous . The most resistant sealant to moisture. It contains rubber and bitumen. Similar products are used to close splits in wood roofing and drains.
- Polyurethane . It has high strength, is resistant to moisture, is a very elastic material, and is easy to work with. But take into account its harmfulness due to the presence of certain additives in the composition. Therefore, it is better to use it for work only on the outside of the building.
When choosing, you need to understand the manufacturers offering popular types of sealant:
| Brand | Description | Add-ons |
| Neomid (Russia) | has high elasticity, resistant to moisture and temperature changes | it is possible to seal fractures with a deformation of 15-30% |
| Eurotex (RF) | a particularly resistant and elastic substance, it can be used with end-side splits | acrylic appearance, additionally provides protection against insects |
| Remmers (Germany) | resistant to aggressive environmental influences, temperature changes, well compatible with paint and varnish coatings | designed for sealing cracks inside and outside buildings, available in transparent and colored versions |
| Ceresit (Poland) | resistant to humidity, temperature changes, gives minimal shrinkage | are produced in the form of silicone/acrylic compounds |
| Check Mate (America) | belongs to elite materials, perfectly protects wood from mold and moisture, gives little shrinkage | acrylic compounds with good elasticity |
When working with sealing compound, do not fill cracks to the brim with it. It is necessary to apply the mass so that it touches only in two places, connecting the opposite parts of the split. When it dries, it will fill the crack on its own.
Adviсe
A log house is the most common option for constructing such a building. The assembly process itself takes a little time, especially if all the preparatory work was carried out efficiently.
Although it is possible to build such a house yourself, it is better to consult with an experienced craftsman before starting work. It is necessary to take into account every little detail, because the strength and safety of the new building may depend on it.
Of course, reviews about this cutting method are contradictory. But it is supported not only by its obvious, well-known advantages, but also by the fact that this method is still the most common, despite certain difficulties and disadvantages inherent in it.
A reasonable approach to business, strict adherence to all the necessary rules will help you successfully complete this work and get a warm, cozy, durable and safe log house.
See below for information on how to cut into a paw.
Property of jute
Jute fiber is extracted from the stems of jute, a herbaceous plant belonging to the linden family. The growing area of jute is quite extensive; it is cultivated in Asia, Africa, Australia and America. India is one of the main suppliers of jute to the world market. In this country, jute fibers have been used to make fabrics and clothing since the 18th century.
Jute fibers are less elastic than flax, and the fabric they make is rough and tough, so jute is widely used as a raw material for the manufacture of ropes (twine, ropes) and packaging fabric (burlap).