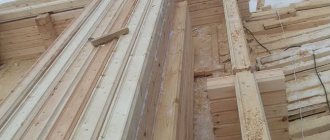
Our great-grandfathers built log houses using only natural materials. In those days, there were no sealants or modern insulation materials, so we made do with what was at hand. But the artisans nevertheless made a certain selection, otherwise the log houses would not have stood for so long. The rules, tested over decades, and the secrets passed down from generation to generation are not lost. For example, such a material as moss for log houses still remains relevant and irreplaceable, the collection, drying and laying of which is carried out using old technologies, practically without changes.
Moss selection
Two varieties of mosses grow in Belarus, differing in appearance and performance characteristics: sphagnum and cuckoo flax.
Sphagnum
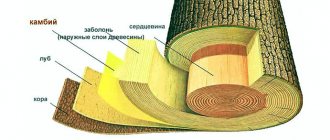
Sphagnum, or white moss as it is also called, is found in coniferous forests and wetlands. The plant has a long pile - green at the top and whitish at the bottom. The roots are short and unbranched (after they die they turn into peat), so collecting the tops is not difficult.
White moss is hygroscopic and not very durable. To insulate a log house, the material must be purchased with a reserve, since when it dries it greatly decreases in volume. With prolonged use, sphagnum caulk crumbles.
Kukushkin flax
It grows in the lower reaches, on forest edges, and in swamps. The plant received its name for its external resemblance to flax: it has tall reddish stems with bright inflorescences. Unlike white moss, red moss is more reliable and durable as insulation for wooden structures. It is dense, elastic, and absorbs little moisture.
How to prepare: collecting according to the rules
The idea of moss stabilization has Scandinavian origins, which is not surprising given the amount of shady forest, peat bogs and tundra in these countries. Various types of moss grow in these areas. In central Russia, everyone collects the familiar forest moss, but in the northern regions it can be replaced with moss (which is sometimes called Icelandic moss, although it is a lichen).
If you set out to stabilize moss at home in order to create an original design, first you need to get the moss. There are rules for collecting moss that help maintain the delicate balance of the ecosystems where it usually grows. If you do not want to upset the balance and at the same time collect plants suitable for further processing, you must adhere to the following rules:
- It is advisable to harvest not near water, but in relatively dry places: on fallen logs, stones, stumps. There the plants are less tender and tolerate the stabilization process better.
Preparation of natural material Source pinimg.com
- If you are collecting material in a city park, try to move away from dog walking areas.
- The thickness of the layers together with the root system should not exceed 2-3 cm (the rule does not apply to moss).
- They try to remove the moss in layers; however, it is not recommended to expose a large area in one place.
- The collected layers are carefully cleaned of large debris and placed in a plastic bag or box so as not to be crushed.
- At home, the plants are washed in water (preferably in a basin), freeing them from soil and small insects. This can also be done in nature if there is a stream at the collection site.
- After water treatments, the plants must be completely dried. Drying may take 2-3 days. Express drying (for example, with a hairdryer) is not recommended - the plants may acquire unnecessary fragility, which cannot be eliminated later.
Lampshade for eco-interior Source vid-stroy.ru
Pros and cons of moss insulation
Construction moss for log houses is more effective compared to another natural material - tow. It is impossible to evenly fill the gaps between the crowns, which is why the tree wears out faster under the influence of external factors. Tow is often pulled out by birds and small rodents to make nesting sites.
Moss is preferable in the construction of log houses due to a number of advantages over other insulation materials:
- thanks to the long fibers, it is easily collected into dense bundles and is convenient to work with;
- environmentally friendly, does not contain toxic additives, smells pleasant;
- due to the antiseptic component (sphagnol), it protects the tree from parasitic organisms;
- absorbs moisture well and quickly evaporates it when wet, preventing the appearance of fungus and rotting of logs;
- retains heat well and at the same time provides air exchange to the walls.
Moss also has its drawbacks. It is difficult to find it on the open market, and collecting and drying it yourself is a rather labor-intensive process.
Caulking technology
Seam sealing is divided into 2 types, which complement each other:
- Stretch. This type of seal received this name because the material is located along the seam with interlacing fibers. Used for primary caulking. The sealing material is placed with fibers perpendicular to the frame. After building a house, the gaps are small, and it makes no sense to push in a thick layer of insulation. The hanging parts of the material are carefully pushed into the seams.
- Into the set. This method is used after the structure has settled, when noticeable cracks have formed. The process is labor intensive. The fibers of the material are collected in a heap, twisted and pushed into the gap. The size of the rollers is different, because the slots are different (sometimes larger, sometimes smaller).
When carrying out the first caulking, you should not skimp on materials, but you cannot lay a thick layer either. After the secondary compaction, after about 5 years, when the log house finally shrinks, you need to caulk all the seams again. In your work you can be guided by the following sequence:
- Clean the seams from any debris and old worn material.
- Check the caulk one by one (along the perimeter of each row) for any distortions, cracks, or crevices that have appeared.
- Work must begin on the outside of the log house, and then on the inside.
- Do the caulking carefully: fix the edge of the material in the crack, use caulking and a hammer to push the material. This is done in several approaches. If you try to hammer in the entire roller at once, skew may occur and the seal will be broken. The same operations are carried out inside the house.
- You need to move from the lower crown to the upper one.
Preparing moss for interventional insulation
The quality of thermal insulation largely depends on the conditions of raw material procurement. Both types of moss are collected in the fall, when there are not many snails and insects in the plant material.
- For sphagnum, the optimal collection time is a clear sunny day. When moisture is lost, its thermal insulation properties do not deteriorate, so it is not afraid of bright rays.
- It is advisable to collect red moss for log houses in cloudy weather, as it is sensitive to ultraviolet radiation. It is better to harvest raw materials not in a swamp, but in a forest area, under trees: there the moss is less wet and dries out faster in the future.
Briefly about the main thing
Stabilizing moss at home allows you to use natural material to make a variety of decor. In order for the result to be high-quality and long-lasting, you should start with the correct harvesting and preparation of layers of moss or reindeer moss.
At home, plants are stabilized in two ways: with glycerin or a mixture of glycerin and methyl alcohol; the second method takes less time. Dye is added to the mixture to maintain the rich shade. Properly preserved plants look natural and remain flexible.
Ratings 0
Rules for drying building moss
To prevent the collected moss from becoming moldy, it is sifted to remove soil, leaves and foreign plants are selected. After this, the material dries naturally within 1-3 weeks, depending on the degree of humidity.
- For drying, Kukushkin flax is laid out in a continuous strip on any base. Ready-made red moss is laid as roll-type insulation between the crowns of the log house.
- Sphagnum is placed in small bunches so as not to disturb its fragile structure.
If the drying technology is followed, the dry moss curls into a rope, but does not break. The finished insulation is collected in bags.
Where to buy sphagnum moss
You can purchase the substrate at any flower shop. Dry substrate needs pre-treatment. All that is required is to clean, rinse under running water, squeeze thoroughly, and place on the bottom of the container. You can place it in boiling water for a while.
Dry substrate needs pre-treatment
Sphagnum can be placed on the main soil in spots. Create islands and hummocks. If desired, you can cover the entire bottom. Use as a main filler. The thickness of the layer should be from 5 to 10 cm. This will allow gastropods to burrow without problems. Once a week, the filler is thoroughly washed. Moss tends to get dirty. Every 1.5-2 years the moss must be replaced.
Laying insulation when assembling a log house
To make the dried material more pliable and easier to take the shape of the groove, after unpacking it is folded into a stack and periodically sprayed with water from a sprayer for two days. Caulking a log house with moss has its own characteristics, taking into account the type of plant material.
- Bunches of sphagnum are carefully fluffed with your hands and given the consistency of cotton wool. Next, the white moss is evenly distributed over the crown, placing the stems perpendicular to the logs.
- Each subsequent bunch is laid with an overlap in relation to the previous one, so that the row is dense.
- Ribbons of red moss are laid across the logs, also maintaining overlap.
- The layer thickness should be at least 10-15 cm.
- At the joints of the logs, the insulation is installed, extending it along the edge by 40 mm, and between the tiers the moss should hang down by at least 10 mm. Subsequently, the edges are folded and the seams are sealed.
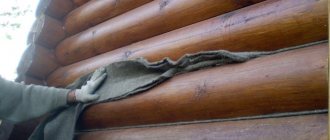
Moss, a wedge with a mallet and a lot of diligence - that’s what caulking is
What does it mean to caulk a log house with moss? You have to walk meter by meter with a mallet (a special carpenter's hammer) and a caulk (this is a wedge with a handle) along the crowns, first tucking and driving in the protruding natural seal. Having tapped a certain area along the seam until it is completely compacted, you can already see the voids and cracks that have formed. Then the moss prepared for caulking is first dried and then moistened. And repeat the procedure of filling the cracks again using a mallet and caulk. Having passed the crown completely around the outside, this procedure must be repeated along the same crown inside the log house. Step by step, crown by crown, to avoid distortion of the frame. There is also a small nuance - the bowl must be caulked immediately after placing the logs in it. Yes, the procedure is not easy; you cannot use a mechanical method and insulate the house in one day, as is the case with ecowool. But there are other goals and other solutions. My bathhouse should be more than just warm. I could achieve this by insulating it with ecowool, the properties of which: thermal insulation, durability, hygroscopicity are very similar to the properties of moss. But I want more forest spirit, and life-giving!
Sybarite C©
How to insulate the ceiling and roof of a log house?
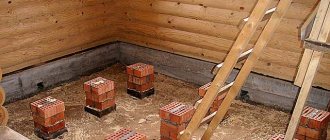
The first step is to insulate the roof and ceiling. If you have a one-story house with an attic, you will need to lay a waterproofing film on the attic floor, and then pour a 20-25 cm layer of insulating material on top. For this purpose, it is recommended to use eco-wool, glass wool, seaweed or sawdust. There will be no need to cover the insulation material. You can lay boards on top to make it convenient to move around the attic. It is not necessary to arrange the floor.
If instead of an attic the house has an attic floor, then it will be necessary to insulate the interfloor ceiling and roof slope. You will need to lay 5-9 cm of insulating material in the ceiling. If the attic flooring is made of wood, then the insulation will need to be filled between the joists. If the floor is concrete, you will need to use basalt wool or polystyrene foam. To insulate the roof slope under the roof, you need to lay a waterproofing film, then lay a 15-20 cm layer of mineral wool. A membrane is laid on top of the insulation. Next, the sheathing and finishing materials for the attic are installed.
If you do all the above steps, the house will be warm.
Floor thermal insulation device
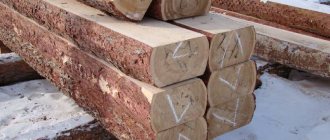
First, they begin to install a waterproofing barrier. Then the vertical sheathing is installed. It is made from timber with a section of 5 * 5 in increments of thirty centimeters.
Note: Before installing the sheathing, the timber is treated with a special antifungal agent.
Before laying mineral wool on the sheathing, it is cut into strips of the required length and width, twenty millimeters greater than the distance between the beams. Each strip is carefully laid and firmly fixed with anchor bolts. A vapor barrier film is installed on top with an overlap of up to ten centimeters using a construction stapler.
To cover the heat-insulating layer, sheathing with 3*4 cm bars is also arranged. The walls can be covered with wooden clapboard. For thermal insulation of walls, you can also use ecowool, glass wool and polystyrene foam.
The process of wall insulation can be divided into stages:
- Cleaning the surface from dust and dirt;
- Sealing cracks with foam, linen felt or tow;
- Treatment of timber for sheathing with antiseptics;
- Installation of timber lathing;
- Mark where the outermost elements will be installed, since the evenness of the entire structure will depend on the design of the first bar;
- Fastening the bars with screws and dowels in increments of 25 to 30 cm;
- One meter is measured from the starting block and the second is attached parallel to the first. And so on around the entire perimeter;
Note: In the locations of the windows, the bars are trimmed around the window opening.
- Insulation is laid between the sheathing;
- Then a vapor barrier is made on top of the insulation using film or polyethylene.
- Wall sheathing using plasterboard, which is screwed to the sheathing beams.
Note: It is not recommended to use a metal frame for lathing, since metal has high thermal conductivity.
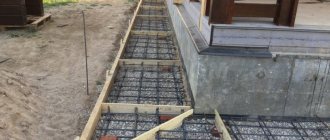
Floor insulation helps create warmth and comfort in your home. Here it is very important to follow the technology of installation of flooring on the ground. First, the bedding is done, then the waterproofing is installed, and then the insulation material.
If the floors are wooden, thermal insulation is laid between the joists in a layer of one hundred to one hundred and fifty millimeters. Then rough or finished floors are installed. And if it is necessary to insulate concrete floors, this can be done using the raised floor method. To install a raised floor, first begin by leveling the surface and eliminating defects. A waterproofing membrane is spread on the concrete surface, logs are laid with a pitch between the beams of up to fifty centimeters.
With the help of beams, the floor is divided into even lines. The voids are filled with insulation, on top of which a membrane is placed and a flooring is made.
Often a log house is insulated with a heated floor system.
Before proceeding directly to the installation of a heat insulator, a number of actions are performed that will stop or slow down the process of wood destruction, as well as reduce heat loss. To do this, do the following:
- Carefully inspect the external walls.
- Remove rotten areas.
- Fill deep imperfections on the log with patches.
- The gaps between the wall parts are caulked.
- The prepared base is treated with antiseptic solutions.
It would also be useful to coat the wood with antiseptic compounds that resist the development of fungus and mold. Some also protect against insects. Such measures will help maintain the strength of the supporting structure much longer.
Application
Technique for laying inter-crown sealant on a log
Let's look at how to properly use the material in your work.
Moss must be laid in the following way:
- If it is dry, then tamp it in a barrel and fill it with 20 - 30 liters of water. Leave for half an hour, drain the water, and squeeze out the moss.
Remember! Dry moss does not allow itself to be manipulated, so pre-washing will allow the material to become more pliable.
- Take ready-to-install moss.
- Lay it across the log without compacting it. Please note that the seal must lie evenly.
- Make sure that the width of the layout is 200 - 250 mm, and the thickness is 40 - 50 mm.
- Laying in the bowl is made with a thickness of 4–5 cm, and the protrusion beyond its limits is 5–10 cm.
Advice! Lift one end of the log and place it on the bowl, then lift the other end, about 50 - 60 cm higher from the place of laying, so as not to move the moss, and release it into the opposite bowl.
- Tap the entire surface with the headstock.
- Perform all subsequent actions as described in paragraphs 2 – 7.
- Take a construction stapler and secure the laid material every 30–40 cm.
Tow is less problematic to work with, since the finished canvas does not require additional time for cleaning and even laying on the log.
Tape jute is especially convenient to use.
It differs only in the installation methods:
- If the timber is for a bathhouse, profiled, glued, then we lay the insulation without bends. We don't use a stapler.
- If the log is ordinary, profiled with natural moisture, then the material must be folded once with a lock. Make sure that the canvas does not extend beyond the edge of the end.
- If the bathhouse is built from a wild log house, a fire monitor structure, or from a milled log, lay the tow in two layers. Use a stapler to secure the fabric.
Attention! Crumpling the canvas is prohibited, as this leads to poor shrinkage and further damage to the wood.
Log caulking technology
Caulking is a stage in the construction process whereby gaps and crevices are filled with a special material to prevent the inside of a room from coming into contact with the outside environment.
Caulking of a stretched log house.
The goal of the work is to fill the visible cracks tightly, without gaps.
- Select a specific area as the primary task.
- If the material is in a log (just insulated), push the protruding part into the gap.
- Take the caulk in one hand and insert the tool into the crack.
- After it stops falling into the gap, proceed to tapping it with a mallet.
The caulking process goes like this.
- Next, compact the next section on the same log, and so on, along the entire length in a circular direction.
- After external caulking of the bath, proceed to the internal filling.
Remember! One log needs to be compacted, both on one side and on the other.
Modern caulking tool.
After 12 months the process must be repeated.
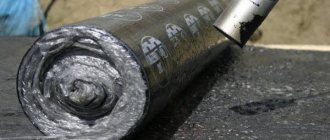
Jute for laying crowns
In cities where harvesting moss is more problematic, jute is becoming increasingly popular. Felt and tow, made from the fibers of the annual plant of the same name, are replacing traditional moss with might and main. Jute, like moss, has been known to mankind for a very long time. Since ancient times, fiber has been produced from the stems of this plant, which was used for the production of durable, coarse fabrics, ropes, mats and other useful things, but even in our time, jute has not lost its value. To insulate the inter-crown space, jute tape is now being produced - a modern and easy-to-use felt-like material made from jute fiber with the addition of a certain amount of flax to give the material additional strength and flexibility. Using this tape is very simple - just roll it out and secure it with construction clips in the bowl of the log and place the crown in place.
What is good about jute? Although it is not superior to moss in terms of heat retention, it is not inferior to it. If the jute production technology is not compromised in any way, it is also no less environmentally friendly than sphagnum or cuckoo flax. Jute significantly reduces the time spent on building a log house, is very durable, hygroscopic and contains the substance lignin in its fibers, which prevents rotting of both the insulation material itself and the wood.
In ordinary log houses, the use of felt jute tape is not very practical, because... the homogeneous structure of this material, unlike moss, is unable to adequately fill all the irregularities and cavities of the log, which, in turn, can lead to some heat loss in the room. However, if you use a rounded log, profiled or regular timber for assembly, the jute tape performs best, perfectly filling flat surfaces and, again, speeding up the assembly time. So which is better, flax or jute? We will probably never get a definite answer, but we have nevertheless come to certain conclusions.
For classic hand-cut log houses, building houses and bathhouses of an old design, moss in combination with flax tow is still best suited, but for rounded logs and timber you can safely use jute tape, flax-jute, and, of course, the same moss. High-quality insulation of log walls will allow you not only to enjoy warmth and comfort on long, winter evenings, but also to significantly save on heating the room, consuming less electricity or gas. In an era of endless tariff growth, this may turn out to be a good insurance against unnecessary expenses in the future. In any case, it will never hurt to consult with a practitioner who has experience working with all the mentioned insulation materials and building materials, and only after that start building your favorite home!
What's better?
Photo: jute spacer between the beams.
Photo: moss is sold in plastic bags. This moss is very popular as a lining for hand-chopped wooden log baths.
It’s not easy to answer which is better, moss or jute. Each of them has its own advantages. They are excellent environmentally friendly insulation materials that are not capable of causing harm to the health of residents or visitors of the bathhouse. They provide good air circulation in the house or bathhouse and are able to control the degree of humidity. Their main characteristics are similar, only in jute they are less pronounced. If we talk about the installation process, then with jute insulation it will be easier, and the work will progress faster. And it will not be easy to deal with sphagnum or red moss without experience working with them. There are also differences in their cost: if you have a limited budget, it is better to take a closer look at moss, and if you have enough money to buy jute, then you can consider it. But to insulate a bathhouse, it is still advisable to purchase moss, only due to its ability to absorb large amounts of moisture, which can prevent rotting of the wooden material. And both moss and jute are perfect for the home.
Photo: such a forest gift is well suited for assembling a log bathhouse from logs.
Tips and tricks for protecting a log structure
This procedure includes the following steps:
- Treatment with an antiseptic (from rotting, insects and rodents).
- Installation of a fire retardant layer (for fire safety purposes).
- Finishing (priming and coating).
The correct process allows you to maintain the beauty and safety of a wooden house.
Insulation of a log house from the outside necessarily includes caulking, thermal insulation of walls, ceilings, window and door openings. Further work depends on the design, purpose and age of the building. All processes can be done with your own hands, but to ensure guaranteed insulation from the cold, the owner of a residential building should contact specialists.