One of the main criteria for a comfortable life in a home is the optimal temperature level, as well as a suitable humidity level. Properly installed layers of heat, moisture and vapor insulation will help ensure good performance. Moreover, correctly laid layers not only improve the microclimate in the house, but also protect the floors from the effects of various factors, including humidity. How to properly install a vapor barrier on the floor?
Floor vapor barrier
Hydro-vapor barrier film
How to properly install a vapor barrier on the floor
Diffusion membranes
The most expensive material used for durable and high-quality vapor barrier is diffusion membranes. People called them “breathing”.
In such membranes, regulation of the moisture level is achieved by allowing air to pass through on one or both sides, so the membranes come in single-sided and double-sided varieties.
When laying a one-sided membrane, it is important not to confuse the side that is applied to the insulation. This aspect is not taken into account if a double-sided membrane is used
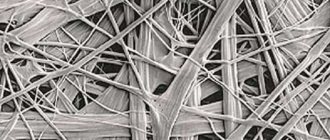
In terms of its microstructure, the membrane is a non-woven material made from artificial fibers that provides a significant coefficient of vapor permeability. The membrane is classified by the number of layers - there are one, two or three layers. In addition, there may be an additional anti-condensation layer, which is responsible for the accumulation of moisture and its further evaporation.
Among the breathable membranes, the most popular and versatile are multilayer smart membranes that allow you to regulate vapor exchange, taking into account the level of humidity and room temperature. Such membranes simultaneously have the qualities of waterproofing, vapor barrier and thermal insulation.
In addition, when using breathable diffusion membranes, there is no need to create a gap between the membrane and the insulation, which saves space and greatly simplifies installation work.
But the material also has a drawback - its high price. However, the simplicity of installation work, durability and reliability of the vapor barrier make it possible to recoup its cost. The use of diffusion membranes provides durable and reliable protection of the floor from moisture, increasing the performance of the structure.
Video description
About the membrane installation technology in the following video:
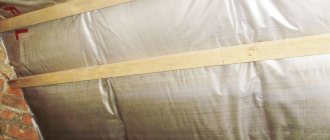
The main condition for installation is that the film is fixed without tension, with a sag of approximately 2 cm. The reserve is created due to the ability of the wooden frame to change its dimensions with the change of seasons (with changes in humidity); otherwise there is a risk of the film tearing.
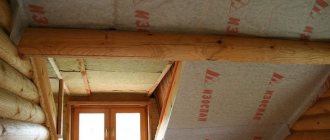
For horizontal installation, installation is carried out from above (from the ridge)
The strips are laid with a reverse overlap (the lower strip overlaps the upper), for additional protection of the insulation; they are connected with tape and secured to the structure with galvanized nails or a stapler. If the thermal insulation layer is not dense, the rolled sheet is fixed using slats, which must be antiseptic. Particular attention is paid to junction points (attics, windows, hatches, pipes, ventilation ducts); they are isolated especially carefully.
Fixing the filmSource pro-uteplenie.ru
Vapor barrier for floors in a wooden house
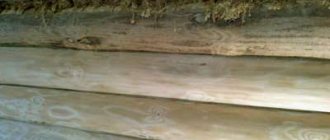
In a wooden house, the ground floor floors are prepared on the ground. The design of the floor is very simple and is a multi-layer cake of the following type: “dirty” floor, wood blocks, hydro-, steam- and thermal insulation, finished floor and floor covering. The floor structure itself is placed on supporting brick pillars or concrete. Between the wooden floor and the ground there is an underground space that has its own ventilation.
It is recommended to create a vapor barrier for a wooden floor during the construction stage of a house. Of course, sometimes it is necessary to do a comprehensive repair of an already finished one, but in any case, the creation of a vapor barrier begins with the preparatory stage.
Preparation work
If, for example, a house is being built from scratch, then there are fewer worries. The very first thing is that all floorboards are made of wood.
should be treated with a special composition against rotting, fungi and insect pests. This is especially true for the cross beams and base floor, since they are closest to the ground. Secondly, you should replace the wood blocks and refine the “dirty” floor, on which the steam and thermal insulation will lie.
In case of major repairs or development of a vapor barrier for an already finished wooden floor
you need to do the following. The very first thing is to remove the old floor covering and finished floor, remove the thermal insulation and what previously could have been a vapor barrier. Second, check the condition of the base floor and cross beams for rotten or sagging boards. If such are found, then it will be necessary to completely or partially replace them and treat the wood blocks and the “dirty” floor with protective agents. Only after they have been repaired and put in place, we begin laying the vapor barrier.
Laying vapor barrier on the floor
All work on laying vapor barriers is a primitive set of sequential actions; they do not require any special skills or knowledge. For vapor barrier of wooden floors, film materials are usually used, one of the light representatives of which is vapor barrier
Izospan B floors and Izospan membrane fabric.
We lay the Izospan vapor barrier on the “dirty” floor, gluing the joints with specialized tape
We lay the Izospan vapor barrier on the supporting frame of the base floor, making sure that the sheets overlap one on one, and the overlap width is 15 - 20 cm. To fasten the Izospan vapor barrier, you can use zinc nails or a specialized construction stapler, but many manufacturers of “breathing” vapor barriers films and films, it is recommended to use specialized adhesive tape. Therefore, when purchasing a vapor barrier, you need to clarify the method of its fastening. A positive quality of the tape is the ability to create a solid coating without cracks or joints. To do this, we simply glue the overlapping areas.
Important! When laying the vapor barrier, make sure that it is laid with the required side facing the thermal insulation. Otherwise, moisture will accumulate and spoil the heat insulator.
We lay the Izospan vapor barrier on top of the heat insulator, seal all the cracks and joints with tape
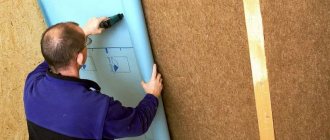
We lay a thermal insulation layer on top of the vapor barrier. This can be mineral wool, polystyrene foam or any other material for thermal insulation. The main thing is that it fits tightly to the cross beams, and there are no gaps or cracks between them. We again lay a vapor barrier layer on top of the heat insulator, making sure that the sheets overlap. After this, we glue the joints and begin installing the finished floor and floor covering.
Wood flooring is very demanding to work with and puts forward strict requirements for its own protection from the negative effects of a variety of factors. First of all, this concerns the level of moisture, since wood is very sensitive to it. However, thanks to today's technologies and people's desire to create reliable and durable structures, hydro- and vapor barrier materials have emerged. They are easy to install and perfectly protect wood from damage, and their scope of use also extends to roofs and walls of wooden houses.
In the case of using foil vapor barrier, first of all, keep in mind the fundamental point: it should be laid with the metallized side up, so that heat is repelled into the room, and also lay it end-to-end, gluing it with aluminum-based tape.
Damp wood and harmful fungi
It is no secret that wood is very quickly attacked by mold fungi if it is always wet. The tree ceases to be strong enough after just a few months. If you start the process and ignore it for a couple of years, the fungus will spread and the material will turn into dust. The most important condition for mold development is optimal amounts of moisture. Therefore, in order to keep the floor of your home in optimal condition for a long time, it must be protected from high humidity.
The absolute humidity of freshly felled coniferous trees is about 90%, of a log house before installation - from 25 to 35%. As for a wooden floor, its absolute humidity under normal conditions throughout the year remains at 10-20% - everything is connected with the current time of year. It is worth saying that the fungus begins its activity when the humidity rises to 22%, and this is only a couple of percent more than the maximum natural state of the tree. By the way, this environment is also optimal for the wood-boring beetle to take a fancy to the log.
With constant high humidity, the wood will lose strength, mold and mildew will begin to appear.
Note! Under no circumstances should the wood be over-wetted as this will cause the structure to decay.
If there is too much water in the tree, it will begin to rot.
Do-it-yourself installation of floor vapor barrier in a wooden house
Most often, floors in a wooden house on the ground floor are made directly on the ground. Often a very primitive design is used, when a subfloor, joists are laid, then vapor barrier, thermal insulation, waterproofing, then the finished floor and only then the floor covering. This entire structure rests on support pillars made of brick, concrete or stone.
The underground, which is also the space between the wooden floor and the ground, is equipped with its own ventilation. Typically, vapor barrier of the floor is done during the construction stage. If the house is already in use and a major renovation is required with the obligatory reconstruction of the vapor barrier, then the installation begins with preparation.
How to vapor barrier a floor on vaults or reinforced concrete slabs?
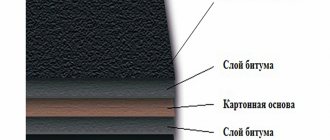
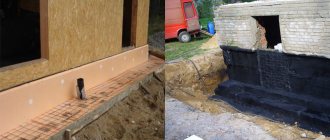
Although the procedure is the same everywhere, this version should be analyzed separately. If the vapor barrier film will be laid on vaults or reinforced concrete slabs, then a different type of material will be required - for example, rolled materials made on the basis of bitumen or any other mastic. You can also use polyethylene made from mastic based on a bitumen polymer. Yes, and polymer-bitumen mastic, applied several times to the surface, will allow you to obtain a high-quality, uniform layer.
The action algorithm for this case is given below.
- Remove the previous coating from the ceiling (if any); for example, paint or whitewash.
- Inspect the surface for visible defects (potholes and cracks), and carry out repair work if necessary.
- Clean the surface from dirt and dust.
- Apply mastic to the surface.
- Lay rolled vapor barrier. Spread it out, place it overlapping, and then secure it well.
Choosing a vapor barrier
In the process of arranging floors and other enclosing structures of a wooden house, it is necessary to select and buy one or another type of vapor barrier film. Considering the variety of types and offers on the market, a logical question arises: “which vapor barrier is better?” The answer to this cannot be unambiguous, since the correct choice is made only based on compliance with the following requirements:
- Firstly, the technical characteristics of the vapor barrier itself.
- Secondly, the operational characteristics of the room or fence where the vapor barrier will be installed, and their compliance with the previous paragraph.
- Thirdly, the cost of the film itself.
- Fourthly, the volume and price of installation work (it was previously mentioned that polyethylene/propylene films, according to the manual, require a ventilation gap, which complicates the installation of a wooden floor).
Practical installation recommendations
It is better to lay the floor on transverse beams - logs. In this case, the ceiling itself will have a spherical structure - a kind of motley “Napoleon pie”. The layer diagram looks like this:
1. Logs and cranial bars. The former are used as support and fastening beams for the main covering, as well as providing the required rigidity. The second is laid on both sides of each joist to ensure clearance of the subfloor boards or slabs from the ground/foundation.
2. Primary floor layer. Placed on the previously mentioned bars. It can be organized from boards or slabs (for example, OSB).
3. Waterproofing. The first barrier layer that prevents water from penetrating into the “pie” from below. The individual elements of the roll are laid with an overlap (150–200 mm), and the connection is made using double-sided tape.
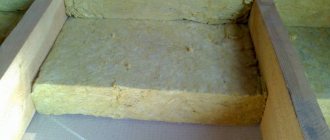
4. Insulation. The most commonly used materials are mineral wool, fiberglass or polystyrene foam of the required thickness. Individual sheets are placed in such a way that there is no gap left between them and the joists.
5. Vapor barrier. The installation principle is the same as in the case of a hydraulic barrier.
6. Counter rails. Longitudinal wooden blocks 10–20 mm high, which provide a guaranteed ventilation gap. If a diffuse membrane film is used as the latter, then they do not need to be installed.
7. Wooden floor. This stage can be final or intermediate, if, for example, laying laminate flooring is planned.
Prices
The price of vapor barrier on the Russian market depends on its type, characteristics and regional features/rates:
| Manufacturer/region | Brand | Barrier type | Price, rubles |
| AMK-GROUP, Novosibirsk | TYVEK AIRGUARD REFLECTIVE | Membrane | 11 860 |
| ISOFLEX SOUTH, Sochi | NANOIZOL V | 1 000 | |
| KREPEZhCITY, Kazan | ONDUTIS R TERMO 25 | Reflective | 600 |
| LTK, St. Petersburg | MEGAIZOL V | Laminated polypropylene | 770 |
| GRATA, Kazan | ISOVEK AT 70 | 720 | |
| MTK, Novosibirsk | ROKWOOL | 920 | |
| RSL-INVEST, Novosibirsk | ISOSPAN V | Rough polypropylene | 1 000 |
Video description
This video explains in detail which side to lay the film on. General tips for installing it are also given:
As mentioned above, the overlap should in any case be at least 15 cm. Sealants and glue should never be used: diffusion film, as well as alternative materials, contains acrylic components. They are destroyed when using glue.
However, tape is acceptable for use. It not only glues parts of the film, but also eliminates defects that appeared during its installation.
There has long been a debate among repairmen about whether it is worth installing a vapor barrier. Some argue that this should never be done - if it does not sag, the degree of steam evaporation will drop many times. For others, on the contrary, it seems that tensioning the vapor barrier is a necessity. As they say, sagging film deteriorates very quickly.
General advice on how to properly install a vapor barrier ends here. During operation, some other nuances may arise, but their number is small.
As well as their degree of importance
Types of vapor barrier materials
In construction, various materials are used for waterproofing and vapor barrier:
- polyethylene and polypropylene film;
- breathable (diffuse) membranes;
- bitumen mastics;
- liquid rubber.
The last two types are suitable for concrete surfaces and are not used on wooden structures. Each of the listed types of waterproofing and vapor barrier has its own characteristics.
The most common and budget option for vapor barrier is polyethylene sheet. It comes in different thicknesses. Consists of 1-2 layers.
Manufacturers produce perforated and non-perforated polyethylene film. The first is used for waterproofing. It contains micro-holes with a higher degree of vapor permeability (Sd=1...2 m). In non-perforated products this indicator is lower (Sd=40...80 m). Because of this, it is used as a vapor barrier.
Modern development of polyethylene films for hydro- and vapor barriers - products with reflective aluminum coating. The vapor barrier ability of this type is higher than traditional samples. It is used to protect plank floors in rooms with elevated air temperatures and humidity exceeding optimal parameters: in kitchens. In bathrooms, saunas, baths.
The main disadvantage of polyethylene sheets is low strength. Any impact will cause them to break.
They are mounted with extreme caution, trying to avoid sharp corners and strong tensions. They have a short shelf life
A more durable and wear-resistant artificial material is propylene. It is similar to the previous option, but surpasses it in quality and performance characteristics when used as a hydro- and vapor barrier product for a wooden floor.
Polypropylene reinforced fabrics, in addition to the main synthetic layer, have a viscose-cellulose insert. It is she who absorbs a large amount of liquid and holds it to prevent the formation of drops. When the air temperature rises, the humidity level drops, and this layer dries out. To make the process happen faster, an effective ventilation system is created.
The main advantage of polypropylene products is a high degree of resistance to any weather conditions. They are strong and durable, affordable and quite easy to install. When using polypropylene sheets for hydro- and vapor barrier, the anti-condensation layer is turned towards the rough flooring boards. A ventilation gap is created between the insulation mats and the film.
The most expensive material for hydro-vapor barrier is breathable (diffuse) membranes. These are high-quality modern products with a high coefficient of vapor permeability. They have a special microstructure. The basis of this material is a non-woven fabric woven from synthetic fibers.
Breathable membranes come in 1-2-3 layers. They contain a special anti-condensation layer in which moisture accumulates and then evaporates. Multilayer products include smart membranes. They combine the properties of hydro-, heat- and vapor barrier, and have the ability to independently regulate steam exchange depending on the level of humidity and temperature.
A serious advantage of breathable membranes is the possibility of using them without a ventilation device. This property allows you to save space on the floor by making the ceiling higher. When using these products, there is no need to install additional insulation.
Diffuse membranes are a durable, wear-resistant material that reliably protects boards from moisture. It is expensive, but has a long shelf life and is easier to install.
To choose the right material for vapor barrier of a wooden floor, you should correlate the structural features, the design of the rough and final coating, and financial capabilities.
Ways to lay the right pie
When using a vapor barrier in a basement ceiling, the material must be laid over the joists on top of the insulation. The basement floor pie should look like this:
- On the side of the cold subfloor, a superdiffusion membrane is fixed - a non-woven multilayer film material.
- Insulation is laid between the joists on the subfloor.
- A vapor barrier is laid on top of the joists, which will protect the insulation from the effects of water vapor so that a ventilation gap is formed. Usually the logs protrude several centimeters above the insulation. If it is laid flush, the tones of the logs are laid with slats of small thickness.
What does "floor pie" mean?
When installing interfloor ceilings, a vapor barrier is attached to the ceiling of the first floor and subsequent ones. In this case, the floor pie looks like this:
- A vapor barrier is installed on the ceiling of the first floor.
- Insulation is laid between the joists.
- A superdiffusion membrane is laid on top of the insulation on the joists (on the floor of the second floor).
- A ventilation gap is formed between the insulation and the floor covering.
Correct wooden floor pie
Important! The vapor barrier must be overlapped and taped. The canvas must be sealed and intact, without a single hole or tear.
Table 2. Installation of subfloor
| Illustration | Description |
| The logs are installed at a distance not exceeding 60 cm to ensure a tight fit to the inside of the beams of the thermal insulation slabs and to prevent the formation of cold bridges. | |
| The bottom of the logs is hemmed with OSB boards. | |
| When the floor structure is located above unheated ground with the likely formation of high humidity, the rough subfloor is covered with a superdiffusion membrane, which will release excess moisture from the insulation and prevent moisture from the subfloor from entering. | |
| Then the insulation is laid in two layers with the seams offset by 10-15 cm to prevent the formation of cold bridges between the insulation boards. | |
| Condensation that may appear on the surface of the insulation is protected from condensation by a vapor barrier film laid with an overlap of 10-15 cm and the joints are taped. | |
| The final stage in the formation of the subfloor structure is the laying of large-format self-supporting material - OSB boards, fiberboard, chipboard, wooden boards, plywood or gypsum fiber board. |
Main types of vapor barriers
A wooden house involves several areas where it would be good to install a vapor barrier. In addition to the floor covering under consideration, an additional barrier often has to be installed in basements, attics, and also in the presence of uninsulated ventilation and furnace ducts. Therefore, it is necessary to know what kind of vapor barrier there is and its applicability in each specific case. They can be divided into three main groups:
1. Painting room. It is a liquid or plastic mixture (bitumen, tar), which is applied to uninsulated metal surfaces (roofing, chimneys). The barrier prevents the formation of condensation, which causes the development of corrosion areas.
2. Film. Thin roll insulation made of dense or membrane materials (polyethylene, polypropylene). Most often used in private housing construction to create a vapor barrier for a wooden floor.
3. Antioxidant film. Used as a safety net, especially at ventilation outlets and chimneys on the roof.
Considering that the topic of the article is the vapor barrier of a wooden floor, we should dwell in detail on the second group. In practice, three main types of films are used:
1. Polyethylene. The most accessible and familiar type, successfully used in the construction of not only floors, but also greenhouses. Depending on the surface texture, these films can be smooth, perforated or aluminized. As a material, polyethylene has low strength, so you need to work with it carefully. As for the barrier properties directly, the best level of vapor barrier is provided by a laminated film - its permeability indicator is at the level of 200 m, whereas for a regular smooth film it is good if it reaches 60 m. It should also be noted that a two-layer barrier additionally retains heat inside the room.
2. Polypropylene. More durable material. The level of vapor permeability reaches 100 m. It is often also two-layer, one side of which is smooth, and the other is woven - a combination of viscose-cellulose fibers - or fleecy. This solution allows you to better retain moisture and evaporate it faster. A striking example is the film Izospan B and Rockwool.
3. Membrane. This is a modern type of vapor barrier, the cost of which, naturally, is higher than its analogues. Multilayer material regulates moisture concentration well, as a result of which there is no need for ventilation gaps during installation.
Installation of hydro-vapor barrier for floors in a wooden house
Vapor barrier in a wooden house is an important condition for its safety. Therefore, we must do it according to all the rules.
Wooden floors are a complex structure consisting of several layers. It is installed at the stage of erecting the foundation and the first crown. Then logs are installed - thick beams that create a frame for the rough flooring and subsequent layers of hydro-, vapor and thermal insulation.
- Boards of the first level are treated with a special compound that prevents them from rotting, fungal attack and damage by insects.
- A vapor barrier sheet is laid on clean, smooth rough floorboards. There is no need to tighten it. This can damage the material and compromise its integrity. He should lie down freely.
Attention! When laying out a vapor barrier sheet, be sure to ensure the correct placement of the outer and inner layers. This information is contained in the accompanying instructions for use and special icons on the canvases themselves.
- When the products are laid out, the joints between the individual fragments are glued together with construction tape.
Important! Vapor barrier sheets are laid with an overlap of 15-20 cm so that unprotected gaps do not form
- The hydro-vapor barrier is secured with staples using a construction (furniture) stapler or galvanized nails with wide heads. Modern products, for example, diffuse membranes, are attached to special double-sided adhesive tapes. Thanks to them, the canvas is not damaged, joints and cracks are not formed.
- Insulation (mats or rolled sheets) is tightly placed on top of the hydro-vapor barrier layer. Then the material is again laid to protect the structure from moisture.
- Lastly, the finishing coating - boards - is installed.
Installing a hydro-vapor barrier sheet is a simple task and can be done with your own hands in a short time. The main thing is to carry out the work correctly, in compliance with technological features. Then the wooden floor will last a long time.
Views: 1,362
We also advise you to read:
Sanding a wooden floor - how to do it yourself Soundproofing a wooden floor - ways to solve the problem
Replacing an old wooden floor Do-it-yourself insulation of a country floor Do-it-yourself screed for heated floors - instructions Do-it-yourself floor insulation in a wooden house
Do-it-yourself floor screed in an apartment - how to do it, video Do-it-yourself floor insulation - concrete and wooden floors
Vote, did you like the article?
Any homeowner spends a lot of effort to create comfortable living conditions for his family.
This is maintaining a constant temperature in the home, ensuring a flow of fresh air, and humidity within normal limits. All life activity of any living creature is accompanied by the release of heat and steam.
Wet cleaning and washing, showering and bathing, cooking, boiling water, and even breathing - all this is a source of steam accumulated in the room. Increased humidity leads to the formation of condensation on various surfaces indoors.
Moisture penetrating deep into the insulation and into the structure of the floor in a wooden house has a negative effect on them and contributes to their deterioration and even destruction. The materials used for construction become moldy. Fungus and areas of rotting form on them. In addition, high humidity does not have the best effect on the well-being and health of people living indoors.
To avoid damage and deterioration of individual floor elements, a special vapor barrier layer is used. Its functional purpose is to prevent the harmful effects of moisture. At the same time, it does not interfere with air circulation; it calmly goes outside. This technique allows floor structures not to lose their working qualities and ensures their long service life.
Advice from installation experts
Some recommendations:
Installation of vapor barrier
- By placing the barrier with its smooth side facing the thermal insulation, the influx of steam and the formation of rotting processes in wooden structures are eliminated;
- when installing a thermal insulation layer outside the building, the insulating layer is placed outside the room;
- the film should fit tightly to the insulating layer;
- When sealing joints, wide adhesive tapes and tapes are used;
- when working with window and door openings, it is necessary to leave a small supply of vapor barrier film;
- The film should be protected from direct sunlight;
- Before starting work, the most critical places are determined - areas of interaction between warm and cold air.
When performing work on installing a vapor barrier film, it is important that the product is attached correctly. Otherwise, the error will lead to ineffective thermal insulation.
Types of Izospan
There are several types of material of this kind:
- Class A insulator.
- Class B insulator.
- Class C insulator.
- Class Isolator
Izospan A
This kind of material is used as protection from wind, as well as protection from condensation on the inside of the roof and walls. It is attached to the outside of the heat insulator for the roof or under the façade material for finishing work. Such wind-moisture-proof single-layer membrane fabric improves the properties of heat insulators and extends the service life of the entire structure.
Izospan A is considered completely harmless. It is easy to use and has good mechanical reliability.
The design of the roof pie, starting from the inside, assumes the following sequence:
- interior decoration,
- Izospan B,
- rafter systems,
- heat insulator (lays between the rafters),
- Izospan
A, - counter rack,
- roof covering.
There is also Izospan AM. This three-layer membrane fabric is needed for installation directly on top of the heat insulator. Which side should I put Izospan AM on? It spreads with its red porous side in the middle.
Izospan B
This insulator already belongs to the category of hydro- and vapor barrier films. It is made of polypropylene.
Its outer side has a smooth laminated surface, and the rest is porous or rough. Thanks to this surface, condensate can accumulate and then evaporate without penetrating into the heat insulator.
It is used to protect walls, partitions, roofs and interfloor and basement floors.
Izospan S
Instructions for use for floors, roofs and other areas demonstrate that it has hydro- and vapor barrier characteristics, but in this nuance it surpasses the performance of Izospan B. One side is smooth, and the rest, with the help of a rough surface, holds drops of condensate, which then evaporate.
To equip a vapor barrier for the floor in a wooden house
Izospan C plays a decisive role.
For example, it is needed when installing laminate or parquet flooring. If a concrete-based screed is poured onto the floor of a wooden house, vapor and waterproofing is provided by Izospan
S. This insulator is also used for roofing waterproofing under metal roofing tiles.
Izospan D
This is a multifunctional material made of polypropylene, which has increased strength. A similar vapor barrier membrane floor fabric is used for concrete or earthen bases where increased humidity is encountered.
The specificity of the insulator is its resistance to ultraviolet radiation, which makes it possible to use it to cover temporary buildings. An additional advantage is the ability to hold snow loads.
How to treat hard-to-reach areas with a vapor barrier layer inside the room
In some places it can be difficult to put down a protective cover. Where the roof and ventilation pipe are connected, a pipeline wrap is created and secured with tape; drywall seam tape can be used.
In the gaps near the hatch or attic window, you need to use a special apron.
The product should also be secured using tape. The window openings near the ceiling are closed so that a deformation fold of 20 mm remains. This is done in order to prevent precipitation.
Equipping a vapor barrier system in your home requires a responsible approach.
Steam has the highest permeability. To prevent it from leaking into particularly important places, the room must be provided with excellent protection against vapor permeability.
Preparation for installation of a water vapor barrier layer
Laying a vapor barrier involves carrying out a number of preparatory works. First, you need to select materials for all layers, as they say, otherwise the pie, and also decide what kind of vapor barrier
better for the floor. This “pie” consists of the following stages (starting from the top):
- Decorative floor covering.
- Plank floor.
- Vapor barrier.
- Counterrail.
- Thermal insulator (between the counter-batten boards).
- Water protection.
- Base floor.
Preparation begins with the base floor itself. All boards, wooden blocks and other parts made of wood should be treated with a special disinfectant composition that prevents rotting, the formation of fungus, and also protects against insect attacks.
If we are talking about repairing the floor, and not about building a new building, then the finished floor boards, floor covering and existing vapor barrier
on the floor must be removed in advance. All debris must be removed and then the wooden structure should be treated with an antiseptic.
Why is vapor insulation necessary?
As we said earlier, wood is a rather specific material for construction: it is excellent for air permeability, but likes to absorb water, and for this reason it swells. Ignoring this fact, you may encounter the following troubles:
- the floor will become crooked or “bulge”;
- finishing materials or coatings will be damaged;
- You can find mold in the corners, which will make the house smell disgusting;
- when water freezes during winter frosts, it expands, causing cracks and small crevices in the wood to become larger - this causes rapid wear of materials (if we are talking about open spaces);
- After a few years, the floor will no longer function correctly, and you will have to install it again - this is costly both financially and in terms of effort.
Moisture frozen in winter expands, and this can lead to damage to building materials.
All of these problems can be avoided if you make a high-quality vapor barrier for the floor.
Polypropylene film
The easiest vapor barrier material to install is polypropylene film. It has high strength and impressive durability. Compared to the same polyethylene, propylene is more durable and better resistant to weather conditions.
This material was first made exclusively from propylene, however, as operation showed, condensation formed in the film on the insulation side. Then manufacturers began to reinforce the film, adding an additional layer of viscose fibers with cellulose. Such a layer easily absorbed and, most importantly, retained a significant amount of moisture, preventing the formation of drops. As the humidity decreased, the accumulated moisture gradually dried out thanks to ventilation.
Video description
This video explains why a vapor barrier is needed and how to determine the external and internal sides. General installation tips are provided:
Which side to lay the vapor barrier
When installing a vapor barrier, it is necessary to strictly adhere to the technology, otherwise the system will not function effectively. And here one of the important points is which side the vapor barrier sheet will be laid in relation to the insulation.
Which side to lay the vapor barrier
Not all manufacturers indicate this on the film or indicate this in the instructions, so you should adhere to the basic rules for installing vapor barriers:
- The smooth side of the double-sided film is always placed on the insulation, and the rough side is on the outside. The fleecy surface absorbs and retains steam and moisture well inside, preventing it from passing to the heat insulator.
- Single-sided laminated polypropylene film is also laid with the smooth side inward and the woven side outward.
- Films with foil coating are placed with the aluminum side facing the room.
- When rolling out any rolled vapor barrier, the outer part is inside the roll, and the inner part is on top.
- If the two sides of the film are different colors, the outer surface will be the one that is darker.
- Conventional polyethylene films have two identical surfaces, so they can be laid on either side.
Video description
About diffuse vapor and waterproofing in the following video:
- A two-layer anti-condensation film is spread with the smooth side facing the insulation, and the rough side facing the source of warm, humid air, the living quarters.
- The foil film is laid with a metal layer to the living spaces - this way it can return some of the heat inside, increasing the thermal efficiency of the building.
- Diffusion double-sided membranes provide the roofing pie with the ability to “breathe”. If both surfaces of the membrane are identical, it is laid on either side. If you have chosen a one-sided membrane, it is better to check the data on the front and back surfaces with the manufacturer (in most cases, the membrane is adjacent to the thermal insulation with a rough surface).
Laying a vapor barrier in a roof with steep slopesSource bostonglobe.com