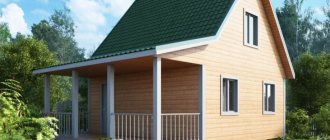
These small structures have their own unexpected plus. When it has been decided exactly what is required, when the estimate has been determined and it is felt that you can add a little and the price will not suffer, this is where the initial small sizes come to the rescue. A 3x4 bathhouse with an attic easily turns into a 4x5.
Moreover, this transformation has practically no effect even on the project drawings, the dimensions are simply rewritten. It will be easy to manipulate the numbers, knowing that the original idea - enjoying the “communication” with the steam room - is not at risk.
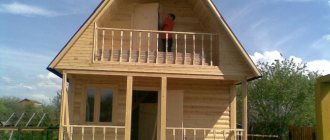
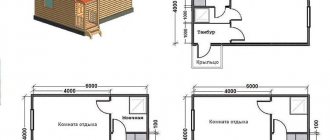
In the photo - the most common design of a 4 by 4 bathhouse with an attic
Furnace installation
For a bathhouse with a 4x5 attic, you can choose a metal or brick stove.
Metal stove
A metal stove heats up faster and provides quick heating of the room. However, it also cools down within a short time. Installation of a metal furnace does not take much time and is carried out as follows:
- The selected oven is installed on the prepared surface. Its power must correspond to the volume of rooms that are planned to be heated.
- a tank is connected to the stove, then a damper, then there is an adapter for a sandwich and an insulated sandwich pipe, which will go to the second floor;
- a ceiling groove is installed in the interfloor ceiling, through which a sandwich pipe passes;
- the pipes are routed through the roof through a special master flash, which will ensure sealing of the passage opening;
- in total, the chimney is mounted at least 4 meters in height.
Furnace installation
The wall near the stove should be lined with bricks or sheathed with asbestos and thick sheets of iron. If you plan to install a firebox inside the partition between the steam room and the dressing room, then it should be lined with refractory bricks. All pipe connections between each other should be sealed.
Brick oven
Brick sauna stove
A brick stove takes longer to heat up than an iron stove, but it retains heat for a long time. You can fold it yourself or seek help from specialists.
For independent masonry you will need:
- fire bricks;
- mortar for laying stoves;
- cast iron grates, valves, doors;
- row masonry diagram;
- metal sheets;
- trowel;
- wire.
Each row of bricks should be laid according to the chosen pattern, and they should be arranged in a checkerboard pattern. Coincidence of vertical seams between bricks is not allowed. Fastening the doors and installing smoke ducts must be carried out strictly according to the instructions, then the finished stove will serve for many years without any problems. Do not forget about installing cleaning doors and valves.
Roof
In a bathhouse with an attic, special attention should be paid to waterproofing the ceiling of the first floor. The steam room and washroom should be protected especially carefully.
After installing the floor joists and subfloor of the second floor, foil insulation should be attached to them from below using a stapler. Tape all joints between strips with aluminum tape. Then put a layer of insulation and another layer of waterproofing on top of the subfloor. And only then install the floorboards on the second floor.
Video - Ceiling in the bathhouse
https://youtube.com/watch?v=Xbn0i3smn0A
The roof in a bathhouse with an attic can be single-pitch or gable. However, a pitched roof will significantly reduce the area of the room on the second floor. Therefore, in a bathhouse with an area of only 20 sq.m. It is more expedient to make a gable roof.
Bathhouse with attic - construction features
Gable mansard roof
Gable mansard roof design
The rafter system is calculated in advance. Racks are installed on the floor joists, to which the attic floor beams, as well as side and ridge rafters, are attached. The distances and angle of inclination must correspond to the length of the rafters and ensure structural rigidity.
Rafter system
Then the sheathing and waterproofing are attached to the rafters. The roof covering is already screwed onto it. This can be slate, ondulin, metal tiles, etc. After this, insulation, vapor barrier and wooden slats are installed between the rafters from the inside. Finishing materials are installed on them. The thickness of the insulation in the attic room must be at least 200 mm.
Roofing pie
This freedom of choice - 4 by 4 or 3-5 by 4 - has its advantage
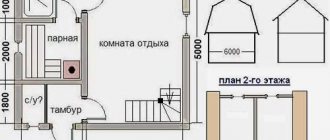
4x4 bathhouse with attic - two in one: first floor - bathhouse; the second, in the attic - a full-fledged living room-bedroom
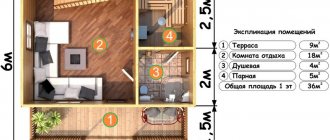
In this area - small compact baths with an attic in the form of a rest room - it turns out that there are their own detailed “top projects”. The above 3D computer sketch and drawing of two floors is one of them.
There are only 4 rooms, but they fully correspond to the purpose of such a “house”:
- A – entrance hall on the first floor and living room-bedroom, occupying the entire area, on the second;
- B – washing-steam room; Note that there are no windows, which means this solution eliminates the need for additional care about insulating the bathhouse openings;
- C – kitchen; everything is very functional, and it is reasonable to provide an exit from the steam room to the kitchen, and not to the hallway, which can be found in some projects.
Some important nuances
Don’t be fooled by its “matchbox”-level simplicity of a 4 by 5 bathhouse with an attic.
This is a serious building, which has its own strict mandatory requirements:
Firstly, regardless of the building material, be sure to provide reliable window openings. You can’t do without insulation and waterproofing here.
If round logs or timber with a rounded profile are used, pay special attention to the processing of joints
Regardless of the size - whether it is a bathhouse with an attic 4 by 5 by 4 by 5 - utmost attention must be paid to the design and insulation of window openings
Secondly, the interior decoration must be made of a safe material from the point of view of the theory of bathhouse construction - no tiles or slippery materials, only friendly wood;
Projects of 4 by 4 bathhouses with an attic may not be particularly cozy. They take others - functionality, simplicity, price, and, of course, constant pleasure for connoisseurs of this type of recreation
Thirdly, there is still no escape from creating a stove, so give it the highest priority. We can say, without fear of making a big mistake, that the success of the whole undertaking will depend on the quality of the water heating device, whether it will be a stove or even a boiler
Whatever the size of a self-made sauna, there should always be room in it for a boiler or stove
Project specifics
The purpose of the future building should be determined. 4x4 houses can perform the following functions:
- For permanent residence;
- For domestic needs;
- For children to play, acting as a play area.
Step-by-step instructions for a 4 by 4 building with your own hands involve sequentially going through the following stages:
- Space planning;
- Calculation of the base;
- Construction of floors and walls;
- Installation of the rafter system;
- Roofing.
The foundation is selected in accordance with the chosen construction technology and soil type. A 4 by 4 frame house project on one floor can have a base made of special blocks connected to each other with mortar. Construction of the foundation begins at the depth of soil freezing. A cushion of sand or crushed stone 20–30 cm thick is placed under the strip of blocks.
4 by 4 construction projects without an attic look natural with a hip roof. However, it is possible to install a roof with one or two slopes. Along the axes of the project 4 by 4, the total area is 16 sq.m., the living area will actually be smaller due to the interior decoration. Extensions add square meters to a project and provide additional space for relaxation or storage. The attic allows you to use the attic space to arrange rooms. The slope of the roof will determine how many squares of usable area are in the room.
Why do you need a bathhouse with an attic?
The very first attics were inhabited by people leading a bohemian lifestyle - poets, artists, and so on, and this is not without reason. After all, in such a bright and quiet place it is pleasant not only to relax, but also to socialize, especially after taking hot bath procedures.
Cozy view inside the attic
A 4x6 bathhouse with an attic can have a very different design; it is not at all necessary that it will be presented in the form of a table and benches.
The attic in the bathhouse is:
- living room with wicker furniture;
- billiard room with refrigerator;
Design options
- SPA salon with modern hydromassage or aromatherapy technology;
- an eastern corner with luxurious pillows that will be on the floor instead of furniture, rugs.
Great view of the room
In general terms, the advantages of the attic can be identified as follows:
- an aesthetic appearance of the bathhouse, which will resemble not a steam room, but a cozy country house;
- in comparison with a two-story bathhouse, in this case you do not necessarily need to build a strong foundation;
- thanks to its presence, heat loss is significantly reduced;
- Thanks to the heat that comes from below, there is no need to install additional heating sources in it.
Frame bathhouse with attic
The frame construction method came to us from Canada and Europe. Undoubtedly, building a bathhouse with an attic using this technology is the fastest and cheapest process, since the price of such a structure, unlike other types, is several times lower.
Frame sheathing
Stages of construction of a frame bath:
- construction of the foundation;
- frame construction;
Frame diagram
- frame covering;
- installation of bath insulation;
- interior decoration of room walls;
- additional façade finishing.
- Typically, the frame of a bathhouse is built in increments of 95 cm, the material for this is usually timber or boards with dimensions of 150 by 50 cm. The frame structure is quite light, both in terms of assembly and the load on the foundation;
Getting started with the frame
- But in the case of the construction of such a structure, you must remember - in this case you will have to use insulation from a special film with vapor barrier capabilities, and good ventilation must also be ensured. Otherwise, your building will not last long;
- A frame building with a 6 by 4 attic provides for a washing room and a steam room on the ground floor, and a dressing room or dressing room will also be located there. An internal staircase will lead from this room to the attic. In the attic room you can arrange a terrace or veranda.
Timber bath
A 6x4 bathhouse made of timber with an attic is preferable to a frame one. Although such a structure will cost you more, it will be much more pleasant to steam in it, since the material from which the structure will be built retains all the positive properties of wood.
Timber bath project
As a rule, such baths are built from timber with dimensions of 110 by 135 cm or more. Each row of timber must be laid with a special fabric made of flax and jute. This is necessary so that your structure maintains its tightness.
Finished timber structure with a simple roof
In addition, it is best to make a bathhouse with a veranda in order to place a staircase in it leading to the attic. Stairs are usually single-flight, but it is also possible to create a rotary or multi-flight staircase.
You can insulate an attic in such a structure with mineral wool or use any other type of insulation for these purposes. This recreation room can be made with a balcony, this will give it more comfort.
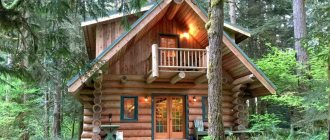
Log sauna and sauna house
The best bathhouse, no matter what they say, is a 4x6 log bathhouse with an attic. The thickness of the walls of such a room makes it possible not to use insulation. It will be enough to cover them with a biological protective composition to protect your building from external factors. The attic of such a building is not built under a sloping roof, but under a half-hip or hip roof.
Log building
You can build a bath house with a terrace or attic from a log. In this case, on the ground floor you can place a room for bathing procedures, and in the attic you can arrange several living spaces.
The size of the plot is not the main thing
Number of floors and their layout
A 4x4 house can have more than two tiers. Japanese architect Tadao Ando developed the layout of a 4-story building with an upper block on remote consoles. Such a project makes it possible to provide all amenities in a limited space.
Frame technology is used for construction. Total area, m2 – 64. Each floor plays the role of a separate area: dining, sleeping, dressing room. The main stages of planning a 4 by 4 building include the construction of a plinth. It is used as a storage room.
You may be interested in: House layout 6 by 6: features of space zoning
Single storey
A one-story 4 by 4 house has several layout options:
- One-room;
- Five-wall building with two rooms;
- Second light.
The “Second Light” project eliminates the attic floor. Under the roof there is a mezzanine, to which a compact staircase leads. Upstairs there is a sleeping place or an office for work. In this case, it is not practical to divide the area of the first floor with partitions.
Stages of construction of a 4 by 4 building with a second light:
- Project development, planning;
- Laying the foundation;
- Wall installation;
- Installation of rafter legs without tightening;
- Roof insulation.
An example of a one-story building 4 by 4, equipped with all amenities for permanent residence, is located in the Republic of Belarus. The owner of the building took the idea for the layout from German architects. The kitchen, hallway and sleeping area are located on different levels. The bathroom is located on an area of 1 m2, there is also a shower. The drain is provided by a drain in the floor. Examples of the layout of such bathrooms can be found in Japan and Hong Kong.
Double decker
The design of a 4x4 house with two floors includes calculation of the foundation and rafter system, selection of material for the construction of walls. The layout provides for two rooms with an area of 14.4 m2. For a comfortable stay, additional buildings are “added” to the main house. The living rooms are spacious enough and are suitable for three people.
The second floor increases the load on the base. To save on the foundation, light wall materials are used - frame or foam block.
Tsokolny
The plinth increases the usable area and reduces the cost of heating the first floor. However, this requires large construction costs, especially if it is planned to be installed as a two-story house. The project must include calculation of the load on the walls of the basement. In case of construction in an area with a high groundwater level, the base needs reliable waterproofing.
Another option
We offer another implementation option, when a 4x5 bathhouse with an attic does not contain a kitchen on the ground floor - everything is given over to “bath” pleasures. Although, if desired, the kitchen can be equipped on the second floor.
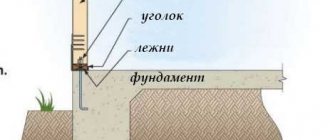
Focus again on the foundation
In the proposed layout, the approach to presenting the design result is very attractive - a three-dimensional sketch with the roof removed is so visual that it gives a comprehensive idea of the entire further progress of the work.
Please note how carefully the area around the piles is finished, 8 of which are located around the perimeter of the house and one in the center. This elevated position of the bathhouse is an ideal protection against the influence of wet soil on materials and an excellent solution to the problem of base ventilation
A three-dimensional view from above, without a roof, removes all questions - a 5x4 bathhouse with an attic appears in full view
So, here we also limit ourselves to four rooms - 3 on the first floor and one large one on the second:
- A – hallway and, at the same time, dressing room;
- B – washing room, note, with one small window;
- C – steam room, no windows;
- D – attic on the second floor; As a small drawback, we note the small attic windows. This is due to the triangular roof included in the project, although this part of the project can be safely changed to a version of the previous project. It provides more space for the attic and, as a result, the opportunity to increase the width of the window openings.
Selection of material for construction
A 4*5 bathhouse with an attic can be built from:
- timber;
- logs;
- heat blocks or foam blocks.
The choice of material depends solely on personal preference.
Most often, site owners purchase a ready-made log house from rounded or regular logs. Each part in it is numbered; during construction, you just need to stack them on top of each other, observing the correct sequence.
Log sauna
Stages of constructing a bathhouse from logs:
waterproofing material and lining boards are laid on the foundation; The first crown of the log house
First crown
First rows of logs
- install the lower crowns of the log house according to the diagram;
- check diagonals, compliance of angles and level;
- treat the lower logs with an antiseptic;
- install logs;
- carry out further laying of logs, installing inter-crown insulation between them;
- The logs are connected to each other by drilling holes with a diameter of 30-40 mm into them and driving in dowels. The distance between the fastenings is from 50 to 100 cm; in adjacent logs they are placed in a checkerboard pattern. When chopping into the paw, an additional dowel is installed in each corner joint;
- install the rafter system and install the roof.
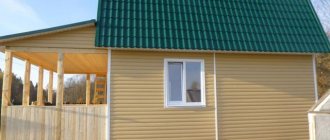
Bathhouse made of timber
You can build a bathhouse with a 4*5 attic from timber yourself. This will require approximately 10 cubic meters. timber 200*200. The result is a high-quality, warm and durable structure. There are many ways to connect timber to each other. One of the most reliable is the “dovetail”. In addition to this, there is also a main tenon, a locking groove and many others.
The choice of method should be made depending on the design features of the building being constructed.
The sequence of construction of a bathhouse made of timber:
- foundation waterproofing;
- antiseptic treatment of timber intended for installation of the bottom row;
- cutting out tenons or locking joints;
- laying the first row;
- installation of logs;
- fastening inter-crown insulation using a stapler;
- laying the second row;
- drilling holes and inserting dowels;
- laying insulation and installing the third row, etc.
Bathhouse made of timber with an attic
Bathhouse made of blocks
Blocks are used much less frequently for the construction of bathhouses, although their thermal insulating properties are often not inferior to wood. In addition, they do not burn, allow steam to pass through well and do not rot. However, not every block is suitable for a bathhouse. It must have high vapor permeability and not contain harmful substances.
Bathhouse made of blocks
The construction of bathhouse walls from blocks (main stages of work) is reflected in the table.
| Illustration | Description |
| Preparing for the construction of walls | Using a level, determine the highest corner of the foundation from which to begin laying the blocks |
| Cement mortar | Prepare a cement-sand mixture |
| Pulling shoelaces | Pull the string level from one corner of the structure to the other |
| Laying the first row | Begin laying the first row on cement mortar, constantly monitoring the evenness of the surface |
| Leveling masonry with a hammer | Tap each block with a rubber hammer, adjusting it to the desired level. Check the evenness of each row of masonry using a laser level |
| Technique for applying glue to blocks | Subsequent rows are laid on special glue for blocks, which is diluted immediately before starting work and applied to blocks no more than 5 mm thick |
| Fastening the Mauerlat with metal studs Fastening the maueralat using an anchor with a washer and nut | The Mauerlat is installed on the top row |
Bathhouse walls made of blocks require additional insulation. From the inside, it will be possible to attach foil material to them, which will reflect heat and retain it indoors for a long time, and on the outside it is best to install a ventilated façade with mineral wool insulation.
Rafter system
When building a hipped roof, a hip structure is most often used, so we will consider the option of a rafter system for it. There are two main types of rafter systems that are used in the construction of a hipped roof: layered and hanging:
- Layered – used for houses with load-bearing internal walls. This type of rafter system has a reduced weight due to a reduction in the amount of materials used and transfers the load only to bending.
This type of construction requires more skill and effort during installation, but is more durable due to the fact that the rafters have constant ventilation. Because of this, the tree becomes less damp and the likelihood of rot or fungus forming is reduced.Also, this design is less demanding in terms of calculations and allows the installation of rafters with beams, linings or trusses (special beams with a complex structure).
- The hanging rafter system is designed for houses in which the internal walls are not load-bearing.
Such a structure requires more lumber, as well as complex calculations, but it is easier to install than a layered one on spans up to 9 m. Such rafters transfer bending and compression loads, and also have high structural rigidity. The hanging system does not use complex node connections, and this reduces the number of difficulties during installation.
When building a hipped hip roof, the central part of its rafter system has a structure similar to a gable roof. The main differences in the Dutch version are that the places where rafter half-legs (shortened rafters) are formed and a triangular hip is formed.
Diagonal (sloping) beams are installed in this place.
These structural members are longer than regular rafters and also rest on the inside or outside corners of the house. Sloping beams are subjected to a higher load than adjacent elements (1.5 times more).
Due to the design features, diagonal rafters are most often made from two beams, since elements with a standard length are usually shorter than required. Also, the bevel parts are made reinforced, and trusses (additional racks) are often used to support them.
Another feature of a hipped roof is the presence of a mauerlat (a supporting fastening beam that is placed on the wall) on all sides of the building, since the weight is distributed on it from 4 hips. In addition, it is recommended to install a reinforced belt under the Mauerlat in order to strengthen the entire structure and not damage the walls.
Floor installation
Before you start installing the floor, you should decide on its type. It can be either wooden or concrete.
Wooden floors in the bathhouse
Wooden floors in the bathhouse
Wooden floors in a bathhouse can be built to leak or not. The choice of method should be made depending on the frequency of operation of the structure and the climatic conditions of the region in which it is located. Leaking floors are usually built in bathhouses, which are used only in the warm season. In winter, they will emit extreme cold due to the lack of insulation. To arrange this structure, it will be enough to lay logs in the washroom and nail boards to them on top. In this case, gaps of several mm should be left between the boards so that water can drain into them. Since a drain with a drainage pipe was already prepared in advance at the lower level of the floor, the water will simply go into it.
Leak-resistant wood floors are a more complex design. They are laid out as follows:
- install logs;
- install subfloor boards;
- insulation is laid between the joists;
- nail the waterproofing with staples;
- lay the top layer of floorboards 40 mm thick tightly, ensuring a slope towards the drain hole;
- a gap of 2 cm is left between the wall and the boards;
Concrete floors in the bathhouse
Floor construction
Concrete floors are less warm, but more durable than wood floors. To set them up you need:
- level the area inside the bathhouse;
- cover it with fine gravel and sand, compact it;
- pour a thin layer of concrete;
- lay insulation;
- install the waterproofing layer;
- lay the reinforcing mesh;
- install level beacons;
- attach damper tape along the walls and partitions;
- pour concrete solution;
- perform the finishing screed device.
Video - Installation of floors in a bathhouse
Electric or water heated floors should be installed immediately inside the screed.
Infrared heating elements can be laid directly under the floor covering.
Construction instructions
The first step in building a hipped roof with an attic is to install the Mauerlat on anchors (which are driven into the wall at a distance of 2 m from each other) or using metal brackets (if it is brickwork. Before
laying it, waterproofing from roofing material must be placed under the wooden beam.
After this, it is necessary to install the floor beams. They can be laid both on the Mauerlat and on the wall itself in special grooves that must be made at the construction stage. First, you should lay out the outer beams and level them . Next, a cord is stretched, with the help of which all other parts of the ceiling are mounted.
If the beams will fit into grooves, then it is necessary to smear the ends of the beams with bitumen mastic and wrap them with roofing felt in 2-3 layers. This will help protect the wood from moisture that it might otherwise absorb from the walls. Most often, the laying step is taken to be 60 cm, so that there is no need to trim the insulation boards.
After laying the floors, it is necessary to begin the installation of the rafter system. Depending on the design of the hipped roof, the structure of the frame may vary. The most commonly used scheme is the following :
- A vertical stand is mounted on each beam.
- A ridge beam is attached to the posts.
- Next, inclined rafters are installed. At one end they are attached to vertical beams, at the other - they are laid on the corner of the wall. For them, you should make a template from a not too thick board, which must be attached to the purlin and the mauerlat to make cuts. This is required in order to cut the rafter beams using this template.
- The intermediate, central and short rafters are attached to the ridge. The rafter legs are attached to the mauerlat using the cutting method, the rafter spacing is up to 70 cm.
- Next, you need to install the sheathing, counter-lattice and all layers of the roofing pie.
- Then cover the roof with the selected roofing material.
To secure all structural elements, you can use nails, screws, metal plates or galvanized corners . The roofing is done depending on the chosen material. For example, if metal tiles or corrugated sheeting are used, then a sparse sheathing of boards is made on top of the beams, and for rolled decking - a continuous sheathing.
Arrangement of the attic floor
One of the main features that should be taken into account when arranging the attic floor is the presence of natural light.
If the windows are installed incorrectly, there may not be enough light , and precipitation can enter the room through them.
For different roof designs, 3 main types of windows are used for lighting:
- Vertical . The cheapest option, but not suitable for all types of hip roofs.
- Panoramic . They require a reinforced frame for installation, but provide a lot of light and greater visibility.
- Attic . This type is mounted on the roof slopes, and not on the gables, like previous options. Such windows require a special double-glazed window that can withstand weather conditions and precipitation (especially hail).
Also, before arranging the attic, you should add a staircase to the house plan , with the help of which you can get to it. You should also take into account the routing of the wiring in order to hide the wires, since after laying the insulation, the walls will need to be sewn up.
To equip the attic floor, you should use lightweight materials that will not create a lot of weight on the floors. For example, wooden parquet, laminate or linoleum is suitable for the floor, and wooden lining or plasterboard is suitable for the walls. You should also take into account that the finishing does not need to be fastened close to the thermal insulation, but within a small space.
Insulation and ventilation
When arranging the attic floor, it is necessary to pay attention to insulation , since in winter it must remain suitable for living. To do this, in addition to the outlet of the heating system, you should cover the walls from the inside of the room with a layer of insulation, which can be used as basalt or glass wool with a thickness of 20-25 cm.
Rafters conduct cold well, so it is recommended to close them. This can be done using thermal insulation and horizontal purlins, the outer part of which is used to attach the vapor barrier.
The ventilation system is an important part of the attic floor, since in addition to saturating the air with oxygen, it promotes air circulation for the beams and roofing. This reduces the amount of condensation, which makes it possible to extend the service life of the insulation and supporting structure. For ventilation, in addition to windows, 3 types of aerators are used :
- Point structures are used for roofs that do not have ridge connections (for example, a hip roof). They are installed 1 piece for every 20 m2.
- Ridge ridges are placed along connections with the same name and remove warm air from the room.
- Cornice . Designed to supply fresh air and are placed under the roof overhang.
conclusions
If you intend to build a bathhouse with an attic on your country plot, you will be faced with a huge number of proposals. But, oddly enough, if your goal is a small two-story bathhouse with an area of no more than 20 square meters, difficulties in choosing will arise - it (the choice) will not be rich. But everything that will be offered has been tested by time and practice.
Focus your efforts on the quality of the foundation, a reliable boiler and insulation of the walls of the washing room and steam room. If these issues are resolved successfully, the proposed designs will last a very long time.
Then the plan of each floor becomes an empty formality, only the dimensions are important here, the construction instructions are perfectly readable from a three-dimensional sketch
Despite the fact that the dimensions simply “scream” - everything is clear, we advise you to watch the additional video in this article, perhaps it will be able to eliminate some of the remaining questions.