Once upon a time, the only type of vapor barrier was glassine. We cut it, attached it, secured it – that’s all! It was only a few decades ago that a more convenient polyethylene film appeared, and more complex and reliable materials began to be made on its basis. Yes, modern options please not only with their strength characteristics, but also with their resistance to temperature changes and ultraviolet radiation, and their versatility. But, at the same time, they are upset by the complicated instructions for their use: they should be connected along a clearly defined line, and only special tape should be used, and - most importantly - do not mix up the side of installation!
It is not surprising that you can so often find panicky questions on the Internet: how and which side to lay the vapor barrier to the insulation, what to do if the sides are mixed up? Do you really have to dismantle the entire structure? We can assure you that you won’t have to. Let’s take a closer look at determining which side is “correct” - you will be very surprised.
What is the essence of roof vapor barrier?
Protecting insulation from moisture is one of the most important problems and we will tell you why.
Water itself is an excellent conductor of heat, because it is used in heating and cooling systems for a reason. And, if the roof insulation is not sufficiently protected from steam from the room, then this will not end well. In the warm season, you will not yet know about the presence of a problem, because... the steam will evaporate easily. And in hot countries, where there is no sub-zero temperature, they don’t think about vapor barrier of insulation at all, because the problem is quietly solved on its own. But in Russian latitudes, due to temperature differences in the cold season, steam rises and penetrates the insulation, concentrating in the form of water when it meets the so-called “dew point”.
At the same time, the top layer of insulation in the roofing pie freezes and creates yet another condition for getting wet from the inside. The effectiveness of the insulation is significantly reduced, and the changed structure contributes to the development of fungus and corrosion. Moreover, accumulating in large quantities, moisture can seep back into the room and thereby damage the interior decoration. A vapor barrier will help prevent such problems.
To understand how to properly install a vapor barrier, you first need to understand its design. Thus, the insulation is protected on both sides by completely different films that perform opposite tasks. Below, on the side of the living room, a vapor barrier is installed that will not allow steam to pass through, and on top - a vapor-permeable membrane, which, on the contrary, will release excess moisture from the insulation and protect the roof from leaks:
But where is the logic, you ask? How can steam get into the insulation if there is a vapor barrier in front of it? In fact, no film or membrane protects 100%, and there are still poorly glued joints and other construction errors. Therefore, some minimum amount of steam will still be in the insulation, and it is important to properly remove it outside without harm:
Look carefully at the diagram: do you see where condensation appears in a well-designed roof? That's right, not from the side of the room, but from the side of the roof, so it is easily removed by a windproof anti-condensation film or membrane. But condensation should not appear on the vapor barrier, and no side of it can cope with it, because... it has a different structure, and we will now prove it to you.
Installation features
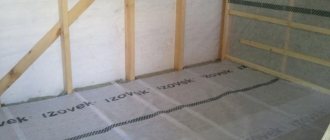
The floor pie is made of several layers, including logs, a layer of waterproofing material, a subfloor, a layer of insulation, a vapor barrier layer, a layer of soundproofing material and a finishing coating. Before installing a vapor barrier, it is necessary to prepare the surface. If the structure is being built from scratch, then there will be no problems with installing this layer. The subfloor boards are simply treated with antiseptic preparations, leveled, and a vapor barrier material is laid on top of them. It is also recommended to coat the joists with protective compounds.
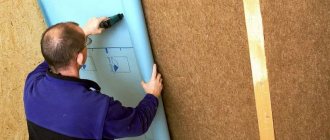
Floor insulation with mineral wool
If the house has already been built and is undergoing a major renovation, then first it is important to remove the old flooring and other previously used materials. Next, it is important to check the strength of the logs and the rough foundation - if they sag or rot, they will have to be dismantled and replaced with new ones. All debris is removed before further work, the smallest specks are removed using a vacuum cleaner.
The vapor barrier layer must be laid on a flat base without protruding nails. Otherwise it may be damaged. Immediately before installation, it is important to determine which side the vapor barrier material will be mounted. As for ordinary polyethylene film, there is no need to determine the side. If Izospan is used, then it is important to look at its color on both sides. It is laid with the light side facing the insulation. If the material has pile, then this side is mounted towards the room - the pile will absorb excess moisture.
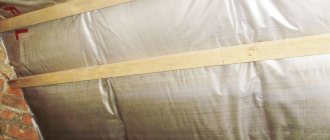
Laying vapor barrier "Izospan"
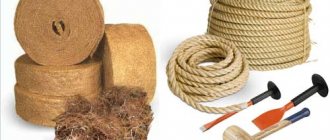
On a note! To work with vapor barriers, a material such as tape is useful. It is used to connect the joints of individual coating strips. This is necessary to improve the tightness of the vapor barrier layer. In this case, individual strips of material are laid with an overlap of 15-20 cm on each other.
Installing a vapor barrier does not require special knowledge. The material is rolled out over the surface of the prepared floor and secured to it using small nails and a construction stapler. However, the easiest way is to use special adhesive tape.
Places that are difficult to reach or have an unusual shape are best treated with a bitumen-based coating agent. The reason for these actions is that in such places it will be quite problematic to lay and properly fasten vapor barrier material.
The process of laying "Izospan"
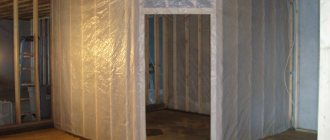
The insulation itself will be laid directly on top of the vapor barrier if the material is used to protect it from moisture not only from the inside, but also from the outside. Foam plastic, mineral wool or expanded polystyrene can be used as an insulating layer. It should fit very tightly to the wooden joists so that cold bridges do not form.
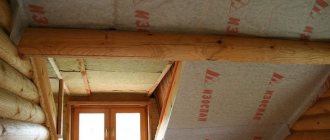
Another layer of vapor barrier is mounted on top of the insulation layer. It will no longer allow moisture coming from inside the room to reach the insulation and be absorbed into it.
On a note! Foil film perfectly reflects infrared radiation. Therefore, it is laid with the shiny side facing the room.
Types of vapor barriers: A, B, C and D
To understand where the vapor barrier should be laid on which side and why, for example, both sides suddenly turned out to be smooth, you must first determine its type. After all, not every species has two different sides!
Type A insulation: for one-way steam exhaust only
Type A cannot be used as a vapor barrier, because eventually all the vapors will end up in the insulation. This film is suitable for waterproofing, since its main task is to ensure the unhindered escape of steam, but not allow rainwater to pass through from the reverse side.
Vapor barrier B: classic double-sided installation
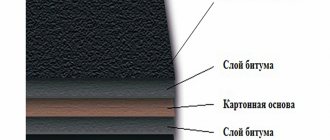
But B is a real vapor barrier material. Vapor barrier B has a two-layer structure that allows you to avoid condensation, due to the fact that moisture is absorbed into its fibers in the morning and disappears during the day.
That is why type B vapor barriers are always placed with the smooth side facing the insulation (film side), and the rough side facing outwards. Vapor barrier B is used only in insulated roofs, because For an uninsulated one, its strength is too low.
Type C membrane: for enhanced protection against water vapor
Type C vapor barrier is a two-layer membrane of high density. It differs significantly from type B in the thickness of the vapor barrier film layer. It is used in the same place as type B vapor barrier, but in itself is more durable.
Additionally, such a vapor barrier is used in non-insulated roofs to protect the wooden elements of the attic floor and in flat roofs to enhance the protection of thermal insulation. Vapor barrier C should also be installed with the rough side facing the inside of the room.
Polypropylene insulation D: for heavy loads
Type D vapor barrier is a particularly durable polypropylene fabric, one of which has a laminated coating on one side. This can withstand significant mechanical loads. It is used not only for insulating attic floors as a waterproofing layer, but also in insulated roofing to protect it from leaks. Moreover, type D vapor barrier is indispensable for rooms with particularly high humidity.
Here are the cases and where all these types of insulation are needed:
What you need to know about laying vapor barriers - answers to popular questions
Install a membrane on the outside or inside of the heat insulator
#1. If it is necessary to insulate the facade, then a film for vapor removal is placed on the outside.
#2. But when insulating the roof, films with an anti-condensation coating, diffuse or volumetric, are used. They must be placed on top of the mineral wool, similar to how it is done in a ventilated façade.
#3. If the roof is built without insulation, then the layer of film should pass underneath the rafters.
#4. When insulating the upper floor of a room under the attic, we place a vapor barrier at the bottom of the heat insulator.
#5. And the last option is internal wall insulation. Here, a vapor barrier film (without perforation) should be mounted on top of mineral wool, located inside the room.
How should the membrane be laid - face or back?
#1. As it turned out, many craftsmen do not know which side to install the vapor barrier. The easiest way is if the vapor barrier film has the same front and back sides, the issue is immediately removed. But not always - single-sided films are also produced. For example, anti-condensation ones - their reverse side is fabric, and during installation it should face the inside of the room. The metal coating on the foil membrane should also be facing there.
#2. The manufacturer usually includes installation instructions for diffusion films. It describes in detail the rules for installing the membrane. Read this description carefully: after all, the same company can produce both single-sided and double-sided films.
Sometimes you can determine it externally - by color. If the membrane has two sides, then one of them is more brightly colored. This is usually the outer side of the film.
In what cases is an air gap near the membrane necessary?
#1. At the bottom of all vapor barrier films there is usually a ventilation gap of about 5 centimeters wide. This is done to get rid of condensation. The wall cladding must not be allowed to come into contact with the membrane. If a diffusion-type film is used, then it is mounted directly on the insulation, moisture-resistant plywood or OSB.
Here the air gap must be made on the outside of the membrane. The anti-condensation membrane should have a gap of 4 or 6 centimeters on each side.
#2. When insulating the roof, we create a gap for ventilation by constructing a counter-lattice consisting of bars. And for a ventilated facade, the gap is obtained by installing racks or horizontal profiles located perpendicular to the film.
What should be the overlap when membrane parts overlap each other?
#1. There are markings along the edge of the vapor barrier films. It means how much overlap the canvases should have – usually from 10 to 20 centimeters. This is important when vapor barrier of the roof - here the film should also protect from moisture. The overlap is calculated depending on the angle of the roof slope. So, an angle of up to 30 degrees requires an overlap of up to 10 centimeters, 15 centimeters is enough for angles from 20 to 30 degrees. If the slope angle is less than 20 degrees, the parts of the film should overlap each other by 20 centimeters, no less.
#2. The diffusion type membrane should overlap in the place where the ridge is, also by 20 centimeters. In the valley the overlap will be 30 centimeters, and an additional strip is laid along the slope if the roof slope is small. The approach of the strip on both slopes should be from 30 to 50 centimeters. On the roof, the membrane also covers the side parts of the heat insulator. Its output goes either to a drain gutter or to a drip.
Why and how are joints glued, and is it necessary?
Individual parts of the membrane must be sealed hermetically. This is done using self-adhesive tapes, single-sided or double-sided. They are made from ordinary or foamed polyethylene, butyl rubber or butylene, polypropylene. These tapes can also be used to repair vapor barriers by sealing cracks and holes.
Manufacturers recommend which tape is best to use. Just don’t use tape, especially narrow tape, for these purposes. In this case, you can forget about tightness - the seams will come unglued in a short time.
Does vapor permeability change when changing sides?
All of the above modern barriers are divided into the following types:
- for one-sided installation, which need to be rolled out with a certain side up and it is recommended not to confuse them;
- and for double-sided use, usually with membranes that can be laid on either side.
You will be interested to know that the first membranes, which had the same properties as modern roofing membranes, were used in astronautics. And from there they were borrowed for construction and the national economy. But until recently, there were not as many problems with their installation as there are today.
There is a strong opinion among ordinary people: if you lay the vapor barrier to the roof insulation “on the wrong side,” then the entire structure will not last long. In fact, the correct choice of side affects exclusively the service life of the interior finishing of the roofing pie, because the rough side has the same abilities as the smooth side and has absolutely the same vapor permeability. But how much it will retain droplets of condensate is a little-studied question.
Preparation for installation of a water vapor barrier layer
Laying a vapor barrier involves carrying out a number of preparatory works. First, you need to select materials for all layers, as they say, otherwise the pie, and also decide what kind of vapor barrier
better for the floor. This “pie” consists of the following stages (starting from the top):
- Decorative floor covering.
- Plank floor.
- Vapor barrier.
- Counterrail.
- Thermal insulator (between the counter-batten boards).
- Water protection.
- Base floor.
Preparation begins with the base floor itself. All boards, wooden blocks and other parts made of wood should be treated with a special disinfectant composition that prevents rotting, the formation of fungus, and also protects against insect attacks.
If we are talking about repairing the floor, and not about building a new building, then the finished floor boards, floor covering and existing vapor barrier
on the floor must be removed in advance. All debris must be removed and then the wooden structure should be treated with an antiseptic.
The right side of vapor barrier: myth or reality?
Let's look at the concept of condensation - it's important. There is a catch here: for some reason, most ordinary people are sure that if high-quality vapor barrier is used, then there will be no condensation at all. Or it will quickly evaporate on its own. In fact, condensation is formed from moisture that rises upward in a vaporous state.
There is such a thing as a “temperature limit”, i.e. that specific condition under which the air temperature and humidity are sufficient for steam to appear in the form of droplets. For example, at a temperature of 15°C and air humidity of about 65%, condensation will already begin to form. But if the air humidity reaches 80%, then condensation will appear at a temperature of 17°C.
In other words, the process of formation of water vapor is the result of a difference in the so-called “partial pressure”. All the water vapor contained in the air tries to escape out into the colder street through the roof enclosing structures, but on its way they encounter a barrier in the form of a vapor barrier. If the air in the house warms up faster than the surface of the vapor barrier, then moisture from the air will fall on it in the form of condensation. Here the difference between an insulated roof and a non-insulated one is clearly visible: any vapor barrier that is laid on the insulation will warm up much faster than something that is in direct contact with the cold elements of the roof.
If there is no vapor barrier layer at all, or there is not enough of it, then water vapor penetrates inside the roofing pie and encounters a “cold front” there, which turns the vapor into condensate, and under special circumstances, also into ice. And all this happens inside the roof! This ice will not bother you until spring comes and the outside air warms up, thereby warming the roofing elements. Then the accumulated ice will melt and form smudges on the slopes inside the house.
But with a properly installed roof, condensation should not appear at all, and therefore the difference between the smooth and rough sides of the film is not particularly significant.
Polypropylene film
The easiest vapor barrier material to install is polypropylene film. It has high strength and impressive durability. Compared to the same polyethylene, propylene is more durable and better resistant to weather conditions.
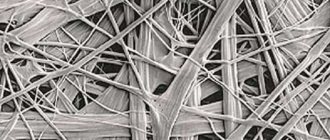
This material was first made exclusively from propylene, however, as operation showed, condensation formed in the film on the insulation side. Then manufacturers began to reinforce the film, adding an additional layer of viscose fibers with cellulose. Such a layer easily absorbed and, most importantly, retained a significant amount of moisture, preventing the formation of drops. As the humidity decreased, the accumulated moisture gradually dried out thanks to ventilation.
Roof insulation from steam exposure
Roof sheathing for ventilation gap
It is worth laying a roofing vapor barrier to protect the structure from moisture ingress from the outside and inside. Installation work is carried out step by step:
- Choice of material and installation side. The foil membrane is placed with the shiny side facing out.
- Rolling out the material parallel to the cornice. Between the cuts you need to overlap the walls by about 15 cm.
- Fastening the foil vapor barrier to the staples with a special stapler.
- Sealing joints with metallized tape.
- Installation of wooden sheathing to secure the membrane and place the external insulation.
- Attaching thermal insulation to the outside of the building.
- Laying additional insulation - you can seal the sheathing cells with mineral wool.
- Installation of a diffusion membrane that removes steam to the street and retains heat indoors.
- Organization of the ventilation gap in the form of a lathing. The thickness of the slats forms the necessary cavities.
At the last stage, a two-tier sheathing is installed in the form of perpendicular strips 25 mm thick.
Working with ventilated facades
Hydro- and windproof membrane
For houses with ventilated facades, a membrane with moisture- and windproof properties is suitable. It will protect the thermal insulation from moisture and leakage of warm air masses. When laying the material, several rules must be followed:
- the vapor barrier coating must be applied with the smooth part facing up;
- direction of the material – horizontally and vertically from top to bottom with an overlap of at least 50 cm;
- fastening points are selected according to the number of ventilation façade fasteners, otherwise the membrane will be torn by the wind;
- the end part of the thermal insulation is positioned so that the top layer of vapor barrier can extend 25 cm underneath it.
Fire stops should be located 120 cm from internal corners, doors, and windows.
Laying a film vapor barrier on insulated floors
Moisture-proof film on floors under insulation
In order to protect the floor surface from moisture and condensation, a film can be laid. Before work begins, insulation is carried out along the joists - mineral or basalt wool is placed in the cavity. Simultaneously with the vapor barrier, waterproofing of the first floor of the house is organized.
In the room area, roll insulation film is used. It is placed with an overlap of 12-15 cm, and then the joints are carefully glued. The material is placed on the wall by 10 cm.
Vapor barrier of concrete floors is performed at the last stage. First, waterproofing is laid, then insulation, and finally film.