What are beacons and how do they work?
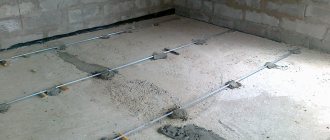
The beacons in the photo are simple devices intended for one-time use. These are guides along which, during the installation of screeds, a rule or vibrating lath is moved and thereby level the mortar layer.
The result is a perfectly flat surface. Beacons are long, smooth slats, usually made of metal, securely attached to the floor.
Slides of solution
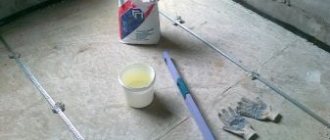
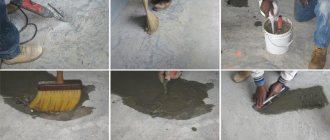
First, 2 screws are screwed into the base. They are connected by wire (fishing line), which is wound several times. The future guide is covered with the mixture to form a low wall, along the top of which a rule is drawn. The wall is leveled to the level of the future floor, and a mortar guide is obtained.
To install a semi-dry screed, it is convenient to install beacons on the floor from piles of mortar (cement-sand). Mounds of the mixture are placed in the corners and brought out below the zero level of the floor. It is imperative to maintain the distance between the tubercles no longer than the selected rule. The piles dry, and the solution is placed in the free space.
Preparation for installation of beacons
Before installation, you need to familiarize yourself with the information on how to correctly position beacons for floor screed.
Sequence of preparatory actions:
- The baseboards and old finishing coating, as well as everything that remains of it, are dismantled.
- Clean the surface of the base from peeling, dust, all kinds of dirt and stains.
- Grind and cover with cement mortar the existing depressions and cracks.
- A primer mixture is applied to the base.
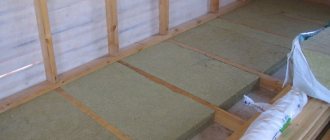
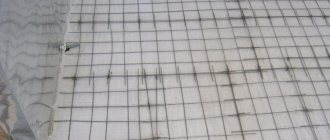
- Lay a layer of waterproofing material. Sound and heat insulation is placed on top of it.
Final Recommendations
Beacons for floor screeds can significantly simplify the process of screeding, as well as ensure the horizontality of the formed base. It is important to control the horizontal installation and ensure a fixed position. To increase the strength of the formed base, a screed with fiber fiber is used. To increase water resistance, add liquid glass to the cement screed. The proportions for concrete and mortar must be observed. Knowing how to calculate a cube of concrete, it is easy to determine the amount of material to fill the base.
On our portal, novice developers will be able to obtain comprehensive information on how to insulate the base and how to calculate the amount of bricks per base.
Definition of zero mark
After completing the preparation, before installing the beacons for filling the floor, they begin to search for the base level and only then set the guides. Using a laser level will help you mark.
The process for determining the zero point is as follows:
- At a distance of 100 centimeters from the floor surface, mark the starting point.
- Then, using a level, markings are applied on the walls at a meter height along the perimeter of the room and all points are connected with a solid straight (base) line.
- After this, measure the distance from it to the surface of the base. Practice shows that there will always be points that are located below the initial mark. For example, this distance is 97 centimeters. Thus, it turns out that the highest point will be one meter, and the lowest – 97 centimeters.
- The zero level is drawn through the highest mark. Then they raise it 3 centimeters. As a result, at all points the screed height will be at least 3 centimeters.
- Since the highest point may be located in the center of the room, it is better to check this. For this purpose, the painting cord should be stretched across the entire width of the room and moved along its entire length. When a new zero point is discovered, another zero level must be carried out. In the case where a small area of the base surface protrudes, you can simply remove it with a hammer and chisel, or it is best to use a hammer drill.
Experts advise how to install beacons for floor screeding: they should be placed in parallel, starting from the entrance. In this case, the distance between them cannot exceed the length of the laser level - it should be 20 centimeters less.
Which ones are better to choose?
It is quite advisable to pour a floor with minor differences of up to 3 cm under profile perforated plaster beacons, those that are used for walls. Their advantages are that they are cheaper than metal profiles for gypsum boards or profile tubes, they are very lightweight and can be easily cut with metal scissors. Their standard cross-sectional dimensions are 10x26 or 6x21 mm, the most common length is 3 m.
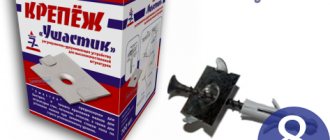
Plaster perforated beacons can be secured to a quick-hardening gypsum mixture, metal or plastic fasteners. The best of them are “ears,” which are thin metal plates with a hole in the middle and small curved ears. Such fasteners are mounted to the floor using ordinary dowel screws. The advantage of fastenings for beacons with “ears” is that there is practically no gap left between the floor and the beacon, this allows you to save on screed mortar.
To perform screeds with high differences, when a layer of more than 3 cm is needed, it is best to use metal profiles for gypsum plasterboard. The required length and width of the guides are selected, then they are cut and mounted under the level using mortar or screws. Their surface is smooth enough to guide along them with a rule.
If the width of the floor being poured is large and requires several layers of thermal insulation, protection from steam and moisture, then the best option is profile pipes installed on cement or gypsum putty mixtures. The design is strong, rigid, and allows you to pour a floor screed on top of penoplex, mineral wool, polyurethane foam, polystyrene foam and other insulating materials.
Calculation of beacons for screeds
Calculations of how to install beacons for screeds begin with determining the location of the first of them.
This can be done using simple calculations:
- For example, between the outermost lines the gap is 655 centimeters. At the same time, they should retreat from the walls 40 -70 centimeters. If the length of the rule is 150 centimeters, taking into account the need to maintain a 15-centimeter margin on each side, the guides must be mounted at a distance of about 100 centimeters from each other.
- In this case, the gap between the outer beacons will be equal to 385 centimeters according to the following calculation - 65- (135x2) = 385.
- Taking into account the permissible distance between the guides, which is approximately 120 centimeters, it turns out 385:120 = 3.2. Based on the calculations made, it is clear that in addition to the two outer beacons, 2 more will be required, which are fixed with the same distance - (655-70):5 = 117 centimeters. At the same time, 70 is the gap between the walls and the outer beacons, and 5 is the number of spaces between the beacons.
The best choice for guides is a T-shaped or U-shaped beacon floor profile, since it is more convenient to work with it than with wooden elements.
Assortment of guides
There are different types of beacons. They differ not only in the types of composite materials, but also in the installation methods. Moreover, some of them are used when pouring self-leveling mixtures, others - when installing screeds.
Lighthouses made of wooden slats
An example of laying a screed with wooden beacons.
The guides are wooden beams with a cross-section of 3x3 cm. In principle, you can use material of other sizes, the main thing is that the cross-section forms a square. Otherwise, the workpieces have minimal stability during operation. They are used for making cement screeds.
The level of the beacons is adjusted using wedges, screws or shims. This marking method is now outdated, but is still sometimes used.
Important! The materials allow you to form a screed of any thickness, but do not guarantee high accuracy when setting the floor level.
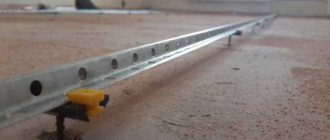
Beacons made of metal profiles
We are talking about a profile for drywall (PN 28x27 or PP 60x27). To increase strength, they are nested inside each other and get a square cross-section. Guides are used for constructing a concrete floor and dry screed or backfill.
You can buy the material at almost any hardware store. It is very convenient to work with, but there is also a minus - the lack of variations in the height of the profiles. The choice is limited: only 3 and 6 cm.
Beacons made of plaster profiles
Plaster profiles used as beacons
are in high demand for several reasons:
- Ideal for forming screeds with a small area.
- They have a simple device.
- They have the function of adjusting the height by screwing in and unscrewing the bolts.
- They differ in their small thickness of about 1 cm, i.e. with their help it is supposed to install only thin ties.
Beacons are used for laying cement screed and leveling self-leveling floors. You need to work with them very carefully - the material is flexible, easily deformable, and sometimes springs.
Metal pipe guides
We are talking about pipes with a round, square or rectangular cross-section. Most often they are used to install concrete floors in rooms with large square footage. The material is very durable and practically does not deform. It is able to withstand a large mass of screed.
Benchmarks
Benchmarks are used for constructing self-leveling screeds and self-leveling floors.
Working with such a professional tool as tripod beacons requires experience and skill. Benchmarks are used for installing self-leveling screeds and self-leveling floors. They are adjusted using a rod, which is used to set the level. They are distinguished by high accuracy. The marker beacons are shown in the photo above:
Self-tapping beacons
An example of using self-tapping screws as guides.
Dowel-nails or self-tapping screws are screwed to the base, and their heads are used to guide them to the level of the screed. Easy to install, but not very helpful in setting the exact level.
Important! For convenience, electrical tape is sometimes placed on the screws.
Mortar guides
They are created from a mixture of the screed itself or lime-cement mortar. Used when pouring cement screed and concrete floors. Their height has no restrictions and, what is especially nice, the beacons do not need to be removed after work is completed. True, you can’t even start working on them until the material dries, which takes several days.
Installation of beacons
The first of the beacons is installed in such a way that it covers a protruding point on the floor (for more details: “Installing beacons for floor screed with your own hands - recommendations”).
There is a certain sequence of actions on how to set beacons for floor screed:
- Using a hammer drill, a recess with a diameter of 6-10 millimeters is made in the concrete base (from the side of the entrance door to the room) on the line of the outermost beacon. A wooden chopper is placed in the hole, then a self-tapping screw is screwed in.
- Another fastener is installed at the second end of the line, where the guide will be located.
- Then a rule is placed on the caps of the fastening elements (a long block is possible) and a level is applied to it. The location of the second screw is adjusted so that the two caps are on the same horizontal line.
- A fishing line is stretched between them (you can use a painting cord). Several more recesses are drilled under it in increments of 50-60 centimeters. Choppers are inserted into them and screws are screwed in.
- A similar operation is performed along the line of the second extreme beacon. Then gypsum mortar is laid in handfuls along the outer guides. Instead, you can use a regular cement composition, adding alabaster to it, and then it will set in about 15 minutes.
Filling the screed
After completing the process related to how to place the beacons under the screed, they begin pouring the concrete floor.
This work is performed in the following sequence:
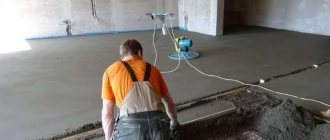
- prepare a solution and place it between the beacons;
- level the surface using a rule that is moved with smooth movements along the guides from the far wall in your direction. Excess mortar is smoothed along the screed into areas for further pouring;
- when the concrete surface has set, the plates are removed, and the recesses are sealed with mortar and smoothed using a spatula.
- When pouring the screed is completed, subsequent actions with the surface can be carried out no earlier than a month later.
Thus, when arranging a concrete floor, the most difficult process is the installation of beacons. If you follow the technology and know how to install screed beacons correctly, you can do this work yourself.