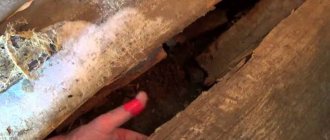
The main task of the vapor barrier shell is to protect the insulation layer from the penetration of household fumes. In the path of water suspended in the air, which contributes to the rotting of roofing materials and a significant reduction in insulating properties, it is necessary to build a reliable barrier.
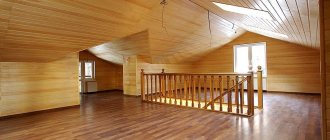
For attic roofs, thermal insulation is installed along the top floor. In such cases, vapor barrier is performed on the ceiling, and not on the pitched planes. They arrange it in a special way, which should be familiarized with by independent roofers and zealous owners of country property.
Why do you need a ceiling vapor barrier?
In modern homes there is much more moisture in a vapor state than, for example, half a century ago.
Its sources are the bathroom, kitchen, indoor plants, etc. Part of the moist air escapes through the ventilation ducts (if the natural one cannot cope, you need to install forced ventilation). But even with optimal air exchange conditions in an apartment or house there will be higher humidity than outside (with the exception of a few days when the humidity outside is about 90%). But even in this situation, due to the higher partial pressure indoors (it’s simply warmer inside an apartment or house), steam molecules will break through the structural elements of the building (floor, walls, ceiling) to the outside.
As a result, the uninsulated ceiling under a cold roof will freeze. After thermal insulation, a second problem arises: the dew point shifts into the insulation, creating a new headache (what the “dew point” is and the processes occurring inside the insulation layer are described in the article “Rules for the selection and technology of installing vapor barriers for the roof”).
Attention: for those who do not want to look at the link, let us clarify a little: vapor barrier is not needed when insulating the ceiling between the floors of a residential building and between the living and attic premises - there is no critical temperature difference that causes the formation of condensation.
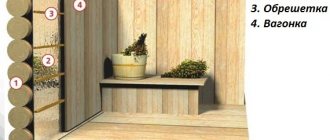
Scheme of vapor barrier from inside the room.
A vapor barrier film helps prevent the accumulation of moisture in the insulation - it puts a barrier in the path of steam molecules. It allows:
- extend the life of the ceiling, especially wood;
- eliminate the problem of accumulation of vaporous moisture in the insulation, preventing the formation of condensation in the winter;
- keep the insulation dry - any material in a dry state holds heat better.
Types of vapor barrier films
Vapor barrier materials differ in the material from which they are made, the principle of operation and the level of vapor permeability, which must be kept in mind when choosing a vapor barrier for the ceiling.
Type of material
For the ceiling, you can use roll and coating (painting) vapor barrier.
Rolled vapor barrier materials. Various types of vapor barrier films are classified as roll insulators. They can be in the form:
- films - do not allow steam to pass in both directions. This is a silent, although sometimes relative, vapor barrier. The vapor barrier film for the ceiling can be one-, two-, or three-layer, with or without reinforcing mesh;
- diffusion membranes that allow vapor to pass through from the side of higher partial pressure. Construction specialists and manufacturers sometimes say that these are membranes with one-way flow, which is fundamentally wrong. If you look at the material in cross-section (the diagram is shown below), you can see that vapor molecules can move in any direction. They cannot get to the insulation due to the higher vapor pressure in it. Therefore, the membrane can be laid on the ceiling on either side;
- foil films - used as reflective vapor barriers. Produced for baths, steam rooms and saunas. They are not used for residential premises - acquisition costs are disproportionate to the functions performed. Simply put, simple, cheap plastic wrap will work just as well.
Coating vapor barrier. Coating vapor barrier materials are represented by various types of mastics on a bitumen-polymer base. They can only be used outside and on concrete floors.
For a ceiling that is also a flat roof, in addition to mastic, liquid rubber is sometimes used.
Principle of operation
Vapor barrier film for ceilings can be of several types: A, B, C, D, F.
- A (some manufacturers mark it with the letters AM) - creates an insurmountable barrier to water molecules and allows steam to pass in both directions. Used to remove steam from the insulating layer;
- B is a typical representative of vapor barrier materials: does not allow steam to pass in both directions;
- C is a type of film B, only reinforced;
- D - laminated polypropylene;
- F - foil film.
Vapor tightness
Based on the level of vapor permeability, films are divided into classes:
- Class I - foil and foil films;
- Class II - vapor barriers made of propylene;
- Class III - soft material with a high coefficient of vapor permeability.
Sometimes, instead of a class, marking with the letters “SD” with a digital value of vapor permeability is used. For example, SD 50 means that in an hour, steam equal to 1 molecule of water will break through 50 m2 of film. For the ceiling, this indicator should be at the SD level of 30-40.
Manufacturers
There is a huge selection of films from different manufacturers on sale. At the same time, high-quality vapor barriers can be found not only in time-tested brands. This means that when choosing a little-known supplier, there is a risk of receiving material that is not of the same quality as planned.
No, not a marriage, but a combination of characteristics. The conclusion is simple: either you need to have a recommendation from acquaintances, friends or professional builders regarding an unpromoted brand, or you still need to buy a product from a well-known company.
Promoted brands include:
"Izospan" - produces polypropylene films of all types (A, B, C, D, F). Products:
- elastic;
- UV resistant;
- with a wide range of operating temperatures;
- environmentally friendly.
You can buy "Izospan" DM for 44 rubles/m2, "Izospan" C - 25 rubles/m2, "Izospan" FB - 35 rubles/m2.
"URSA SECO" (). Under the URSA SECO brand, membranes of type A and AM, films B and D are produced. These are high quality products designed to protect various structural elements of a building from steam. Effectively performs its assigned functions throughout the entire service life of the insulation.
Membranes can be purchased from 110 rubles/m2, films in the range of 11-19 rubles/m2 (depending on the density of the material).
"TechnoNIKOL". For the ceiling, a universal film is used, consisting of 3 layers, the top and bottom of which are polypropylene. Price 1 m2 - about 20 rubles.
"Axton" is a trademark of the French company Leroy Merlin. Membranes (type A) and films of types B, C and D are produced. For the ceiling you need to buy membranes (price starts from 21 rubles/m2) and film type B for 15-17 rubles/m2.
In addition, the following companies should be noted:
- "Ecolife";
- Tyvek;
- "Utah";
- "Ondytis".
Sometimes they talk about such criteria as resistance to ultraviolet radiation and the possibility of leaks under the weight of rainwater. Such characteristics have nothing to do with the ceiling.
Vapor barrier materials
Vapor barriers are produced by specialized enterprises and, according to their performance, are divided into the following groups:
- sheet products;
- rolled materials, including films;
- paint and varnish compositions.
Dry cement-based mixtures are also used as vapor barriers, mixed with water before application to the base.
Sheet materials for vapor barrier
Making vapor barriers from sheet materials is widespread. This is due to the fact that some finishing materials also have vapor barrier properties, so their use solves two problems simultaneously: finishing and vapor barrier.
Examples of such finishing are sheets:
- asbestos-cement (including corrugated slate);
- plaster-based cladding (moisture-resistant dry plaster);
- wood-fiber (hard).
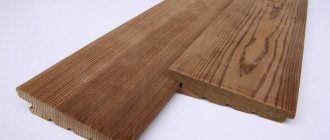
Rolled vapor barrier materials
This group includes polyethylene and polypropylene films (regular, reinforced, foil), aluminum foil and many modern vapor barrier materials with high performance, which are varieties and combinations of these films.
Conventional polyethylene film has high vapor barrier properties in all directions, but is fragile. Film reinforced with mesh or fabric has increased rigidity, which simplifies the installation process and makes the material more durable. There is a perforated type of polyethylene film, which is used where it is necessary to create conditions for the evaporation of condensate.
Polypropylene vapor barrier film has a fleecy cellulose-viscose layer on the outside of the impermeable shell, the pile of which prevents the condensate that forms on it from draining and ensures its gradual evaporation.
There are also so-called “breathing membranes”, which are used as a one-way vapor barrier - they are impermeable to water when open, since they have pores tens of thousands of times smaller than a drop of water, but are permeable to steam in the opposite direction.
This coating is used to insulate wooden roof structures - precipitation does not penetrate through the roof, and steam from the inside is freely removed to the outside. It is also used to protect ceiling insulation from steam, but from the base side, and the material must be laid in a certain way - with the markings facing outward, and the plain side facing the heat insulator.
Paint and varnish compositions
In rooms with low aesthetic requirements for ceiling finishing, various types of bitumen-based polymer mastics are effectively used as an effective means for vapor barrier of wooden ceilings. The advantage of this coating is the ease of application even on complex surfaces and the absence of the need to use frames and fasteners.
Which insulation is better to choose?
The choice of insulating material is directly related to the type of base, its evenness, the purpose of the room and the thermal insulation materials used.
For wooden ceiling
Rolled products are suitable for wooden surfaces, which prevent moisture from penetrating into structures and at the same time do not interfere with the effective ventilation of wood materials.
They cope with this task:
- polyethylene and polypropylene films;
- foil insulators;
- glassine;
- vapor barrier membranes.
Some of the listed materials, for example, polyethylene films, require the creation of a ventilation gap between it and the finishing layer, which will allow moisture condensing on the surface to evaporate without damaging the finish.
For concrete ceiling
To insulate concrete ceilings from moisture, materials that can be attached directly to the base surface are suitable. These are insulating mastics, varnishes and paints, foil insulators.
It is worth noting that foil vapor barriers can be attached either directly to a concrete ceiling surface or to a supporting wooden frame. The latter method is convenient because you can subsequently attach a ceiling made of plasterboard, plastic or wooden panels to the frame.
Features of vapor barrier installation
An important stage in protecting insulating materials is laying a reliable vapor barrier layer. All work is carried out during the repair or reconstruction of a finished building or during the construction of a new building. To correctly install a vapor barrier, you need to understand how to connect membrane sheets and which side to fix them to the insulating base.
Preparatory work
At this stage, work is carried out to select the appropriate type of vapor barrier, taking into account the features of the installation process, operational characteristics and material requirements.
Before laying a vapor barrier, careful surface preparation will be required. It is important to consider the type of material used in the construction of floors, walls, ceilings and roofing structures.
- During the construction of a log house, all structural elements are treated with protective antiseptics and fire retardants.
- When carrying out repair and reconstruction work, complete dismantling of the finishing, cleaning and preparation of surfaces is carried out:
Wooden elements are treated with compounds against aging, rotting and burning. Concrete, block and brick surfaces are treated with deep penetration antiseptic compounds.
Proper preparation of surfaces will ensure a long service life of the insulating material and the entire structure.
Technology for laying vapor barrier on the ceiling
If the roof structure and interfloor ceiling are made of wood, then the installation of a membrane for waterproofing is carried out on a prepared base.
Roll or block insulation is installed in the space between the rafters and joists; the best option is mineral or basalt wool. Next, you can lay vapor barrier protection on the ceiling surface.
When the thickness of the insulation is equal to the height of the logs, an additional slatted counter-lattice is installed to maintain natural ventilation.
It is necessary to install a vapor barrier on the ceiling with a slight overlap on the walls around the perimeter, and special attention should be paid to the corners. It is better to place the joints on the joists and glue them on both sides with tape on a reinforced base.
Important! When installing a vapor barrier, sagging and deformation of the panels should be avoided.
To thermally insulate a flat roof or concrete ceiling, a waterproofing film is mounted from the inside on a self-adhesive tape, then a sheathing made of wood or metal is installed.
The height of the sheathing is determined based on the thickness of the thermal insulation material and the minimum technological gap for ventilation. The installation step is 3 cm narrower than the width of the heat insulator, which allows for high-quality installation of the insulator into the prepared sheathing cells.
Technology for laying vapor barrier on the floor
The installation scheme for vapor barrier protection on the floor is similar to how the material is laid on wall and ceiling surfaces.
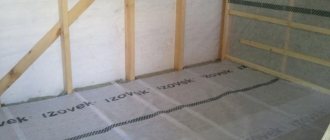
The wooden floor is insulated using joists, on which a waterproofing layer is laid. Next, insulation is placed in the space between them - wool on a mineral or basalt basis. After this, vapor barrier material is laid.
The rolled material must be laid with an overlap of 12 cm, with the joints carefully sealed with metallized tape on both sides. A properly laid vapor barrier should completely cover the floor surface with an overlap of up to 10 cm on the walls.
To install a vapor barrier on a concrete base, you will need to install a sheathing, in the cells of which a waterproofing layer and a heat insulator will be laid.
Laying waterproofing
Places of application: insulated roofs, structures with external insulation, suspended ventilated facades, attic floors.
How to lay: in the middle between the insulation and the outer cladding, the rough side towards the thermal insulation, the smooth side out. Often there is a manufacturer’s logo on the waterproofing; such a film should be attached with the logo facing out.
Characteristics: water resistance - from 300 to 1000 mm water column, vapor permeability - from 800 to 2000 g/m2 per day, tensile load - from 160 to 190 N/50 mm.
The face or the back of a vapor barrier?
If a breathable membrane is used to create a protective barrier, the main thing is to determine which side to lay the vapor barrier on - face or back.
The vapor barrier cake must be placed so that the protection is directed towards the heat insulator on both sides with the smooth back side, and with the rough front side facing the inside of the room.
The rough surface provides protection from moisture penetration into the insulation, and the smooth surface promotes maximum heat accumulation.
Selection of connecting tapes and adhesives for vapor barriers
A properly designed vapor barrier is a continuous and continuous layer. Moreover, ordinary construction tape for gluing overlaps and junctions is not suitable here - only special vapor barrier tape. Each manufacturer offers its own options for connecting tapes for different tasks.
For example, some of them are intended exclusively for fabric overlaps, while others are intended for adjoining films to smooth surfaces, and others are intended for connecting vapor barriers to porous and rough surfaces. Moreover, it is extremely important to purchase connecting tapes from the same manufacturer as the vapor barrier itself in order to achieve 100% tightness of the layer.
There are also several types of these:
- special glue for film;
- adhesive composition for connecting the membrane;
- construction tape;
- single-sided aluminum tape;
as well as double-sided adhesive tape to ensure the seal of individual panels.
How to choose a high-quality vapor barrier based on technical characteristics?
So, today there are many materials that have high resistance to vapor diffusion and low vapor permeability. For a long time, ordinary polyethylene films were very popular, which, in principle, do their job, but still do not please with high vapor permeability, low breaking characteristics and fragility.
Therefore, modern manufacturers, following their policy of import substitution, produce quite interesting technological solutions, among which there are even metallized membranes. There are many such materials and it is worth studying their characteristics to understand: what is the best vapor barrier for the ceiling of your home?
Let's list the most important characteristics for a vapor barrier:
- Vapor permeability is a characteristic of films and membranes from 0 to 3000 mg per square meter per day. This indicator tells you how many grams of water in the form of steam can pass through each meter of film per day. And the lower the number, the better, of course. If the numbers show vapor permeability in hundreds or thousands of grams, then you have a vapor-permeable membrane in front of you, and it should be placed not under the insulation, but on it.
- Durability . This characteristic significantly influences how easy your installation work will be. Cheap vapor barrier films are quite easy to tear; they lose their integrity even during installation, when tools fall on them or when they are touched. On the other hand, durable vapor barrier also tolerates temperature changes well.
- Water column pressure. The vapor barrier film is designed to retain water. This indicator is mainly important for a vapor-permeable membrane, which can literally get rained on. For the ceiling, this, of course, is not critical, although attic leaks should never be ruled out.
- UV resistance. This indicator varies from several days to a month. Surely you have observed how polyethylene, which has been on the street for a long time, becomes brittle and breaks. But high-quality material retains its strong performance for a long time. This is valuable if your installation work involves storing the exposed vapor barrier film on the ceiling for a long time without internal lining.
And in order to figure it out and clarify whether you have chosen the right vapor barrier for the ceiling according to the technical characteristics, carefully examine the pictograms shown on the packaging. And trust the brand that is known and trusted in the domestic market. Among such brands are Izospan, Izover, Technonikol, Delfa and others.
Vapor permeability as an argument for the design of a pie
All building materials have some degree of vapor permeability, which confirms their ability to pass vaporous water into and through themselves. If the roofing pie is constructed without taking this ability into account, in thermal insulation, i.e. In the main and thickest component of the roofing system, moisture will accumulate, which has a destructive effect on the elements of the building structure.
A properly selected vapor barrier must either prevent vapors from entering the roofing system at all, or sharply limit their penetration. Therefore, the vapor barrier film is selected so that its vapor transmission capacity is the smallest.
If a certain amount of moisture nevertheless passes through the vapor barrier, the thermal insulation layer, together with the waterproofing protection located above the insulation, must have a greater throughput. This pair of building materials should more actively remove water suspended in the air so that it does not stagnate in the thickness of the roofing pie.
Therefore, first on the side of the room, a vapor barrier is placed on the ceiling as a material with minimal throughput. Then, according to the rules for ensuring free diffusion, thermal insulation is installed, the vapor permeability of which should be higher than the same characteristic of the first layer. Before purchasing materials, you must definitely study their technical data in order to correctly select the components of the roofing cake.
Which vapor barrier is better for the ceiling of a wooden house
For wooden houses, as a rule, a vapor barrier membrane or polypropylene film is used. As for the first type, it is worth paying attention to the “smart membrane” - a modern material that can independently regulate the level of humidity in the room. But its cost is much higher than that of others, but maintaining the correct microclimate is ensured. Experts advise choosing the following types of vapor barrier materials when forming a ceiling in a wooden house:
- Penofol A is an easily installed vapor barrier due to the presence of a self-adhesive layer.
- Penofol B has a foil side for better heat retention in the room.
- Penofol S is a vapor barrier for the ceiling in a wooden house, similar to the first two groups with the presence of a self-adhesive layer.
- Izospan is a material with two layers and an improved system for evaporating moisture from the surface.
- Alucraft is a vapor barrier film with three layers, used in rooms with high humidity.
Application of varnishes and mastics
Mastics and varnishes are applied to concrete floor slabs. Their purpose is the same as that of rolled materials, i.e. they protect the insulation from moisture getting into it. The application technology is simple: using a brush or spatula.
Before starting work, you should carefully read the attached instructions, paying special attention to the temperature conditions for the work. Solvents used in varnishes and mastics are fire hazards, so special attention should be paid to preventing fires.
Polypropylene and polyethylene film
The cheapest option of all the above materials are thin polyethylene and polypropylene films. However, low cost does not mean poor quality and low efficiency; such materials provide controlled release of steam from the room.
Reinforced polyethylene film can be of two types: perforated and multilayer foil. Both options are used with great success to create a vapor barrier layer in houses with wooden ceilings. The foil material simultaneously performs a heat-reflecting function. As a result, heat remains in the room, which allows for some savings on heating costs.
Polypropylene film contains hygroscopic fibers, so it simultaneously allows steam to pass through and absorbs moisture. Thus, moisture penetrates the fibers and, gradually evaporating, comes out.
Films made of polyethylene and polypropylene are presented to the consumer in roll form, which determines the method of their installation. Solving the question of how to make a ceiling vapor barrier involves performing the following steps:
- The film is cut into pieces of a certain length.
- Lay the canvases on the ceiling, making an overlap of about 15 cm.
- The joints are hermetically sealed with wide self-adhesive tape.
- Fix the edges of the vapor barrier material using a metal profile or construction staples.
Izospan V has the best vapor barrier characteristics in this group of materials. However, despite the excellent vapor permeability, this isospan for the ceiling in a wooden house has a rather significant drawback - the lowest strength characteristics. This property greatly complicates installation work. When using Izospan B, you should be careful and careful.
The material “Izospan B” is a two-layer polypropylene non-woven fabric. Its top layer has a smooth surface, the bottom layer is fibrous and rough. It is the villi that prevent condensation from penetrating into the insulation and the ceiling. When choosing this material for arranging a vapor barrier layer, you should know one feature: its installation is carried out before the insulation. When vaporizing a ceiling in a wooden house, first of all, lay the Izospan B film, pointing its smooth side down.
The process looks like this:
- The roll is unpacked and the canvas is rolled out. Measure and cut pieces of a certain size.
- The strips are laid with an overlap of 15-20 cm in the horizontal and vertical directions.
- Elements for fixing the canvas are selected depending on the material from which the decorative ceiling will be made. For example, for a plasterboard ceiling, metal profiles are used, for a ceiling covered with clapboard, wooden slats are used.
- Regardless of the material used, it is recommended to purchase self-tapping screws with an anti-corrosion coating.
- The joints of the canvases are sealed with adhesive tape, and this must be done tightly enough.
- The insulation is attached to the ceiling using plastic disc dowels or galvanized self-tapping screws.
- Another layer of Izospan V vapor barrier is installed on top of the thermal insulation.
- Finally, the finishing material is installed. In this case, a free space of about 4 mm should be left between the vapor barrier material and the decorative structure.
Main characteristics and advantages of Alucraft vapor barrier
One of the best options is the Alucraft vapor barrier material with a three-layer structure. The top layer is aluminum foil, the bottom layer is kraft paper, and the connecting link between them is molten polyethylene. A special feature of aluminum foil in this material is its high tensile strength, which is ensured by the paper base. In this case, the material allows vapor to pass through and at the same time reflects the heat flow, therefore, the heat returns to the room.
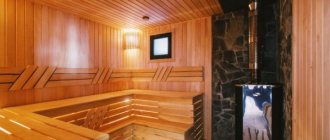
The material of this brand can be called an excellent option for creating a vapor barrier layer in a bathhouse and sauna, with brick, concrete and wooden walls. As for the ceiling of a private house with wooden floors, Alucraft is the best option in this case.
All materials with a foil layer do not pose a risk to human health. They do not tend to emit harmful substances when heated or exposed to solar radiation. In addition, foil vapor barrier for the ceiling is characterized by a very reasonable cost. The material is rolled into rolls, which simplifies transportation to the site and installation work.
Stages and methods of installation of various materials
Before laying the vapor barrier material, it is necessary to prepare the base for its fastening. If roll vapor barrier is used, the surface is pre-puttyed. If a liquid paint vapor barrier is used on a concrete base, it is enough to smooth out the unevenness. Then the surface is primed, and after drying, a vapor barrier can be applied.
Preparing a concrete ceiling
The materials, which are panels, are attached to the base with a construction stapler. Particular attention should be paid to the corners. Insulation panels are attached along the perimeter of the ceiling with an overlap of 10-15 centimeters.
The film spreads with tension, without allowing sagging of more than 1.5 centimeters. To ensure reliable fastening, the panels are fixed with tape. For fastening between beams, nails with a special enlarged head are used. The pitch between nails is 30 centimeters. The joints are additionally taped with construction tape. If the vapor barrier is attached after the insulating material, slats are attached with screws on top of it.
Sealing ceiling vapor barrier joints
The sheet vapor barrier is laid on an aluminum profile frame, which can be purchased at retail outlets. The profile can be replaced with thin bars, but experts advise preferring a factory profile, which already has grooves for attaching vapor barriers. After installing the solid sheets, all joints are glued with PVC film.
Rolled materials are rolled out from the bottom up and secured with profiles or slats.
Foil materials are placed with foil inside the room. The purpose of this installation is to reduce heat loss due to the reflective effect.
Advice! When purchasing vapor barrier material, it is important to correctly calculate its quantity. It is definitely worth considering that the rolled material is laid overlapping and with allowances, so its size increases accordingly.
Tools for installing ceiling vapor barrier
Tools for creating ceiling vapor barriers
When starting work on installing a ceiling vapor barrier, you should prepare the necessary tools. To install roll-type materials, you will need carpentry tools: a hacksaw, hammer, scissors, knife, stapler. On a large site, it is useful to supplement this list with power tools: a hand-held circular saw, the design of which would allow for attachment to a workbench, a screwdriver, a pneumatic stapler. The latter will entail the need for a compressor.
Varnishes and mastics are applied to concrete surfaces using brushes and spatulas. Work must be carried out in strict accordance with the attached instructions. To wash the instrument, you will need appropriate containers in the form of cuvettes and glass or plastic jars. Plastic ones are preferable because they do not break and do not pose a risk of injury to workers. In addition to tools, performing work on the ceiling surface requires the presence of stepladders and scaffolding of appropriate height.
You can make scaffolding yourself from suitable boards. It is simpler and easier to use purchased prefabricated scaffolding made from square pipes. At an affordable price, they are very convenient to use. They are light in weight. Quickly assembled and disassembled. Allows you to vary the working height within a wide range. They have wheels for moving around the premises.
How to lay a vapor barrier on a ceiling
Vapor barrier materials are very diverse. To install them correctly for maximum efficiency, the following factors should be considered:
- side of laying the vapor barrier - for some materials this does not matter, but if, for example, a double-sided membrane is used, attention should be paid to this issue, such a film does not allow water to pass through only on one side;
- docking - the vapor barrier coating must be solid; for this, different techniques are used;
- ventilation gaps - vapor barriers cannot be laid close to the ceiling insulation.
The purpose of the room and the nature of the wooden ceiling are also important: it separates the heated rooms or living room and attic.
Which side to put the vapor barrier on the ceiling
Which side to lay the vapor barrier on the ceiling depends on the type of vapor barrier chosen. The exception is coated and painted material, since in this case the functionality is ensured by the vapor barrier composition.
For all other options, the following recommendations apply:
- with a double-sided film, one side is rough and the other is smooth; the material is laid with the rough side outward and the smooth side inward; the outer layer retains moisture but allows it to evaporate; the smooth layer is impenetrable to steam and does not allow moisture to pass into the insulation;
- one-sided polypropylene film with a laminated layer is mounted according to the same principle: the smooth side inward, towards the insulation, and the regular side outward;
- ordinary plastic film has both smooth sides, so how exactly it is laid does not matter;
- foil sheets are laid with a metal layer outward, this option is designed to retain heat in the room, and it is the foil layer that reflects thermal radiation back into the room.
Important! There are always exceptions. For example, Izospan film is laid contrary to generally accepted recommendations: with the rough side inward and the smooth side outward.
How to install a vapor barrier on the ceiling
The vapor barrier coating must be a solid structure. Even fastening with nails can disrupt its vapor barrier properties:
- if a coating vapor barrier is used, then make sure that there are no untreated areas left; it is necessary to also cover the upper section of the wall in order to isolate the joints between the ceiling and the walls;
- films and membranes are laid with an overlap of 8–15 cm and the joints are taped, the sheets are laid as closely as possible to each other, the seams are taped.
If a sheet vapor barrier is performed, then a special profile can be used. The latter can be done with your own hands.
Ventilation gap when installing ceiling vapor barrier
There should be a ventilation gap of 50 mm between the layer of insulation and the vapor barrier on the ceiling. If the height of the logs is greater than the thickness of the insulation, such a gap is formed automatically. If the values coincide, then a wooden sheathing 50 mm high is first attached to the logs, and then a vapor barrier is laid on top.
A ventilation gap should also be maintained between the vapor barrier coating and the finishing of the ceiling. They use the same technique for this: install a sheathing of thin slats.
Characteristics and advantages of Penofol vapor barrier
The materials of this brand are very popular for creating a vapor barrier on the ceiling in a wooden house. The structure of such vapor barrier materials contains a thin aluminum film and polyethylene foam. Modification “A” has one foil layer, materials of group “B” have two layers of durable foil, models of group “C” have an additional adhesive base.
To solve the problem of how to properly make a ceiling vapor barrier, you must follow the following rules:
- The foil layer should be facing indoors towards sources of heat and moist steam.
- It is recommended to lay the panels end-to-end, trying to avoid gaps.
- The joints are hermetically sealed with adhesive aluminum tape.
- To create additional thermal insulation, the sheets are laid with an overlap of 10 cm.
- When using materials with double-sided foil, care should be taken when dealing with low-quality electrical wiring close together. It is important to remember that foil is an excellent conductor of electricity.
How to attach a vapor barrier to the ceiling
Ceiling installation includes 3 stages: waterproofing, insulation and vapor barrier. This is the last layer before finishing. Its installation is determined by the type of material used, as well as the design of the ceiling.
Fasteners for proper installation of vapor barrier on the ceiling
Construction staples are preferable for fastening the covering. They are much thinner, provide the same reliable fixation of the film, but do not violate the vapor barrier properties of the coating. Thick cardboard or other similar material should be placed under the staples.
It is allowed to use nails with wide heads. It is better to choose galvanized ones, as they are resistant to moisture and will last much longer.
Scotch tape also serves as a fastening element. It is used both for attaching film to joists and for vapor barrier of joints. In special cases, a profile is also used to connect sheets to each other.
How to install and secure different types of vapor barrier on the ceiling
In order for the vapor barrier to effectively perform its functions, it is necessary to follow all the rules for waterproofing during installation:
- during installation, it is allowed to use vapor barrier materials that are less resistant to water than waterproofing materials;
- it is very important to achieve a solid surface; for this, the film is laid overlapping, the sheets are glued with tape, and so on;
- it is necessary to exclude moisture in the vapor barrier coating; work cannot be carried out during snowfall, rain, or fog;
- when laying rolled vapor barrier, the material must first be kept in a warm room for at least 20 hours;
- The film should not be stretched too much, it should sag slightly;
- When vapor barrier corners, be sure to use solid material.
Important! When choosing different types of coatings, the list of rules is supplemented with recommendations from the manufacturer.
What tools and fasteners will be required?
For successful work and compliance with the sequence of steps, it is recommended to prepare the entire tool in advance. When working with vapor barrier, the following materials are used:
- Roulette.
- Hacksaw.
- Construction glasses.
- Knife with replaceable blades.
- Stationery knife.
- Hammer.
- Side cutters.
- Scissors.
- Pliers.
- Level.
- Construction stapler.
- Construction wide tape (tape).
To fasten materials, thin and always reliable staples are used. Experts with many years of experience claim that this is an ideal film fixer, and moreover, it does not interfere with the vapor barrier functions of the coating.
It is recommended to place any thin sealant such as cardboard under the staples. For proper installation, the materials of the ceiling covering, the side of installation, joints and ventilation gaps play an important role.
How to properly install a vapor barrier on the ceiling: step-by-step instructions
The finished vapor barrier in appearance resembles a pallet with sides. The coating should cover not only the insulation on the ceiling, but also the gap between the heat insulation and the walls. In addition, the film must cover each beam.
The first stages of finishing the ceiling are carried out as usual. The wooden surface is cleaned, treated with antiseptics and fire retardants, and communications are installed. Then the ceiling is waterproofed and insulation is laid on it.
- Laying begins from any wall. The roll or sheets are cut to size and secured to wooden beams with staples. In this case, a gap must be maintained between the heat insulator and the vapor barrier. If necessary, pre-attach the sheathing.
- The film or membrane must cover each beam. There are two ways to do this. A simpler option involves fastening the material around the beams. In this case, the canvases are laid perpendicular to the beams, taking into account some recess into the interblock space. If the length of the film is not enough, gluing the vapor barrier is allowed.
- Another option: cut the film into fragments of the appropriate size; you need to wrap each compartment separately. All seams and joints are additionally taped with tape. As a rule, this method is used for vapor barrier of panel-box ceilings. Laying is done with an overlap. The tolerance on walls is 10–15 cm.
- The joints are sealed with tape according to the following scheme. First, glue the seams between the canvases. To do this, bend the overlap, secure the edge of the vapor barrier with tape, then remove the protective strip from the adhesive tape and attach the overlap on top. The joints with the wall are sealed in the same way. In this case, you cannot stretch the film; it should sag by about 2 cm.
- Then the second and third layers of vapor barrier are laid, following the same rules. Make sure that the joint of the next layer does not coincide with the seam on the first layer. The displacement should be at least 30–40 cm.
Foil material, especially sheet material, is mounted according to a different scheme.
Membrane "TechnoNikol" for the ceiling
The leading position among vapor barrier materials is occupied by the TechnoNikol membrane. Her brand “Optima” is excellent for vapor barrier of the ceiling in a house with wooden floors. The structure of this material contains three layers, two of which are made of polypropylene, the middle layer between them is a high-tech functional vapor-permeable film. Membranes of this brand are in most cases presented in roll form up to 1.5 meters wide and 50 meters long. The material is the best option when creating a vapor barrier layer on any type of floor. Can be used both indoors and to protect the external surfaces of a building.
Installation of a vapor barrier on a wooden ceiling is carried out according to the following scheme:
- The membrane should be laid on top of the thermal insulation, with the smooth side facing the inside of the room.
- The stripes can be located in a parallel or perpendicular direction relative to each other.
- The strips are installed with an overlap of 10-15 cm.
- To fasten the membrane, it is recommended to use galvanized self-tapping screws with a wide head or special brackets that have an anti-corrosion coating.
- The joints of the canvases are hermetically sealed with mounting tape with a self-adhesive side.
- The edges of the membrane sheet must be placed on the wall by 15-20 cm and secured with a wooden strip or metal profile.
- The perimeter of the vapor barrier layer is also taped with mounting tape.
- In areas where the membrane will come into contact with beams, pipes and ventilation ducts, care and attention should be exercised. It is important that the vapor barrier does not have folds or sagging.
- A gap of about 3-4 cm should be left between the vapor barrier membrane and the decorative ceiling for ventilation.
In addition to the main listed brands, there are other materials on the market for ceiling vapor barrier. Their quality characteristics and efficiency are also at a high level.