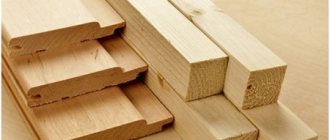
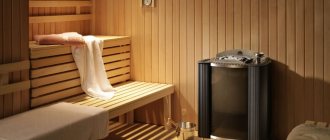
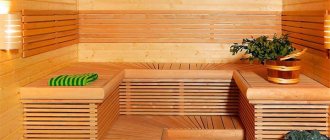
Wooden finishing slats - the material is so versatile that it is used for cladding almost any living and working premises: in the country house, in the bathhouse, on the balcony and in the bedroom. However, in order for such a finish to last a long time, it is necessary to choose the right material and secure it correctly.
Fastening the lining
Features of the material
Wood is heterogeneous in its structure. This means that the manifestation of certain qualities depends on the direction of effort. For example, moisture from the air is more actively absorbed across the trunk, and removed along the trunk, which allows the log house to do without ventilation - this role is performed by the tree itself.
Lamels - boards cut from a trunk, mostly lose this feature, but even the thinnest lining can remove excess moisture from the room.
However, when wood absorbs moisture, it changes in volume, unevenly, and along the grain. Hence the first strict requirement when installing products.
Moisture absorption and removal rate depend on many factors.
Wood is not the only material that changes in volume as temperature changes. In all such cases, laying involves non-rigid fastening so that the material has room to change in length.
Reply to reader
Greetings, Sergey!
We are always happy to help our readers with any problems they may have, and we try not to miss every such request. There is only one solution to the problem, although the ways of its implementation may differ - we will talk about this a little later, but now let's figure out why the casing can swell.
Wood and its properties
We know that wood is heterogeneous in its structure, which directly affects its properties. For example, moisture enters it from the air mainly across the trunk, and is removed along it. It is this property that allows the construction of log houses from logs and beams without organizing ventilation. The lining, due to its dimensions, is practically deprived of this property, however, it is still capable of removing excess moisture from the room.
Having absorbed a certain amount of water, the wood begins to change in size - mainly along the grain. This feature determines some rules when installing this material.
- The lamella itself (lining board) has a certain profile designed for a tongue-and-groove connection. Its groove is always deeper than the tenon, so that there is space for ventilation and thermal expansion of the material. However, when installing the lining, you still shouldn’t hammer the lamellas too tightly into each other - usually the connection is not completed by 2-3 mm. This requirement should be followed especially clearly in particularly damp and warm rooms, for example, saunas and baths.
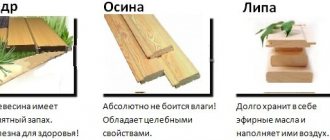
- Not all types of wood are equally susceptible to moisture. The denser its structure, the slower the process, which is why these varieties are chosen for finishing wet rooms (linden, abashi, aspen, cedar).
- This parameter is greatly influenced by the degree of dryness of the wood. The better it is dried, the less likely it is that warping will begin over time.
Advice! In general, changes in temperature and humidity cause many materials to change in size, so these indicators are always taken into account during repairs and construction.
Reasons for swelling of clapboard sheathing
The defect looks like a wave consisting of two or more lamellas. And as luck would have it, it most often appears not somewhere in an inconspicuous place, but in the middle of the wall. The reason for this phenomenon, as we have already found out, lies in a change in volume, which, in turn, can be caused by various factors.
- In 90% of cases, the reason is the use of natural humidity when covering the lining. Such wood does not need strong changes in temperature and humidity in order to respond to the environment by changing its geometry. Very often it is country houses that suffer, which are not heated in winter. The reason is that wet wood does not have the reserve volume for additional absorption that dry wood does.
- The second reason why swelling occurs at normal humidity levels is the installation method, as we discussed earlier. If the boards are fitted too tightly, then the expanding tree (this can happen after turning on the heating) can literally tear out the fastener “with its roots”, or it can crack if the fastening is too secure.
- If a similar picture is observed on the ceiling, then the culprit is often the accumulation of moisture behind the cladding (sometimes such incidents also happen with walls). Moisture can appear on the ceiling for various reasons: poor steam or waterproofing, condensation in the absence of insulation - this can only be determined on the spot by disassembling the casing and looking under it. In this case, no measures will help until these shortcomings are eliminated.
- A similar effect can occur if there is insufficient ventilation behind the sheathing. Lack of air movement also causes wood to warp.
Why did the lining swell?
The deformation looks like a wave of several lamellas formed on the ceiling, usually not near the wall, but closer to the center. And before you decide what to do, you need to establish the cause of what is happening. The change in the volume of lamellas is a natural phenomenon. But why exactly it took on catastrophic proportions, and the lamellas swollen, needs to be found out on the spot.
Trying to fix the material as rigidly as possible to compensate for the deformation will lead nowhere. The tree is capable of tearing out the strongest fasteners, or it will simply crack on its own.
Elimination of deformations
There are essentially only two methods. However, if the slats are damaged due to deficiencies in the roof or ventilation, it will not be possible to correct the matter only by refinishing.
If the reason is the high humidity of the material, then it is advisable to dry it before laying it back. The ideal option for this is a heated garage or shed. Heaters greatly dry the air, which will provide better conditions.
Source
Corrective Action
So, how can you correct the situation with your own hands?
In fact, the instructions for action are extremely simple, but they will require time and some effort. The price of work when hiring a specialist can be quite high, since usually no one wants to take on alterations - you just have to fix everything yourself.
- There are two methods, but they differ only in that they will need to expand different areas of coverage.
- In the first case, the sheathing is removed from the corner, right down to the last raised lamella. As you understand, you will have to tinker a lot, not only during dismantling, but also during reassembly. Inspect the curved panels carefully; perhaps it is better to reuse them somewhere closer to the corner, so that if something happens, you do not have to repeat the jointing again.
- Reassemble the surface, carefully checking the expansion gaps between the boards. Most likely, the end panel will not fit into place and will have to be cut to width. Use clamps and self-tapping screws as fasteners.
- The second method will also require jointing, but only the swollen area. Technically, it is more difficult to complete, since you will have to trim the lining tenons a little. Then the boards need to be tucked back in, which is not always possible. To fix the elements you will have to use either nails or self-tapping screws.
Advice! If the cause of swelling lies in excess moisture of the material, then before reinstalling it, it must be dried.
That's all! Now you know why the lining swells, and you can return the lining to its original appearance, taking into account the necessary details. This video in this article will also help you.
Wooden finishing slats - the material is so versatile that it is used for cladding almost any living and working premises: in the country house, in the bathhouse, on the balcony and in the bedroom. However, in order for such a finish to last a long time, it is necessary to choose the right material and secure it correctly.
Wood is heterogeneous in its structure. This means that the manifestation of certain qualities depends on the direction of effort. For example, moisture from the air is more actively absorbed across the trunk, and removed along the trunk, which allows the log house to do without ventilation - this role is performed by the tree itself.
Lamels - boards cut from a trunk, mostly lose this feature, but even the thinnest lining can remove excess moisture from the room.
However, when wood absorbs moisture, it changes in volume, unevenly, and along the grain. Hence the first strict requirement when installing products.
- The lining is not laid tightly. Do not drive the tenon into the groove all the way; there must be a technical gap of 1–3 mm, otherwise the board will swell. This condition must be observed especially strictly in the bathhouse, where the humidity and temperature are high.
Moisture absorption and removal rate depend on many factors.
- Wood species - aspen and linden, for example, are not prone to swelling, which is why they are used for finishing in the bathhouse. But poplar and birch are prone to warping.
- Sections of the trunk - when cutting, the boards turn out to be cut from different places of the trunk. As a result, their ability to expand turns out to be different: a board with a tangential cut expands by 9–15%, a board with a radial cut – by 5–10%.
- Degree of drying - the lining is produced with natural humidity, that is, air-dried, and dry with a humidity level of 8–12%. To do this, the latter is dried in drying chambers. The drier the wood used, the lower the likelihood that the lining will swell.
Wood is not the only material that changes in volume as temperature changes. In all such cases, laying involves non-rigid fastening so that the material has room to change in length.
The deformation looks like a wave of several lamellas formed on the ceiling, usually not near the wall, but closer to the center. And before you decide what to do, you need to establish the cause of what is happening. The change in the volume of lamellas is a natural phenomenon. But why exactly it took on catastrophic proportions, and the lamellas swollen, needs to be found out on the spot.
- The most common reason is the use of natural moisture lining for interior work. Such wood reacts even to small changes in humidity, which is especially noticeable when decorating a dacha where the premises are not heated, or on a balcony. Dried wood has a kind of reserve for absorbing moisture without changing in volume.
- Why the lining swelled at good humidity levels can be understood by evaluating the fastening. If the nails or screws are tightened all the way, the lamellas simply have nowhere to expand. As a result, the fasteners will simply be torn out, and the “freed” boards will swell.
Trying to fix the material as rigidly as possible to compensate for the deformation will lead nowhere. The tree is capable of tearing out the strongest fasteners, or it will simply crack on its own.
- The accumulation of moisture behind the sheathing occurs when finishing a wall, but is more often observed on the ceiling, especially in the country, where the roofing cake is the simplest. What exactly was the cause - poor waterproofing, insufficient vapor barrier, lack of insulation - can only be determined at the scene of the accident. In any case, this means that on properly installed trim, condensation will collect on top, and roof deficiencies will need to be corrected before anything can be done to the trim.
- Almost the same picture is observed in the case of insufficient ventilation. Again, the lining on the ceiling swells more often, since in a vertical position the drainage channels on the back side of the board are more active. The absence of a layer of air between the roofing cake and the lamellas necessarily leads to the latter swelling.
There are essentially only two methods. However, if the slats are damaged due to deficiencies in the roof or ventilation, it will not be possible to correct the matter only by refinishing.
- The first method is the most labor-intensive. It is planned to remove part of the material, including the deformed one, and lay it again, carefully observing the requirements - loose joints and non-rigid fasteners.
- The second method is somewhat simpler, but requires accuracy and experience. In this case, only damaged lamellas are removed. But before laying back, 2 or 3 of them are cut in width so that all the material is returned to its place with gaps - both when joining the tongue and groove, and with the side ones.
If the reason is the high humidity of the material, then it is advisable to dry it before laying it back. The ideal option for this is a heated garage or shed. Heaters greatly dry the air, which will provide better conditions.
How not to spoil the finish. Why was the lining bent like a boat?
Today we have a very “sick” but relevant topic for conversation. It is quite common for cases when, after a certain period of time, quite unpleasant moments with the finishing begin, the lining swells or, on the contrary, dries out, it bends like a boat, and is torn off from the fasteners. This is how it recently turned out for our regular customer and good friend. Thin lining was purchased in packs in shrink film for finishing the ceilings indoors. As it turned out later, the workers treated their duties very incorrectly and their carelessness led to such consequences.
The lining was delivered to the room, the film was completely removed, I would like to note that the heating in this room was maintained at a high level and the temperature rose to a significant height, and as a result of this, natural drying processes began to occur. Despite everything, the “masters” tried not to burden themselves and installed the material right away. And just a few days later, the ceiling began to resemble a “boat” rather than a smooth and even surface.
What rules exist for wooden lining in order to avoid natural processes, so that the finish remains beautiful, causing joy, and not bitterness and disappointment. It is not known why, but many people neglect all the rules for the operation and use of wooden products. Well, who told you that you can immediately install the lining on the walls and ceilings on the day you purchase it? How wrong you are in your knowledge. In order to avoid making mistakes in the future, you need to know and follow simple operating rules for products made from natural wood.
Boat-shaped lining
Lining is the most common finishing material, beautiful, practical, high quality and with an affordable price tag, it is not a scarce product. The finishing made with lining looks aesthetically pleasing, creates special warmth, closeness to nature, coziness and comfortable living. This material is simply ideal for interior decoration.
When buying lining, you understand perfectly well that it can subsequently be treated with any varnish and paint composition, giving it a certain look and at the same time protection from unwanted processes, and also for lovers of the ECO style, the lining remains in its natural, original form. But the specialists of the Lesobaza company. The Russian Federation advises not to neglect surface treatment and application of paints and varnishes in the near future.
The lining is absolutely safe to use. For its production, raw materials of coniferous trees, larch, cedar, alder, linden, oak and other species are used. We can safely attribute the following to the positive qualities of the material:
- Possibility of installation in any direction, creating the desired pattern;
- It is light in weight and easy to use;
- no careful leveling of walls is required;
- used for various surfaces;
- excellent thermal insulation;
- duration of service life.
Professionals of the Lesobaza company. The Russian Federation notes three types of gross violations in laying lining:
- Natural drying processes occurring in different types and species of wood - you should take into account which type of wood is most susceptible to the influence of natural drying processes: for example, lining made of coniferous wood will shrink from 3 to 5% and are universal in use; cedar products undergo the least changes 1 2%; Larch, although not sad, is in first place in terms of changes. For example, a board with a width of 150 mm, under certain conditions, can shrink by 10 mm. All this leads to gaps between the panels and spoils the appearance of the finish.
- Installation of sheathing or frame (must be taken into account when cladding the facade). In this case, an incorrectly calculated step or distance between the lags can lead to deformation, that is, cause the board to bend, it will simply “lead” and this will not go unnoticed.
- Selection of fasteners. You should not save on such a necessary matter, otherwise, in the future, you will have to part with a much larger amount of money to correct mistakes. If the fasteners are of poor quality or not quite suitable, you will face such unpleasant “surprises” as the boards bending like a “house” or “boat”, panels tearing out, breaking them, chips, cracks, as well as possible detachment from the surface of the walls and ceilings.
Use specially designed clamps for hidden fasteners, protect the finish from damage and at the same time provide a strong, reliable and beautiful bond. The clamps are completely invisible to the eye, guaranteed to be safe, with a long service life of 20 to 40 years, and most importantly, with a price tag that is affordable for everyone.
If your choice is self-tapping screws, then use special small products with an anti-corrosion coating, which, in case of dampness, will not give unsightly, rusty stains. Some craftsmen use nails and a construction stapler when working; we would like to point out right away that these products are not reliable enough fasteners.
After you have purchased the lining, you must:
- Remove the protective film.
- Carefully, never on bare ground, but in the room where it will be used, lay the boards on a flat wooden surface.
- It is necessary to allow the material to acclimatize to these conditions for two weeks or more. We should not immediately grab the hammer; let it sit, dry and “get used” to the humidity of a particular room.
- Do not forget that the humidity of the board and the room where finishing work is planned must be identical! Otherwise, it will cause irreversible deformation processes.
The frame or sheathing for external use must be treated with an antiseptic to protect it from the occurrence of fungus, mold and rot.
If the temperature in the room for cladding is below +10 degrees C and the humidity threshold is too high, you should not start work. If you have any questions, ask them to the specialists of our company website
and receive comprehensive answers. We are happy to help you provide any assistance in finishing and construction work, as well as in selecting and calculating the required volume of boards, processing agents, and painting in our own production paint shop. We will do everything quickly, efficiently, without damage to the home owner. We are waiting for calls at the phone numbers listed below and also read us on the blog on the website of the same name, watch videos with practical advice from experts.
company . RF
thanks you for your cooperation, wishes you favorable weather in your home with our products.
Wooden finishing slats - the material is so versatile that it is used for cladding almost any living and working premises: in the country house, in the bathhouse, on the balcony and in the bedroom. However, in order for such a finish to last a long time, it is necessary to choose the right material and secure it correctly.
The main reasons for swelling of the lining
A tree is a self-sufficient system that can maintain its own moisture. Absorbed across the trunk, it is immediately removed along it, so houses made of timber are not subject to swelling or deformation due to humidity. Lining, like any sawn board, is devoid of these natural properties, therefore, when exposed to high humidity, its fibers expand. This is the main answer to the question why the lining in the bathhouse swells due to high humidity.
Externally, the swelling of the lining looks like waves along or across the room, squeezing the lamellas out of their place and disturbing the geometry of the masonry. Why does the lining swell in waves? Causes of deformation include:
Measures to combat lining swelling indoors
You can talk for a long time about why the lining swells and how to avoid it, but if trouble happens, all that remains is to correct it by all available means. The repair methods are not complicated, but require some effort; they are all based on rearranging and expanding the covering area of the lining.
- If the lining is swollen vertically, it is necessary to disassemble all the boards from the corner to the swollen area and reposition them while maintaining the required distance. The outermost lamella is trimmed to the required width. It is possible to disassemble only the swollen section, but reassembling it will require carpentry skills.
- When the waves are directed horizontally, the swollen area is completely dismantled and the lamellas are trimmed to height. Then they are laid again.
- If the cause is poor-quality installation of ventilation or vapor barrier, then it will have to be repaired, at least in the damaged area.
3/5 — (2 votes)
What to do if the lining on the ceiling has dried out and come apart and methods of repair
Wooden lining is used as ceiling lining in rooms for various purposes. Wooden coverings will last quite a long time if they are installed in compliance with technology and operated under proper conditions. A lining ceiling can be found in a country house, in an attic residential floor, on a balcony or loggia, in a utility room. Sometimes deformations, gaps and cracks appear on such a ceiling. If your ceiling lining is deformed or comes apart, you will learn what to do from our article.
What to do if darkening of the material in the bath is noticed?
Many people complain that darkening or changes in the original color appear on the surface of wood panels. This is due to material of inadequate quality or intense influence of external conditions. This is characteristic of all types of wood, including larch, which is characterized by high strength and density.
Attention
Wood fibers after drying decrease in size and become more brittle. This is especially noticeable in materials that have been artificially dried.
When moisture again enters the tissue structure, they absorb it and swell. Subsequent drying is not always complete in baths and saunas. Often, rooms that are not completely dry are again subject to a change in microclimate with an increase in the level of moisture in the air.
As soon as the first spots of darkening or spots are noticed, they should be gotten rid of. To do this you will need:
- fine-grained sandpaper;
- special stain or antiseptic composition for wood;
- tools;
- various improvised means.
After completing all the activities, you should not immediately use the bathhouse, since the effect must be consolidated and the compositions must be absorbed into the structure of the material.
In the steam room
Most often, elements that darken are removed, and new ones are inserted in their place without damage. This is very expensive because removing one strip requires removing the coating before it is positioned. Compared to other boards, the material will be different and will shine with a new coating. There are 4 simple ways to get rid of dark spots without dismantling the entire wall:
- Removing plaque with sandpaper and applying an acrylic coating. Thanks to this material and cleaning method, the wood quickly returns to its original appearance and acquires the necessary protective properties. Read about how to clean dirt on lining here.
- Coating with paints and varnishes simply hides the changed color of the lining. At the same time, the texture of the panels with wood fibers will give way to a strict monotonous classic (read about how to paint the lining inside a house here)
- Thanks to a varnish coating containing a light color, it is possible to lighten wood panels by 2-3 tones. This will make the material attractive, but will not return it to its previous state.
- A solution for bleaching wood is prepared as a mixture of chlorine or the active component of another substance with hydrochloric acid. It is possible to obtain a lighter shade of the surface due to the chemical reaction of the composition, but to preserve it, a coating with a colorless or light varnish is required.
Important
It is impossible to return the lining to the appearance of a new finish using any of the listed methods, but it is possible to significantly improve its appearance.
You can find out about cladding the walls of a bathhouse with clapboard here.
Why was the lining on the ceiling deformed?
Before you begin repairing a ceiling lined with clapboard, you need to understand the reasons for this problem. Various surface damage and deformations occur even in rooms with a normal microclimate. There are many reasons for damage to the ceiling surface lined with clapboard. Let's look at the reasons for such problems.
Causes of swelling of wooden lining
In order to understand how to repair a swollen lining ceiling, you need to understand why this defect appeared. Wave-like deformations of wooden ceiling coverings occur more often in the central part of the ceiling. It is less common to encounter such a defect on the edge.
When the humidity in a room changes, any natural wood materials expand or contract slightly. As a rule, such linear changes in size are insignificant and invisible to our eyes.
However, there are several reasons why such deformations become significant:
On a note! If the wood is well dried at the factory, then it has a volume reserve that allows the material to absorb moisture without a significant change in linear dimensions.
Advice! Before leveling the lining on the ceiling, you need to eliminate the causes of its swelling. Otherwise, you will have to face the problem more than once.
The lining came apart
Dry areas of the coating and cracks appear due to the fact that the wood unevenly releases moisture throughout the entire board. Moisture evaporates most actively at the end of the panel. Moreover, the greater the changes in temperature and humidity in the room, the more the material will deform. This leads to cracking of the lamella and its deformation.
If the lining on the walls and ceiling of the room has dried out, then there may be several reasons for this phenomenon:
How I searched for a common language with clapboard
The first proven method of dealing with unexpected situations is to do nothing. That's what I did. Comrades in misfortune wrote on the bathhouse forum that the lining often returns to its old place without outside participation. The bet is that after drying the tree will decrease in size and return to its previous position. To make the process go faster, I deliberately created drafts.
Unfortunately, this method did not help me. The reason is simple - drying only works when there is free space on the inside and outside for air circulation. Due to my inexperience, I laid the walls in the steam room without taking this feature into account, for which I paid in the future.
Due to the fact that the wood does not dry out in the steam room, the risk of not only swelling, but also rotting of the material increases.
The lack of space on the inside prevents moisture from leaving the lining and accelerates its destruction. Things were going for the worst - I was already thinking about starting a complete re-paneling of the steam room. But it didn’t come to that.
A neighbor with a homemade sauna, who has already faced the consequences of his engineering solutions, gave me a real sauna life hack. If the water does not evaporate on its own, it needs help in this matter. To do this, I removed one board in an inconspicuous place to help air circulation.
How to repair a lining ceiling?
There is no point in repairing the ceiling without eliminating the cause of the deformation, gaps or cracks. Only by eliminating the cause can you insure against the occurrence of a problem in the future. Then you can begin repairing the wood paneling.
Elimination of coating swelling
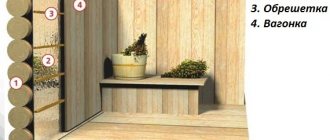
As a rule, the most common reason for deformation of a wooden plank covering is due to poor ventilation of the space behind the covering. This is due to the lack of a ventilation gap or insufficient insulation and waterproofing of the roof. In any case, before repairing the clapboard ceiling, you need to redo the roofing pie using high-quality materials. If there is no ventilation gap behind the casing, then it is completely dismantled and installed on spacer strips 2 mm thick.
First, we will tell you how to straighten the bulging lining on the ceiling. The following expert advice will help you with this:
Important! If the reason for the surface deformation is the installation of boards of natural moisture, then the lining is removed and laid to dry in a heated room with a working ventilation system.
The lining has dried out and what to do
We should also tell you what to do if the lining on the ceiling has dried out. The choice of repair method depends on the purpose of the room and the extent of surface damage.
Depending on the size of the defect, one of the following methods is used to eliminate it:
Attention! Do not use putty to repair boards in an unheated room. Significant temperature changes will lead to rapid cracking of the solution and its spillage from the cracks. The reason is that putty has a high coefficient of thermal expansion.
One more piece of advice needs to be given. When using a mixture of sawdust and varnish, keep in mind that it sets very quickly, so you do not need to prepare too much of the mixture. It is better to do it in small portions and apply it with a spatula. Using this tool, the solution is well compacted in the cracks. When it dries, the surface is sanded well, cleaned of dust and repainted or varnished.
Source
How to choose and lay lining to avoid swelling in the future
To avoid problems with deformation of wood finishes in rooms of varying humidity, you need to know why the lining swells and how to avoid it. When installing lining, the following rules should be observed:
- Choose dry wood (8-12%) of a variety suitable for the type of room.
- Do not install the boards too tightly. When preparing, it is taken into account that the tenon should not fit into the groove all the way, but it is recommended to leave another 1 mm for insurance. At this point it is important not to overdo it; with a larger increase in distance, gaps may form.
- Proper ventilation device. On the back side of the lining there are grooves through which condensate flows if it has formed. The system works when installing planks on walls vertically, but is not effective when installed horizontally or on ceilings. In this case, it is necessary to pay special attention to the moisture removal system in the room and do not forget about a centimeter of free space between the insulation and the board.
What to do if the lining on the ceiling has dried out and come apart
Wooden lining is used for covering premises for various purposes. It is used for finishing the surface of walls and ceilings in living rooms, baths, utility rooms, for cladding loggias and balconies. Provided installation rules are followed and a protective finishing coating is used, the lining will last for many years. But it happens that the lining of the lining swells, dries out and becomes covered with cracks. If the lining on the ceiling bulges or comes apart, we will tell you what to do and why this happened in our article.
Processing lining in a bath to prevent blackening
In order not to wonder why the lining turns black in the bathhouse, what to do, you can prevent the process of damage to the board
The first thing people pay attention to when choosing a product is safety. Use indoors, especially in a bathhouse, implies the absence of toxic substances, the release of which increases with heat exposure
Among the natural remedies that are suitable for treating the inside of a bath, the most common are:
- Melted natural wax;
- Linseed oil;
- Special compositions for baths based on oils and wax, which can be bought in the store.
Treatment with compounds forms a thin, invisible film on the surface of the board, so the lining does not turn black even after years of active use and not very good ventilation. Before the finishing coat, it is recommended to treat the wood with an antiseptic solution based on boron salt. These compounds are harmless, suitable for use in damp and residential areas, and protect the lining from the formation of mold, mildew and blackening.
The main reasons for swelling of lining on the ceiling
A swollen lining ceiling covering looks like a wave-like deformation, which is located closer to the center of the room, and not near the walls. Before deciding how to repair a swollen lining ceiling, you need to understand the cause of this problem.
The fact that a wood product changes its geometric dimensions due to changes in humidity and temperature in the room is a normal and natural phenomenon. But why it reached such catastrophic proportions remains to be seen.
Repair of the coating due to swelling may be necessary for the following reasons:
Important! A well-dried product made from natural wood has a volume reserve that allows the material to absorb moisture without significantly changing its geometric dimensions.
Attention! The desire to fasten the boards as tightly as possible in order to protect against deformation of the coating will not give the expected result, since when the material swells, even the strongest fasteners can tear out.
Methods for eliminating bloating
Now let's talk about how to level the lining on the ceiling. Of course, if the cause of swelling lies in the incorrect design of the roofing pie or in the lack of ventilation of the ceiling space, then before leveling the lining, the cause of the problem must be eliminated. Otherwise, the repair will help for a short time, and the boards will again diverge and swell.
If the lining on the ceiling is swollen, our recommendations will tell you how to level the coating:
Important! If the problem arose due to high humidity of the material, then the boards should be dried thoroughly before installation. To do this, they are laid out for several days in a well-ventilated and heated room.
Causes of defects
Wood is a special material. Its properties appear depending on the direction of the fibers. For example, wood absorbs moisture over almost its entire surface, but condensation accumulates inside along the direction of the fiber, which allows it to be removed painlessly.
This remarkable property provides excellent fresh, clean air in rooms lined with wood - from the living room to the bathhouse. But it also makes the material sensitive to the amount of moisture, temperature and method of fastening.
The lining often swells on the ceiling, usually in the form of a wave and, as if on purpose, closer to the center, where the defect is more noticeable. Why is this happening?
High wood moisture is one of the most common causes. Slats with varying degrees of humidity are available for sale. Wood obtained by natural drying does not always achieve the required 8–12% moisture content. In fact, the finish dries already in assembled form, and, accordingly, changes in volume - it shrinks. But if during the construction of a log building this feature is not forgotten, then when installing the lining it is easy. The lamellas, accordingly, swell as they dry in a fixed form.
Rigid fastening is the second common mistake. Why wood cannot be fixed rigidly is clear from the description of the inherent property of wood: to change in volume with changes in temperature and humidity. If the lamellas are joined tightly, without a technical gap of 1–3 mm, and the screws are reliably deepened, then the material is firmly fixed.
A change in volume cannot be prevented in this way, but instead of the usual swelling, in this case swelling and warping begins. Most often this happens in a bathhouse, since here the effect of moisture and high temperature is especially strong.
- Accumulation of condensation - the lining swells even if the ceiling or roof is installed incorrectly. Lack of hydro- or vapor barrier, leakage, lack of insulation - there can be many reasons and the true one can only be established by disassembling a fragment of the ceiling. It makes sense to take some action to eliminate the defect of the lamellas only after eliminating the cause of moisture accumulation.
- The second case, similar in nature, is insufficient ventilation. One of the reasons why paneling is mounted on sheathing is to provide air passage between the wall or base ceiling and the trim. If there is no ventilation gap, and the room is also reliably insulated - insulated doors, metal-plastic windows, then condensation will inevitably accumulate and the lining will deform.
What to do if the trim is blistering?
There aren't many options. The fact is that if the material is already deformed, then it cannot be returned to its original state. Rigid fastening, which is sometimes used in such cases, will not help much: the wood will either tear out the screws and nails, or simply split. This option absolutely cannot be used in a bathhouse, since the metal heats up additionally and contributes to further drying out of the wood.
The first method involves completely removing the finishing from the sheathing and re-attaching it, taking into account deformations, if they are not too noticeable, and observing the rules: the presence of a technical gap, the tightness of the joint, the obligatory preservation of the gap between the lamella and the wall, etc. The second method is somewhat simpler. Only those lamellas that are swollen are dismantled and cut in width and length so that they can be installed in place, but in compliance with the installation conditions
Here it is important to calculate exactly how much and how to trim the boards, otherwise you can aggravate the problem.
If the lining swells due to dampness of the raw materials, then the material should be dried before re-laying. This is easy to do: just place the boards in the garage and dry with the heaters on. It is advisable to use those models that strongly dry the air. Why? It is dry air that is needed to reduce the moisture content of wood.
Ceilings in rooms for various purposes are often lined with wood paneling. This material is used in living rooms, on balconies, loggias and utility rooms. If the installation of the boards is carried out in compliance with the technology, and the surface of the material has undergone protective treatment, then the service life of the coating will be impressive. But it also happens that the material becomes deformed, cracks, and gaps form between the lamellas. If the lining on the ceiling is swollen or split, what to do and the reasons for this phenomenon will be described in detail in our article.
Causes of drying out and cracking
Wood products absorb and release moisture unevenly throughout the board. This occurs most actively at the ends of the product. When wood is saturated with moisture, the lining expands, and when moisture is released into the air, the material shrinks. If the scale of shrinkage and moisture gain is very large, then the product becomes covered with cracks along the length of the board along the wood fibers.
If the lining on the walls and ceiling of the room has dried out, then the reason for this phenomenon lies in the following:
Methods for sealing cracks in lining
What to do if the lining on the ceiling has dried out depends on the size of the cracks and the operating characteristics of the room. Typically, in such a situation, one of the following methods is used to resolve the problem:
Important! The putty method is not suitable for ceilings in unheated rooms, because the putty will simply crumble and fall off after a season. This is due to the fact that the coefficient of thermal expansion of the material in unheated houses is very high.
The mixture of varnish and sawdust sets very quickly, so apply it in small portions. A spatula is used for application. They put the mixture between the boards and compact it well. After drying, the surface is sanded, painted or varnished.
Source
Warping and drying out
Lining is a material made from solid wood, unlike fibreboards or siding, while retaining all the advantages of wood, it has the same disadvantages. It is precisely such a useful quality as the creation of a microclimate that is the cause of severe deformations.
If we are talking about a log or a thick rounded beam, the appearance of such defects does not affect the usable qualities: as soon as the humidity increases, the tree, having gained the required amount, will return to its original state. But with clapboard the situation is different.
Boards of small width react differently: they bend along their length in different directions, decrease in volume, and as a result become detached from each other, forming gaps between the lining. This process is especially noticeable in unheated rooms when warm weather sets in.
The same process occurs on the balcony, terrace, facade and so on. The lining itself does not create gaps, but the distances between the slats can be considerable. Sometimes it’s not easy to close them up.
The second reason is essentially a continuation of the first. In the vast majority of cases, poorly dried wood cracks. After installation, it is “dryed” on the ceiling of the room or in the steam room, which, of course, can hardly be called favorable conditions for this. As a result, the material warps and the surface loses its integrity, as in the presented photo.
How to seal cracks in lining
Several methods are used. Their effectiveness depends on the amount of damage and operating conditions of the premises. What to do in such cases.
Solid oil - the composition includes linseed oil, turpentine and rosin, designed for floorboards, but can help in this case too. However, they “treat” lamellas that have just begun to warp. The product prevents the active absorption of moisture and prevents the wood from swelling.
What to do if the process has already gone quite far, and the lining has dried out considerably? You can use wood putty. The composition fills defects and holes, forming a dense, but not hard mass. After drying, the putty is sanded with sandpaper, painted or varnished.
The method is not suitable for unheated rooms. The difference in coefficient of thermal expansion between materials is too great. If the house does not warm up in winter, the putty will crumble the next season.
How to seal the gaps between the lining if the putty is not suitable? A composition of small shavings obtained by sanding wood with sandpaper and PVA glue is used. The coefficient of thermal expansion of this composition is much closer to wood; the material swells and dries along with the lamellas. Instead of glue, you can use wood varnish.
The composition is prepared in small portions, as it sets quickly. Apply with a spatula into the seams between the lamellas and lightly compact. After drying, the surface is treated with paint or varnish.
How to level the lining - causes of deformation and their solution
Such a practical and environmentally friendly finishing option as lining is very popular not only among our fellow citizens, but also far beyond the borders of our homeland. And although the technique of treating surfaces with wooden slats itself is quite simple, it still has a number of its own characteristics, which must be strictly observed, otherwise there will be trouble. Namely, there is a high probability that the coating will deform during operation.
Causes and prevention of lining curvature
There can be many types of damage: surface swelling, twisting, separation at the seams, cracking, separation at the seams, mechanical defects and much more. And the reasons for their manifestation can be many factors, the main of which are:
Even a small defect can nullify the owner’s efforts. However, you shouldn’t get upset ahead of time, because you can still try to fix it. But before you level the lining that is swollen, you need to understand the primary reasons for the violation, otherwise everything may happen again.
When starting to decorate walls with clapboards, you must first check the degree of natural moisture content of the wood. If the wood is not dried enough, then even in conditions of a slight increase in moisture, the panels will begin to swell. But well-dried material has a certain reserve to maintain shape stability.
It is recommended to carry out the installation itself using clamps, since they always have a reserve of movement in case of wood expansion, so that the fasteners do not get torn out. It is not recommended for construction beginners to use hardware, because screwing in all the way will not allow the lamellas to separate later, and too much freedom will not hold the structure. Re-attaching the dies may cause them to crack.
In the process of laying out the lamellas, it is necessary to leave sufficient space for ventilation, and you should also take care of the waterproofing layers. This is necessary so that condensation does not subsequently accumulate under the panels, which leads to swelling.
Before leveling the lining, it is necessary to visually assess whether the dies are suitable for repeated work. Determine the degree of humidity, check the quality, the presence of areas of rot, etc. As a rule, severely damaged panels are not updated, but completely replaced. Even the slightest doubt about the quality of the product is a reason to go shopping for new building materials.
Why the lining is drying out, preventing the problem and restoring the finish
Has the fresh clapboard paneling given cracks? The situation is unpleasant, it is necessary to eliminate the problem and understand the reasons why the lining is drying out. Solid beams are able to independently regulate humidity due to their geometric shape; flat boards require more serious microclimate control.
The main reasons why lining drys out
A board that is properly processed and dried according to the rules will never crack along its plane. The lining cracks only in the places where the planks join each other. Under the influence of changes in humidity and temperature, the lamellas begin to bend, increase or decrease in size, deform and bend. The drying process is more often noticed in rooms without heating or where radiators and electric heaters heat too much. The board loses the remaining moisture and the opposite process to swelling of the lining occurs, when the lamellas simply no longer fit in their place.
Most often, lining made from poorly dried boards drys out. During installation, the dies are laid according to the rules, with a small gap between the tongue and groove. During operation, under the influence of high temperatures, the lining dries and decreases in size, forming cracks.
A common reason why linings made from boards of normal humidity and not exposed to temperature changes dry out is improper installation. If, just in case, the gap between the dies is left too large, the natural drying of the wood will expose the seams.
How to avoid drying out of lining indoors
To prevent the lining from drying out, it is recommended to follow the rules for laying lamellas indoors:
- Indoor storage. As soon as the lining is brought to the installation site, work cannot begin. The tree must rest, breathe, and get used to the microclimate in the room. To do this, the packaging film is torn and the wood rests for two weeks if it is larch or 10 days when working with spruce and pine.
- If there is no time for aging, buy euro-lining-calm, which has an additional shelf. The design will not allow holes to appear, even if the lining dries out.
- Cedar is a wood most suitable for working in unheated or too dry rooms. The wood of this species has short fibers, thanks to which it is resistant to changes in humidity and temperature. Rarely deformable.
- Narrow panels up to 115 mm are less susceptible to drying out. If this is a summer house and heating is not provided in winter, narrow 90 mm slats are best suited.
- Do not leave a large gap between the tenon and the groove during installation.
Eliminating the consequences of drying out the lining
Depending on the extent of the damage, the dried out lining can be returned to its normal state. Small cracks will most likely disappear on their own in the spring, when stable warm weather sets in outside. If you don’t have time to wait, you can repair the lining using the following methods:
Solid oil based on flax oil, turpentine and rosin. The composition developed for floor boards helps the lining that has just begun to dry out.
The oil saturates the wood and prevents it from drying out, while at the same time preventing the absorption of excess moisture, which is useful for preventing swelling. If the process has worsened and, no matter why, the lining has dried out too much, you can use putty. A special composition for wood is applied to the cracks, rubbed with sandpaper and covered with a paint coating in the color of the finish.
The method is not suitable for rooms that are not heated during the cold period. Temperature changes will cause the putty to discolor and fall out. The most difficult method of repairing cracked lining is to fill the cracks with a solution of wood shavings and PVA glue. Sawdust of a small fraction obtained by sanding with sandpaper is suitable. The thick mixture is applied to the dry areas, dried and painted. Due to the presence of wood in the composition, the grout will expand and contract almost like the lining itself, while remaining inside the cracks.
If you take a radical approach to the issue and find out exactly why the lining is drying out, you can disassemble and reinstall the finishing, taking into account previous mistakes and the characteristics of the room.
How to level the lining on the walls and ceiling if it is swollen from excess moisture
There are two ways to solve the problem. In the first case, experts suggest removing the panels from as large an area as possible. Next, dry each die in a well-heated room, avoiding open fire, direct sunlight or direct heater action. After drying and quality inspection, the lamellas can be re-laid, ensuring a loose joint and completely replacing all fasteners.
The second option suggests replacing only the most defective dies, carefully cutting each new part so that the lamellas fit with a gap.
How to attach it to the wall
Indeed, there are some nuances in how to fix the lining in the bathhouse - on the wall or ceiling. The principle itself, of course, does not change, but where to start, how to finish and how to work in cases where you need to leave a hole is worth describing.
As for how to fasten the paneling in a bathhouse to the wall, the options are those that have already been described - with nails or self-tapping screws, or staples, through clamps or without them.
Since we have two directions for laying the lining at our disposal, we can use any of them, remembering, however, that horizontal laying in wet rooms is more profitable, because damage over time concerns only a few strips, which are easy to replace, whereas with vertical laying the ends of all may deteriorate (!) planks.
Horizontally
Cut off the tenon from one of the planks. She will be the first.
IMPORTANT! According to the rules, the first plank goes from above, from the ceiling. And it should be facing downwards
In this case, the connection is kept dry - water will not flow into the groove.
The final bottom strip is usually fixed not through the groove (you can’t crawl into it), but right through from the front side. It is assumed that these places will not be visible later anyway, because they will be covered with a plinth.
If the last board cannot be installed, they do this: they connect the last two or three planks separately, then they install everything at once as one, usually it works. Fastening, unfortunately, is only through the front side.
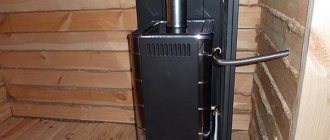
There is one secret that not everyone knows about yet. It happens that everything was done perfectly, but after several fires the wall began to “wave”, the planks at the junction points began to rise like drawbridges.
Here is a visual demonstration of the process, with torn screws:
The reason why this happens is simple - when you mounted the boards on the wall, they were in a dry state, they had one volume. And when they heated the bathhouse and turned on the steam, the wall became damp, the lining swelled, and there was nowhere for it to go, so it swelled.
BY THE WAY! This applies to both horizontal and vertical installation methods.
The tongue-and-groove joint does not have to fit perfectly when the parts are put together. There should be a small empty space between the top of the tenon and the bottom of the groove - the tenon does not seem to reach the bottom of the groove. Only in this case will you avoid trouble when the wall goes into “waves” after moistening. Watch a video that talks about just this.
But here’s the difficulty: if you push the slats too far apart, then during the swelling-drying process, cracks may form. There is only one way out - take a lining with a long tenon, so that you can retreat even a millimeter, and so that there is still enough left.
Another option is to use linden wood. It practically does not change dimensions when moistened - that is why bath doors are made from it, because a swollen door usually does not want to close, and a linden door does not swell. Linden shelves are popular in bathhouses. A separate publication about them provides all the useful information for those who decide to make shelves for a bathhouse from linden: what do you need to know about linden wood? what to process? Antiseptics and impregnations are not the only means for treating wood; do not forget about the possibility of painting.
Yes, and the wood, which is called “thermowood”, does not change its dimensions, that is, dried in a chamber with a high temperature until the bound moisture is almost completely evaporated. But such lining will be very expensive
!It is important not to confuse thermowood with impregnated
Vertical
You can start attaching the paneling in the bathhouse vertically from any angle. It is advisable to cut off the tenon of the first board. There are no problems with securing the first board, but the last board can cause some inconvenience.
Firstly, it may be wider than the remaining distance. In this case, there is no other option but to cut to the desired width. Of course, it’s better to calculate this in advance and make sure it ends up in the least noticeable corner.
Secondly, it will not be possible to mount the last board on the wall in the same way as the previous ones were mounted. Therefore, you will have to nail it right through the front side, as in the case of the last horizontal one. If you plan to cover it with a decorative corner, then the fastening will not be noticeable, otherwise it is better to cut off the heads of nails or screws. Or drown them and fill them with a mixture of wood dust and PVA. (Dust can be collected from a sander.)
You can learn how to make holes from this video:
How to level the lining if the dies are dry
The causes of the problem may be seasonal temperature fluctuations (in the autumn-winter period the dies are saturated with moisture, and in the spring-summer season, on the contrary, they dry out) or increased natural humidity of the wood.
The most popular solutions to this problem can be considered the purchase of specialized wood care products.
Special solid oil consists of natural and synthetic substances (linseed oil, turpentine, rosin, etc.). With this oil, all cracks ranging in size from 2 to 4 mm are carefully treated and the excess is carefully removed, thereby preventing further damage to the surface and masking existing defects.
There is also wood putty, which is purchased depending on the type of wood and type of work (walls, ceiling, floor). This product is used for large cracks, applying putty into the voids and leveling with a spatula. After hardening, the mass becomes denser, but remains quite mobile. After treatment with putty, the surface is sanded and tinted with any available paints and varnishes to match the tone of the main panels.
It is important to remember that putty is not used in unheated rooms, since the composition will quickly crumble. In such rooms, a product that you can make yourself by mixing PVA glue (or wood varnish) and sawdust is perfect. Moreover, varnish is the most preferable option, although it hardens much faster, so you need to work quickly and you shouldn’t cook too much.
Eliminating the consequences of drying out the lining
Depending on the extent of the damage, the dried out lining can be returned to its normal state.
Small cracks will most likely disappear on their own in the spring, when stable warm weather sets in outside. If you don’t have time to wait, you can repair the lining using the following methods: Solid oil based on flax oil, turpentine and rosin. The composition developed for floor boards helps the lining that has just begun to dry out.
The oil saturates the wood and prevents it from drying out, while at the same time preventing the absorption of excess moisture, which is useful for preventing swelling. If the process has worsened and, no matter why, the lining has dried out too much, you can use putty. A special composition for wood is applied to the cracks, rubbed with sandpaper and covered with a paint coating in the color of the finish. The method is not suitable for rooms that are not heated during the cold period
Temperature changes will cause the putty to discolor and fall out. The most difficult method of repairing cracked lining is to fill the cracks with a solution of wood shavings and PVA glue. Sawdust of a small fraction obtained by sanding with sandpaper is suitable. The thick mixture is applied to the dry areas, dried and painted. Due to the presence of wood in the composition, the grout will expand and contract almost like the lining itself, while remaining inside the cracks.
The method is not suitable for rooms that are not heated during the cold period. Temperature changes will cause the putty to discolor and fall out. The most difficult method of repairing cracked lining is to fill the cracks with a solution of wood shavings and PVA glue. Sawdust of a small fraction obtained by sanding with sandpaper is suitable. The thick mixture is applied to the dry areas, dried and painted. Due to the presence of wood in the composition, the grout will expand and contract almost like the lining itself, while remaining inside the cracks.
If you take a radical approach to the issue and find out exactly why the lining is drying out, you can disassemble and reinstall the finishing, taking into account previous mistakes and the characteristics of the room.