- Laying according to foundation type
- Preparatory work
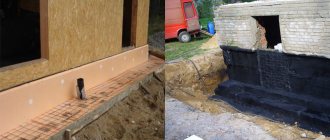
The deeper the base of the house is laid in the ground, the more it needs protection from moisture penetration. In most cases, foundation waterproofing is performed with roofing felt glued or fused onto a rigid base - this is the most convenient to install and inexpensive way to treat large-area structures. Why roll material is so good and what needs to be taken into account when laying it, we will tell you further.
Advantages and disadvantages of roofing felt
Roofing felt appeared in America in the form of cardboard pieces that were thoroughly impregnated with bitumen. Initially, the material was used only for the construction of the roof. Ruberoid was a temporary layer that was removed once the building had a regular roof and roofing. Today the material is used more multifunctionally.
This is a cardboard base soaked in special compounds that provide water resistance. Petroleum bitumen is most often used for strengthening. And for the production of sheets, cellulose, fiber from polyester components or non-woven materials are selected. Each option has its own advantages:
- polyester is more resistant to mechanical and temperature effects, it is chosen for extremely cold and hot climatic zones;
- Cellulose consists entirely of organic components, which means it is harmful to human health and nature.
Composition of the material Source legkovmeste.ru
Ruberoids can consist of a mixture of several materials. Then they can be classified as follows:
- based on synthetic components. Used under slate;
- based on cardboard sheets. Exactly the roofing material that should be chosen for the foundation;
- based on fiberglass. Used as a top and bottom layer when laying roofing;
- based on thin cardboard, which is impregnated with petroleum products. Most often used to create temporary, removable layers of waterproofing.
Today, roofing felt is one of the most popular materials for processing and strengthening the foundation of a house. The main advantage due to which cardboard sheets are used is durability. If you know how to lay roofing felt on the foundation and follow all the recommendations, then the waterproofing will last 50 years. At the same time, the likelihood that the material will deteriorate from exposure to weather or oxidize is minimal. Roofing material is resistant to the effects of salts, which are present in varying quantities in any soil and groundwater. Another advantage of the material is its low cost. You can find cardboard sheets in the required quantity at any construction market.
Large selection in any hardware store Source stpulscen.ru
There are fewer disadvantages, but they do exist. The main one is flammability. The material is highly flammable. In addition, if handled incorrectly, the sheets may break.
See also: Catalog of companies that specialize in foundation work of any complexity.
Exploration of hydrogeological conditions
To clarify the situation at the site of the proposed construction, a number of activities need to be carried out:
- determination of groundwater levels during periods of their peak rise. This information can be collected by interviewing local residents or personal inspection of nearby water supply sources - wells and boreholes during the period of their maximum filling;
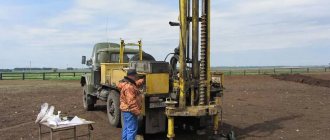
- determining the composition of soils at the construction site. The most reliable data is provided by exploratory drilling. The simplest method is the percussion-rope method, which allows you to take soil samples as the tool deepens; in Fig. 2. – independent exploration drilling.
- analysis of construction practice when creating foundations in the construction region.
The collected information will allow you to make the right decision on such fundamental issues as:
- Selection of support structure design.
- Determination of the design parameters of the foundation and its depth.
- Materials for this object.
- Choosing the timing of construction.
However, the requirement for thorough waterproofing of the foundation remains unchanged and is a mandatory element of the structure, regardless of other conditions.
How to choose material
Having determined that it is cardboard material that is required, all that remains is to understand which roofing material is best to use for waterproofing the foundation. On the market you can find cardboard waterproofing material for roofing and lining. If the roofing material will lie on the surface (for example, on top of the roof), then a higher density is required, at least 350 g/sq.m. For lining under the roof, you can get by with a less dense one (200-300 g/sq.m).
To protect the foundation from moisture, you can choose material of the RKP-350 or 400 brand. This brand has advantages. This material is more resistant to moisture. In addition, it is more durable, which means it will last longer.
Suitable material Source alfastroy.kharkov.ua
Stamps
To make the best choice in favor of a certain type of material, you need to understand its labeling. According to GOST requirements, all rolls of roofing felt are subject to mandatory marking.
It is printed on the paper cuff of the roll. If the brand is a combination of letters and numbers such as RPK-350, then this means the following:
- P – name of the material;
- P – lining material for insulating foundations;
- K – coarse-grained topping. There may be other letters. M – fine-grained, H – scaly, C – colored.
The numbers indicate the density of the material. In this example, it is 350 g/m2. This roofing material is suitable for both vertical and horizontal insulation of foundation surfaces.
Types of waterproofing
There are two ways to lay roofing felt on the foundation: horizontal and vertical. The first method is more common. The material is laid flat and covered with bitumen on top for better protection. Thanks to this, moisture moves up the soil capillaries, but does not penetrate inside the wall. This means the building is not damp. The advantage of horizontal laying is that it protects not only the plane of the foundation, but also partially covers its sides. This is achieved through the use of roofing material, which is larger in area than the surface of the foundation.
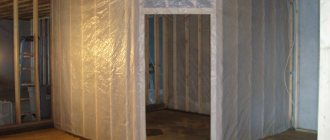
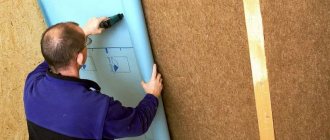
Vertical protection is not simply applied, but glued to the foundation. The installation process is more complicated, it includes more steps, but the protection of the building will be better. Indeed, in the case of vertical installation, it is possible to apply several layers of waterproofing.
This is what vertical waterproofing looks like Source pro-karkas.ru
Base finishing
The outer part of the foundation, also covered with waterproofing, requires additional design. To decorate the base, various types of tiles for outdoor use are used. Other finishing materials in the form of molded products that require mechanical fastening are not suitable for these purposes.
Violation of the continuity of the insulating layer will inevitably lead to the penetration of moisture into the foundation. The tiles are installed using special adhesive compounds for exterior use, which are resistant to temperature changes and have good adhesion to bitumen compounds.
Basement waterproofing
When designing the foundation base, you need to take into account the visual compatibility of the finishing material and the exterior of the site.
Laying technique
Just a few years ago, the method of laying roofing felt on a foundation was simple. The builders covered only the horizontal surface of the future building with roofing felt. The side parts remained “bare”, so they were treated with bitumen. If the master is short on time and money, then it is possible to use this technique. But it is necessary to remember that such a protective coating is short-lived. In less than 10 years it will be useless.
Fortunately, there are more modern ways of laying roofing felt. The technology depends on the type of installation - horizontal or columnar. However, the initial stages are no different. First you need to clean the foundation from dirt and foreign debris. Before laying the material, you need to check the surface for integrity. If cracks, irregularities or crevices are found, it is worth covering them with cement-sand mortar in advance and allowing it to dry.
At the second stage, the entire surface that will be covered with waterproofing is primed with a primer. This is necessary for better adhesion to the bitumen mastic, which will be used as the next layer. Experts recommend applying bitumen in 2-3 layers for reliability. The main thing is to let each layer dry.
What can be replaced?
If we consider only the roll type of waterproofing, then roofing felt can be replaced with materials such as fiberglass, fiberglass and polyester. New materials include more advanced versions of roofing felt of the following brands:
- Technique,
- Bipole,
- Bicroelast,
- Rubemast.
They are more expensive than regular bitumen cardboard, but have better characteristics.
Everything you need to know about foundation waterproofing can be found in this section.
Video description
This video explains more about vertical waterproofing:
Horizontal
If a slab foundation is used, then you need to follow the standard scheme. Even before laying the roofing material, a trench 1 meter wide is dug around the slab. The depth of the trench depends on the size of the foundation. It is necessary to measure the thickness of the base and add an additional 50 cm. Then the slab is prepared for further processing - it is cleaned and treated with cement mortar to remove unevenness. After the primer layer, waterproofing is laid on the slab.
It is important that the roofing material layer is monolithic. That is, it must cover not only the horizontal surface, but also the sidewalls. If roofing felt is laid in several layers, then the second layer should lie across the first.
Laying technology based on foundation type
The algorithm for laying waterproofing may differ depending on the type of foundation. If the base is strip, then the insulation covers the supports. It is done either in the basement or on the ground floor. The main difficulty during installation is providing suitable conditions for the mastic. It should dry in a ventilated area. If the basement is wet, the material will not adhere well to the base.
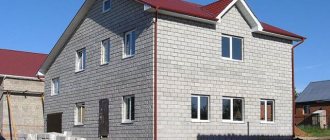
Example of a strip foundation Source prom.st
Horizontal
Horizontal waterproofing involves gluing roofing felt to the foundation cushion using bitumen mastic.
This method protects the foundation and basement from moisture penetration from below. Insulation is carried out with a margin of 15-20 cm. After the construction of the foundation is completed, the remaining edges of the roofing material are folded up and attached to the concrete.
Horizontal waterproofing is mostly carried out during the construction of the foundation, with the goal of minimal compliance with building codes. Horizontal insulation cannot be called truly complete and worthy protection of the foundation from water.
Let's sum it up
The most common way to protect the foundation is to use rolled materials, namely roofing felt. Its advantage is simplicity, efficiency, low cost and reliability. Even a beginner can cope with this task. You just need to select the material, carry out the preparatory work and perform the installation. Thanks to this, the foundation and the entire building as a whole will last for decades, without the need for repair work and spending money on it. This is why waterproofing is an essential part of construction work that should not be neglected.
Recommended Posts
Bituminous mastic for waterproofing the foundation.
What kind of foundation is needed for a house made of aerated concrete?
Do-it-yourself USHP foundation
DIY strip foundation
Pile foundation with grillage
Types of waterproofing for foundations
INSTALLING BEAM ON THE FOUNDATION
After the foundation has been insulated, the installation of the lower piping begins.
The beams installed on the foundation should fit fairly tightly to each other without creating a minimum space between them. This is especially true for the lower part of the frame, where the floor will be created and where significant loads will be placed.
The beams are fastened together with metal dowels, which are achieved using a wooden mallet. In some cases, if necessary, the beams are additionally fastened with staples or nails.
Scheme of fastening the bars to each other
The joining of the lower crown beams to each other occurs by picking at the corners using any of the existing methods:
- “in half a tree” - a variant of laying beams, in which the upper half of the array is removed in corner joints on one beam, and the lower half on the other;
- “into the paw” is the most common way of connecting beams, which is the opposite and does not include the end part of the log protruding beyond the level of the wall.
Nuts and wide washers are used to secure the timber to the surface of the foundation. A wide washer will expand the area of contact of the nut with the surface of the wood. You only need to use a hex nut, and square or round nuts are not suitable for such purposes. If you use narrow nuts to fasten the beams or do not use them at all, then during installation work it will be quite clear that the nut will completely sink into the surface of the beam and the connection of the house frame elements will be unreliable and short-lived.
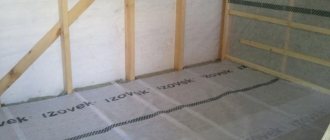
DIY horizontal insulation technology
Typically, such insulation means internal insulation of the foundation, covering the basement floor to protect against moisture coming from below.
The principle of work here is exactly the same as with vertical insulation.
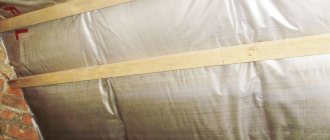
The floor is covered with mastic or bitumen. Sheets of roofing felt are rolled out, heated and attached to the floor. The edges of the roofing felt are attached to the walls using the same technology.
A screed is made on top of the roofing felt. If the floor is wooden, then the floor covering is immediately laid on top of the insulation; using plywood to level the surface will not work.
Ruberoid is one of the most standard, widespread, economical and effective methods of protection against water. Proper waterproofing of the foundation with roofing felt will help preserve and protect your home from the destructive effects of moisture and increase the service life of the basement.
Preparation
The entire surface of the foundation must be completely cleaned of dirt, sand and soil. All cracks are sealed and leveled. For better adhesion, concrete should be coated with a special solution.
Leveling is necessary so that the roofing material is attached as tightly as possible to the surface. To fill cracks and level, a simple solution of cement and sand is used.
The foundation is covered in several layers with hot liquid bitumen or mastic. Thus, all cracks are sealed, and adhesion at the surface of the foundation is improved. Bitumen is applied using a brush or roller.
Cold mastic is a priority option, i.e.
because it is much easier to apply and has increased adhesiveness. You can add fluff to the mastic, this increases the waterproofing properties of the material.
If you want to save money, then bitumen bars are used, which must first be heated and only then applied to the surface. To improve the properties of bitumen, you can add used machine oil (no more than 20% of the volume of bitumen).
Timber quality
Lumber for the first crown must be selected taking into account certain requirements. It should not have knots or blue spots, and all four surfaces should be smooth, without nicks, depressions or sharp bends. The timber must be pre-treated with an antiseptic and fire retardant. Even if the seller assures that the material was impregnated under production conditions, he will not be able to provide truthful information about the thoroughness of processing, the circumstances and shelf life of the timber. So it's better to play it safe.
When buying solid wood timber, you need to pay attention to its cross-section. High-quality material has an average core location and annual rings evenly moving away from the center
When drying lumber with a different “pattern”, problems may arise associated with various deformations of the wood - bending, twisting, severe cracking, etc.
You can hear different opinions about applying a film-forming composition to the ends of solid timber. Some opponents argue that cross-sections need to be “sealed” immediately so that moisture does not leave the wood too quickly. Others give arguments about the inadmissibility of such actions, although they agree that the ends need to be covered. For these purposes, they recommend using clay, lime or water-based emulsion. The film prevents moisture from escaping naturally, resulting in the formation of pockets of rotting inside the trunk. In fact, both sides are right to some extent.
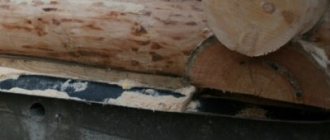
Installation of protective ebb
The main purpose of low tide is to prevent moisture from appearing at the junction of the wall and the part of the foundation protruding outwards. They are made of metal or plastic.
Plastic castings are lighter and are not afraid of corrosion, but they are easily damaged during operation. Metal ones require monitoring of the condition of the protective paint, but in the case of complex foundation geometry, it is easier for them to give the required shape.
When installing basement flashings, a number of points need to be taken into account.
- Installation must be done before cladding the external walls.
- The presence of slopes helps maintain tightness. They are created from a cement mixture. The optimal slope of the slope surface is 15 degrees.
- The sills can be attached to the wall and to guides made of galvanized profiles or bars. They are nailed to the wooden base with ordinary nails, and the material is fixed to the profile with self-tapping screws.
To ensure tightness, the ebbs should be overlapped. Internal and external corners can be made from scraps of the ebbs themselves.
INSTALLING BEAM ON THE FOUNDATION
After the foundation has been insulated, the installation of the lower piping begins.
The beams installed on the foundation should fit fairly tightly to each other without creating a minimum space between them. This is especially true for the lower part of the frame, where the floor will be created and where significant loads will be placed.
The beams are fastened together with metal dowels, which are achieved using a wooden mallet. In some cases, if necessary, the beams are additionally fastened with staples or nails.
Scheme of fastening the bars to each other
The joining of the lower crown beams to each other occurs by picking at the corners using any of the existing methods:
- “in half a tree” - a variant of laying beams, in which the upper half of the array is removed in corner joints on one beam, and the lower half on the other;
- “into the paw” is the most common way of connecting beams, which is the opposite and does not include the end part of the log protruding beyond the level of the wall.
Nuts and wide washers are used to secure the timber to the surface of the foundation. A wide washer will expand the area of contact of the nut with the surface of the wood. You only need to use a hex nut, and square or round nuts are not suitable for such purposes. If you use narrow nuts to fasten the beams or do not use them at all, then during installation work it will be quite clear that the nut will completely sink into the surface of the beam and the connection of the house frame elements will be unreliable and short-lived.