Vapor barrier is a technical term that describes the action of protecting thermal insulation materials and building structures from the penetration of moist vapors with subsequent loss and absorption of condensation. Literally, vapor barrier is resistance to vapor penetration. It is achieved by using various vapor barrier materials in combination with heat-insulating materials while observing installation technology.
When performing a vapor barrier, you need to understand the principle by which it works. You need to understand:
- which side to attach the vapor barrier;
- how the vapor barrier membrane is designed;
- what types of vapor barriers are there;
- how the system is installed;
- what insulation is used in each specific case.
Knowledge of the basics of installing vapor barriers will help reduce effort and costs during construction, and avoid errors in design and installation.
Which side is the material laid on?
There is a lot of confusion and substitution of concepts on this issue. The fact is that vapor barrier materials in their pure form do not have a working side as such. The protective material is completely impervious to moisture in any form, so it makes no difference how you unfold it. The only exception is anti-condensation films with a fleecy coating. They are designed to absorb settling moisture, therefore, to obtain the full effect, you must follow the general rule - the smooth side of the film is always laid towards the heat insulator. If the canvas is the same (one-sided), it can be laid in any way. The rule is simple, but installation errors most often relate to incorrectly deployed material.
If we are talking about membranes with one-way permeability, the same rule is followed. Usually, the side facing outward has a pattern, and the side that fits against the heat insulator is smooth and without a pattern.
Types of vapor barrier:
Materials for arranging vapor barriers are produced in the form of rolls or sheets. Rolled insulation is rolled out vertically and secured with slats or profiles. Fasteners are placed horizontally. Ventilation holes are also required. To install a sheet vapor barrier, you need to install a base, a frame made of profiles. Sheet material is inserted into the finished frame and secured with self-tapping screws. This type of insulation is used for further surface covering.
During installation, special attention is paid to the correct placement of the insulating layer: the canvas is positioned with the inner surface facing the insulation. Mounting features
To firmly secure the insulating layer, self-tapping screws are used; nails are less commonly used.
Roll of vapor barrier
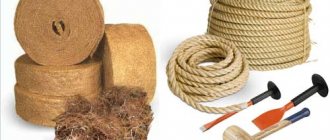
Materials and tools for work
In addition to the vapor barrier film, the following materials will be needed to install a vapor barrier:
- double-sided adhesive tape for fixing the film;
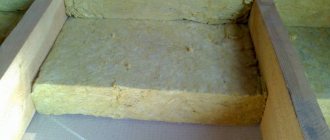
- insulation, usually mineral wool is used for wooden floors;
- wooden slats for mounting the counter-lattice on top of the film;
- self-tapping screws for fastening the slats.
To perform the work you will also need tools:
- screwdriver for flooring and installation of sheathing;
- construction stapler for securing film.
Variety of materials
To protect surfaces and insulation from moisture use:
- reinforced polyethylene film;
- aluminum coated film;
- film made of propylene fibers;
- membrane vapor barrier.
What where When?
The main role of a vapor barrier material is to protect wooden structures and insulating material from moisture, rotting and, as a result, premature destruction.
It is extremely important to use it on lower floors, above basements and basements, and especially above bathrooms and kitchens. It is also necessary to remember that the insulation protection must be double-sided, since wet mineral or glass wool almost completely loses its thermal insulation qualities. That is, the film is placed between the finished floor and the insulation material, as well as between the insulation and the subfloor
However, often the bottom layer is replaced with waterproofing
That is, the film is placed between the finished floor and the insulation material, as well as between the insulation and the subfloor. However, often the bottom layer is replaced with waterproofing.
Which side should I lay?
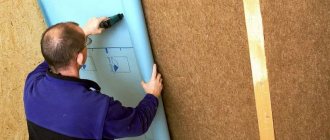
You need to know which side to lay the vapor barrier on the floor. An extremely important nuance, since the wrong technology for installing the material will negate all its properties.
A man lays vapor barrier material on the floor
Here are the instructions:
- The double-sided film is placed with the smooth side facing the insulation and the corrugated side on top. The rough surface acts as a filter for steam and even the smallest drops of water.
- It is customary to lay polypropylene with the wicker side away from the insulation, and the smooth side inside.
- Installation of foil vapor barrier is carried out with the aluminum side facing the room, as it tends to reflect infrared radiation.
- Individual installation technology is possible for individual brands and types of vapor barrier materials.
- Before use, be sure to read which side to place the vapor barrier on the subfloor and insulation.
Laying algorithm
It's not complicated:
- First, the old flooring is dismantled down to the subfloor. Then the base is prepared: debris is removed, cleaned, leveled, treated with antiseptic and primer. Old floor beams or joists that have begun to collapse must be replaced with new ones.
- Hydro and vapor barrier of the subfloor is carried out, preventing moisture from entering the insulation from the ground or lower rooms. The film strips are laid with the correct side (see above) overlapping by 15-20 cm. The edges must be glued with reinforced or double-sided tape. Also, the vapor barrier should extend 10-15 cm onto the walls and joists. It can be attached to beams and joists with metal brackets.
- A layer of insulation is laid on top of the film with the seams staggered and a thickness of at least 20-30 cm.
- A second layer of vapor barrier is laid on top of the insulation, also with an overlap and gluing the joints. If installation is carried out on wooden floor joists, it is necessary to lay the film so that it sag slightly: this way a ventilation gap is created between it and the finished floor. However, it is also recommended to put counter-battens on the logs on top of the vapor barrier, which will prevent the film from coming into contact with the finished floor.
- The finished floor is filled and then finished with the finishing floor covering.
Now you know how to install a vapor barrier on the floor and will not make the mistake of doing your own repairs.
We recommend looking at what happens if the vapor barrier is not installed correctly. Condensation fills the ceiling with water, the insulation gets wet and mold spreads. Don't make these mistakes.
In winter, when it’s frosty outside but the inside of the house is cozy and warm, unnoticeable steam forms in the rooms. And this steam must leave the room freely. To accomplish this task, a vapor barrier is installed. You need to know which side to lay the vapor barrier on the floor, walls or ceiling.
How to lay a vapor barrier correctly
The question of which side to place the vapor barrier against the insulation depends on the manufacturer’s recommendations. If the packaging clearly indicates which side should be facing towards the structure and which should be facing inside the room, you must follow the instructions. If there is no marking or the packaging is damaged, it is worth considering the general installation rules.
First of all, the position of the “dew point” is taken into account
Warm air from inside a building tends to escape into the cooler outdoor atmosphere (most of the year), with interior structures transferring heat relatively easily. Reaching the insulation, the heat flow gradually dissipates; the heat is absorbed by the loose mass of the insulating material. If the outside of the insulation is protected from atmospheric moisture by a waterproofing film, then the question of which side to place the vapor barrier on the roof is decided as shown in the illustration above - between the rafters and the insulation, the rough or reflective surface inside the house. For materials with identical sides (both smooth), the manufacturer does not give any advice regarding installation - the film can be turned towards the rafters with either side. Usually, in this case, it is customary to nail the film directly to the rafters with staples; accordingly, it is better to choose a material of increased strength. It will not sag in the spaces between the rafters and will not tear under the weight of the insulation.
When deciding which side to lay the vapor barrier in the attic from the inside, you should take into account information about whether the room is heated or not. For heating, the film is laid on the inside of the rafters so that there is a gap of 10...15 mm between the insulation and the film, with the reflective side facing the inside of the room. If the roof gets very hot and moisture condenses on the outside, you can turn the film the other way around. In this case, it is convenient to use a material with a rough surface for moisture condensation.
In the case of installing a vapor barrier in a room, the question of which side to place the vapor barrier on the ceiling is solved as follows: for ordinary rooms, the reflective or rough side turns into the room, for rooms above hot and humid rooms (for example, a relaxation room above a steam room) - vice versa. The same goes for gender. Vapor-impermeable films can be installed arbitrarily.
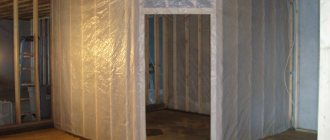
For walls, the general principle is used - you need to retain heat inside the room. Therefore, the vapor barrier is installed from the inside and usually with the help of dense, vapor-impervious, reinforced polyethylene films. Here, the question of which side to attach the vapor barrier to the wall is not fundamental - the films retain heat and moisture equally, regardless of the mounting side.
What is the difference between anti-condensation film and “anti-condensation side”?
As we have already said, most modern manufacturers emphasize that their vapor barrier films have a so-called “anti-condensation side”:
The “anti-condensation” side differs from the usual one in the presence of a fleecy layer that absorbs a small amount of condensation and holds it until it evaporates.
Thanks to this, the risk of the film surface getting wet is much lower, which extends the service life of the interior finishing of the roofing cake. That is why the rough side should always be directed inside the living room or attic, and the smooth side should be leaned against the insulation. But is this really so?
Practice shows that if condensation forms inside the roofing pie, then the fleecy side of the film can only hold it on its surface so that these drops do not flow down. However, the anti-condensation side of the vapor barrier and the anti-condensation film are two different things. The latter is used, as a rule, for arranging cold roofs.
To summarize: the “right” side of the vapor barrier does not remove water vapor, does not destroy drops of moisture and does not solve the problem with condensation. It only delays it until it evaporates completely naturally.
If you are currently in the process of building a roof, then do as the film manufacturer instructs in the accompanying instructions. If you have already installed a vapor barrier and are in doubt whether it is correct, forget it and don’t worry anymore. But if you hope that the “right” side of the vapor barrier will take care of all the shortcomings of the roofing pie, don’t believe it.
Experienced roofers often declare that they generally consider the epic “which side to attach the vapor barrier” to be a kind of shamanism. Allegedly, by complicating the product, they increase its positioning in the market. But in fact, as we have already said, with a well-equipped vapor barrier, there should be no drops on the walls.
Vapor barrier laying technology
After choosing a vapor barrier, it is also very important to install it correctly. This is not difficult, but requires care when installing, since in most cases the vapor barrier material has an external and internal surface in relation to the insulation
Choosing a side
Among builders, there are two opinions on which side to lay the vapor barrier against the insulation. Some believe that the vapor barrier should be attached only to one “correct” side, while others believe that it does not matter which side the vapor barrier is attached to. All vapor barrier membranes come in two types:
- for one-sided installation, this type of vapor barrier is attached to only one side;
- double-sided, which can be worked with regardless of its side.
Before installing the vapor barrier, you should carefully study the instructions included with the material itself. If there is none, remember these simple rules:
- The outer side of the vapor barrier has a pile in which moisture is retained and then evaporates. The inner one is smoother. It is the smooth side that should come into contact with the insulation.
- If the vapor barrier material has a different color, then the light side will be the inner side and should lie on the insulation.
- Usually the vapor barrier is sold in rolls. When rolling out such material, the side that will be facing the floor will be the inner one.
If you still have doubts, you can do a small experiment. Take a small piece of vapor barrier membrane and cover a mug of hot water with it. Condensation will appear on the side of the film that is waterproof, which means the inside.
Installation of vapor barrier film on the ceiling
After determining the inner and outer sides of the vapor barrier, there are no further questions about how to properly lay the vapor barrier. But still, a few nuances need to be taken into account:
Before laying the vapor barrier, it is necessary to carry out preparatory work. First of all, it is necessary to treat all wooden elements with special agents against insects, fungus, rot and fire. Subsequent work should be carried out only after the impregnation has completely dried. Irregularities on the surface to which the vapor barrier will be attached should not exceed 0.5 cm. If the house is located in a climate zone where there are frosts below -25˚C in winter, then a vapor barrier must be laid on both sides of the insulation. When installing, pay special attention to the corners
It is important that the corners are covered with a solid film. It must be well stretched. At the joints of the canvases, the vapor barrier must be laid with an overlap of at least 10-15 cm. With less overlap, moisture can penetrate inside.
Seal the joints with tape
You need to use special tape, preferably the same brand as the vapor barrier. The film is attached to the beams using a stapler. If installation is carried out between beams, you can use slats and screws with a wide head.
Laying vapor barrier on walls and ceilings
After installing the insulation on the walls, a vapor barrier film is laid. Which side to lay towards the insulation was discussed above. You just need to consider the following:
- The vapor barrier must be well tensioned so that it does not sag, there are no unevenness and so-called waves.
- The joint should overlap 5-10 cm and be securely taped with wide tape.
- The film should fit tightly to the insulation.
- Near window and door openings, it is necessary to leave 2-4 cm of vapor barrier film “in reserve”, since shrinkage or deformation of the material may occur during operation.
- There should be a small gap between the vapor barrier and the facing material for ventilation and condensate removal.
- After laying the vapor barrier, it is necessary to cover it with finishing material as soon as possible, since this material is “not friendly” to sunlight. If you leave the vapor barrier uncovered for just one season, ultraviolet radiation will do its dirty work and all your work will go down the drain, and the vapor barrier membrane will have to be replaced.
When laying a vapor barrier film there is nothing complicated and no special skills are needed. The main thing, as with any other work, is to be careful, take your time and read the instructions of the manufacturers of the material you are working with. Then there will be fewer mistakes, the house will be warmer, the mood will be excellent and you will be proud of your creation.
Criteria for choosing a vapor barrier material
When choosing a material, you should pay attention to several important criteria, including the following:
- Vapor permeability, the ability to absorb moisture and let air pass through is one of the most important factors; it is measured in g/m2 per day;
- Life time. Cheap materials can tear very quickly; membranes made of non-woven artificial fibers show the best indicator of this criterion;
- Difficult to install. When choosing, you should find out how the material is attached (what kind of overlap is made, and what tapes are needed); it must be attached tightly to the insulation, or leave a gap;
- Price. Products for this purpose are sold in rolls. In a store, they usually pay attention only to the price, but do not take into account that rolls come in different sizes; in order to sensibly assess the cost, you need to compare these two factors and calculate the real price.
The ability to absorb moisture and allow air to pass through is one of the most important factors.
Installation
In order to properly install a vapor barrier, you must first know what the house is like. It can be frame or made of timber. The fact is that laying material indoors and outdoors is not the same thing. Laying will be done differently.
- If we talk about external vapor barrier, then it is necessary to protect the house from the effects of cold wind; you should use a layer that will perform this function. Waterproofing is only needed when the building is old and needs to be protected from moisture.
- If a layer of waterproofing is laid inside the walls, then you should know that when water evaporates on the surface of the material, it must go somewhere. That is, the connection to the insulation should not be too tight - a small gap should be left.
- If the house is made of cylindrical timber, then there is already a gap for drainage, since the timber has a natural rounding. In this case, the membrane must be attached directly to the logs using a stapler. Afterwards it is necessary to make the lathing and install the internal finishing material.
If the vapor barrier is carried out from the outside, then in this case the film should, as it were, lie under the sheathing layer and adhere well to the insulation. At the same time, there should also be a place for condensate to accumulate and drain. In this case, the technology will be as follows:
- if the log is round, then the vapor barrier will be secured using a construction stapler;
- all joint surfaces must be glued using construction tape;
- if the house is frame or made of rectangular timber, the membrane must be placed on the counter-lattice in the same way as it was done from the inside;
- the film is nailed with wooden slats at the same intervals as the counter-lattice posts.
You should pay attention to another option for installing a vapor barrier, which is universal. This method will be used when mineral materials are used as a heat insulator.
This process consists of the following steps:
The vapor barrier film must be positioned on the side that is needed, and then carefully and efficiently fasten it to the sheathing. Damage to the film in this process is unacceptable; after this, you should glue any possible cracks, as well as places where there are punctures or overlaps; a sheathing should be made using beams to form good ventilation; Drywall, wall panels or necessary finishing materials should be placed on the structure.
It is necessary to figure out when it is really possible to simply insulate the walls with polyethylene film, and when better protection is needed. In this case, there are two options.
- If polystyrene foam, polyurethane foam or something similar is used as insulation, then there is no need to install a film to protect them, since it is not typical for them to absorb moisture. But if the house is insulated with ecowool or mineral wool, or with a material such as sawdust, then a membrane should definitely be used, since wool that has become damp will definitely become rotten in just 1-2 years.
- If the house is old and made of a wooden frame or a bulk structure, then a moisture retention layer will be necessary in any case to protect the wood itself.
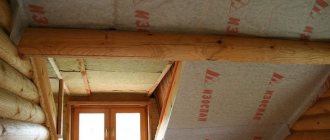
Vapor barrier of walls from inside a wooden house
The vapor permeability of a wooden base largely depends on the tightness of the sealing of seams, grooves, and the absence of cracks in the wood.
Therefore, the walls of a wooden house often require auxiliary protection - the installation of a vapor barrier layer during their insulation.
Vapor barrier can be done on the inner surface of the tree, but such a solution will not be entirely correct. The best option is to install a sheathing, which will later serve as a frame for the internal cladding.
To do this, wooden planks are placed on the base surface in a vertical direction, which are leveled (wedges are placed along the depressions, and the material is removed on the protrusions). First, the outer slats are set, along which the intermediate slats are aligned using a thread.
The insulating material is stretched onto the sheathing from the bottom up and secured using a construction stapler.
It is necessary to lay the insulation in such a way that the matte rough side is directed inward, this reduces the formation of condensation. There is no need to stretch the film very tightly, since after a while the wood will dry out, the tension may increase and the vapor barrier will simply break.
The canvases are overlapped and taped with moisture-proof adhesive tape.
A canvas with a self-adhesive strip along the edge will help speed up the process, thanks to which the joints are reliably glued without additional time spent on their subsequent gluing.
To install a vapor barrier indoors, the following materials are used:
- polyethylene film, the thickness of which is more than 0.1 mm;
- membrane film;
- mastic (excellent for plasterboard bases, the material perfectly allows air to pass through while retaining moisture);
- aluminum foil, at least 1.02 mm thick.
The foil is laid with a reflective surface towards the air space, this ensures a decrease in the degree of heat transfer.
Estimated cost of the material (depending on the manufacturer), the price is for 1 roll:
- aluminum foil – 800–6300 rubles;
- connecting tape – 150–500 rubles.
To effectively install a vapor barrier layer, you must adhere to certain rules:
- Inside the house, vapor barrier materials are mounted on the walls, which divide the living space into zones. These areas are often insulated with mineral wool, which, accumulating moisture, loses its positive properties. Therefore, it is recommended to lay a vapor barrier on top of the insulation.
- It is best to secure the film on the inside of the base with wooden planks pre-treated with an antiseptic. It is laid on both sides of the partition bases. At the junction, an overlap of approximately 2.5–3 cm should form between the panels, while the edges on both sides should not coincide with each other, and the distance between them should exceed half a meter.
- For effective ventilation of the walls and an optimal environment, the insulation is mounted on the inside of the thermal insulation layer.
Laying stages
Let's look at the process of installing a vapor barrier step by step. It must be taken into account that the installation of insulating material is only an integral part of the overall process of installing the roofing and insulation pie. Therefore, it is quite difficult to highlight only the installation of a protective film.
The insulator is laid on both sides - between the roof and the insulation, and on the attic side on top of the heat insulation.
- The first step is usually to lay the outer layer. Most often, diffusion membranes or similar materials are used to remove residual water vapor from the heat insulator.
The membrane is laid before the roofing is laid. The material is laid in longitudinal strips, starting from the bottom (from the eaves area); strips are spread, trying to avoid wrinkles
This is important, since the connections are glued with a special adhesive tape. In some cases, two types are used - double-sided tape and a special wide adhesive tape to secure the connection line; The amount of overlap is usually 10-15 cm (it is often marked on the film with special marks)
When laying, you must act carefully, avoid tears or cuts of the tape. Particular attention is paid to the tension of the material - it should not sag, but excessive load is also dangerous, since when fixing the strips with a stapler, breaks are possible; the finished canvas must be completely sealed. All areas adjacent to supporting structures, cornices or ridges must be secured with double-sided tape or a special adhesive.
- Laying the heat insulator. This procedure is performed from the attic side (from the inside). Different materials are used - mineral wool, polystyrene foam, penoplex, etc. There is no point in considering the installation of insulation, since this is a separate and responsible procedure.
- Installing a vapor barrier from the inside. It uses a basic insulating film that is completely impermeable to any moisture. If the region has frosty winters, it is recommended to use foil material to save thermal energy. Installation procedure:
- The first strip is laid from the bottom. The side edges are glued (or fixed with slats) to the rafters. It is necessary to provide a temperature reserve in case of changes in the length of the web. To do this, a deformation fold is made near the edge of the strip, which is fixed with a clamp. With any changes in length, it will maintain the strength of the fastening and the overall tightness of the canvas. The length of the strip is attached to the rafters using a stapler;
- subsequent strips are installed overlapping. Its size is marked on the film and is 10-15 cm. The strips are connected to each other with double-sided tape and adhesive tape connecting the joint from the surface side;
- All areas of passage through the roof, adjoining walls or supporting structures are carefully glued with special acrylic glue or other materials. If the surfaces are smooth, you can use double-sided tape.
The last step should be the installation of longitudinal strips on top of the vapor barrier sheet. They are needed for installation of sheathing (OSB, chipboard, plywood, other sheet materials) and subsequent finishing. These strips are attached horizontally to the rafters. It is imperative to cover the joint lines of the vapor barrier strips with them. This will help protect the joint areas of the material from damage.
All passages of pipes, antennas or other structures must be insulated with special care. Special materials are used - adhesive tapes, sealant, etc. There should be no cracks, gaps or other openings through which moist air can enter the roofing pie. Otherwise, all efforts and expenses will be useless.
Tips and tricks
The main purpose of a vapor barrier is to prevent water pores from leaving the room through the insulation and surfaces. This means that the vapors, one way or another, remain in the room, and in order to prevent the humidity from increasing and the microclimate from being disturbed, it is necessary to carry out natural or forced ventilation in a timely manner.
If you are interested in the question of what kind of overlap to make if parts of the membrane overlap each other, then we advise you to pay attention to the films themselves. There are markings along their edges - they indicate how exactly the overlap of the films should be.
Depending on the type and company, the value indicated there is no less than 10 cm and no more than 20.
For information on installing a roof vapor barrier and which side to lay the vapor barrier against the insulation, see the following video.
Peculiarities
Before installing the vapor barrier, the following features must be taken into account:
- Material. By studying the technical characteristics of the material, you can understand how suitable it is for working indoors or outdoors.
- Correctness of work. In addition to the fact that the rolled material is laid with an overlap of at least 20 cm, you need to know which side and in what method: vertically, horizontally.
- The joints of the material must be glued to avoid moisture getting on the insulation.
- The material is fixed every 60 cm.
For quality work done, craftsmen recommend purchasing vapor barrier and its components from the same company. Let's say that the tape for the joints should be of the same brand as the material itself.
Vapor barrier of the walls of a house can be carried out not only when a new building is being built, but also during renovation work. The walls of the house are destroyed under the influence of moisture, so to preserve them, the material is installed outdoors and in the house. Only in some cases is work carried out on one side (frame house). Having studied all the nuances of installation, the vapor barrier will last a long time, and the microclimate in the house will not be disturbed by moisture.
How to properly install a vapor barrier on the floor
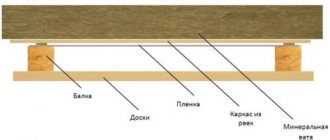
Scheme for laying vapor barriers when insulating floors along joists in a wooden house.
Insulating a floor is not much different from a roof, the only thing is that there is no finishing of the subfloor. Thermal insulation is laid between the logs of a wooden house. A subfloor is first laid underneath, which should not be solid, that is, between the narrow boards there should be indentations no less than their width. Thanks to these indentations, steam will have the opportunity to leave the insulation. Moisture enters the thermal insulation along with the air from the room, so the layers of floor insulation in a wooden house should be laid as follows:
- finishing floor;
- vapor barrier;
- insulation;
- wind protection or waterproofing.
A gap between the insulation and the vapor barrier is not required, but whether it is needed between the finished floor and the film is a controversial issue. Let's return to the moment when we talked about replacing the concept of a buffer air zone with a ventilated gap. Essentially, a ventilation gap is a space where constant air circulation occurs; if this does not exist, then it is just a buffer zone.
The classic version of the ventilation gap can be seen in the structure of the roof and ventilated façade. When insulating walls from the inside, it is still possible to achieve circulation in the buffer air zone, but with the floor it is more and more difficult. We need to make holes in the floor, but there is no guarantee that air will circulate there the way we need and whether it will at all.
Therefore, many craftsmen refuse a ventilation gap between the finished floor and the vapor barrier, and the same applies to walls. But if you look from the other side, a gap is still needed. Even if moisture condenses on the film, it will not be absorbed into the material in contact with it, and accordingly, it will not mold.
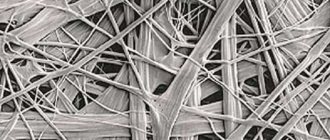
Membrane structure and operating principle
The membrane consists of several layers of film with microscopic perforations. The holes are not able to let a drop of water through, but easily allow steam to pass through. Inside the membrane, moisture is distributed over the entire area, evaporates, or flows down through internal channels.
Vapor barrier prevents the penetration of wet vapors into the heat-insulating layer and prevents condensation from falling on wooden and metal structural elements. When wet, thermal insulation ceases to perform its function, accumulates moisture and becomes a source of threat to the wooden and metal structures of the building. Over time, wet insulation develops mold, which spreads to nearby areas and can affect a large area.
A properly installed vapor barrier becomes an impenetrable obstacle to moisture and locks it in. Moisture remains outside the heat-insulating cake, but this leads to the accumulation of vapors inside the room. If some of the moisture nevertheless penetrates into the thermal insulation (through fastening holes, at the junction of the strips, small damage in the film), it is blocked there and begins its negative destructive effect. Ordinary PVC film often provokes such consequences.
A vapor barrier membrane has the property of allowing moisture to pass in one direction, preventing its reverse penetration. Manufacturers even regulate the degree of this penetration, producing vapor barrier materials with different technical characteristics. This allows you to select a membrane with the parameters required in each specific case. Thanks to the correct choice of vapor barrier, optimal ventilation conditions are created in the room while simultaneously conditioning the internal heat-insulating layers. At the same time, the vapor barrier must be attached in strict accordance with the technology, otherwise moisture penetration bridges will arise, which will significantly reduce the overall effectiveness of the protection.
What materials are used
The building materials market offers various types of water vapor barrier that have excellent characteristics. As a rule, breathable membranes and films are used to protect the walls of wooden houses from moisture, but there are other types of vapor and waterproofing. What materials are suitable for home insulation and vapor barrier:
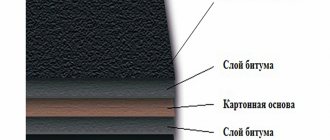
- Ruberoid. The advantage of this type of material for waterproofing is its low cost, but roofing felt is more suitable for laying on the roofs of outbuildings than for protecting the walls of wooden houses. In addition, it is more appropriate to use such a product not as the main vapor barrier, but as an additional layer to more effective materials.
- Aluminium foil. The film is coated with metal on one side and has a reinforced mesh on the other. This device helps create a vapor barrier inside the room and a layer that reflects heat. To insulate a wooden house, a foil vapor barrier is spread with a metallized coating on the outside. Such material must be placed on the walls carefully so as not to damage its integrity. If you decide to foil your home, your home will not only be protected from corrosion, but also insulated.
- Diffusion membrane. Vapor-permeable material protects the home from moisture, regulates its amount, thanks to the ability to allow air to pass through (from two or one side). The vapor barrier membrane has a high vapor permeability coefficient, which is due to the microstructure of the material. A significant advantage of the diffuse film is the absence of a ventilation gap between the thermal insulation and the membrane, which ensures the most efficient use of space. Such a vapor barrier for the walls of a wooden house provides good insulation of the room. Unlike other types of vapor barriers, the membrane has a high price - this is its only drawback.
- Polyethylene or polypropylene film. Compared to polyethylene, polypropylene is more durable and weather-resistant. However, a vapor barrier film made from this material previously had a significant drawback - condensation formed on the insulation side of it, which led to a rapid loss of the performance characteristics of such a vapor barrier for walls. The modern type of material has a special layer of viscose containing cellulose. It absorbs a large amount of moisture, gradually drying under the influence of air ventilation. The main advantages of films for the walls of wooden buildings are their affordable cost, durability, and ease of installation.
Read with this
- Everything about installing heated floors
- Vapor barrier of walls of a wooden house: choice of material
- Vapor barrier for ceilings in wooden floors: materials and installation features
- Insulation of a veranda in a wooden house
- Hydro-vapor barrier “isospan b”. characteristics and instructions where and how to use insulating material
- Fum tape technical characteristics, how and how much to wind on the thread
- Subtleties of attic floor insulation
- How to update old tiles in the bathroom
- How to cut metal using a grinder
- How to quickly and easily unscrew a tightened nut on an angle grinder
Video example of the work
- Author: AnastasyaF11
Rate this article:
- 5
- 4
- 3
- 2
- 1
(28 votes, average: 4.5 out of 5)
Share with your friends!
Floors in a wooden house: which base is better + installation of a wooden floor on beams
Insulating the floor in a wooden house: simple tips