Types of chimneys
The design of stove chimneys varies. This can be a direct flow chimney, where hot smoke simply flies into the chimney, or a variation in the form of a labyrinth through which the smoke passes, giving off its heat to the bricks of the stove. Another version of the device is a bell chimney or a two-chamber system, where hot smoke accumulates and heat is accumulated.
When constructing a flow chimney in the form of a labyrinth, brick laying is often used “on edge,” which requires fewer bricks. Such ovens heat up quickly, but cool down just as quickly.
In stoves with a bell chimney system, bricks are laid flat, and their consumption is much greater. But such a furnace cools down much more slowly, and its efficiency is higher, because the heat does not “fly out into the chimney” in the literal sense of the word, but remains in the chambers for a longer time.
Chimneys for sauna stoves look much simpler and are much less demanding in their design. For a bathhouse, it is not necessary for the stove to maintain temperature for a long time, so straight chimneys are often used, without turns or chambers. After all, the main heat is accumulated in the stones that are installed on the stove.
Make it yourself or order it
You can make some elements yourself for installing single-layer pipes or lay out a brick structure (if you have the skills of a qualified mason).
But the installation of prefabricated structures can be done with your own hands - this will help save a considerable amount from the family budget. You will have to pay a lot for the services of a qualified team - the amount is comparable to the cost of materials. There is a risk of running into unskilled workers.
When deciding whether to do the work yourself, you need to carefully analyze your capabilities:
- How accessible is the roof;
- do you have friends or relatives who can help;
- Do you have a fear of heights?
- What are your qualifications in performing repair work?
Schemes and drawings
There are many different types of ovens available online. starting from the usual “Dutch” and ending with a fireplace stove. Naturally, each stove design is accompanied by a photo of the chimney and drawings.
“The devil is not as terrible as he is painted,” although this does not apply to the drawing of stoves and their installation. Usually a drawing of the general view of the furnace structure is given in section and the so-called “orders” - diagrams of the laying of each row.
You can’t do without spatial thinking here. If you find a design that suits you, do not be lazy and draw the entire drawing yourself several times in order to better understand the device and not get confused during the process of laying the stove.
Preparing for assembly
Before installing a stove in a country house with a pipe exiting through the wall, you need to prepare. Work requires special clothing and gloves. If you will be cutting metal products, it is advisable to wear safety glasses.
Selection of tools and materials
To complete the work, the following tools are required:
- drill, equipment for cutting material;
- heat-resistant sealant;
- riveter;
- clamps, dowels, corners;
- foil construction tape;
- screwdrivers;
- level, plumb;
- knife;
- ladder;
- When working with concrete walls, you will need a hammer drill.
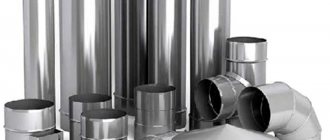
Components for installing a chimney Source vse-postroim-sami.ru
The materials you will need are a steel pipe, with which the horizontal fragment is connected to the boiler. You also need a tee for connecting pipes, an elbow (with its help the structure is directed upward), and a support console. Brackets and dowels are used to mount products on the wall. The connection of several pipes is carried out using clamps. You also need thermal insulation material and a protective cap.
See also: Catalog of companies that specialize in the installation of fireplaces, stoves and utility networks.
Choosing a location
The house has central and side walls. The second is located on the side of the slopes and under the roof overhangs. Liquid gets onto this part when it rains (if the drainage system is not fixed). There is a small roof overhang above the central walls, so the risk of liquid entering from the roof is minimal.
It is better to mount the smoke exhaust structure on the front wall. Here it is taken into account that there should be no windows or balconies on it along the line of the chimney. If you have to install a pipe through an overhang, then high-quality fire protection is installed.
Choosing a location for the chimney outlet through the wall Source stroychik.ru
Calculation of chimney height
Since it is possible to correctly bring a chimney through a wall to the street in a wooden house only if technical requirements are met, the first parameter that is taken into account is the height of the structure. It depends on the number of floors of the house. If the height of the building does not exceed 5 m, then the minimum parameter for the height of the structure is 5 m. If this value is neglected, the structure in the house will smoke in the house, the draft will deteriorate, and the performance of the heating device will decrease.
If the pipe is too long, fuel consumption will increase. When the height of a building exceeds 10 m, the main reference point is its ridge: it should be 0.5 m below the chimney. This characteristic is affected by the cross-section of the pipes and the power of the heating equipment.
Chimney height Source vosaduly.ru
Pipe diameter calculation
The internal diameter of the structure must correspond to the dimensions of the pipe. Any narrowing of the internal volume of the pipe affects the formation of draft. The presented value is affected by the power of the equipment: the higher it is, the larger the internal diameter. You need to follow standard building rules:
| power, kWt | Internal section, cm | Minimum diameter, cm |
| up to 3.5 | 14×14 | 15,8 |
| 3,5-5,2 | 14×20 | 18,9 |
| 5,2-7 | 14×27 | 21,9 |
If we take into account all the technological features of installation, the structure will last for decades without significant problems.
Tools for work
You won't need many tools for laying stoves. This is a trowel (a special trowel for laying bricks), a container in which the clay mortar will be mixed, a drill with a “mixer” attachment for mixing it (although you can do without it) and a building level to control the evenness of the masonry and check the geometry of the furnace.
Despite the fact that the stove is a fairly simple geometric figure, it is still worth keeping an eye on the level. because the mortar can be heterogeneous, its thickness can vary from row to row, and the brick always strives to “move” somewhere. When building “by eye”, the entire structure often “collapses” in one direction.
Geometry and Physics
After laying the foundation of the stove (yes, stoves need a foundation), they begin laying its base, which is a continuous layer of brick. Everything here is not difficult, the main thing is to initially create a flat surface.
And then you need to return to the drawings and once again consider how the ash pan, firebox and chimney for a wood-burning stove are constructed. The main difficulty is that the combustion part of the stove and the chimneys are laid out at the same time, so that the bricks in the masonry are connected to each other, so you need to have a clear understanding of the entire structure and, when laying each row, understand what “place” you are in.
First of all, it is necessary to lay out the ash pan, that section of the furnace through which air enters through the grate and in which ash accumulates, as is clear from its name.
The next step is to start building the firebox, and here it is better to look again at the installation diagram of the chimney for the stove. After all, it is at the level of the beginning of the firebox that the chimney begins to assemble.
There are several nuances here. The first thing to consider is that the outlet from the firebox must be large enough to create good draft. Despite the fact that we remember from physics lessons that air is sucked into a narrower passage more intensely, this does not work in ovens.
On the contrary, a small exit from the firebox into the chimney creates reverse draft, and the smaller it is, the more smoke there will be in the room. The optimal size is a hole the width of a brick and the height of three bricks (that is, along three rows of the firebox you need to leave a hole for the chimney).
Traction force
Factors influencing traction force:
- pipe height;
- condition of the surface of the internal channel - regularity of soot removal, wall roughness;
- the presence of inclined or horizontal sections. The presence of horizontal and inclined sections is undesirable, since lengthening the chimney is undesirable - the gases will cool, the draft will decrease until it tips over;
- installation of a deflector;
- quality of insulation;
- air supply to the firebox.
Your safety depends on the force of traction, so it is necessary to regularly check the presence of traction and take measures to clean the channel from soot and the pipe head from ice.
Did you call a chimney sweep?
It is also necessary to take care of cleaning the stove chimneys. For a flow chimney, one or two cleaning doors are sufficient; in a bell-type system, it is necessary to install from two to four such doors, because ash and fumes are deposited evenly over the entire surface of the dome, as well as in the places of transitions from one dome to another.
Gradually, row by row, raising the firebox and chimney passages, we are gradually approaching the moment of installing the cast iron stove. To do this, you need to select a groove in the bricks and mount the hob.
Advantages and disadvantages of installing a steel chimney along the facade and indoors
The answer to the question why most people choose a steel chimney is simple:
Let's move on to the pros and cons of installing a chimney system outside and inside the building.
Ilya Manaev
Helpful information! Steel chimney systems are assembled without the use of sealants. All elements have socket connections. The DS parts are inserted into one another and crimped with a clamp. This guarantees tightness and high reliability of the system. Sealing compounds can only be used to connect the chimney and the heating device.
Advantages of installing a chimney on the facade:
- saving space indoors;
- DS cleaning takes place outdoors (no moisture or dirt);
- it is easier to install the chimney to the facade;
- there is no need to violate the integrity of the roof and ceilings.
Disadvantages of a chimney on the facade:
- if the heating device operates irregularly, an air lock may form in the internal chimney channel;
- a pipe running along the facade can reduce the aesthetic component of the building;
- Ice may form if proper condensate drainage is not organized;
- Single-wall chimneys cannot be used; only double-walled insulated steel chimneys are recommended.
Advantages of installing a chimney inside a building:
- optimal traction is created;
- the service life of the chimney is extended when compared with outdoor placement;
- no negative impact of wind loads and precipitation;
- the risk of damage to the chimney by third-party factors is minimized.
Disadvantages of a chimney indoors:
- during installation it is necessary to violate the integrity of the roof and ceilings;
- when the chimney is located in residential premises, cleaning and drainage of condensate is difficult;
- it is difficult to fix the DS to the mounting surface;
- the chimney may not fit into the design of the room.
Reliability of masonry
When laying chimneys, the difficult issue of installing a closure or cap arises. Because It is customary to make passages one brick wide; to block it, you need to place two bricks end-to-end over it. In this case, the seam does not rest on anything. Such a ceiling device looks, at first glance, weak and unreliable, and one would like to lay a rail for support, but this is not necessary.
Firstly, the rest of the furnace array stands on the second half of these bricks, preventing them from falling through. And secondly, the overlap is done in two rows, in the first row the bricks are laid end to end, and in the second row the bricks are tied, and the brick is laid on the seam. Thus, a kind of “lock” is obtained that firmly seals the passage of smoke.
Foundation
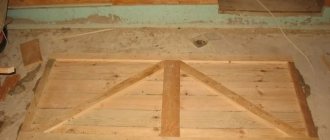
Stoves weighing less than 750 kg are installed on the floor without a foundation. Only a kitchen stove can be laid on a floor without a foundation. If the strength of the floor is insufficient, it is reinforced with beams that are installed on brick pillars. In this case, sheet asbestos in clay mortar is laid on the floor under the base of the furnace, an iron sheet is nailed on top, and only after that the base of the furnace (foundation) is raised with two rows of brickwork. After this, they begin laying the furnace from the first row according to the drawings. In this case, the distance from the combustible part of the floor to the chimneys will be equal to the thickness of three rows of brickwork. Reducing the thickness of the stove base is unacceptable in terms of fire safety.
Stove without foundation
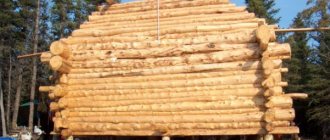
But most stoves are installed on a specially constructed foundation, which supports the stove body and chimney.
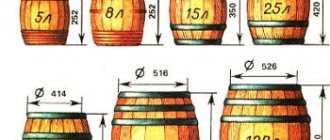
Knowing that the average weight of one brick is 3.5 kg, you can approximately calculate the weight of any household stove. For example, to lay a Russian stove measuring 141x141 cm with a pipe, about 1,500 bricks will be required. The approximate mass of the stove is 1500×3.5 = 5250 kg.
Foundations for furnaces can be solid (Fig. 2, 3), columnar (Fig. 4, 5) and mixed. The foundations should be wider than the base of the stove by 5-7 cm in each direction. The depth of foundation placement depends on the properties of the soil and the groundwater level. Soils can be rocky, coarse, sandy and clayey.
Rocky soils are solid solid rocks and some sedimentary rocks: sandstones, limestones. They have high compressive strength and resistance to groundwater.
Rocky soil
Coarse soils are fragments of rock. They are also solid foundations, since these soils contain a large amount of crushed stone, gravel and pebbles.
Coarse soil
Sandy soils consist of sufficiently dense and strong particles for constructing foundations for furnace foundations.
Sandy soil
Clay soils are determined by their clay content. Clay in its pure form is very rare in nature, so soil that contains more than 25% clay is considered clayey. If the soil contains clay in the range of 10-25%, such soil is called loam, and soil with a clay content of up to 10% is called sandy loam.
Clay soil
Sometimes there are soils with large pores, which are dangerous because when groundwater gets into them, they easily liquefy and lose strength. These are bulk soils that have great looseness.
In dry sandy soils, the foundation depth can be 50 cm, in clayey soils - 75 cm.
The soil on which the base of the foundation rests is called its base. In wet soils, the depth of the pit from the ground level should be at least 1 m. The foundation is laid in them using clay-cement mortar. In dry soils, foundations are laid on a 1:3 lime mortar (1 part lime paste and 3 parts sand). In strong dry soils for furnaces weighing up to 2 tons, the foundation depth can be reduced to 25 cm, and for furnaces weighing up to 3 tons - accordingly, up to 40 cm. In wet soils, it is not recommended to reduce the depth of foundations.
Depth of laying the foundation for the furnace
For laying the foundations of furnaces, rubble stone, cobblestone, crushed brick of all types, gravel and pebbles, ordinary clay baked red brick, coal slag, and iron ore can be used.
To construct a foundation, a pit is dug in the ground. The dimensions of the pit should be 10-15 cm wider than the base of the furnace in each direction.
Rice. 1. The principle of foundation construction. 1 - floor; 2 - furnace body; 3 - two rows of brickwork; 4 - protrusion 50-70 mm; 5 - external foundation; 6 — ground level; 7 - foundation in the ground; 8 - base of the foundation
First, material (rubble stone, crushed brick, etc.) up to 10 cm thick is placed in a dug pit, then filled with liquid cement mortar. The rubble stone is laid out, observing the rules for bandaging the seams, the gaps are filled with small stones. In this way, the foundation is brought to ground level. A waterproofing layer (3 layers of roofing felt or roofing felt) is laid on top of the foundation in the ground. An external foundation is built on the waterproofing layer.
Laying the foundation for the furnace
The external foundation can be laid out from the same materials as the foundation in the ground. The height of the masonry depends on the depth of the underground space. When laying an external brick foundation, whole bricks are placed along the edges, and halves are placed in the middle. The external foundation should be 5-7 cm smaller than the foundation in the ground in all directions.
It should be remembered that the outer foundation area should be 5-7 cm wider than the stove base in all directions. The outer foundation is not brought to the floor level by 14-15 cm (two rows of brickwork). The floor is cut to the size of the stove base.
According to the dimensions of the stove base, following the rules for bandaging the seams, lay out one row of brickwork. After this, lay out the second layer of waterproofing (two layers of roofing felt or roofing felt). The second row of brickwork must correspond to the floor level or be higher, but not more than 3-5 cm. At this point, the laying of the furnace foundation is considered complete, then the laying of the furnace body begins.
Foundation for the stove
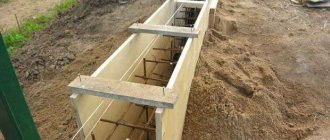
The figures below (2, 3) show solid foundations. External solid foundations made of small stone, crushed brick and gravel are laid out using boxes made of boards. The boxes are filled with layers of crushed stone up to 10 cm, carefully compacted with a tamper and filled with cement mortar. External slag concrete foundations should be 7-10 cm wider than the dimensions of the furnace base in each direction.
External solid foundations made of small stone, crushed brick, gravel and cinder concrete are also not brought to the floor level by 14-15 cm. The first layer of waterproofing made of two layers of roofing felt or roofing felt is laid on top of the foundation leveled with cement mortar. After this, the first row of brickwork is laid out according to the dimensions of the stove base, then the second layer of waterproofing is laid out. A second row of brickwork is laid on it, which should correspond to the floor level or be higher, but not more than 3-4 cm.
Rice. 2. Solid foundation made of small stone, crushed brick and gravel. 1 - floor; 2 - two rows of brickwork; 3.6 - waterproofing; 4.7 - leveling layers of cement mortar; 5 - external foundation made of slag concrete; 8 - foundation in soil made of crushed brick and gravel; 9 - soil
Rice. 3. Solid foundation made of rubble stone and brickwork. 1 - floor; 2 - external foundation made of brickwork; 3 - waterproofing; 4 - leveling layer; 3 - foundation in the ground; 6 - soil
On rocky and rocky soils, foundations are not made in the ground, but an external foundation is laid out from the surface of the soil. To save building material, external foundations can be erected on two columns (Figures 4, 5). In this case, foundations in the ground can be built solid, as mentioned above, or separately for each column. When laying brick columns, whole bricks are placed along the edges, and halves are placed in the middle. The width of the columns should be equal to the length of 1-1.5 bricks.
Rice. 4. A foundation of two columns connected by laying bricks with separate foundations in the ground. 1 - floor; 2 - waterproofing; 3 - columns made of brickwork; 4 - foundation in the ground; 5 - leveling layer; 6 - soil
Rice. 5. A solid foundation in the ground, connected to an external foundation of two columns covered with reinforced concrete lintels. 1 - floor; 2 - waterproofing; 3 - leveling layer; 4 - reinforced concrete lintels or slab; 5 - foundation in the ground made of rubble stone and crushed stone; 6 - soil; 7 - brick masonry columns
The distance between the columns is covered with reinforced concrete lintels or a reinforced concrete slab. After leveling with cement mortar, one row of brickwork is laid according to the dimensions of the furnace base. A second row of brickwork is laid over the laid waterproofing, which must correspond to the floor level.
If the distance between the columns is no more than the length of two bricks, then the columns can be connected by running bricks into the continuous plane of the foundation. In this case, the columns do not reach the overlap of 5 rows of brickwork (see Fig. 4). After connecting the continuous plane of the foundation, the first row of brickwork is laid according to the dimensions of the base of the furnace, waterproofing is laid on it, after that - the second row of brickwork, which should be at floor level.
During the construction of furnaces, the pressure on the ground gradually increases, and the settlement of the foundation also increases. With the completion of the laying of the stove and chimney, settlement of the foundation stops. Between the foundations of the walls of the building and the furnace, sedimentary joints 5-7 cm thick are left, which are filled with sand. Settlement seams are left due to varying degrees of settlement of the walls of the building and the furnace.
In the upper floors of buildings, furnaces can rest on a lower furnace or on special beams (steel, cast iron, reinforced concrete) embedded in the walls on fireproof partitions, which are provided for by the building design.
When can you start heating?
After all the rows have been laid out, the stove must be coated with clay, or, if it is a beautiful new brick, all the seams must be thoroughly coated and the stove must be allowed to dry completely.
After a week has passed, which is the minimum time the stove should dry out, you can begin to gradually heat it, adding firewood in very small portions. In order to “break through” the draft, it is recommended to burn newspaper while cleaning the stove before starting a fire in the firebox.
It's okay if the oven smokes a little the first three or four times. This only means that she is still a little damp inside. If the stove continues to smoke even after a week of constant firing, this means only one thing - a mistake was made somewhere. And then you will have to either shift the oven completely, or look for ways to troubleshoot problems with minimal losses. Based on this, it is best to carry out this work in the summer, and not just before the heating season.
In any case, the construction of stoves is a much more complex process than ordinary brickwork. It requires spatial, even mathematical, thinking. But if you give it the proper time and attention, the result will warm your soul and warm your home for many years to come.
Installing a chimney from a chimney
The choice of the type of steel chimney depends only on the individual preferences of the owners and the characteristics of the boiler or furnace.
Be that as it may, when installing a stainless steel chimney yourself, a number of rules should be taken into account:
- The assembly of the structure must begin from the bottom link, gradually rising upward. Please note that the upper sections must fit tightly with the lower ones, and the gaps must be sealed with fire-resistant sealants rated for temperatures up to 1000℃.
- To reduce heat loss, the chimney should be wrapped with insulating material.
- In cases where the building has a roof made of flammable materials, a spark arrester is required.
It is worth noting that all these manipulations will seem trivial compared to the process of running a chimney out through the wall or roof of a private house or bathhouse.