The use of screw piles to create a foundation for low-rise buildings or fences is a competent and rational solution. Therefore, they have become one of the most popular construction projects not only on personal plots, but also in regions with difficult operating conditions.
However, during installation, many are faced with the following problems: how to tighten the pile, center it correctly, bypass hidden obstacles in the ground, and manually. This article will allow you to learn the basic nuances and manual method of driving piles without errors.
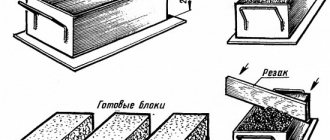
Do-it-yourself installation of screw piles
Before you begin, we recommend that you read the advice of experts:
- vertical. The deviation from the screwing axis can be no more than 1 degree. To be able to constantly monitor this parameter, you need to use a laser level or a regular building level fixed on the top of the pile;
- lever arm. The longer the lever, the easier it is to tighten the pile. The convenient lever length for use is 3-4 meters;
- depth of placement. The determination of the lower limit when installing a pile is carried out using the calculation method. Data such as soil freezing depth, groundwater level, and soil composition are taken into account. For most of the Russian Federation, the freezing depth is 1.5 m.p. Data on soil density is obtained by conducting research directly on the site.
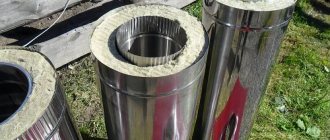
Choosing the right diameter
The diameters of piles produced in production and their purposes are indicated in the table:
| № | Diameter | Purpose |
| 1 | 5.7 cm | Suitable for installing chain-link fences. |
| 2 | 7.6 cm | They are used as supports for concrete fences, small utility buildings, and country houses. |
| 3 | 8.9 cm | Suitable for the construction of one-story houses. One such pile can withstand a load of 3 to 5 tons. |
| 4 | 10,8 | They are used in the construction of two-story houses made of light building materials. A support of this diameter can withstand a load of 5 to 7 tons. |
Manual installation of screw piles - step-by-step instructions
- clearing the area. Piles are good because they do not require leveling the terrain, but it is necessary to remove debris and provide access to the installation site.
- tying the foundation to the site. We are talking about applying markings to surfaces. Pile field, tape or free-standing piles - the main thing is that the installation location exactly matches the project. The permissible marking error is 50 mm.
- marking.
The presence of markings allows you to evaluate the entire picture of the piles. To carry it out, you need to install a beacon at the site of future installation of the pile or make a depression in the soil. A garden drill is used for this. In this case, it is important that the depth of the pit (recess) does not exceed 50 cm. A large depth, of course, simplifies the tightening of screw piles, but it affects its load-bearing capacity. Indeed, in this case the pile is not twisted into the soil, but simply installed in it. This approach may be critical for the foundation.
- pile processing. Additional application of an anti-corrosion composition will protect the metal pile from destruction due to the chemical activity of the soil. Often, factory-made piles already contain a protective layer. However, it can be damaged when screwing the pile into hard soil.
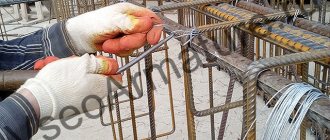
- installation of the first pile. The corner pile is always installed first. To tighten a screw pile with your own hands, you should thread a metal rod into the eyes and carefully tighten it together. The length of the lever is 2-3 m. The longer the lever, the less force will need to be applied to tighten the pile. A level is attached to the barrel, and after each turn the degree of deviation is monitored. The permissible deviation is no more than 2°.
Note that the deeper the pile goes into the soil, the more difficult the twisting process is, the more important it is to apply uniform force on the lever to avoid deviation of the pile from the vertical axis. In one full circle, the pile will deepen by 100-200 mm. depending on the distance between the blades. The time for tightening one pile takes from 30 minutes and depends on the density of the soil.
The fact that the pile has taken its place is indicated by two parameters: the achievement of the calculated immersion depth and the deformation of the metal at the installation site of the rod. If the pile becomes deformed at a depth of less than 1.5 meters, this may mean that it has stalled (hit a solid object) and will have to be moved.
- installation of the remaining piles. In this case, corner piles are installed first, then ordinary piles, then the pile field is filled (if this method of installing screw piles is provided). To mark ordinary piles, twine is stretched between the corner piles, which eliminates significant deviations from the installation site.
- alignment. Since piles are difficult to screw perfectly to a given level, after installing them you should check the level height using a level or hydraulic level. After determining the desired height, the piles are cut using a grinder.
Note. You cannot unscrew the pile in order to adjust it to the level!
- pouring concrete. The recesses made before installing the piles are filled with concrete mixture. Note that concreting does not significantly increase the load-bearing capacity of the pile, however, it eliminates the access of air into its internal cavity and prevents corrosion.
- installation of the head. The piles filled with concrete are ready for further work. The next step is to weld the caps to the top of the pile. It is important to clean the weld from scale and apply primer or paint to it.
- tying piles along their heads. The presence of holes in the heads allows you to screw a wooden beam to it with suitable screws.
Calculation of the mass of the house
Calculate the total weight of all construction and finishing materials that will be used during construction. The estimated maximum weight of furniture, household items, and people who will be in the house are taken into account. Calculate the mass of the bathtub or pool, taking into account that the tank will be filled with water.
Take into account the load of the snow layer that may lie on the roof in winter. This indicator is calculated on the map depending on the region:
How to tighten screw piles with your own hands
- a rod (crowbar) threaded through the eyes of the pile is the simplest device. The rod can be lengthened by placing hollow pipes on both sides. However, this approach is fraught with deformation of the pile. The reason may be: the pile reaching dense soil, a solid object, or insufficient thickness of the pile shaft (pipe).
- mounting head. A device that allows you to eliminate deformation of the top part of the pile. The mounting head is made of a pipe onto which clamps are welded. With this method, a rod (lever) is inserted into clamps.
- meat grinder. A device driven by an electric drill. The power of the drill should be more than 1000 W, the number of revolutions per minute should be 600.
- motor drill
- pile driver This device will allow you to completely mechanize the twisting process. However, due to its cost, it is advisable to buy a device only if it is necessary to drive a large number of piles. In particular, it is bought by construction crews. However, pile drivers can be rented; this service will cost 800 rubles/hour. Minimum time – 8 hours.
As a rule, developers do not risk driving screw piles under the house themselves. In this case, special equipment is used, which imposes the only condition - free access to the installation site. The technology works much faster and more efficiently than people, the only negative is the high cost. In addition, you will need to pay for the work of a team of three people (minimum) - one operator and two people controlling the twisting process.
Where is grillage used?
- During the construction of baths, technical buildings with a small mass of load-bearing structures;
- When constructing residential buildings on slopes with a large inclination angle;
- If you need to make a garage or basement built into the depths;
- When stratification is detected during soil surveys, especially when combining clay and sandy soil;
- When restoring stone and concrete foundations of old buildings, if subsidence of individual corners is detected. Then special supports are placed under the base, then the platform is poured and only then the supporting grillage is spread around the outer part.
Pile-grillage foundation in section.
Equipment for driving screw piles
Among the techniques that have proven themselves well are:
- Krinner, Aichi, Iron, Whirlwind, Craftsman - a group of electric piledrivers.
- Tornado is a compact installation; it requires a 380 volt network or a 5.5 kW generator to operate. Drives piles with a diameter of up to 150 mm;
- Capstan. Maximum pile diameter – 219 mm;
- MGB-50P – allows you to work on soil of frost category 4.
Note. The use of the technique is shown in areas with complex terrain, for example in coastal areas.
Are the piles screwed in correctly (defective)
The work of driving a pile can be assessed using two parameters:
- deviation from the vertical level (deviation from the vertical axis by more than 2°);
- immersion of the pile below the design level.
In these cases, the pile should be removed and tightened again. Otherwise, it may not cope with the design load.
Final installation of a pile foundation based on
- When creating the final foundation, it is worth making sure that the upper ends of the supports form a flat horizontal surface.
- The leveled base is poured with concrete.
- The heads are welded onto them.
- A channel and beam are installed to create the strapping.
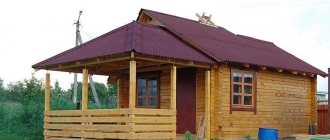
Further, on the basis of such a foundation, you can begin work on the construction of household structures or a small summer house. The design features of a pile foundation, as a rule, exclude the creation of a basement or underground floor. Such a foundation for a building simply does not imply this. But in this case it is quite possible to create a small underground floor.
A high-quality pile foundation is durable and has a low cost of production.
Mistakes and rules for driving piles
Experienced installers name a number of mistakes that those who want to screw a screw pile with their own hands may encounter. In particular:
- unscrewing the pile. When a pile deviates too much or hits a hard object, developers often unscrew it and screw it back into place. Experienced installers claim that in loose soil the load-bearing capacity of the pile decreases. You should shift the installation location a few centimeters and screw the pile into dense soil;
- ignoring the stage of concreting the pile. Concrete does not provide stability to the pile, so many private owners place a cap on the top of the pile immediately after cutting it. But, concrete makes it possible to exclude the flow of air into the internal cavity of the pile, and thus eliminate the occurrence of corrosion and extend the service life of the support;
- installation of the pile at an angle. It is necessary to control compliance with the level along the vertical axis from the first turn of twisting. Don’t think that the level can be easily corrected in the future;
- recess for installing the pile. To make your work easier, it is tempting to make a hole under the pile with a garden drill. However, this approach significantly reduces the load-bearing capacity of the pile, because it will not be tightly screwed into the soil;
- stopping the twisting after hitting a hard object. Failure to reach the specified depth is fraught with loss of bearing capacity of the pile. This can be prevented by removing solid objects (usually stones) from the soil and re-screwing the pile;
- stopping at the calculated depth if the pile is still being driven. It is difficult to foresee everything in calculations. If the pile continues to move after reaching a given mark, it is recommended to increase it and continue twisting until dense layers of soil are reached.
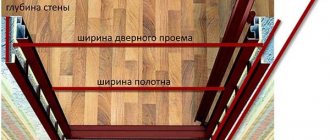
Carrying out marking
Before starting work, you need to make markings.
Driving the piles according to plan requires careful marking on the ground. The racks are placed at the required distance, not exceeding 3 meters. Increasing the run leads to sagging of the grillage trim. The perimeter is marked on the site, and diagonals are measured to check, the size of which must match.
First, mark the corner elements and twist them in the center of the bar. If the extreme dimensions of the grillage are indicated, subtract 0.5 of the width of the bar on both sides. After installing the first rod, determine the position of the second support, focusing on the dimensions of the foundation and the distance between the centers of the heads.
The house is placed parallel to the fence, the road, the red line of the street, so from this line they measure the same distance as the first support and place the second rod. They dig a pit, insert a post, check the vertical and measure the gap between the axes. Screwing begins if there are no deviations or the element is aligned to the design and planned position.
The place of the third support is found at the intersection of two linear distance indicators, the accuracy of the marking is checked by comparing the legs and hypotenuse of the formed triangle. Use pegs, nylon cords and a tape measure. The work is carried out together. The permissible error for horizontal measurements is 5-10 mm, and for vertical measurements - no more than 2°.
Solution
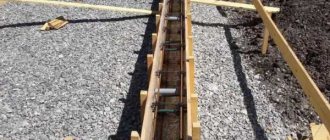
As I already mentioned, it was September, the weather was nice and warm, and our whole family was still living at the dacha. One evening I decided to dig a hole for the pile by hand. I prepared a bayonet shovel, a narrow selection and a crowbar. Half an hour of work and the preparation for the pile was ready. It turned out to be no more than 30 cm in diameter and about 100-110 cm deep.
Now I knew the reason for all my troubles in terms of unsuccessful attempts to install a screw foundation. It turns out that everything is simple: after removing a layer of 60-70 cm, very dense clay began. And in it, large stones of irregular shapes, 10-20 cm in size, seemed to be melted in. This layer of clay with stones was small - only 30 centimeters. I had to work painstakingly and persistently with a crowbar and shovels. There was gravel and sand deeper, but I didn’t touch it anymore.
Very dense clay and stones did not allow the pile blades to be screwed in deeper. The stones simply got stuck between the blades. I was also struck by the fact that 8-10 years ago, on this site 15 meters from the construction site, I carried out excavation work to bury the strip foundation of an old house. The excavator dug trenches up to 2 meters deep, but there was no layer of such dense clay. This is how strange it turns out: here there is one soil, and 10 meters away there is another. Although this may be a feature of our river floodplain.
Immersion depth
The pile is screwed into the ground until it stops, until it stops going in even with extreme effort. This means that a layer of such density has been achieved that it can withstand the support under load. You can lay the foundation.
After this, the supports are cut, maintaining the cutting height according to the level.
Sectional diagram of a screw pile foundation
Related video: Instructions on how to tighten screw piles
Which ones are best suited for private construction?
The choice of a specific brand and size of trunks is, first of all, made based on the type and characteristics of the soil.
After determining the most suitable variety (single or multi-bladed, length, tip type), the trunk diameter is selected. The calculation is made based on the bearing capacity of the support.
For private houses, trunks of relatively small diameter are usually used:
- VS-57.
- VS-76.
- VS-89.
- VS-108.
Large diameters require significant effort when immersing, so they are practically not used for private housing construction.
Features of installation technology of various types of support pillars
The principles of construction of a pile foundation are set out in SNiP 2.02.03-85 and SP 24.13330.2011. Each technology differs in the method of construction, as well as the types of power elements.
Work on laying the foundation for all types of piles begins with clearing the site of construction and other debris, unloading materials, preparing technical equipment, and marking the field in accordance with the plan.
Bored
The piles are made at the construction site. Algorithm of technological operations:
- In designated areas, pits are constructed to the designed depth.
- The bottom of the well is covered with a layer of sand and the material is compacted to obtain a height of at least 20 cm.
- Using technology without the use of casing pipes, the walls of the well are strengthened to protect them from destruction by clay solution. In most cases, inventory pipes are used, which in private housing construction can be replaced with sheet roofing felt.
- A reinforcement cage is prepared and placed inside the well.
- Fill the structure with mortar, leaving protrusions of the longitudinal reinforcement above the surface.
- After hardening, align the support at the same level.
Screw
Installation of screw products can be done manually or using gear units for installation. Technological processes for laying the foundation on a marked field:
- screwing the rods to a depth when the blades are immersed in the bearing layer;
- alignment of the protruding parts of the piles at the same level horizontally;
- concreting the pipe cavity to prevent oxidation of the metal inside the supporting elements;
- welding of ends;
- cleaning of welds and coating with a hydrophobic compound.
Installation of reinforced concrete screw piles is carried out using special equipment, since the structural elements have significant weight and it is almost impossible to manually ensure the alignment of the pillar.
Installation of reinforced concrete supports using the drilling method
The need for preliminary drilling of wells for driven piles arises in the following cases:
- The power of hammers for driving is not enough to independently overcome the resistance of the soil.
- Construction is carried out on highly dense, permafrost or, conversely, heavily waterlogged soils.
- Piles must be inserted into the ground at a certain angle.
Sequence of technological stages of pile laying:
- leader drilling of pits;
- cleaning of mined-out land;
- immersion of reinforced concrete pillars;
- alignment of structures protruding above the surface at the same level.
Drivers
To install the driven supports, special equipment with a fixed diesel hammer is used. Excavation algorithm:
- Marks are made on the driving posts in 1 m increments.
- Using slings, the product is lifted into a vertical position and fixed above the design point.
- The blows of the diesel hammer are made with a gradual increase in force. The height of the working stroke is no more than 0.5 m.
- To ensure that the bearing layer is reached, after the pile is immersed to the design depth, 10 final blows are made. If the pile remains in place, then the installation of the load-bearing element is considered complete.
Strengthening the Northern Fleet
The need to strengthen the structure may be caused by errors in design and construction, changes in hydrogeological conditions, or the appearance of additional loads on the foundation.
Reconstruction stages:
- design and calculation of a new foundation;
- delivery of materials to the site;
- lifting the house on jacks;
- dismantling the old power structure;
- marking the pile field;
- installation of new supports;
- pile tying;
- returning the house to its original position.