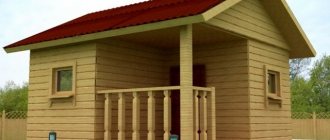
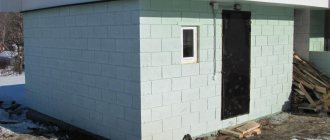
Previously, wood was used in the construction of a Russian bathhouse, but today other materials (brick, aerated concrete) have begun to be used. But wood still remains a popular material that helps create a special atmosphere and recreate the true spirit of a Russian bath.
Construction cost: timber vs. log
There is an opinion that a log house made of logs costs less than the same one made from profiled timber (it is better processed than regular timber and has locks that reduce the risk of cracks). If you look at the cost of one cubic meter of material, then this is true. But for the same project you will need much more logs than timber. If you take a 200 mm beam, then the wall thickness will be 200 mm and the height of the crown will be 200 mm. And if you take logs with a diameter of 200 mm, then a groove 10-12 cm wide is selected in it. And the thickness of the wall at the junction of two logs will be this 10-12 cm. And the height of the crown will not be 200 mm, but 100-120 mm. This is where the difference in the required volumes when purchasing emerges. Add the labor-intensive nature of the work, and it will immediately become clear why log cabins are often built from timber. If we talk about profiled timber, then its dimensions must coincide within a few millimeters. With such material, work progresses quickly: just the bowls are cut (most often with a chain saw), the insulation is laid and a new crown is placed.
When constructing a log house, a longitudinal groove is cut out in a log to “join” it with another
Another important fact: working with timber is easier. Especially with a profiled one. It has absolutely the same dimensions (if it is made well) and folds together without problems. And with a log, if it is not rounded, there is more than enough fuss.
Choosing lumber for a bath
The log house for the bathhouse is built from coniferous wood - spruce, juniper, pine, cedar and larch. At the same time, the best lumber for the construction of wooden baths is considered to be the part of the wood from the butt (root part) to the crown. This area has a high density of wood fibers and is virtually free of flaws.
There are two types of wood on the construction market:
- dried;
- with natural humidity levels.
Important! After construction, a log house made of dried material is less susceptible to shrinkage.
In order to properly build a log bathhouse, it is important to consider the following recommendations when choosing and preparing lumber:
- The quality of the material is determined by the absence of stains, deformations, knots, cracks and wormholes on the surface.
- The permissible level of curvature of one log should not be more than 10 mm, diameter - from 25 to 35 cm.
- A wooden frame from raw material is erected immediately after its preparation for uniform drying and shrinkage of the finished structure. This will prevent possible deformation of the bath.
- Wood felling is often carried out during the cold season - in late autumn or winter.
- The sawn logs must be stable and mature for at least 30 days from the moment of felling.
- When preparing the material yourself, the logs are carefully cleaned of bark and knots with a scraper. In this case, strips up to 20 cm wide are left on the edges for natural shrinkage of the wood.
- To ensure long-term storage, cut logs are stacked in bundles or stacks, maintaining 6 cm gaps between individual elements, 1.5 cm between rows, and 15 cm from the top ground level to the bottom elements.
Important! When preparing logs, one should take into account the technical shrinkage of the trunk diameter, which should be up to 8 mm for each linear meter of wood.
Log processing
The first thing you need to know is that a log house made of logs or timber (except laminated veneer lumber) must remain under the roof for at least 8 of the driest months. Most often, a bathhouse is installed in December, finishing work begins in August. But only if these are really dry months and they are in a hurry to start the sauna. If there is no rush, it is better to wait one and a half to two years.
The ends of the logs must be coated with a special compound
There will be enough work for the drying time. After installation, the logs must be treated with solvent-based antiseptics. For example, Tikkuril has Valti Pohjusta impregnation, and Woodex Base. They will protect the wood from fungi and blueing. To prevent them from being torn during drying, the ends of the logs are coated with another composition “Teknol JRM” from the same “Teknos” or its equivalent.
The log house itself also needs processing
After the wood dries, the log is sanded, removing the bacterial treatment. This operation opens the pores of the wood, allowing it to be painted with high quality. Oil-wax is most often used to paint a log house. These products also contain a coloring pigment that gives the wood a tint. Therefore, in addition to protective properties, they also perform a decorative function.
After shrinkage, the frame is sanded and then painted
Construction of log walls
The next stage of work is the assembly of the wall structures of the log house from round timber. Many novice developers are interested in how to cut down a bathhouse and what tools to use in the work? The standard set of tools includes:
- electric or gasoline saw;
- ax and hammer for wood;
- electric drill and plane;
- chisels of different sizes;
- measuring instruments - building level, tape measure, ruler, square and plumb line.
To assemble a sauna log house, classical technology is used, which is simple and easy to master. It involves the construction of a wooden structure in strict sequence.
- When erecting walls, it is necessary to make a binding (cladding) crown. It uses 4 logs, pre-treated with an antiseptic. To ensure a tight fit of the crown to the foundation, insulating material is used - tow or jute. The location of the logs is at right angles, the connection is in a bowl or paw. The optimal size of the log house is 9 sq.m.
- The next two pairs of logs are installed in a similar way, forming the second row.
- The joints between the logs are carefully caulked to prevent heat loss.
- The crowns are secured to each other with square dowels or round wooden dowels.
- When the required height of the log house is reached, ceiling beams and a rafter system are installed.
Important! The technology for connecting log house elements into a bowl is provided for rounded and prepared logs. And the technology is in place - for logs and beams without preliminary preparation.
Sealing cracks
It's no secret that even in a well-made log house there will be gaps: it is impossible to cut out a bowl so that it perfectly follows the shape of the log. Still, some gaps remain. Moreover, during the drying process, they increase, and cracks also appear and deepen.
All these cracks are sealed - caulked. For this purpose they use a tool similar to a small flat spatula and a hammer. Moss or tow is placed in the cracks. Using caulk, tuck the tow into the crack, compacting it by tapping on the handle.
This is how they caulk a jute bathhouse
If the frame was assembled with moss (dried moss is laid between the crowns for compaction), then its ends hang out of the cracks. To prevent birds from snatching it away, it is tucked inside immediately after installation. There is no need to compact or be zealous. The purpose of this treatment is only to remove hanging ends. The caulking itself is carried out later - after six to seven months.
If the log house is placed on a jute tape or tow, the first caulking is carried out after the initial shrinkage of the log house - after six months. After this, you can install windows and doors in the log house. Secondary caulking will be needed in about a year. It usually requires less time and materials than the first time.
In general, as they say, a log house “drives” all its life. Therefore, it needs to be inspected periodically and the cracks sealed. In addition to the fact that the old ones become wider, the tow is taken away for birds’ nests. You have to periodically update the finish. But this is the case if the outside of the log house is not finished with anything.
This is what a log house collected with moss looks like. The ends are trimmed, the remains are tucked into the cracks
For more information on how to caulk a log house, read the article “How to properly caulk a bathhouse and when to do it.”
How to reduce the cost of construction without sacrificing quality
The main costs for the construction of any structure are the cost of design work, materials and installation and finishing works. You should not save on any of these points if we are talking about a permanent building of complex design. But the bathhouse is a slightly different matter.
It does not have much weight and dimensions, therefore it does not require serious geophysical research of the site and can be erected without the use of construction equipment and specialists. That is, you can reduce the cost of the project by making drawings for the bathhouse and doing the bulk of the work yourself.
Materials
The only thing you shouldn’t skimp on is the quality of materials. On the contrary, by choosing the best, you ensure that there are no problems associated with the repair and operation of the bathhouse in the future, and therefore no costs for these purposes.
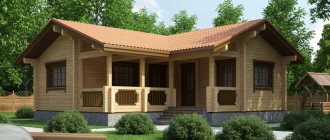
Since bathhouses in our country are traditionally built from wood, we suggest you pay attention to the following materials:
- Rounded log. Its advantages are the same diameter of the lumber along the entire length and a smooth polished surface. They simplify the installation of the log house and allow you to abandon the need for external and internal wall decoration. But the main thing is the ability to order components made on the basis of your design, from which the box is assembled like a construction set thanks to the docking bowls and grooves made in production.
Assembled log house
- Profiled timber. Even making a log house from ordinary timber with your own hands is much easier than from a log - its smooth edges allow you to ensure high-quality joints and accurately maintain the laying level. If you use profiled timber equipped with special grooves on the working planes, the task is greatly simplified.
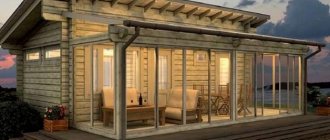
Advice. When choosing a material, give preference to well-dried material or one made using modern adhesive technology. It is practically not subject to deformation and shrinkage during construction and operation; it eliminates the need for months-long technological breaks for drying, thereby significantly reducing construction time.
Photo of a sauna under construction made of laminated veneer lumber
By choosing a rounded log or profiled timber for the walls of a bathhouse, you can refuse the services of craftsmen whose specialty is cutting log houses.
Project
It is also necessary for the construction of such a simple structure. Even if it’s just a bathhouse - without any “frills” like a swimming pool, gym, living attic or bathroom.
Projects and drawings of bathhouses of various sizes and characteristics are available from many contracting organizations engaged in individual construction. They can be found on the Internet and specialized literature. You can order it from specialists indicating all your wishes. But all these options are mostly paid.
The finished project can be remade by changing the dimensions or layout
Therefore, if you want to reduce its total cost, you can make a drawing of a bathhouse made of timber yourself or take a ready-made one as a basis and modify it in accordance with your desires, capabilities and needs.
Features of construction and operation
Quite a lot of problems arise for owners of wooden baths during operation: high humidity stimulates the development of various sores and fungi. Few people agree to treat wood with any strong chemicals: you can also treat yourself at the same time. Therefore, even during construction, it is necessary to take all possible measures to ensure good ventilation:
- When pouring a strip foundation (the most common), make vents along the perimeter of the foundation. They will provide ventilation and drying of floors.
- When laying the first crown, do not forget to put a layer of waterproofing. And it’s better that it’s not roofing felt. Its service life, even in ideal conditions, is about 3-5 years. Then its hydrophobic properties drop sharply. Today there are similar materials, the service life of which is 10-15 years - roll waterproofing on fiberglass or fiberglass (also called euroroofing felt, but materials for waterproofing are needed, without sprinkling). They cost more, but, firstly, the price/quality ratio is maintained, and secondly, not so much is needed.
- The lower crown must be impregnated with bactericidal compounds. Moreover, almost all bathhouse admirers (among the owners of log houses) will agree with this. Firstly, most likely the first crown will be below floor level. And in the underground the ventilation is good, and the temperatures even under the steam room are not at all high, so if vapors get into the steam room, it is far from being in a critical volume. In any case, there are no consequences or foreign odors.
The lower crown of the log house is treated with antibacterial impregnation immediately after installation - It is good to think over the drainage system in the steam room and washing room. When performing it, do everything with all possible care. This is the case when it is better to be safe than sorry. It's very difficult to fix.
- Make a well-thought-out ventilation system. It is better to spend a few more logs on a fire than to change crowns, floors, and wall cladding.
In addition, after each visit to the bathhouse, it is necessary to create conditions for drying the entire room. This is not difficult to do: after steaming, throw an armful of firewood into the stove and open the windows and doors. Additional heat from the steam with a draft will dry the bath well.
The wooden bathhouse also has one more enemy: woodworms. If in the washing room and rest room the lining is most often treated against these pests with impregnations, then in the steam room they prefer to install it “as is”. If steamed at temperatures above 60°C, the larvae do not survive and there are no problems. But the Russian steam room provides for temperatures below this threshold. Then, if you notice traces of woodworms in the trim or on the shelf, you need to fry them. Heat the sauna “dry”, and raise the temperature to at least 80-90°C and hold it for at least an hour or two. It is necessary to ensure that the inside of the wood is warmer than 60°C. Then there is a chance to get rid of both adults and larvae without harming the wood.
Grinding and all other work is carried out both with logs and timber
If the problems are still local - there are few places where the larvae emerge, you can get by with a little blood: warm up the damaged areas. This can be done using a hair dryer. Just don’t set the temperature too high—no higher than 150°C—even without charring, the wood can get a thermal burn and then quickly collapse. And you won’t understand why. So, set the temperature and warm up the beetle exit points (holes) and surrounding areas.
Read how to treat lining in a bath here.
Selecting a location
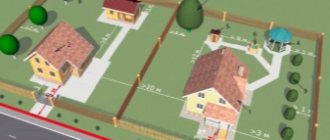
Location of the bathhouse on the site according to SNiP standards
The correct place for the bathhouse must meet fire and sanitary requirements, and also be conveniently located. The minimum distances are specified in the Fire Safety Rules and SNiP 30-02-97*, which determines the planning and development of the territories of horticultural dacha associations of citizens. Based on these documents, standards are also developed for populated areas, which may differ for each region or city.
On your own site, a wooden bathhouse can be built into a residential building or located 8 m from it, if it is a separate building.
The distances between the timber bathhouse and the buildings at the neighboring dacha should be:
- from 10 m, if the house is entirely made of non-combustible material;
- at least 15 m to buildings made of flammable materials.
You should retreat 5 m from the red line of streets, and 3 m from the red line of driveways. You should retreat 1 m from the fence separating the dachas; the distance is calculated not along the wall, but along the roof overhangs. The slope should be towards its site. If the water flows towards the neighbor, then they retreat 1.5 meters from the fence.
It is important to maintain the recommended distances. If there are no disagreements at the present time, over time new neighbors may appear and demand the demolition of the building.
In addition to the requirements of regulatory documents, when choosing a location, they try to take into account:
- Ease of movement between home and bathhouse. It is advisable to make the distance as small as possible.
- Minimum costs for laying communications.
- Possible damage to the wood of crowns and walls in low areas of the site, where there is high soil moisture and constant snowdrifts.
- Distance from trees that may be damaged by dirty runoff containing detergents.
- The need to install a drainage pit and the presence of a well on the site. The distances between them should not be less than 15 m.
In addition, a distance of at least 4 m is provided from the bathhouse drain septic tank to the neighboring area.
Bath preparation time
The peculiarities and difficulties of construction are not all the pitfalls. Saunas made of logs (and timber too) need to be heated longer than aerated concrete ones. The point is the high heat capacity of wood. Until it warms up, the air will not begin to heat up. But the radiant heat emanating from heated walls feels much more pleasant and is better perceived by our body, warming it to a greater depth.
But the fact remains: preparing a steam room in a wooden bathhouse will take more time and firewood (all other things being equal). If we talk about a log sauna in which there is a brick stove, then the preparation time generally requires at least 3-5 hours. Sometimes more, sometimes less - depends on the wood, design and power of the stove. Moreover, in order for the temperature background to level out, several more hours must pass after the desired degree of heating is achieved. The owners of such baths even have a special term: the bath is standing. Total preparation time is 6-8 hours. Few city dwellers have such a reserve of time (and patience).
Brick stove in the sauna = great atmosphere, but preparing the steam room takes a lot of time
One point: in such baths there is usually no special insulation of the walls of the steam room. The ceiling can still be insulated, and even then, rather using traditional methods - clay, sawdust, expanded clay. To heat such a steam room with a metal stove, you need to use it with a good reserve of power. But then it is difficult to keep the temperature within the standards of a Russian bath - at the level of 50-60°C.
Read about how to insulate the ceiling in a bathhouse here.
In the case of installing a metal sauna stove to create conditions close to a Russian steam room, a brick screen is placed around it, and a heating panel is also erected. They shield hard radiation from the body and chimney and serve as a heat accumulator.
But in this case, one of the main advantages of metal stoves immediately disappears, because they do not require a foundation. They can be placed on a non-combustible base. A foundation is required for the screen and shield. The mass of all bricks turns out to be several times more than 200 kg, at which it is possible not to make a foundation. And to this mass you need to add a stove with wood and a water tank. So a foundation for a furnace with a screen and shield is necessary.
How heat from flue gases is used with different types of chimneys
To ensure that the steam room takes less time to warm up, they are insulated. Even in wooden baths. But then it doesn’t really matter what material the outer walls are made of: they are covered with a multi-layer cake. And if there is any difference, it is rather purely technical: wood still removes moisture better, which is why there is no need to organize additional ventilation of the insulation. But this advantage “works” only if the outside of the logs are painted with compounds that do not form a film on its surface. If the log house is painted with regular paint, ventilation is necessary to exactly the same extent as in a brick or foam concrete bathhouse. Another thing is that a brick “box” needs not only internal but also external insulation, but such a building does not require time to shrink. So everywhere there are subtleties.
Advantages of sauna log houses
A log bathhouse is a reliable and practical structure, the main advantage of which is the speed of construction. Other advantages of wooden construction include the following:
- availability of construction work without the involvement of third-party specialists;
- possible shrinkage of the finished log house does not exceed 11 cm;
- saving money when building a wooden bathhouse yourself;
- a large selection of ready-made bathhouse projects or the opportunity to develop your own project;
- confidence in the quality of the building material;
- useful experience in private low-rise construction.
Log sauna projects
If all the above fears have not scared you away, it’s time to choose a project (we are not against wooden baths, not at all, but you need to know what are the “pros” and what are the “cons”).
The advantage is, of course, visual appeal, but only if the log house is processed correctly. Another thing is that walls are installed quickly.
Layout of log bathhouses 6 by 6
This size of a wooden bathhouse is very successful: both logs and beams are made in a standard size - 6 meters. So there will be very little waste. Just remember that a log 6 meters long does not mean that the internal size of the bathhouse will be the same. “When clean,” the internal size of a log house made from a six-meter log with a diameter of 22-25 cm will be about 5.2 m. After all, bowls are formed from this log at both ends. With timber the picture is not so sad, but it also takes about 45-50 cm. And also the interior decoration. If the timber does not need finishing, then the logs are often covered with clapboard. And under it you also need a sheathing, and these are also “eaten” centimeters.
This project is convenient because there will be little waste: all lumber is needed either 6 meters or 3
But in this project, the division of areas is not the most rational. A large washing area is only useful if you plan to install a hot tub in it. If there is only a shower and a couple of benches, it is better to fence off the room for a dressing room or increase the steam room. It's up to who will prefer what.
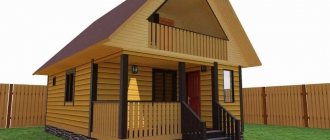
Another note concerns the entrance. If the bathhouse will be used in winter, then a vestibule is needed. It will prevent cold air from greatly affecting the room temperature. In this project it is easy to fence it off from the rest room.
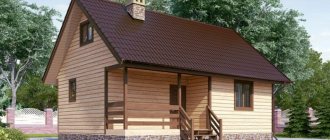
Project of a log bathhouse with a veranda
Here the distribution of areas between the steam room and the washing room repeats the previous option. The only difference is that the veranda is adjacent to the gable of the bathhouse. If we talk only about the size of the building, then it will be under a six-meter log. But the veranda will still be built separately and most likely on a separate foundation.
Non-standard version of the layout of a log bathhouse 6*6
This log house project is the same size: 6 by 6 meters. But the approach is more interesting. There is a small porch and a vestibule. From it there is an entrance to the rest room, as well as a door to a small bathroom. The division of areas between the steam room and the washing room is suitable for a sauna - the size of the steam room is small. But a Russian steam room can have the same division, only the stove will need to be rearranged so that one of its sides goes into the furnace room, and is heated from the rest room. Then it will be very warm in the washing room, and there you can relax on a trestle bed in a warm and humid atmosphere after the steam room.
Plan of a small log house for a bathhouse
Log plan for a 5*4 bathhouse
This project can be called standard: both the arrangement of the rooms and the absence of a vestibule are all found in almost any drawing. Only the location of the terrace has changed - it is located on the left.
Project layout of a log house for a 6x3 bathhouse with a veranda
The bathhouse itself measures 6 by 3 meters. Attached to the long side at the front of the building is a veranda spanning the full width of the gable. The premises have equal areas and are arranged like a tram. The shower room with this layout is walk-through.
Read about what dimensions bath rooms should have in the article “Optimal bathhouse: what is it?”
Bathroom layout: recommendations
At the very beginning, make drawings of the bathhouse in which the ideal bathhouse area will be located.
View this post on Instagram
Publication from Sergey Bogachev (@serj_bogachev)
The ideal area per person is approximately 5 sq.m. Approximately 4 people will visit the bathhouse, then the total area should be at least 20 sq.m.
The minimum number of rooms for a bath is recommended: steam room, washing room, relaxation room and dressing room. Determine for yourself the location of all the rooms and how convenient they will be.
View this post on Instagram
Publication from ► DACHA, HOUSE, BATH in MOSCOW ↗ (@zakazdom)
Make some diagrams and drawings:
- General plan of the building.
- Foundation diagram.
- Drawing of each room.
- Roofing diagram.
- Plan of the floor and ceiling of the bathhouse.
- Fastening plan and timber laying.
- Installation diagram of the furnace, taking into account its structural features.
View this post on Instagram
Publication from HOUSE BANYA BRUS LOG OTSB (@domavashi)
You can create all the drawings that you may need yourself, but you can also find ready-made drawings that are provided below or find them in the public domain, choose the one that suits your needs. You can also pay an architect or builder and commission a unique design from them.
View this post on Instagram
Publication from ► DACHA, HOUSE, BATH in MOSCOW ↗ (@zakazdom)