The standard procedure when visiting a bathhouse is to cool the body. In this case, use a pool, lake, font or snowdrift if it is winter. Such procedures have a large number of benefits: they improve health, improve mood, and tone the skin. Unfortunately, not everyone has the opportunity to take a dip in a lake or pool after a bath. A dousing bucket for a bath is a simple type of font that is accessible to everyone, and you can make and install the device yourself.
Where to install a bucket for dousing with cold water?
As already mentioned, most often the bucket is mounted in the washing room, since it is located next to the steam room, so you can rinse off immediately after warming up.
In addition, the washing room is already supplied with water and has a good drainage system. We recommend reading:
Eucalyptus bath broom
If the bathhouse is very small, where the steam room and washing room are combined, then the container is installed in the steam room.
Sometimes, especially if the sauna is used only in the warm season, a tipping bucket for a sauna is installed on the street. It collects rainwater, which is considered beneficial. In this case, you will not have to install a complex drainage system, since the water will seep into the soil.
Peculiarities
A modern shower bucket for a bath is not much different from previous models, which were actively used by our grandfathers and great-grandfathers when they expressed a desire to improve their health. Essentially, this simple device is called a “shifter.” In order to increase comfort, buckets were and continue to be made with a rope and chain. Such a device is installed mainly in a specially designated place for dousing - in the washing room, next to the steam room. Why is such a remarkable device found in many village baths if there is no lake, river or pond in the immediate vicinity? A useful activity - dousing with cold water contains many benefits for the soul and body:
- the immune system is strengthened;
- blood circulation functions accelerate;
- skin color improves;
- the skin becomes firm and elastic;
- toxins are removed from the body;
- rejuvenation processes are activated.
A seemingly simple procedure gives an amazing effect. In addition to the above advantages, a person receives a charge of vivacity, energy, and good mood for a long period. The main advantages of the cold water dousing device:
- simple production in a minimum amount of time;
- use without other aids;
- allocation of a minimum number of free square meters;
- saving money (for dousing there is no need to build a shower, swimming pool, font).
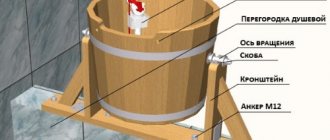
The simple design can be installed anywhere in the bathhouse where it is possible to organize a water supply, as well as drain dirty waste into a sewer canal. The dousing device consists of three key elements:
- classic bucket with hoops;
- rotation system;
- wooden brackets.
The assembled mechanism, attached to the wall, is a U-shaped structure, in the middle of which, above the center of gravity, there is a bucket on the axis with a hanging metal chain and a handle at the end. At a certain point, the bucket is filled with clean, cold water. A man stands under an upside-down bucket, pulls the chain towards himself and douses himself.
Most craftsmen and lovers of this useful procedure improve the design and ensure that after the dousing is completed, the water automatically flows back into the empty bucket. It's not difficult to improve a simple device.
Tips for use
Initially, the manufacturer recommends correctly determining the installation location based on consumer preferences, as well as permissible height standards. We must not forget that the structure is supported by a bracket whose width is 240 mm and length 130 mm. Given this information, you can attach the bucket. The width of the screws must be at least 6 mm, otherwise the structure will be shaky and unreliable. Then connect the device to the water supply system using a fitting.
Since it is made of plastic, tighten it tightly, but without kinks, otherwise this part will quickly fail. Install a shut-off valve in front of the sprinkler. When it is opened, water will begin to flow into the tank and fill it only to the required level.
After turning off the entire system, it should take in water and stop again at the position set by the float. The manufacturer provides a 12 month warranty. In this case, it is prohibited to carry out full-fledged repairs on your own, since in this case VVD is not responsible for the quality of the product.
Natural ventilation
Natural air exchange is carried out due to the difference in density and temperature of the air inside the building and outside. The traction force is affected by:
- channel cross-section;
- wind direction and strength;
- presence of turns;
- thermal insulation of the system.
This type of ventilation is based on channels that are in a vertical position. It is in great demand due to its financial accessibility and simplified design. The system eliminates the presence of complex elements and mechanisms, which determines its reliability. As for its maintenance, everything is quite simple, you just need to inspect it from time to time. Fresh street air warms up more actively. The flow in such a ventilation system is not regulated, which negatively affects the microclimate. Operates in silent mode.
Natural hoods have a number of significant drawbacks. First of all, it is worth noting its dependence on weather conditions. In summer, on hot days, when the air temperature outside is higher than outside, ventilation will not be able to fulfill its functions. In winter, serious heat loss is observed. Moreover, dust and insects have access to the room.
Installation of a sprinkler device
First you need to decide on the place where the bucket will hang. The structure can be installed both inside the bathhouse and outside - on the wall of the building or in the yard. But the best option is installation in the washing compartment of the bathhouse. In this case, one of the important points is determining the installation height of the bucket. It is installed based on your own calculations. It is necessary that the structure be fixed at a height of 2.2–2.5 m, then a person in a standing position will feel comfortable during dousing.
The bucket of water is quite heavy. It can weigh all of 15 kg. Therefore, it is worth thinking carefully about which wall is best to install the sprinkler device on. Unreliable walls or decorative boards are completely unsuitable for finishing.
If the height of the room is 2.8 m, then you need to leave at least 20–30 cm of free distance from the ceiling so that the bucket can be easily turned over. Special mounts are mounted on the wall, and two holes are made in the container itself. The bucket is suspended using a hinge mechanism.
Many people now use an automatic system to fill the bucket with water. The water supply is quite simple. To do this, you need to connect a water pipe to the location of the dousing container. At the same time, a water supply tap is installed at a height of 1.5 m from the floor. Then you need to attach a flexible hose to this pipe. A water level control system is connected to one end. When the bucket tips over, everything spills onto the floor, and when it returns to its original position, a special valve is activated, and water begins to flow into the container again.
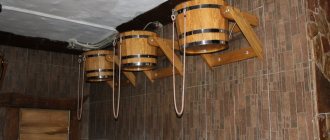
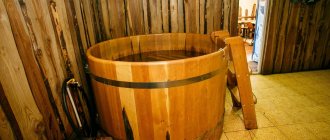
Buckets in the bathhouse are used not only for dousing, but also for steaming brooms
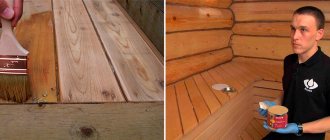
But in any case, if such accessories are made of wood, you should pay special attention to their care. The bucket for dousing must be constantly filled with water, since if you keep it empty for a long time, cracks and gaps will appear in the container
Although some experts believe that the reverse process is also possible - the wood will swell excessively and its service life will be shortened. At least a couple of hours before bathing procedures, you need to check that the bucket is full.
Design
The peculiarity of the bucket is that it can be made from different materials. Regardless of this, the design will always be the same, which is an advantage, since you won’t have to search for a suitable model for a long time.
Each dousing device consists of 4 main parts:
- The bucket itself, with a capacity of 10-20 liters, the choice depends on the number of users;
- Fixing parts so that the structure can be easily installed in various rooms;
- An automatic water control system will help you collect the required amount of liquid so that it does not overflow;
- Rope or chain for quickly tipping the bucket.
There is nothing complicated in the device, which is an advantage, since you don’t have to use complex mechanisms. Many manufacturers make fixtures from wood, because it matches best with the interior of a classic bathhouse. The only drawback of the solution is difficult operation. Because before installation, a person will need to fill the container with water and let it sit for a while. This action is necessary because it promotes swelling of the wood.
It is also important to understand that the structure cannot be left empty for several days, because the container may dry out and water will begin to seep through the cracks formed. But there is also a downside - the liquid should not be constantly inside, as this will lead to it deteriorating, and the inside of the bucket will become covered with unpleasant mucus, and in some cases it will completely turn black
It is important to maintain a middle ground so that there are no unforeseen problems.
But if a person cannot constantly be at the dacha where the bathhouse is installed, it is enough to buy a bucket with a plastic insert; stainless steel is also suitable. The outer part will be made entirely of wood, but the inner part will have water-resistant material. Of course, compared to standard plastic buckets, this solution will be more expensive.
Some useful tips
- Before first use, fill the bucket with water and leave it for a couple of hours to allow it to swell.
- Do not keep the wooden container empty for a long time to prevent it from drying out. But be careful that the water in it does not bloom.
How to make a bucket for a bath
To make a waterfall bucket, take a first-grade board with a radial cut. They stock up on metal for making circles, and you will also need a hacksaw, drill, plane, and other carpentry tools.
- They begin to manufacture blanks, which are called rivets, and the bottom of the product. To do this, the prepared boards are given a given shape and the parts are processed with a plane.
- At the next stage, holes are made in each side element for mounting the bottom. At the same time, the ends are cut off to obtain a rounded structure.
- The blanks are pre-assembled into one whole, numbered if necessary, and at this stage the size of the bottom is determined.
- Metal strips are measured to make the upper and lower rings. The lower ring is mounted immediately, and the upper ring after fitting all the parts.
- At the final stage, operations are carried out to polish the finished product.
Operating rules
In order for the “Russian shower” to serve for the benefit of bath attendants for a long time, it is necessary to comply with simple operating conditions for the device:
- before putting it into operation, it is necessary to hold cold water in it for two to three hours, so the container will acquire the required shape and will not dry out in the future;
- after removing the water, the walls are thoroughly washed with water without using chemical detergents;
- Do not place the container near a hot stove: this not only threatens to dry out the structure, but can also lead to a fire.
Another operating rule is related to installing a bucket outside: some steam room lovers fill it with rainwater. In this case, experts advise checking the state of the environmental situation in the area.
Tree species for making a sauna waterfall
Manufacturers use several types of wood, each of which has its own characteristics:
- Ordinary or stained oak produces expensive, durable products; oak is considered a durable wood, so oak products are suitable for exclusive premises;
- linden has a pleasant light shade, resists warping, and is considered a durable wood species. From time immemorial, bathhouses have been built from linden, so an accessory made from it will fit perfectly into the interior of the steam room;
- cedar is resistant to moisture; due to the content of essential oils in its composition, it is considered an effective material for the manufacture of bath accessories;
- larch has an unusual wood structure and beautiful shades; larch products will decorate any bathhouse;
- Aspen does not have outstanding properties, but its containers are durable and last a long period of time.
Method No. 1
It is not recommended to use a new wooden bucket without first steaming it. To do this, about three days before using it, you need to pour boiling water into it, close it tightly and leave until the water cools completely. The boards will swell and the cracks will disappear.
After use, the bucket must be washed. To do this, place several large pieces of quicklime on its bottom, fill it with water and close it tightly. The steam generated inside will saturate all the boards and extract acids and tannin from them.
After about 3 hours, the lime water is poured out and clean water is poured in and the inner surface is thoroughly washed. Buckets treated with lime water almost never become moldy.
Dousing bucket for a bath: installation. How to make a bucket with your own hands?
As already mentioned, you can buy a ready-made sauna bucket or make it yourself. The easiest way to make a dousing container is to use a plastic bucket. Even a beginner can handle this, and you don’t have to be afraid to make mistakes. Even if the wooden planks are not placed level enough, the plastic will prevent water from flowing out.
In this case, you need to take a regular plastic bucket and remove the handle from it. Prepare 25-30 sanded wooden planks, the exact number depends on the size of the bucket.
Glue wooden planks to the outer walls of the container and coat the joints with transparent silicone.
Afterwards you need to coat the resulting bucket with varnish and additionally strengthen the planks with metal rings.
A more difficult option is to make a wooden bath bucket from scratch.
To make it, you will need first-grade boards 1 cm thick, as well as a piece of iron strip, 3-5 cm wide, for two rims. Wood species that can withstand moisture are suitable for the bucket:
- regular or stained oak;
- Linden;
- cedar;
- larch;
- aspen, etc.
First you need to prepare templates for the sides. Next, you need to cut the parts according to the template, process them with a plane and sherhebel.
The rivets (sidewalls) need to be given a barely noticeable trapezoidal shape. It is necessary to decide on the outer side of the side panels and cut the ends at an angle of 3 degrees so that when connecting the individual planks, a circle is formed.
To make the bottom of the bucket, you need to make a 4 mm recess on each plank at a distance of 4 cm from the bottom edge.
Collect all the parts and number them. Determine the diameter of the bottom and cut out the part for it. Cut the top and bottom of the ends so that the diameter is 1 cm less than the original one.
Measure a piece of metal strip for the bottom rim. Use a hammer to give it a rounded shape and make holes for riveting at both ends. Attach the resulting rim to the bucket.
We recommend reading:
How to knit brooms for a bath?
Prepare the upper rim in the same way (at a distance of 10 cm from the top), assemble all the elements and file the protruding parts.
The bucket for dousing in the bathhouse must be equipped with a water level control system. According to the principle of operation, it is similar to the system in the cistern. The pipe should be installed at the height of the container, and it is recommended to make the tap at a level of 1.5 m from the floor.
A hose made of stainless metal, plastic or rubber must be connected to the pipe. On the other hand, it must be attached to the water level control system.
Video - how to make a dousing bucket for a bathhouse with your own hands:
It is important to correctly determine the height where the bucket for dousing in the bathhouse will be located. First of all, it depends on your height
The height of the place where the container will be attached is calculated in the following way: height + 40 cm (length of outstretched arms) + height of the bucket itself.
If all the people in your company are of average height, then the bucket can be attached at a level of 2-2.2 m. If there are tall people in the family, then it is better to attach the container at a level of 2.6-2.8 m.
But you should not install the bucket directly under the ceiling; you need to leave a gap so that, if necessary, you can pour water into the container manually.
The distance from the bucket to the wall must be at least 10 cm so that the container can rotate freely.
A bucket of water weighs quite a lot, so the fastening must be as strong and reliable as possible. Traditionally, the bucket is held by metal brackets; of course, it is better to choose stainless steel so that the mount will last longer.
Installation of brackets is permissible only to the structural part of the bathhouse, capable of withstanding a load of up to 60 kg.
To make the bucket turn over, you can weld special hooks on the sides of the container or install a metal rod that will pass through the container.
If there is no running water, then the bucket can be filled manually.
A dousing bucket is an important accessory for a bathhouse. If there is no pond or swimming pool near the bathhouse, then such a bucket can help you enjoy wellness treatments.
983
If you make it yourself
It is possible to make a dousing bucket for a bathhouse with your own hands, but it is not easy. Naturally, this formulation of the question concerns a classic wooden bucket, made in the best traditions of quality and reliability. And if there are no problems with the supporting frame, the hanging and tipping system, standard metalworking techniques are used here for assembling metal structures, then there may be a hitch with the manufacture of the wooden container itself.
A pouring device for a bathhouse with a wooden container can be made in the form of a simple cylinder with a straight riveting and equal diameters of the neck and bottom, or in the more practical form of a jug, where the riveting is also straight, but the diameter of the neck is smaller than the diameter of the bottom.
By the way! This design allows for more dosed dousing, but at the same time requires greater effort on the chain or rope. Do you want the effort to be reduced? Make the neck wider than the bottom.
The most difficult thing is the manufacture of individual elements - rivets, design of the chimney and assembly of the structure, with adjustment to the location. In production conditions, manual labor is replaced by milling processing based on numerical control. This solves a lot of problems, from complex radius cutting to the design of a tongue-and-groove system with a given mating angle. In the conditions of home handicraft production you need:
- Jigsaw;
- Hand-held milling cutter with a device for radius milling and a set of cutters, with a shank mounted in a collet chuck;
- Electric drill or screwdriver;
- Welding inverter for tension welding of tie hoops.
The sequence of work is as follows:
- In a calibrated board 20x50x250 mm, in the center of the side surface along the entire length, we use a cylindrical cutter to make a 5x8 mm groove.
- We produce planks 5×15×250 mm. they will play the role of a double-sided tenon, which will fit into the reciprocal grooves of the boards.
- We assemble the shield, carefully gluing the joints with polyvinyl acetate glue. We tighten the shield with clamps and leave it under tension until the glue completely polymerizes and gains the necessary bonding strength.
- On the plane of the shield we mark a circle according to the estimated area of the bottom.
- Using a jigsaw, cut out a circle along the contour. For this operation, it is convenient to use a blade for figured cutting, which has a smaller tooth size and pitch, as well as a smaller width relative to a standard cutting blade.
- The edge of the circle is processed with a profiling cutter to a thickness of 10 - 12 mm.
- We make a typesetting strip for the walls of the bucket. Its dimensions should be within 20×50 mm and a length that determines the height of the bucket. The side of each plank should be cut at an angle of 10 degrees, directed inward. Trimming can be done with the side edge of a cylindrical cutter, having previously given the angle to the workpiece using substrates of the required thickness.
- At the bottom of the planks we mill a 5x11 mm groove at the same distance from the edge, approximately 25 mm
- We collect all the planks around the bottom, stuffing them “pull” onto its edge. You can temporarily unfasten the set using twine.
- From a metal strip 30x2.5 mm we tie the set from below, determining the length. Let's cut it off. At the edges of the future hoop, we drill two holes on each and screw two corners with a hole in the shoulder in the middle, into which a tightening bolt is inserted. We bring the edges together end-to-end and weld. We repeat the operation for the middle ring and the top one.
- We weld or screw metal ears on the top ring.
- We place the hoops on the bucket, tapping them evenly with the nose of the hammer, avoiding distortions.\
- We process chamfers on sharp edges.
- Check the bucket for leaks. If necessary, wax or soak.
- We fasten the bucket on a suspension, equipping it with the necessary fittings to fit the location.
Considering the prices for industrially made buckets, especially if you have wooden blanks, the necessary tools and desire, then it’s definitely worth a try.
DIY making
Since the buckets have a simple design, they can be assembled by anyone without practical skills. You need to select in advance the volume of the bucket, the location and height of the structure, and prepare the tools.
Preparation of tool materials
To make a homemade waterfall system for a bath, you need to prepare:
- rope or twine for turning the bucket over;
- water level control device;
- boards of different shapes for walls, bottom;
- brackets.
Design of a bucket that is mounted on the wall
Metal hoops with rivets can be used as a decorative element and additional fasteners.
Choosing a location and height
In order for installation work to proceed quickly, you need to select in advance the location and height of installation of the dousing bucket. Selection principles:
- it is necessary to provide access for water supply;
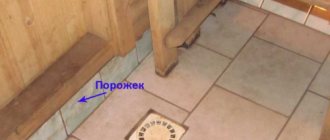
- it is better to place the structure above the drain;
- The bucket should be kept away from heated surfaces.
If the location of various elements is designed before construction, it is recommended to allocate a separate place for the drip structure.
You can combine the hanging system with some other washing item to save space.
The optimal height for securing the container is 200–220 cm.
Sizing
The dimensions of the container depend on the amount of free space
Attention should also be paid to the number of people who regularly visit the bathhouse. The volume of the container depends on this
Water supply
Peculiarities:
- The water pipe must be located above the waterfall system.
- It is better to install the valve to shut off the liquid at a height of 1.5 meters.
- A strong hose must be attached to the end of the pipe and connected to the float valve.
It is better to hide the pipeline in the wall so that it does not interfere with visitors. The tap is then brought out.
Manufacturing stages
Assembly:
- Cut planks from the boards to make containers. Sand them so that there are no rough spots left.
- Glue the planks together with waterproof wood glue and place crimp hoops on the structure.
- Wait for the glue to dry. Secure decorative elements or cover it with waterproof paint.
Drill holes in the walls to secure the turning mechanisms. Install a water control system with a float.
Separately, you need to assemble two triangular supports from wooden blocks.
general description
A dousing bucket is a large wooden container fixed to the wall. The device is called a flipper because by pulling the existing cord or chain, it is easy to turn it over so that water can flow.
This device has been used since time immemorial. It was made from birch bark or a whole log with a hollowed-out recess. Later, the container began to be made from wooden planks fastened with metal strips.
Features of using the equipment: a tap is opened, filling it with water, after which the flow must be shut off with a float switch. When the chain or cord is pulled, the float is lowered and the liquid splashes out and is adjusted again.
Components of the device:
- storage tank;
- supports that provide attachment to the wall;
- structure with water supply;
- a rope that ensures the container is turned over.
A bucket shower will not take up most of the space, so it is not necessary to equip another room for it. It is located in the washing area at a height of approximately 200-220 cm and is a cheap alternative to a swimming pool or shower.
The main disadvantage of the device required for dousing is that it has to be filled in advance, since the container must swell so that water does not leak through the cracks.
Tips for choosing
After a hot steam room, it’s always nice to douse yourself with cold water to “throw off” all the heat. This is not only pleasant, but also very useful. Therefore, if possible, it is worth purchasing such a system.
But what should you pay attention to? After a long study of the varieties of dousing devices, it is worth thinking about exactly how much volume you need to purchase. On average this is 20 liters per person
But there are models with a larger number of liters.
Please also note that if you choose only wood as a material, you will need to take additional care of it. You should not constantly keep water in a barrel, as it tends to stagnate and freeze.
Therefore, it is always worth draining the water. Drying can be avoided if you choose a coated bucket (plastic or steel). This, of course, is not necessary, but it will significantly increase the service life.
The main thing is the dimensions, namely the height. Due to the low height, sometimes one or another model may not fit and ruin the showering process.
Top 4 budget metal pouring buckets in 2022
Furnaces Max
1 place
Dimensions: 39x30
dousing bucket Pechi Max
| Options | Characteristic |
| Volume | 15 l. |
| Manufacturer | Russia |
| Material | stainless steel |
| View | waterfall |
| average price | 3000 rub. |
Advantages:
- design;
- ease of use;
- durable metal chain;
- durability.
Flaws:
None.
The design of this model is very interesting. Unremarkable curls at the fastening give the interior a more mysterious atmosphere.
Novikoff
2nd place
Dimensions: 35x30
| Options | Characteristic |
| Volume | 10 l. |
| Manufacturer | Russia |
| Material | stainless steel |
| View | waterfall |
| average price | 3399 rub. |
Novikoff dousing bucket Advantages:
- original wooden mount;
- durability.
Flaws:
None.
The model is very easy to use. The metal does not require special operating conditions, and there is no need to use special impregnation.
Shower
3rd place
Dimensions: 48x4x56
| Options | Characteristic |
| Volume | 50 l |
| Manufacturer | Russia |
| Material | stainless steel |
| View | changeling |
| average price | 600 rub. |
shower bucket Shower 48x4x56 Advantages:
- price;
- can be connected to a stationary storage tank;
- three-valve water intake mechanism;
- Additional decoration is possible using wooden inserts.
Flaws:
None.
Thanks to the trigger mechanism, the water evenly covers the human body.
Dousing bucket for a bath: installation. How to make a bucket with your own hands?
As already mentioned, you can buy a ready-made sauna bucket or make it yourself. The easiest way to make a dousing container is to use a plastic bucket. Even a beginner can handle this, and you don’t have to be afraid to make mistakes. Even if the wooden planks are not placed level enough, the plastic will prevent water from flowing out.
In this case, you need to take a regular plastic bucket and remove the handle from it. Prepare 25-30 sanded wooden planks, the exact number depends on the size of the bucket.
Glue wooden planks to the outer walls of the container and coat the joints with transparent silicone.
Afterwards you need to coat the resulting bucket with varnish and additionally strengthen the planks with metal rings.
A more difficult option is to make a wooden bath bucket from scratch.
To make it, you will need first-grade boards 1 cm thick, as well as a piece of iron strip, 3-5 cm wide, for two rims. Wood species that can withstand moisture are suitable for the bucket:
- regular or stained oak;
- Linden;
- cedar;
- larch;
- aspen, etc.
First you need to prepare templates for the sides. Next, you need to cut the parts according to the template, process them with a plane and sherhebel.
The rivets (sidewalls) need to be given a barely noticeable trapezoidal shape. It is necessary to decide on the outer side of the side panels and cut the ends at an angle of 3 degrees so that when connecting the individual planks, a circle is formed.
To make the bottom of the bucket, you need to make a 4 mm recess on each plank at a distance of 4 cm from the bottom edge.
Collect all the parts and number them. Determine the diameter of the bottom and cut out the part for it. Cut the top and bottom of the ends so that the diameter is 1 cm less than the original one.
Measure a piece of metal strip for the bottom rim. Use a hammer to give it a rounded shape and make holes for riveting at both ends. Attach the resulting rim to the bucket.
Prepare the upper rim in the same way (at a distance of 10 cm from the top), assemble all the elements and file the protruding parts.
The bucket for dousing in the bathhouse must be equipped with a water level control system. According to the principle of operation, it is similar to the system in the cistern. The pipe should be installed at the height of the container, and it is recommended to make the tap at a level of 1.5 m from the floor.
A hose made of stainless metal, plastic or rubber must be connected to the pipe. On the other hand, it must be attached to the water level control system.
Video - how to make a dousing bucket for a bathhouse with your own hands:
https://www.youtube.com/watch?v=55LCzlviGZs
It is important to correctly determine the height where the bucket for dousing in the bathhouse will be located. First of all, it depends on your height
The height of the place where the container will be attached is calculated in the following way: height + 40 cm (length of outstretched arms) + height of the bucket itself.
If all the people in your company are of average height, then the bucket can be attached at a level of 2-2.2 m. If there are tall people in the family, then it is better to attach the container at a level of 2.6-2.8 m.
But you should not install the bucket directly under the ceiling; you need to leave a gap so that, if necessary, you can pour water into the container manually.
The distance from the bucket to the wall must be at least 10 cm so that the container can rotate freely.
A bucket of water weighs quite a lot, so the fastening must be as strong and reliable as possible. Traditionally, the bucket is held by metal brackets; of course, it is better to choose stainless steel so that the mount will last longer.
Installation of brackets is permissible only to the structural part of the bathhouse, capable of withstanding a load of up to 60 kg.
To make the bucket turn over, you can weld special hooks on the sides of the container or install a metal rod that will pass through the container.
If there is no running water, then the bucket can be filled manually.
A dousing bucket is an important accessory for a bathhouse. If there is no pond or swimming pool near the bathhouse, then such a bucket can help you enjoy wellness treatments.
Application
A wooden bucket is a container unique in its range of uses. It is made from environmentally friendly material - wood.
This container is ideal for pickling vegetables, and for use in a sauna and bathhouse, where you can steam brooms, carry and store water. A wooden bucket does not emit harmful fumes. On the contrary, the healing substances contained in the wood will give the water beneficial properties and softness, and add elasticity to the brooms.
For pickles, you can purchase a bucket with a lid. Since such products are made without the use of adhesives, the products in them will be tasty, aromatic and healthy.
A wooden bucket is also used to create a certain atmosphere and surroundings. These products are popular:
- In restaurants, clubs and cafes, whose interior is designed in the style of old taverns or hunting lodges.
- In holiday homes and hotels in the style of family estates, estates or castles of yesteryear.
- In baths and saunas. This is the most extensive area of their use, since it is rare to find a Russian bathhouse that does not have a wooden bucket.
- For all sorts of themed events, reconstruction of past events, shooting music videos, movies, advertising and various programs, you may also need a new or old wooden bucket.
- There are owners of log houses who love to decorate the premises in the style of ancient Russian chambers.
- This product will be an excellent gift. It is not only very useful in everyday life, but also looks very attractive.
Types of construction
Waterfalls come in several models and shapes. Typically, such an attribute is made of wood, since it can withstand temperature changes and is an environmentally friendly material. In addition, the aroma of wood gives this procedure even more pleasant moments. However, not all types of raw materials are suitable for making a waterfall bucket. Most often they are made from the following tree species:
- natural oak;
- bog oak;
- Linden;
- cedar.
Waterfalls come in two shapes - round and oval. Each of them has its own characteristics and advantages. For a small bathhouse, it is recommended to choose a round bucket for dousing. But an oval bucket provides a longer pouring time, since it has a protracted process of pouring water, in contrast to the instantaneous turning over of a round bucket. Another difference between these two forms of waterfalls is where they are installed. An oval bucket requires more space, so the axis for it is installed in the center of the pouring area.
When choosing this bath attribute, you should pay attention to its volume. It can be either 10 or 30 liters
The required volume is determined based on personal preferences and the dimensions of the bath.
Also, when choosing a waterfall, you need to take into account its color so that it fits harmoniously into the interior of the bathhouse. It is best to select a bucket from the same wood from which the interior decoration of the room is made. The most practical and durable are buckets lined with plastic inside, which will reduce the likelihood of leakage and increase its service life.
general characteristics
So what is a waterfall for a bath? This is a wooden bucket held together with metal rings. Its volume can be very different, but most often there are buckets of 12-20 liters. It is attached to the wall with brackets. A hose passes over it, from which cool water flows into the container. Usually the bucket is filled before visiting the steam room. It is recommended to choose containers made from environmentally friendly, high-quality material. The most popular materials include stained oak, which is strong and durable.
If there is a pool, then after leaving the steam room they cool down in it. But if such luxury is not available, then a waterfall bucket is perfect for this purpose. This procedure is not only a tradition, but also a way to strengthen the body, while receiving a sea of positive emotions.
The waterfall system was invented thousands of years ago, but has not yet lost its relevance. For a complete relaxation in the bathhouse, you need all the attributes, not just a steam room and a stove. The pouring bucket has long been present in all baths. The essence of this procedure is to instantly cool the body after warming up in the steam room. The original appearance of the waterfall will decorate the interior of the bathhouse, creating a special atmosphere. In addition, such a structure can be installed not only in a steam room, but in the courtyard of a private house in order to be able to cool down in the hot summer.
Simple, like everything ingenious
A dousing device for a bath, for all its simplicity and, to some experienced eyes, outright primitiveness, is an extremely effective bathing tool. If, while diving into an ice hole, a person plunges into it with his feet, then throwing a bucket of ice water over himself, instantaneous cooling occurs in the opposite direction. However, in most cases the sensations turn out to be close in intensity of passions and a fountain of emotions. A very sharp change in ambient temperature and a sharp cooling of the surface of the body is a very serious shock to the body. How's the classic doing? “Everything that doesn’t kill us makes us stronger.” This procedure, according to some ardent admirers, has the following positive qualities:
- Perfectly trains the cardiovascular system. For such a procedure, as for any branded product, they came up with a bright and catchy name - “gymnastics for blood vessels.”
- Increases the tone and turgor of the skin, making it strong and elastic. Of course, cold, as an active irritant, initiates increased blood microcirculation and supply of skin with nutrients and oxygen.
- Metabolism increases, pressure in the main vessels increases for a short time, and the pulse increases. Any physiological activity forces the body to shed ballast and activate hidden reserves.
- As a result, the overall resistance of the body at the immune level increases.
- Finally, this procedure is very invigorating, and in this process, it is unlikely to find serious competitors.
There are, however, some disadvantages. And the opponents of this action also have a full sleeve of trump cards, read, arguments:
- This is a state of shock for the body, and any shock, including temperature shock of different signs, is a difficult test for the heart and blood vessels. If everything is not in order in this regard, you should be careful.
- The human head, and especially the parietal part of the skull, is one of the most vulnerable locations of the body as a whole. Therefore, when dousing, you should not forget about this.
- A dousing bucket for a bath, if a large amount of water is incorrectly consumed, can provoke the manifestation of cervical radiculitis syndrome, caused by inflammatory processes in the root part of the nerve endings, due to a sharp temperature change or injuries of a purely mechanical nature, from an involuntary sudden movement of the head.
In any case, living is harmful, but moderation and balance in approaches to any bath procedures are a sign of high culture.
Briefly about the device
A bucket for dousing in a bathhouse is a wooden container assembled using metal, preferably stainless, hoops from individual elements - rivets, tightly fitted to each other or connected through a tongue-and-groove pattern, minimizing or completely eliminating the flow of water.
In general, the issue of drying out of solid wood structures is very acute. The container should always be filled with water. In modern conditions, this is solved by supplying tap water or water from a well pump into a bath bucket and equipping it with an automatic filling system, with a level cut-off using a float, as in a toilet cistern. Reliable and practical. The main condition is that there is always a positive temperature inside the bathhouse during the cold season, preventing the water from freezing both in the bucket and in the supply system.
If this is not possible, and sometimes there is simply no water supply system, then the pouring bucket for the bathhouse is filled manually as the water is consumed from it. And the problem of drying out is solved by pre-soaking. 3 - 4 hours before the procedure, the container is filled to the top with hot water so that the swollen wood fills the gaps and the leaks are eliminated.
It is worth noting that a sauna bucket in itself is not self-sufficient. For the system to work, it must be equipped with a tipper and a supporting frame. The supporting frame, as a rigid structure, is fixedly attached to the wall, at a height sufficient for a tall person to stand under it, on the other hand, to ensure the free movement of the bucket, preventing it from getting caught on the ceiling. As a rule, this distance is approximately 2150 - 2200 mm from the floor level. The rolling mechanism itself can be very diverse, from bearings to torsion bars. The only condition is clear movement in all spatial positions, the impossibility of failure and the availability of quick dismantling for scheduled maintenance of the tank. A shower bucket for a bath, as a rule, has a capacity of 10 to 30 liters, so the fastening and suspension system must be designed to exceed the safety margin by 4 times.
What is needed for a “Russian shower”?
The improved “Russian shower” attracts with its ease of use and design simplicity. Surely, the craftsmen examining the finished cooperage product had thoughts about applying their own efforts. Without a doubt, it’s easier and easier to buy, but it’s much more interesting to tinker with making it yourself. The process is extremely exciting, and the result can be boasted to your guests. And a considerable amount is saved, because high-quality models of dousing buckets are quite expensive.
We found out that to assemble an extreme shower with our own hands we will need:
- wooden container with a capacity of 10 to 40 liters;
- brackets capable of supporting the weight of a water container;
- preferred type float valve;
- metal rod - a piece of smooth reinforcement grade A3. The diameter of this rod can be from 8 to 14 cm, because the size depends on the calculated weight of the dousing device filled with water;
- ball valve;
- a piece of flexible hose.
You can purchase the entire list in a store and, by drilling three technological holes in a wooden bucket to install a metal axis and a float, you can quickly and easily make a dousing device. You can buy only that part of the mini-shower parts, which is pointless to do with your own hands. The home craftsman has economic justification for showing skill in making brackets and containers. So we will discuss folk methods of their production.
How to use it correctly
The procedure of dousing with a waterfall bucket begins with psychological preparation for a sharp flow of cold water. After the person is emotionally ready, he should quickly enter the place of dousing and simply pull the rope sharply. The strength of the flow depends on the sharpness of the movement turning the bucket over. If you tug lightly, the cold water will pour out gradually, and with a strong tug, the entire volume of water pours out immediately, instantly cooling the hot body. It is the sharp temperature contrast that provides the healing effect. This procedure should be completed by wiping with a towel.
Continuity
The photo shows an option for installing a dousing bucket in the shower for hardening procedures.
Today, many of the attributes and traditions of Russian baths are being actively revived. True, a modern bucket for pouring into a bathhouse is much more convenient than the buckets of our ancestors.
Article on the topic: How to conduct wiring in a house made of aerated concrete
Nowadays, more than ever, people need to relieve stress and improve their health. Bath procedures help remove harmful toxins from the body. They help improve metabolism and help harden.
A contrast shower has always been considered the best procedure that hardens and strengthens the nervous system. It is actively used for rehabilitation treatment in sanatorium and resort institutions.
Pouring ice water gives amazing results. The person becomes cheerful, the mood improves, and sleep is restored. This procedure can be used by all age groups.
Important. It is advisable to consult your doctor to see if you have any contraindications against such procedures.
Tags
a bucket from make a bucket from this bucket from assemble a bucket now we can assemble the bucket first you will need boards of the same all the boards are the same cut the boards under many boards non-oak board radial each board we make with our own hands with our own hands with our own hands. with our own hands with our own hands. with our own hands from with our own hands. with our own hands with our own hands buckets with our hands. for making the author Manufactured rimstools. Manufacturing of buckets, technology for making wooden ones. Manufacturing of buckets, process of making a vessel. for making wooden ones.
bottom rims edges joints