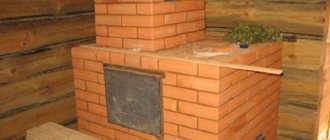
Most owners of steam rooms do not think much about how the drain in a bathhouse with a water seal is designed and works. In the process of arranging the sewer route and water drainage, the first option that comes to hand is selected, more or less suitable in size. The locking system somehow serves in the bathhouse until it stops completely and fails. Then it’s time to figure out the problem and make a normal water seal for the bathhouse with your own hands.
Water seal for sauna sewer
There can be a lot of problems with the water drainage system. Most often it is necessary to redo or modify the existing drain for two reasons:
- The smell of sewage regularly appears in the bathhouse, which cannot be eliminated by ventilation and sanitary treatment;
- The bellows or drain does not have sufficient capacity, so the water in the bathhouse drains very slowly, which annoys both guests and especially the owners. Instead of relaxing after the steam room, you have to waste time and wait for the water to completely drain through the drainage system.
Important!
This may be a sign of a blockage in the drain or the occurrence of such an unpleasant phenomenon as backflow in the bathhouse sewer. Sometimes attempts to speed up the flow of water using brushes or cable brushes lead to depressurization of the drain and even breakage of the bellows seal. Even if the water has gone, you still need to inspect the drain, otherwise the plug will occur with enviable frequency.
The main purpose of the water seal
The system for locking the outlet into the sewer is used primarily to reliably cut off the internal space of the outlet pipes from the bathhouse atmosphere. Otherwise, odors and gases released from the drains will easily break through into the washing and steam room of the bathhouse.
The second purpose of the drain valve is to block wastewater discharged into the sewer. A bellows or any other type of valve locks dirty water and prevents it from rising into the bathhouse through the drain hole in the floor.
Corrugated, tubular siphons
In this situation, the basis of the water seal becomes a plastic pipe. It can be either smooth or corrugated, but in any case flexible. Smooth pipes bend worse, so each bend takes up a lot of space; this does not affect functionality, but the aesthetic appearance of the room deteriorates. Therefore, corrugated systems that accommodate bends of the required length in a very limited space are more popular.
These systems have the following advantages:
- the ability to adjust the siphon loops after installing the entire system;
- the ability to move a sink or other device without disconnecting the siphon.
Water seal for a bath: types
Unlike conventional bathrooms and showers, baths use drains with increased capacity. That is, the size of the drain receiving grid is usually 100x100 m or even more, instead of the standard 60x60 mm. In this way, it is possible to ensure normal operation of the drain even with a large amount of soap and dirt residues.
In addition, you have to take into account the size of the bathhouse, the design of its floors and the frequency of use. Therefore, several water seal schemes are used for the drainage device:
- Classic bellows with U-shaped elbow;
- Pendulum or dry shutter;
- Float type of shutter;
- Controlled or transom drain option.
The first and third types of water seals are classified as “wet” types of devices; for their normal operation, the presence of a sufficient amount of water in the system is extremely important. The second and fourth are classified as “dry” devices; they work equally well in baths, both under normal conditions and when there is a lack of water in the drain chamber.
Varieties
Gates can be divided into two main categories - mechanical and electrified. Within each category, in turn, several more subspecies can be distinguished.
Mechanical
A typical modern mechanical valve is a polymer body in which a profiled stainless steel valve is movably mounted. Its normal position is closed; the damper is oriented with its concave side towards the gate inlet.
The valve must be oriented relative to the direction of movement of the waste in a strictly defined manner. The direction of wastewater flow is usually indicated by an arrow on the housing.
The shutter cover is removable. The hatch is necessary for servicing the valve and cuffs that ensure its tight fit to the saddle.
During normal sewer operation, the wastewater pressure lifts the damper; in counterflow, the excess pressure at the outlet, on the contrary, presses it tightly against the seat seal.
Since the speed of movement of wastewater in a gravity sewer is low, dirt inevitably builds up on the sealing collars over time. Accordingly, the shutter needs cleaning.
This is done in two ways:
- Once every three months, one or two buckets of water are poured into the toilet, located as close as possible to the valve. The volley release ensures that water moves at a sufficiently high speed to flush the sealing collars;
- Once every six months to a year, the valve hatch is opened, and the seat and cuffs are cleaned mechanically. You can clean them with your own hands, using a regular toilet brush, or with a stream of water from a hose. The technological hatch cover can be removed without the use of tools.
On sale you can find several subtypes of mechanical shutters:
- Single chamber;
- Single-chamber vertical;
A sewer drain with a dry valve is a special case of a single-chamber vertical valve.
- Single-chamber, providing for manual fixation of the damper;
I have encountered the use of a conventional wedge water valve with a diameter of 100 mm, welded into a sewer gap, as a valve with manual fixation. Despite its advanced age, it performed its functions perfectly when the yard drainage system was clogged. The debris that got under the cheeks was simply ground up when closing.
- Two-chamber (with manual fixation of the damper in one of the chambers).
Electrical
How does a typical electrified shutter work?
- It is equipped with two cameras. One chamber is equipped with a conventional mechanical shutter, the second with an electric drive;
The mechanical damper provides manual locking in the closed position.
- The filling sensor located inside the housing is responsible for the activation of the electric drive;
- Each chamber is equipped with its own maintenance hatch;
- The control unit monitors the valve position and transmits information about it to the dispatcher;
- If necessary, the electrically driven shutter can be closed forcibly;
- Optionally, the shutter is equipped with a battery capable of maintaining its operation in standby mode for a week.
Wet valves
If you choose a water seal for a bathhouse based on the efficiency of locking, then the best option would be a hydraulic circuit with a curved U-elbow, or an annular chamber with a concentric partition.
Eternal knee
A water seal in the form of an elbow requires a free space of at least 150 mm in height for pipes with a diameter of 50 mm and an overhang of 250-300 mm for a full drain with a cross-section of 100 mm. Therefore, knee bellows are used primarily for bathhouse projects on stilts or columnar foundations. To reliably lock the pipe, the height of the water column must be at least one and a half diameters of the channel.
The main advantage of a water seal is its simplicity of design; it is quite possible to make such a siphon for a bathhouse with your own hands from parts of sewer fittings and pipes. It turns out not as beautiful as industrially made drains, but for a bathhouse it is more important that the structure is easy to repair and simple to maintain. The knee can be easily cleaned, either with a brush or with specialized attachments, rotating brushes and even chemicals such as “Mole”.
This type of drain can work in a properly constructed bathhouse for a couple of decades, until someone uses a cable to punch a hole in the plastic elbow of the water seal.
Flat water seal
For a bathhouse installed on a strip foundation, it is best to use a trap water seal. Its height usually does not exceed 10-12 cm, so the drain box can be safely mounted into the floor screed, and no additional fastenings are required for connection to the sewer.
For example, the “CENTER AQUAPA” model consists of two halves. In the bottom part of the water seal there is an annular cavity with water, which, after installing the top cover, will be divided by a partition. The result is the same bellows, but with a gate height of only 15-20 mm. The drain body is simply put on the receiving hole of the compensating adapter of the sewer pipe of 110 mm.
Important! In this case, the use of a sliding adapter is a prerequisite so that the water seal box is not torn off the pipe due to the expansion of plastic from hot water in the bathhouse.
The box-shaped design turned out to be quite reliable and easy to maintain; the only drawbacks include a small level of water in the water seal. In summer, the water in the drain evaporates, and, accordingly, odors from the septic tank will break into the bathhouse within a couple of days. Whereas in the bellows elbow the water seal will last 3-4 days.
In winter, in a country bathhouse, the drain drain may freeze, but this does not affect its operation in any way. There is little water left, so the risk of damage is minimal. A water seal with an elbow can actually be crushed by frozen water.
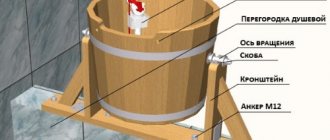
Float device for organizing a drain in a bathhouse
Structurally, the water seal with a float is very similar to the previous version of the water seal. The only difference is that in the ladder version, the outlet hole is blocked by raising the water level, and in the float version, the same window is blocked with a foam liner.
Float valves very tightly and reliably block the drain passage even with a minimum amount of liquid. In practice, the drain in the bathhouse can be reliably blocked within 10-15 days from the date of the last visit to the steam room. Among the disadvantages, one can note the sensitivity of the water seal to contamination. After soapy water, the float must be washed with clean boiling water.
Rules for installing liquid shut-off valves
The instructions for installing such fittings often do not cause difficulties even for amateurs.
It consists of 5 main actions:
Personal toilet valve.
- The device cuts into the point of connection of 2 sectors of the pipe or at the point where the sewer pipeline is connected to the plumbing, for example, to the toilet;
- If the fittings are mounted horizontally, then they must be set clearly in level, without distortions;
- The same devices that cut into vertical and inclined systems can be installed at any angle;
Operating principle of a vertical membrane structure.
- When assembling a sewer pipeline, the connecting sockets must be directed towards the movement of the liquid. You need to pull out the pipe sector and insert the valve neck into the socket in its place, then cut off the excess from the pipe you removed and insert it into the valve on the other side;
- At the last stage, the check valve or pipes on both sides directly next to the lock must be firmly secured with clamps to the floor or nearest wall. This should not be neglected, since the operation of such equipment causes slight vibration, which means that sooner or later the connection may depressurize.
As you can see, the instructions for installing a check valve with your own hands are not complicated, but there are a lot of little things that need to be taken into account.
Horizontal valve with two plugs.
- On each check valve, regardless of the model, there is an arrow indicating the direction of fluid movement, so before installing the device, find this arrow;
- It would be a good idea to check the device for leaks before installation. To do this, take the device, pour water into it, like into a glass, from the side through which it should not pass and leave. Typically, leaks are caused by trapped debris or an old gasket;
- The pipe stop must be installed with the same cross-section as the pipe itself. Any adapter greatly increases the risk of blockage, plus these are additional connections, and the fewer of these connections, the more reliable the system;
- And finally, such equipment is installed to prevent emergency situations, which means it must be provided with unobstructed, convenient access in case of cleaning or inspection.
Plastic check valve 110 mm.
The most difficult thing is to install such equipment in multi-story buildings. The ideal option is to install shut-off valves at the entrance to the central riser pipe.
But the thing is that the dimensions of the bathrooms in most of our houses are, to put it mildly, modest, and the valve for a pipe with a cross-section of 110 mm is a voluminous thing. So the owners have to install several personal valves for each drain instead of one capital common valve.
In the literature, I came across a proposal to install a similar lock on the access riser, just below the first floor drain. But this can be justified only if blockages regularly occur not in the riser itself, but in the central sewer well or main line, which, believe me, happens extremely rarely.
Check valve with 90º rotation.
The fact is that installing the valve just below the first floor is virtually useless. Think for yourself, the water does not come from below, the pipe is filled by draining wastewater from the upper floors. If there is a blockage in the basement on the riser, then the system will fill up to the valve, it will close and the system will continue to fill further, which means it will flood the first floor.
Insertion of the shutter into the central drain.
In private houses, as a rule, there is enough space, but there is no point in installing such a valve in a residential area. Flooding can only come from the side of a septic tank or a common central sewer line.
Accordingly, it is better to install the device either in the basement or in a separate insulated well, equipped specifically for installing a shut-off valve.
Design with manual flow blocking.
When installed on drainage system outlets, all outlet pipes must be equipped with locks. In this case, there is enough space in the well and almost any model can be mounted, but here it is better to install valves with floats.
Floats are the same petal system, only a float is connected to the rotating rod of the membrane. When the tank is filled, the float floats up and the valve closes. This process is clearly shown in the video in this article.
Options for metal shut-off valves.
Dry water seal for a bath
Until recently, for most summer residents there was a problem of how to dry the drain in winter, and thereby preserve the pipes and shutter of the bathhouse during the period of frost. Most often, water was simply drained from the water seal elbow through an additional fitting. The solution to the problem was to use a dry shutter for the bath.
Pendulum or leaf shutter mechanism
The design of a dry water seal differs from the ladder or float version only in the presence of two plastic curtains suspended above the outlet window on a pendulum suspension.
The petals do not create obstacles to the flow of water moving from the bathhouse through the window into the sewer pipe. In the opposite direction, the mass of water presses the curtain against the window and blocks it. As a result, the internal cavity remains dry and impermeable to gases from the sewer system.
Controlled type of water seal
Used in bathhouses not connected to a centralized sewerage system. The design of the water seal is almost identical to the drain drain design. The only significant addition is the presence of a controlled valve. At the top of the grille there is a ring, by clicking on which you can snap a ring petal that covers the window into the drain pipe.
In this case, the water is drained directly into a container for collecting dirty water. After completing the procedures, the water seal opens or closes, depending on whether the bathhouse needs to be dried or not.
In this case, the waste collection container can be equipped with an improvised valve according to the diagram below.
It was on this principle that drainage pipes were installed in the Sandunovo steam rooms and baths in the last century.
Important! The controlled type of water seal is ideal for any type of bath.
For example, if a bathhouse is used all year round, then in winter a wet-type water seal can cause failure of the drain and the receiving flank of the sewer pipe. Dry transoms for a bathhouse turn out to be too capricious. The controlled drain option requires no worries at all. Even in winter, after a bath, there is no need to blow out and dry the drainage part. It is enough to open the valve and leave it to dry until your next visit to the bathhouse.
Laying a drainage sewer system
Such a drainage system is more suitable for small steam rooms designed for a small number of visitors. Sewerage in a bathhouse based on drainage is arranged as follows:
- A drainage well is installed next to the steam room to a depth below the soil freezing level (up to 150 cm).
- A clay layer (no more than 11 cm) is poured onto the bottom of the prepared pit to prevent wastewater from seeping into the ground.
- The clay is covered with a composition of expanded clay, crushed stone, gravel and sand up to 50 cm thick. Bulk materials are used to create a drainage cushion.
- A layer of soil is poured over the drainage and compacted thoroughly.
- The drainage well is equipped with a special gutter, which is used to drain wastewater into earthen trenches.
- The sewer pipe laid from the bathhouse to the drainage well is insulated. This will prevent it from freezing during the winter.
If the drainage sewer is laid on sandstone, the drainage well can be replaced with a drainage trench up to 110 cm deep and up to 35 cm wide. The upper part of the trench is protected by a crushed stone layer 25 cm thick. This ensures that the wastewater will be discharged into the drainage base.
How to make a water seal for sewerage in a bathhouse
The transom “wet” version of the shutter is considered the easiest to install. First, before the floor equipment, it is necessary to lay a 100 mm sewer pipe with a swivel angle. The upper edge of the corner should be located 20 mm below the level of the concrete screed.
The inlet hole is closed with a plastic plug, in the center of which a weaving nail is installed. After pouring the screed, the nail will help to correctly mark the contours of the future hole for water drainage equipment on the bathhouse floor.
After the base screed of the bathhouse floor has completely hardened, it is necessary to level the hole and give the edges even, rounded shapes. This can be done using a grinder and a stone disc with a diameter of 125 mm. You have to cut not in the radial direction, but in the axial direction, that is, with the entire edge of the disk at the same time.
Next, all that remains is to install the water seal body, cap and external drain grate.
The simplest version of a bolt with an elbow can be made from four plastic corners connected to each other in a U-shaped structure. The only thing that needs to be done is to glue the sealing collars with sanitary sealant, otherwise the structure will very quickly split into two parts.
Why is this necessary?
With rare exceptions, sewerage is discharged outside the building below ground level. There are several reasons for this:
- Temperature regime of the soil
. Below the freezing level, the soil has a temperature of 8 - 12C, which allows you to not worry about pipes freezing; - Protection from mechanical damage
, which is provided by deepening the outlet to the well; - Finally, buried pipes do not clutter up the yard
and do not create obstacles for transport and pedestrians.
At the same time, the basements and ground floors of many buildings are used for warehouses, administrative offices, gyms, etc. Often, plumbing fixtures are installed in them, and their sides are significantly lower than the well cover.
When a sewer or yard drain becomes clogged, the level begins to rise. Much earlier than it reaches the level of the well cover, the wastewater begins to flow to the plumbing fixtures in the basement.
We are talking about the drains of the entire house, or even several houses, since the exploited basement floor turns out to be the lowest point in the sewer network backed up by a clog.
Sewage check valves and gates eliminate the counterflow of wastewater: as soon as it begins to flow into the building from the outside, the lumen of the pipe is completely blocked.
Reasons for water seal failure
Often in bathhouses connected to a central sewer, an unpleasant phenomenon occurs such as squeezing out the water seal. The liquid from the water seal can either be squeezed out into the steam room or washing room, or discharged into the sewer pipe.
In both cases, the reason for the release of the water seal is the lack of ventilation of the sewer lines. Excessive pressure inside the pipes squeezes out the contents, and if a large amount of water is discharged into the sewer near the drain point, the water seal, especially the transom seal, can easily be left without liquid in the bellows.
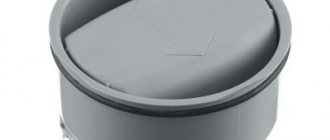
Features of the bottle siphon
The bottle siphon is the most common. It can be disassembled, so this type is easy to repair by replacing individual elements. If a valuable item falls into the water inlet, you can quickly get it out by disassembling the siphon and rinsing it. Its compact dimensions allow the use of a bottle siphon in the pedestal of a tulip sink.
In their shape, such devices can be S-shaped or P-shaped. The inspection cover is installed on top, this allows you to monitor the condition of the siphon and its contents.
DIY making
The question often arises of how to make a water seal for making mash with your own hands. Making a water seal yourself is not at all difficult. When choosing a reliable method for creating a homemade mash device, you first need to assess the tightness of the system. This factor directly determines the future taste characteristics of an alcoholic drink.
Water
To make a water seal for mash, you will need:
- cork (made of wood or rubber) or lid for cans made of nylon;
- thin silicone rubber tube of the required length;
- sealant to seal the joint between the pipe and the plug (previously ordinary plasticine was used, currently sealant is used for plumbing work);
- liter jar;
- scotch.
A hole is made in the plug that corresponds to the tube. Then it is inserted into it so that it goes in 2 cm.
The joint is properly lubricated with plasticine or sealant so that outside air does not penetrate into the container with mash or wine.
A tube is placed over the container with the alcoholic drink, the second end is lowered inside the jar of water and the tube is secured to the jar with tape so that it does not suddenly fall out.
Medical glove
This invention has been used for a long time. It has still not lost its popularity due to the availability of “materials”, clarity and the ability to put a glove on any neck, ensuring tightness. To make a glove on a mash, you need:
- put a glove on the container into which the mash is poured and tape it tightly to the neck with tape;
- to remove carbon dioxide, make a hole in the fingers with a needle;
- The fermentation stage is determined by how full the glove is: when it falls, the mash is ready for the next stage.
Cotton plug
In some cases, some users use cotton wool as a seal. This method is the easiest of the existing ones; it will be enough to tighten the neck of the fermentation container with a piece of cotton wool. However, this will not make the method more effective, since air still penetrates inside the container.
Another disadvantage of this method is the impossibility of establishing the completion of the fermentation process. In such a situation, you need to bring a match to the neck of the container. When it burns, fermentation is complete. When the lit match goes out, the yeast is still working.
From syringes
You will need a dropper tube with a plastic adapter and a syringe. A simple water seal design is done as follows:
- a 0.4 cm hole is drilled in the lid;
- the adapter from the dropper with the tube is inserted inside;
- the body of a single-use syringe is inserted into the tube;
- the cap is placed on the bottle (the tube is directed downward and then raised);
- the syringe is attached to the bottle with tape;
- water is poured into the syringe.
Purpose of the device
Running a drainage hose outside through a hole in the wall is the easiest way to remove condensation. A flexible tube 80 cm long serves to drain the resulting moisture. A simple and affordable option has its drawbacks: it is prohibited by SNiP, drops fall on passers-by, and in winter the drainage pipe freezes. In a private house, erosion of the blind area is added. The optimal solution is to connect the air conditioner to the sewer. An indispensable condition for proper installation is the installation of a siphon with an odor-locking device. It allows liquid to pass in one direction and prevents not only odor but also dangerous gases from entering the room.
Review of popular models
Hepvo CV1WH
(Cost: about 1000 rubles). Siphon with a dry water seal (polymer membrane with molecular memory) with a check valve function. Inlet Diameter: 1/2¨ Outlet Diameter: 40mm
McAlpine MRNRV40
(Cost: about 1200 rubles). Siphon with dry water seal (silicone membrane with molecular memory) with check valve function. Inlet Diameter: 1/2¨ Outlet Diameter: 40mm
Hutterer & Lechner HL136.3
(Cost: about 3000 rubles). Siphon with mechanical locking device, with horizontal outlet and dirt collector. Threaded connection diameter: 5/4¨ Outlet diameter: 40mm
Recipe for wine from jam and raisins
In one liter of water, stir 1 liter of fermented, sour jam and about 100 grams of unwashed raisins. Pour this mixture into a bowl, filling 2/3 of the volume. Close the neck with a simple cotton plug and place the “shell” in a warm place for a week. When the grounds float to the surface, the mixture must be filtered through several layers of gauze. The semi-finished wine product should be poured into a bottle, closed with a water seal and placed again in a warm and dark place. After one and a half to two months of fermentation, the finished drink is poured (using a straw) into another container and again left to settle for a short time. Then everything is bottled, tightly corked and stored in a cool room.
DIY making
The price of purchased products is quite high, so some craftsmen decide to assemble the siphon with their own hands. However, you cannot make a high-quality device with a check valve yourself.
You can make a U-shaped system from regular plumbing tubing. But when the split system is turned off for a long time, the liquid in the elbow will dry out and an odor will appear from the sewer. A homemade drainage element will also be too bulky and difficult to install.
It is better not to skimp on a condensate siphon and purchase a factory model with compact dimensions and a convenient functional design. A properly selected siphon for an air conditioner will ensure optimal and efficient operation of the device without unpleasant side effects such as odor or moisture formation near the split system.
Moonshine quality guarantee
Since the last century, prejudice against moonshine has been firmly rooted in the minds of citizens. Meanwhile, these days, a strong home-made drink can adequately compete with factory-made vodka for the simple reason that the quality of the products on store shelves often leaves much to be desired. It’s no secret that illegal products that pose a health hazard are released into trade through “leftist” channels.
When buying store-bought cognac or vodka, you can never be sure that the holiday will not turn into a tragedy, as has happened more than once
In the case of homemade moonshine, the master is always confident in the quality, since he adheres to the technology and prepares the drink for himself, family and friends, while showing every possible caution and discretion.
https://youtube.com/watch?v=1YDyyep0hFM%3Ffeature%3Doembed