It would seem that the idea of building a bathhouse with your own hands is difficult; there are many ready-made projects, sketches, standard solutions and recommendations. Just use the suggested options correctly, choose the best one and implement it exactly in practice. In fact, building a bathhouse with your own hands is a rather complex, almost creative process, requiring a thoughtful approach and taking into account all the nuances associated with arranging a steam room, stove, foundation and insulation.
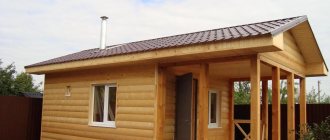
The timber version of the bathhouse will last at least ten years before renovation
Russian bath: features of its action
The human body temperature does not exceed 40° because he sweats, due to which he releases excess heat into the surrounding air with the release of excess fluid. This is the basis of the operating principle of any type of bath. The differences are only in the ratio of temperature and humidity.
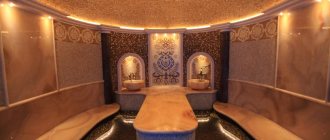
Hammam decorated with mosaics
In a Turkish bath (hammam), the humidity reaches 100%, and the temperature of the air, stone floor and benches does not exceed 40°. In a sauna (Finnish bath) this ratio is completely opposite. At 120° the humidity is only 40%.
A sauna can also be installed in an apartment
But the optimal combination of temperature and humidity for health (and there will be no negative consequences from such a procedure) can only be maintained in a Russian bathhouse, but only if it is properly designed and built.
A bathhouse cannot be called a cheap pleasure. If you order its construction on a turnkey basis, the amount may turn out to be unaffordable. With average prices for materials and specialist work, you will have to pay from 7 to 22 thousand dollars. You can build the simplest bathhouse yourself, saving significant money.
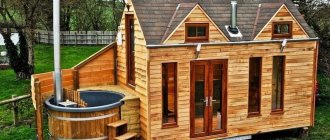
Construction of a Russian steam bath
Russian baths, as close as possible to traditional ones, are coming back into fashion. They have their own characteristics:
- the foundation is a boulder stone that does not require a plinth;
- the walls are logs, wild, debarked and dried, selectively chopped logs that have not undergone any other processing;
- assembly without metal parts such as nails or corners;
- caulking with natural materials such as tow and moss;
- insulation with natural materials, for example, peat or moss;
- waterproofing - natural resin;
- roof - shingles, turf or shingles;
- the stove must be made of stone;
- font - barrel, pool (you can always run outside and plunge into a river, lake or rub yourself in the snow).
Traditional Russian steam bath built on boulders
All this creates a lot of unnecessary difficulties; the bathhouse itself is generally flammable and short-lived. But there is every opportunity to independently build a bathhouse with the same qualities, but much more practical and modern. It is recommended to make a sauna house not only with a steam room, but also with a washing room, where there is a font, a tub for dousing or a shower, and a dressing room.
A Russian traditional steam bath can consist of several rooms
Waiting room
They undress in it, store towels, sheets, brooms and brooms, relax between visits to the steam room, and drink tea. This room serves as a barrier to cold air. There is a window there (for security reasons and for beauty).
A well-equipped dressing room can lift your spirits
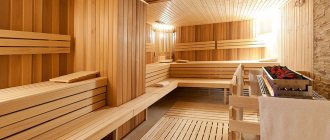
Steam room
A heater with a water tank is installed in it, and beds or shelves for lying on are built. The oven provides uniform, strong heating and exposure to superheated steam without convective air mixing. The steam room may have a small window for ventilation, which will help avoid waterlogging (one or two ventilation holes can be made for the same purpose).
A steam room with beds can be equipped with one window
Washing
Heat enters this room from the back wall of the furnace. After visiting the steam room, you need to cool down in the font or shower, which removes waste and toxins from the body. At the same time, sweating does not stop, and due to high humidity it also intensifies. The washing machine's operating principle is similar to that of a hammam.
The washing area with a font and rinsing tubs is heated by the rear wall of the stove
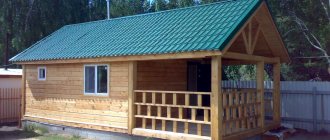
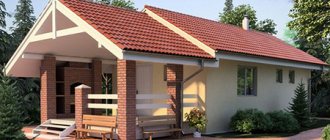
Small bathhouse in the country
Quite often there are cases where the size or topography of a summer cottage does not allow the construction of a full-fledged bathhouse. To realize your desire, you can agree to a small bathhouse in the country, the size of which in plan will be 3x3 meters, consisting of a steam room and a dressing room.
It is worth noting that a state of bliss can be achieved in such a small cozy bathhouse, if you do not elevate the degree of comfort of bath procedures to the rank of priority values. As a roofing material for a small bathhouse building, the most optimal solution would be polycarbonate sheets.
Note!
Do-it-yourself greenhouse - a review of the best ideas on how to build a good greenhouse on a summer cottage (80 photo ideas)
Do-it-yourself firewood rack for a summer residence: photos, examples of designs, dimensions. Review of simple and complex options for storing firewood on the site
Do-it-yourself wooden gazebo - step-by-step instructions on how to build a beautiful wooden gazebo (100 photo ideas)
Approval of the project by administrative authorities
This is a key step. Without approval of the project before the start of construction, an already built bathhouse can be demolished due to any complaints from neighbors, and you will lose the labor and money invested. The project should include the following items:
- A plan (floor plan, even if you have only one), created according to all the rules of drawing with specifications, sections and explication.
- Approximate estimate for materials.
- Planned type of foundation with drawing.
- Consent of the closest neighbors for construction.
The bathhouse design must be agreed upon with the necessary authorities
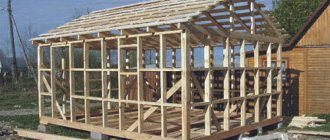
Walls and roof
You can assemble timber walls with your own hands.
Wooden baths are considered the most comfortable and healthy, since solid northern pine is an absolutely environmentally friendly product. The material can be ordered in the form of a cut kit for installation according to the design of the bathhouse you are building.
Advice! It is better to use profiled timber, glued together from lamellas of dense pine or larch. The lower three to four crowns are best made from pure larch. These materials are practically not susceptible to chemical and biological corrosion, which affects solid wood of other conifers.
The cutters must draw up installation instructions with numbered parts. In accordance with it, the timber is numbered.
The timber is marked for ease of assembly.
Two layers of euroroofing felt are laid between the concrete foundation and the plinth, since it is stronger and more reliable than ordinary roofing felt. The upper end of the base is also covered. During laying, anchors with threads are built into the base for attaching wooden frames.
Two layers of euroroofing felt are laid on the foundation.
Advice! For strapping, it is better to use larch beams, since this tree is not afraid of moisture. If the timber is made of solid pine, it must be treated with water-repellent compounds, but not with waste or similar artisanal substances, but with materials suitable specifically for the conditions of the bathhouse.
The first crown of beams is placed on anchors and screwed to the base with nuts. The holes are countersunk so that the nut is recessed into the body of the beam. Next, according to the instructions, lay the remaining beams, carefully checking the geometry using a level and tape measure.
The beams of the first crown are screwed to the base.
Floor beams are cut into the last crown of the wall box, to which the rafters will be attached. The rafter system will be assembled from triangles, reinforced with a crossbar at the ridge.
When the rafter triangles are installed, they are covered with a sheathing made of chipboard or plywood, which is sheathed on top with metal tiles or profiles.
Triangles with crossbars are used as a rafter system.
The floor and ceiling of the bathhouse are carefully insulated and vapor-proofed. The roof is also insulated and vapor-insulated, the gables are made of frames: a frame made of 100x100 mm timber, sheathed on both sides with moisture-resistant plywood, between which insulation is laid. The outside of the plywood is waterproofed and covered with clapboard.
The roof is insulated and the gables are installed.
Next, the finished floor is installed, furnace equipment is installed, ventilation is installed and interior finishing begins. They also carry out all plumbing work and install a septic tank.
Approximate material calculation
To carry out the calculation, you need to take into account what diameter the log will have. A larger one is better for a bath, but it is more expensive. The optimal diameter is 280 mm. The cost of 1 m3 of such logs with cups is on average about 8 thousand rubles.
Now you need to determine the height of the pediment. To do this, it is recommended to focus on natural conditions. In case of a large amount of precipitation, the gable should be high and the roof steep so that the snow does not linger on it, and in strong winds, vice versa, so as not to create excessive windage. The average height of the pediment is 1.5 m.
Photo gallery: drawings of a log house and necessary parameters
Top view and log cross-section parameters
A drawing of a log house will help in filling out the initial data
To calculate the amount of material, you must fill in all the initial data
A special calculator can help with the calculation.
All values can be entered into a special table
Roof
There are three types of roof for a bathhouse:
- Single-pitch.
- Gable.
- Complex - consisting of four or more slopes.
Usually the first two options are used for a bath. Let's look at the option of a gable roof covered with metal tiles:
The manufacture of the roof begins with the installation of the Mauerlat. In the case of frame walls, the role of the Mauerlat is performed by the upper outline.
- Place the uprights on the bench.
- Connect the posts using purlins and ties.
- Install the rafter legs by attaching them to the mauerlat, purlin and connecting the upper ends together. The distance between the rafters should be 50-60 centimeters.
- Install sheets of metal tiles.
- Cover the gables with wooden slats or sheet metal.
For a more visual understanding of the roof fastening, here is a drawing:
All dimensions of roof elements are given in the list:
Please note that the less you slope the roof, the more snow load it will bear in winter. Also, a small roof slope can lead to poor water drainage and leaks.
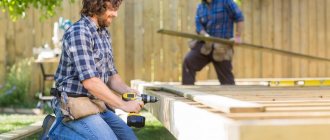
What tool will you need?
To build a bathhouse with your own hands you need:
- electric saw;
- grinder with a set of discs;
- drill with various drills and grinding attachments;
- planer, jointer (or electric analogues);
- axes;
- crowbar, mount;
- pliers, nail puller;
- bayonet and shovel;
- hydraulic level;
- hammers;
- mallet;
- bit;
- set of chisels;
- files;
- caulk tool;
- tape measure and carpenter's meter;
- buckets;
- wheelbarrow;
- stairs;
- construction trestles;
- container for concrete or construction mixer.
Now you can proceed directly to construction.
Sewage system
When constructing the foundation, installation holes should be provided at the required level for laying sewer pipes. A drainage well up to one and a half meters deep is installed not far from the bathhouse. Then they fill it with large crushed stone to one third of the depth of the well, cover it with a wooden lid and install a ventilation mushroom.
The receiving manifold is made of plastic pipes with a diameter of 100 mm with a natural slope of five degrees. Wastewater receivers are installed from the washing department, sanitary unit, and only then proceed to the installation of floors.
Tips for interior decoration of the steam room
Even at the construction stage, it is necessary to use modern impregnating compounds that can withstand high temperatures and humidity without harming human health. This way you can protect the building from fungus and rot. Those that are suitable for the ceiling cannot always be used to cover furniture.
Manufacturers of varnishes and paints (Senezh, Empils, Rogneda, Dulux, Tikkurila, Nobel, Belinka, Teknos) produce many such products with water-repellent natural substances such as paraffin, wax, oil. They are divided into those suitable for external walls, internal surfaces that a person does not touch with his body (ceiling) and furniture.
Silicone impregnation suitable for ceilings
Pyroprotective and antiseptic impregnation of logs is usually done at the timber mill, but it must be done again after construction.
The first application of the compositions to furniture is carried out immediately after its manufacture on a dry and clean surface, or even before manufacture (on wooden blanks). The product should be evenly distributed with a sponge, soft cloth or brush. Due to the thick consistency, a spray gun will not work.
Impregnation can be applied with a sponge, brush, or cloth.
Recommendations from specialized experts
It is advisable to locate the building for bathing procedures as an independent building on an elevated site, which is remote from outbuildings and will not be at risk of being flooded by flood waters.
When determining the size of the bathhouse at the design stage, it should be taken into account that according to sanitary standards, one person must have at least five square meters of the total area of the building. Wooden structures must be impregnated with fire-retardant saline solutions.
Note!
Do-it-yourself porch to the house - the best projects and construction ideas (125 photos of new products)
DIY brick barbecue: diagrams, drawings, photos, dimensions. Review of simple and complex structures on a summer cottage!
House with a bay window - 150 photos of the best planning and design ideas. Overview of all features of an architectural element
How to build a sauna stove
For all sauna stoves there is a single condition, the fulfillment of which is mandatory - lengthening the combustion channel so that the door is located in the dressing room (firewood is placed in it in that room).
The oven door must be in the dressing room
You can install a metal stove by purchasing it ready-made, or build a brick one yourself (it is much better due to its slower heating and long-term heat transfer). The most difficult thing will be to correctly remove the chimney through a wooden roof, insulating it with special metal sheets and vermiculite.
When installing a stove, the most difficult thing is the chimney outlet
Stones must be selected as carefully as possible. They must have the following qualities:
- heat resistance (does not collapse due to temperature changes);
- heat capacity (gives off heat for a long time);
- environmental friendliness (does not emit harmful substances when heated);
- homogeneity and the same coefficient of thermal expansion (foreign inclusions with a different thermal expansion can explode when heated);
- round shape (it improves the circulation of hot air).
The stones should be:
- up to 13 cm for the first layer on the grill;
- up to 9 for the intermediate layer;
- up to 6 for the top layer.
Bath stones should be round in shape
If the heater is made correctly, then unforgettable moments of steam await you.
Russian traditional steam room with heater can be supplemented with dry herbs for aroma
Step-by-step construction of an object with your own hands
Construction is taking place in stages:
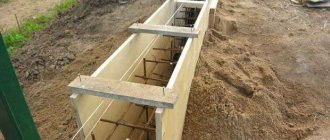
- along the perimeter of the future building and under its load-bearing internal walls, pits are created to form a strip foundation;
- sand is poured onto the bottom of the trench, the finished “cushion” is pressed and watered;
- the pits are filled with reinforcing bars and liquid concrete, the layer of which is smoothed with cement mortar;
Before pouring concrete, formwork is constructed from boards
- the base for a brick kiln is formed from concrete;
- several layers of waterproofing material treated with bitumen mastic are placed on the platform;
- assemble the frame, connecting the beams using the method “at the corners in a paw, and the ends in half a tree without a trace”, laying insulation between them and installing dowels through each row at a distance of 20 cm from the edge;
The corners are connected in 4 steps, and the ends are connected in 3 steps - prepare a platform for the floor, that is, pour a 10 cm layer of sand, press it, and then cover it with a 10 cm layer of crushed stone;
- the crushed stone is covered with sheets of roofing felt, the edges touching several centimeters;
- cement is placed on the roofing material, creating a screed with a slope, thereby arranging the flow of waste water towards a sewer pipe built into the ground and leading to a separately dug hole;
- a facing material is glued onto the hardened cement screed, and a wooden sheathing is placed on top of it;
Wooden sheathing on the floor prevents your feet from touching the cold floor
- floor beams are attached to the upper bars of the walls in a horizontal position;
- the installed beams are connected with iron brackets to the rafters - thick beams;
- fasten the rafter legs to each other using ridge beams;
- the rafters are covered with rolled waterproofing sheets and wooden flooring - the basis for the roofing material;
- create a ceiling, that is, lay out boards every 2.5 meters for non-load-bearing walls;
- A vapor barrier film is laid on top of the ceilings and thermal insulation material is placed.
Features of operation
Only a steam room provides the healthiest and only correct ratio of humidity and heat. But even there there are extreme values. This is also confirmed scientifically. The best state of health at a certain combination of humidity and temperature is graphically expressed by a homeothermal curve. Below the first curve is the optimal combination of temperature up to 90° and humidity up to 80%, which is what the Russian steam bath provides.
Homeothermal curves can be considered an indicator of well-being in the bath
While in the steam room, the body is washed with hot, humid air, especially when exposed to it with a broom, due to which everything warms up. In this case, there is a constant flow of oxygen to the tissues.
Air circulation in the steam room provides a healing effect
After being in the steam room, you need to plunge into the ice plunge pool.
Fonts in a washing Russian bath should be filled with cool water
Boiler
The boiler model for a sauna will largely depend on your financial capabilities and the fuel you will use for heating. If you know how to use welding, then you can make a simple boiler yourself from thick sheet iron. If you prefer more advanced colas with gas or electricity, you can purchase them from specialized companies.
The boiler in the steam room is installed in such a way that the combustion chamber is loaded with fuel either from the street or from the rest room (dressing room). The boiler itself, for fire safety purposes, is located 10-15 centimeters from the nearest walls. The walls are as high as the boiler and covered with iron sheets. A good solution would be to line the boiler with bricks, thereby reducing its cooling time and protecting the walls from fire.
When installing a chimney for a boiler, pay special attention to the place where the pipe comes into contact with the ceiling. The opening for the chimney should be insulated with refractory material. Also, pay attention to the place where the chimney pipe exits through the roof. This area is usually prone to leakage, so it should be sealed thoroughly. Below are the options for boilers for baths:
- Homemade boiler made from metal sheets.
- A gas boiler.
- Electric boiler.
- Solid fuel boiler.
Stage 4. Waterproofing the base
Waterproofing strip foundation
Waterproofing a strip foundation with roofing felt
Treat the surface of the foundation with molten bitumen and lay a layer of roofing felt on top. After the bitumen has completely dried, repeat the procedure. As a result, you will have reliable two-layer waterproofing.
Waterproofing with mastic
Additional insulation with roofing felt
Stage 8. Caulking logs
Types of tools and caulking methods
After shrinkage is completed, the log house is caulked. To do this, prepare the following equipment:
- hammer;
- caulk (made of wood or metal).
Attention! If you sealed the inter-crown space with tow or moss, you can skip this step, since you most likely will not need caulking. But if you find even the slightest cracks, then it is still better to carry out the procedure.
Proceed to work only after the insulation has completely dried. First, twist the material (tow or moss) into a rope, then hammer it between the crowns with a hammer and caulk.
Caulk
You can use tape jute - in this case, the material is simply fixed with nails or a mounting stapler.
Primary and secondary caulking of a log house
Video – Caulk of a log house
Stage 7. Doors and window openings
We specifically started talking about openings after construction was completed, since there are two options for their arrangement.
Installation of a casing for installing windows and doors in a log house
- In the first case, holes are created after the completion of construction work. At the same time, in the crowns located in the places of future openings, first leave small gaps (the dimensions of the latter depend on the size of the mounted products). Once you've finished laying the logs, simply cut the openings with a chainsaw.
- In the second case, leave openings during the construction process. This is very labor-intensive and expensive, since you will use bars with notches at the ends and special grooves.
How to install a window in a log house
Window installation
Bath windows
Doors for a bathhouse made of logs
Therefore, we advise you to give preference to the first option.
LAYING TILES ON THE FLOOR OF A BATH: CORRECTLY PERFORMING THE COVERING
The quality of the final type of tiled cladding on the floor depends on the technical nuances that should be followed in the process of decorative and finishing work. Compliance with the established technical standards guarantees the quality of the laid tiles even for a novice who does not have the relevant experience as a tiler.
REQUIRED EQUIPMENT
The quality of facing work is a well-chosen arsenal of accompanying tools. Professional finishers have the following technical devices and tools at hand:
- Container (polymer or metal) for mixing tile adhesive. You can use a basin with a volume of 10-15 liters.
- Corded electric drill with the ability to operate at reduced speed. The tool is necessary for high-quality mixing of tile adhesive. An alternative to an electric drill is a screwdriver with a power of at least 14 W.
- Steel whisk. The technical equipment carries out high-quality mixing of glue in a volume of water.
- Putty knife. A technical tool without which it is not possible to evenly apply the tile adhesive mixture. It is advisable to use a device with a width equal to the width of the ceramic tile sheet. A serrated spatula is convenient to prevent excess adhesive mass from being applied to the back surface of the tile.
- Small spatula. Necessary for applying the adhesive mixture over the canvas of the main (notched) spatula. It is enough to have an auxiliary spatula with a width at the base of the steel sheet in the range of 50-70 mm.
- Level with bubble flask. Equipment for monitoring the correct installation of decorative tiles relative to a single horizontal line.
- Jointing spatula. It is required to be used when filling the cracked spaces between the laid tiles with jointing mixture. For good mashing, it is advisable to buy a rubber spatula.
- Tile cutter. Essential equipment for cutting tiles into required pieces.
In addition, plastic crosses are also used. A bag of 50 pieces is usually enough. The elements refer to the type of consumables to ensure equal slot gaps between the tile cladding.
PRELIMINARY WORK
The floor covering is preceded by a number of the following preparatory activities:
- Removing the layer of previous tiles, if any;
- removing residual islands of old glue and areas with cracked screed;
- in the absence of waterproofing, appropriate work is carried out;
- leveling the concrete base by installing a new screed.
The result of the preparatory work is cleaning the room from construction debris and sweeping away dust.
DIRECT WORK
The angle and side in the bathhouse room relative to which the ceramic tiles will be laid is determined. The choice is important because it will determine the presentability of the laid cladding. For professional craftsmen, the area where the facing material begins to be laid is called the “red corner”.
Three tiles without glue are laid out in the selected corner: one directly in the corner, one more on each side of the first tile. This is necessary to determine the state of the corner formed by the adjacent walls. By performing this estimate, you can avoid undercutting other tiles glued along the walls. With an ideal angle of 90 degrees, tiles can be glued close to the walls.
So, after applying the adhesive using a notched trowel, the first tile is laid in the “red” corner. After placing the initial tile, you should press it down a little so that a little of the adhesive mixture comes out on all four sides. The mass of squeezed out adhesive mixture must be collected using a small spatula. Next, a tile is glued on each side of the already laid (previous) one. It turns out that the “red” corner of the floor is tiled. Until the adhesive mixture under the placed tiles has hardened, a level is placed on their decorative surface to adjust all three tiles to the common horizontal line. You can continue tiling the floor along either of the two walls, periodically checking the location of the tiles using a building level.
Don’t forget about the crosses when sticking them between the tiles being laid. The number of crosses is two pieces on each edge of the tile.
The last row of tiles, in most cases, has to be cut using a tile cutter. The cut is made along the glazed side of the tile.
APPLYING THE GRADING MIXTURE
The process is carried out after the tile adhesive has completely set (10-12 hours). The seams are filled with jointing mixture. An alternative option for jointing mixture is tile adhesive. The tile joints are filled completely, without voids inside.
Depending on the color of the glazed surface of the cladding, the appropriate color can be added to the jointing mixture. Work on filling the spaces between tiles is carried out using a rubber spatula. After the jointing has hardened in the seams, a basic wet cleaning of the excess mixture is carried out, and then the coated area is rubbed with a dry rag.
Bathhouses made of wood are considered classics of the genre in Russia - we can say that wood has been the national building material for centuries. Certain architectural and aesthetic traditions have developed that characterize wood as the best raw material for construction.
The bathhouse is rightfully considered an integral part of Slavic culture and an indispensable attribute of its history. Moreover, the concept of “Russian bath” is perceived not so much as a process of ordinary washing, but as a certain custom of bodily and spiritual cleansing. This process of visiting a bathhouse has developed and improved over several centuries.
Stage 2. Timber processing
Processing logs for scraping
Processing a log for scraping
Step 1. After the consumables have been delivered to you (or you have cut and delivered them yourself), they need 25-30 days to rest.
Step 2. Next, carefully examine and sort through the logs - keep only the highest quality ones, and discard defective or damaged ones.
Step 3. Then start processing. First, peel the bark from the logs (do this carefully so that they do not crack), leaving a little of it on the sides - about a 15-centimeter strip on each side.
Step 4. After processing, place the logs in storage approximately 25 cm from the surface of the ground. You can stack it however you like - in stacks, packs, etc., the main thing is that the distance between the logs is 7-10 cm.
Scheme for preparing logs for building a log house
Log storage