Features of wood of various species
The choice of wood species determines the quality of the future structure. Depending on the purpose of the door, deciduous and coniferous wood is used. Wood is distinguished by its beauty, resistance to mechanical damage, good sound insulation and noise absorption. Wood can be soft or hard.
Soft wood is easier to process, but has low strength and a short service life. It is rational to make interior doors and structures for outbuildings from such wood.
Working with hardwood lumber is more difficult. The structures made from them are strong and will last a long time. They are used for indoor options and as entrance doors.
Hardwood
Deciduous wood is used very often for the manufacture of door systems.
- Birch. Cheap material, has low strength and density. Birch is easy to polish and paint.
- Oak. It has a beautiful texture that becomes darker over time. The material is dense, durable and hard, so it is difficult to process. Oak structures are heavy, so reliable hinges must be selected for them.
- Beech. In many ways it resembles oak, but it is easier to process. Impregnations and paints and varnishes work well on beech wood. The disadvantage is the possibility of deformation after the boards have completely dried.
- Ash. It has a beautiful texture, is resistant to rotting, and durable.
They also use alder, walnut, and maple. Entrance structures are often made of oak or beech.
Conifers
Coniferous wood contains many resinous substances, which makes it resistant to moisture. Pine wood is soft and can be processed well. A large number of resins prevents high-quality treatment with impregnations. Larch is a very moisture-resistant material, but over time it gains greater strength.
Wood selection rules
- For interior doors, lumber from soft types of wood can be used.
- For structures that are used outside, it is worth choosing hardwood.
- House doors are made from new, high-quality boards. Old materials are only suitable for commercial buildings. Low-grade wood can also be used here.
Choose smooth beams and boards with a minimum of knots.
Materials for production
To understand how to make a door from boards yourself, you need to decide where the structure will be installed. Doors are:
- made of solid wood;
- paneled;
- panel;
- frame.
The wood species, grade and quantity are selected depending on the purpose of the door and the budget. Additionally, you will need wood glue and self-tapping screws, dowels or confirmations. It is advisable to choose wood that has been dried in special chambers. This prevents the plank door from deforming during operation.
It is necessary to choose even boards, since planing makes the material thin. Depending on the purpose of the door, the thickness of the boards can be 25-50 mm. Before making the structure, all boards must be thoroughly sanded with fine-grain sandpaper or a sanding machine.
Paneled
Paneled doors are made from boards or solid timber, but the glued version is more popular. To ensure that the material has a beautiful appearance, it is covered with wood veneer. If the door is made with high quality, it is difficult to distinguish it from a solid solid structure.
A simple paneled product consists of a frame of 2 vertical and 3 horizontal crossbars. They are connected to each other using spikes or dowels. To give the structure additional strength, all parts are glued together. The number of cross members also affects the rigidity of the product. The more there are, the stronger the door will be.
Panels made of thin boards are inserted into the openings that form between the frame elements. Plywood is also used; MDF, chipboard or glass can be installed. The panels can be coated with veneer or plastic, which imitates the texture of wood. The thickness of the panels does not exceed 1/3 of the thickness of the timber for the frame. The inserts are fixed using glazing beads or recesses in the frame. Since the panels are thin, the doors are used only as interior partitions.
These structures are not inferior to analogues made from solid wood in terms of strength and durability. Sometimes canvas can cost much more than solid wood. It all depends on what kind of wood and beams the frame is made of, as well as what type of veneer is made of.
From the array
Massive doors are assembled from thick boards, which are joined together to form a flat surface. The wood can be tongue-and-groove or planed. For rigidity, horizontal jumpers must be installed.
Depending on the functional purpose, different types of wood are used for doors. For entrance structures, choose dried dense material, for example:
- oak;
- larch;
- cedar;
- alder, etc.
With proper processing and care of the material, the product can last for several decades. The appearance of the door can be either simple or containing carvings or other relief design. It should be noted that solid wood structures are heavy. Therefore, they are more often used as entrance doors, but homemade interior doors are also found. Since the latter are not exposed to atmospheric influences, a type of wood with a lower density is selected, and the shield is also taken thinner.
Types of wood doors by design
Wooden structures are made in several versions:
- Swing. Consist of one or two canvases. Sometimes one-and-a-half versions are made, in which part of the canvas opens only when moving large objects.
- Sliding. They are convenient because they save space in rooms. Such wooden structures are used as interior structures or for wardrobes. They are well suited for large opening widths.
- Folding wooden options are also used for interior spaces. For manufacturing it is worth choosing lightweight materials.
Wooden doors are made in a solid version or with glazing. The structures are made of solid wood or on a frame. The standard shape of the opening is rectangular, but designer models can be made as arched ones.
How to strengthen?
Sooner or later, the performance characteristics of wooden doors begin to deteriorate. Most often, the reason for this may be the manufacture of products from low-quality materials or violation of technological conditions during installation. Hinges and jambs become loose over time, and various types of defects appear on the canvas. To solve this problem, it is not necessary to purchase a new door; it is enough to strengthen the old structure.
To completely transform the canvas, you can upholster it with a 1.5 mm steel sheet
The only thing worth paying attention to in this case is strengthening the hinges, since under the influence of the weight of the metal the structure will sag and problems will arise with opening/closing the door. For the strength of entrance products, they also use the installation of steel strips along the entire perimeter of the surface; they are fixed with a layer of mineral wool and decorated with beautiful material
Required tools and materials
To begin work, purchase the necessary consumables and equipment. The specific list is determined by what kind of design you will make.
Materials
You can make a structure yourself only if you have the right material:
- Dry lumber - boards and beams. The thickness of the boards for interior doors is at least 2.5 cm, for entrance doors - 5.0 cm.
- Accessories - awnings, handles. An additional lock is purchased for entrance structures.
- Wood glue.
- Nails or screws.
It is better to choose lumber that has been technically dried, smooth, without knots or defects.
To finish the door, depending on its type, you may need the following materials and devices:
- primer;
- paint, stain or varnish;
- sanding paper of various grain sizes.
In addition to materials, you need to stock up on the appropriate tools.
Tools
Many tools are available in any home, but there are some things you will need to purchase in advance:
- hand or electric saw;
- hand router - for shaped processing of boards, making grooves and locking joints;
- drill;
- screwdriver;
- roulette;
- plane;
- square;
- grinding machine;
- level;
- chisel;
- hammer;
- brush or spray gun.
When all materials and tools have been purchased, you can begin direct work on the structure.
Manufacturing procedure
The assembly of an interior door is carried out using different methods. But if the meaning of all operations is clear, then developing your own technology is not difficult.
Box
It’s quite simple with it - assemble a rectangular structure, and only then place it in the opening. But installation is recommended only after the fabric has been manufactured. This makes it easier to mark the places where the awnings and latch (lock) are attached. Doing this on a jamb already installed in the opening is much more difficult. In addition, it is necessary to select the grooves for the door. Therefore, after the box is knocked down, you still have to return to it.
Canvas
It all depends on the chosen design, and therefore where to start - with tying or cutting MDF boards - is decided based on the door drawing.
Frame making
The technology is simple - a rectangular shape is assembled according to the size of the sash. But there are options for filling it.
Stiffening ribs are installed in the form of vertical posts. This solution is advisable if the frame is planned to be sheathed with MDF or plywood - the strength of the coating will be ensured.
One horizontal jumper in the center. A good solution for insulating an interior door. For example, installed in a passage leading to a cold room (utility room). The canvas is filled with expanded polystyrene, and its slabs are foamed around the perimeter.
Leave one frame without additional elements (small-hollow design). How to fill it and whether to do it is decided depending on the specifics of the room. But this frame option is only suitable for interior doors that are covered with boards. Otherwise, there can be no talk of strength.
Fabrication
- Its dimensions are known; All that remains is to cut the MDF into 2 - 3 fragments, according to the drawn up drawing.
- The second stage is assembling the harness. That is, the frame is assembled using a ready-made canvas.
Door processing
- It is advisable to use the antiseptic again. Since material sampling and drilling were done, individual areas may be “exposed.” Secondary use of the anti-rot composition eliminates this disadvantage.
- Surface design. Options are marked: stain, varnish, veneer, film - depending on the design concept.
Preparation for installation
At this stage, latches, eyes, handles and hinges are installed on the canvas. The box is placed in the opening, aligned and securely fixed.
All that remains is to hang the door, align the second half of the canopy with the mounting holes and secure it with self-tapping screws (included in the kit).
“Finishing chord” - checking the correct operation of the canvas, tightness, absence of distortions; If deficiencies are identified, eliminate them. All further measures - insulation of the opening, installation of platbands, decorative design - are a slightly different topic.
Making an interior door at home is quite possible. Success largely depends on proper work planning, choosing the optimal design scheme and your own diligence. And quality is ensured by a good tool, the purchase of which is not worth regretting.
How to make a wooden door: step-by-step instructions
The following types of doors are suitable for a home or outbuildings:
Each of these structures can be made independently, but the process has its own nuances. How to make wooden doors with your own hands from boards step by step - let's take a closer look.
Keyed
Keyed structures are among the easiest to make yourself. They are installed, as a rule, in technical or utility rooms, for example, a bathhouse, a barn, a toilet. To understand how to make a keyed door from boards with your own hands, you need to know what it consists of.
- boards;
- dowels for fastening boards;
- brace
The boards are connected to each other tightly or with a gap. The second option allows you to ventilate the room where they are installed. The dowels in the form of a bar are simply stuffed onto the canvas.
Inserting parts into boards will become more reliable. Instructions for performing the work:
- The prepared boards are laid on a flat surface.
- The canvas is leveled and fastened.
- The location of the keys is marked on the boards.
- At an angle of 45 degrees in the elements, wood is sampled to ¼ or ½ thickness.
- The made recess is leveled with a chisel to the size of the key.
- The key is inserted into the groove and driven across the entire width of the blade.
- The edges of the strut are sawed off at an angle of about 60 degrees.
- The block is secured to the canvas between the dowels.
Tip: The edges of the fasteners are filed down to a cone. This will allow the structure to be fully opened.
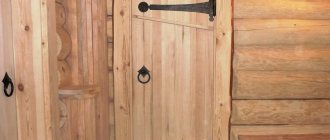
Keyed doors made of boards, finished in an antique style, are used as interior doors in many ethnic styles.
Panel
If you want to avoid costs, you should know how to make an entrance panel door from boards with your own hands. This variety is one of the most accessible. A design made from a frame and various cladding will hide defects in lumber - it is quite easy to do.
The main points here will be: strict adherence to dimensions, correct connection of the frame components. For their manufacture, timber or boards are used. The type of wood does not play a special role - the frame practically does not interact with the environment, since after assembly it is sheathed with other materials. In addition, glued parts can be used instead of solid elements.
- Two beams are cut to the height of the door frame with a gap of 5 mm.
- Two more parts are made along the width of the frame with the same gap.
- All elements are fixed at an angle of 90 degrees.
The parts can be connected using the tongue-and-groove method or in an overlay. For more reliable fastening, the fixation points should be coated with wood glue. The bars are attached to nails or screws.
The cladding is made from:
Help: The cladding can be simple or with a certain decor. The board is finished with veneer or various types of film.
To improve the parameters, heat-insulating and noise-absorbing material is laid between the casing:
- mineral wool;
- Styrofoam;
- expanded polystyrene.
If the structure is an entrance, it is worth installing an additional cross beam at the location where the lock is installed.
Paneled
A panel is an insert into the fabric binding, which is made from:
The insert can also be made of glass, finished with veneer or plastic. The texture is made smooth or profiled.
- flat - installed in the middle of the frame beams, used when installing interior doors;
- overhead - fixed on the sides of the timber; for entrance doors, insulation is laid between the panels;
- with applied moldings (curly profiles);
- with figured planed edges (figares).
Making paneled doors yourself is a complex process. It requires professional skills, as well as tools and equipment. But a paneled structure is lighter than a massive one, so this option is often chosen for interior doors. In addition, you can save on materials, since fewer are required for panels.
A simple design is made of two vertical bars or thick boards and several transverse crossbars, which are connected using a tongue-and-groove method. The frame is strengthened with dowels or furniture confirmats. Horizontal bars give the structure rigidity.
Related article: How to install a glass shower door
The openings that are formed by the frame parts are filled with inserts. They are fixed in the internal grooves of the timber or fixed with a glazing bead. For glass elements, an internal sheathing is made, which is attached to the main frame.
To install the fittings, you need to make a hole in the timber or board. Secure locks and handles using self-tapping screws.
Any wood products require finishing. This will improve their appearance and protect them from negative influences. Interior options can be finished using stain, tinting impregnation or varnish.
Entrance structures require a more careful approach. The wood should be well soaked with antiseptic agents. This will extend the service life and prevent rotting. If possible, wood is treated with fire retardants. Paint and varnish materials for entrance options are selected taking into account outdoor use.
Low quality wood can be finished with veneer. You can do this yourself using glue. This method of finishing will allow you to significantly save money, but the appearance of the structure will be very attractive.
Making plank doors yourself is not too difficult. The main thing is to choose the type of construction and materials, and strictly follow the instructions.
Harvesting lumber
To make a simple panel door with your own hands, it is enough to find a beam 25-40 mm wide for assembling the frame. The quality and type of wood does not play a big role - spruce, pine and other materials available on the farm will do. Here it is important to choose external decor - cladding that hides external defects of the frame.
When selecting materials for assembling a paneled or solid door, consider several useful recommendations:
- You need to know the shape and dimensions of the future door, determined by the installed door frame.
- Choose the type of wood in accordance with the allocated budget. An important nuance is that the wood must be dried, otherwise the homemade canvas will warp.
- Check the curvature of the boards by laying them on a flat surface. Reject products that are curved.
- The thickness of the boards for interior doors is 25-30 mm, for entrance doors - 5-6 cm.
- Don’t forget to consider the option of finishing the slopes - prepare wooden trims or buy a ready-made kit made of plastic or MDF panels.
Reminder. When choosing lumber to fill arched openings, add a margin along the length of the boards for sawing.
In the process of preparing materials, take care of purchasing all the necessary small things:
- door handles, latches and locks;
- at the entrance from the street it is advisable to install a door closer or a simple limiter;
- It is better to equip the balcony door with a ball lock;
- You will need to stick a sealant on the porches of street and bath sheets;
- To close a barn or cellar, you need a latch or steel rings for a barn lock.
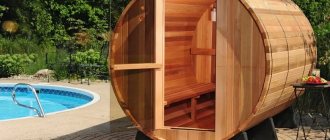
Option for sliding doors for a barn or garage
A typical decoration for swinging wooden doors is the application of 2-3 layers of varnish. You can choose a colorless or darkened composition to make the canvas “antique”. Be sure to buy any antiseptic for primary wood treatment.
How to make a door from boards with your own hands
Wooden doors cannot be called a scarce commodity these days; it is much more difficult to find a truly high-quality product. Almost the entire assortment of specialized stores is made with a huge amount of synthetic additives. It is difficult to judge the quality, and even more so the environmental friendliness of such products. Making wooden doors is not a very simple matter. And when the desire and need arises to make a good, reliable product with your own hands, you need to prepare carpentry tools, suitable material, and get down to business. Let's take a closer look at several options for making a door from boards with your own hands.
A set of tools necessary for work
When making door frames from wooden boards with your own hands, a home craftsman will need the following set of tools and consumables:
- To take measurements and apply markings:
- Laser or mechanical tape measure with a length of at least 3 m.
- Ruler with steel blade 1000 mm long.
- Carpenter's corner.
- Plumb line with nylon scissor.
- A marker or a simple pencil with a soft lead.
- For cutting raw materials:
- Cross-cutting machine with rotary bed.
- A miter box with a hand saw, which is usually included in the kit.
- A jigsaw with a set of different files.
- Circular saw with wood blade and protective cover.
- To process boards before assembly:
- Manual plunge router with a set of replaceable cutting elements of different diameters.
- A chisel with a hammer, the weight of the striker is from 300 to 500 grams.
- Trimming machine.
- File with coarse abrasive.
- Drill with disc abrasive sets.
- Looping machine.
- To assemble the canvas:
- Drill with a set of wood drills of different diameters.
- Wooden or rubber hammer, mallet.
- Screwdriver with a set of bits.
- Hand-held Phillips or slotted screwdriver.
- To install the door:
- Screwdrivers, screwdriver.
- A hammer drill for making holes in a brick or concrete wall for anchors for fastening the box.
- Wrench with cap nut and ratchet for tightening anchors in a box.
- Construction or laser level.
- Foam or sealant gun.
- To finish the door:
- Brushes, rollers.
- Pallet for mixing paint and varnish compositions.
- Rags for degreasing and cleaning fabrics.
- Vacuum cleaner for removing small sawdust.
- Consumables:
- PVA glue or epoxy resin.
- Polyurethane foam.
- Silicone sealant.
- Antibacterial impregnation.
- Varnish, paint, for finishing coating.
- Spacer wedges for door installation.
- Wooden sticks replacing self-tapping screws (if necessary), or the self-tapping screws themselves with different lengths, pitches and thread diameters.
All tools must be of high quality, in good working order, sharpened, cleaned of dust and dirt, and prepared for work. When purchasing consumables, it is recommended to pay attention to the shelf life of each composition, which is limited to 12 - 24 months.
Door designs made of natural wood
The classification of products depends on the features of their design:
- From the array. The fabric of the product is assembled from thick tongue-and-groove boards. The rigidity of the structure is ensured by inclined or horizontal jumpers.
- Paneled. It is a frame assembled from processed boards and inserts - panels. The product is assembled using wood glue. Making your own paneled wood door can be challenging. The work process requires machine tools and carpentry skills.
- Panel doors can conventionally be called wooden. The design is based on a wooden frame. The outer skin is most often MDF or plywood. There are several options for filling the internal cavity: cardboard cellular filling, glued timber, or a layer of insulation. You can leave the door hollow.
Decoration methods
To make a truly beautiful door with your own hands, you will need additional decor. The door leaf can be processed as follows:
- paint;
- cover with wallpaper or self-adhesive film;
- open with stain and varnish;
- clad with veneer, laminate and similar materials;
- cover with plastic.
Varieties of door decoration methods
Interior wooden products can be decorated with a variety of creative techniques or you can style them yourself to suit a particular interior. For example, interior designs can be complemented with stained glass and patina for classics, baroque moldings or decoupage combined with craquelure and artificial scuffs for country and shabby. Hand painting deserves special attention. Acrylic paints are used for this. Glass is best treated with stained glass compounds. Additionally, you can use pieces of fabric, beads and rhinestones, as well as other small items at hand.
The metal sheet must be opened with paint. Enamels are best suited for this purpose. Also, such doors can be covered with plastic panels or MDF. Another option is soft lining; it allows you to create an additional layer for insulation and sound insulation. Dermantin is used for decoration. When making it yourself, the final appearance of the product depends only on your imagination and capabilities.
Material selection
How to make a solid wood door yourself and get a good quality product? First you need to make sure that good material is chosen. It is important to take into account not only the type of wood from which the lumber is produced, but also its grade, quality of processing and drying.
Wood type
- Pine is easy to process, but it dries out over time. Has high resin content. The presence of blue on the surface of the material indicates a violation of the storage technology.
- Spruce is a soft wood with a golden hue that can retain its natural color for a long time. The species has low resin content and is not susceptible to cracking, has few branches, but is more difficult to grind and cut than pine.
- Larch is an expensive material with a dense, uniform structure. It does not rot and does not require additional treatment with special protective compounds.
- Cedar is a durable and expensive wood. It does not rot, has a pleasant aroma and antiseptic properties, providing healing properties to others. Its color ranges from light pink and light beige to dark brown.
- Oak is an excellent material in terms of strength and durability, but is difficult to process. If the technology is not followed, it may break.
Criteria for choosing lumber
If the choice of wood depends more on financial capabilities, then you should not skimp on quality. Even inexpensive lumber should be well dried and processed. To ensure that wooden entrance doors do not dry out over time, do not bend, and are pleased with both a long service life and a decent appearance, when purchasing material you should consider:
- Grade of boards (“extra” or grade “A”) A smooth, uniform surface without knots or with very little of them, a light surface with a clearly defined wood pattern is an indicator of good quality.
- Residual humidity is within 12–15%. The process of removing moisture from wood must take place in a drying chamber.
- Evenness. This indicator is checked on a horizontal smooth surface. The mortise-tenon locks must fit each other perfectly.
How to make a door frame yourself?
The door frame is the basis of the door structure, it is the key to its quality and strength, long service life, as well as an attractive appearance. It is with the preparation of the doorway that all work on the manufacture of the door begins - this is the load-bearing fabric of the entire product, as well as the place for installing the lock plate. Making a door frame is quite simple, but only if you take a responsible attitude to this stage of manufacturing, you can ultimately get a good result and a door that will fulfill its direct responsibilities. The manufacturing scheme does not contain anything complicated.
You can use any type of wood for the box, but it is important to consider its properties
Let's look at an example. Pine is most often used for door frames. This is a material with an affordable price, which corresponds to the quality, but pine is categorically unacceptable for entrance doors, since it has such properties as softness and elasticity: such a product will not be able to have a high level of strength, and therefore not perform its direct functions. Oak is better suited for entrance doors, while pine is an excellent solution for interior structures.
Metal is a durable and high-quality alloy, which at the same time does not look very aesthetically pleasing.
Thus, MDF boards are the destiny of interior doors, and metal is the destiny of entrance doors. But while wood fiber is easy to work with, metal structures require remarkable welding skills.
The manufacture of a door frame traditionally begins with careful measuring manipulations, which should be done after dismantling the old structure. It is necessary to measure the sides of the doorway, as well as the threshold and the top of the opening, and then calculate the required amount of material. The width of the door frame is directly proportional to the width of the walls.
The next stage is cutting the material and connecting the structure
Here it is extremely important to decide on the type of connection. Experts prefer the groove method; it is considered the most reliable, but it is quite difficult to cut all the grooves yourself
The upper edges of the vertical and horizontal elements are cut at an angle of 45 degrees, thereby forming diagonal joints of the structure.
If all measurements are made correctly, then you can begin assembling the structure and processing it, and then installation. This process is quite simple, but some nuances may arise in the final stages.
When installing a door frame you must:
- make sure that the frame matches the parameters of the door;
- mark all areas where hinges or other fasteners will be located;
- mount the frame into the doorway, adjusting all dimensions using a plumb line and level;
- fix the position of the door using pegs or strips;
- secure the structure with bolts;
- Fill the cracks with foam.
In most cases, at this stage the installation of the door frame ends, but this is a practical part, and we must not forget about aesthetics. It is also necessary to hide the junction of the doorway and frame, as well as take care of closing empty spaces that may well arise if the owner wanted to change the geometry of the doorway and reduce it.
The process of making a door from boards
The technology for making wooden doors is not so simple and depends on the design. For example, the production of panel doors requires good tool handling skills and the ability to operate machines. Let's consider several options for how to make an entrance door to a house, bathhouse or outbuilding.
Solid wood door
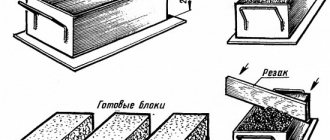
From solid wood you can assemble entrance doors to a house, bathhouse, utility room, and interior structures. For residential premises, products are carefully processed so that they have an aesthetically pleasing appearance. The simplest panel doors made of wood are a solid panel reinforced with transverse or diagonal elements. A tongue-and-groove board or a regular one (for outbuildings) is suitable for the structure. If you are going to make a wooden entrance door to a residential building, prepare a board 40–60 mm thick.
- First, the boards are marked to a given size and sawed.
- The prepared material is laid flat so that the grain of the wood is directed in one direction.
- The boards are joined together using wood glue.
- Measure the required width of the sash and cut off the excess.
- The made shield is clamped in several places with clamps and kept on a flat surface until completely dry.
- Further processing with a router makes the joints of individual boards invisible and levels the surface.
- How to make cross members? Parts are cut out of the board, which in section have the shape of a trapezoid.
- To make a groove, the crossbar is placed on the canvas and outlined around its perimeter.
- According to the markings, a groove is cut with a router, up to half the thickness of the board.
- The crossbar is driven into the groove from the side, carefully knocking it down with a mallet.
To install it in a home, a homemade version requires a little modification - coating with water-repellent compounds, fire retardants, stain, and varnish. If there is a need to additionally insulate the door, the simplest and most inexpensive way is to cover the canvas with leatherette.
Paneled door
It is not at all easy to make paneled wooden doors with your own hands, since all structural elements require complex processing on machines. The product is a frame made of timber and panels - elements that fill the free space of the frame.
- The initial stage is drawing up a detailed drawing with measurements of all individual structural elements. It is necessary to take into account not only the length and width of each part of the blade, but also the parameters of the groove.
- A board or timber is used to make the frame and crossbars. The elements are processed with a milling cutter to obtain a tongue and groove in accordance with the drawings.
- A groove is made at the ends of the transverse elements for further installation of panels.
- For panels, boards, chipboards, plywood or glass (for interior structures) are used.
- The surface of the wooden panels is processed with a milling cutter to obtain a relief, or left smooth. Reduce the thickness of the edge so that it fits freely into the groove of the crossbars.
- Before assembly, all structural elements are impregnated with an antiseptic and allowed to dry.
- Do-it-yourself door assembly is done on a flat surface. All joints are coated with wood glue.
- The finished canvas is carefully tapped at all joints with a mallet, the degrees of the angles are checked, compressed with clamps and left until dry.
For finishing, stain, varnish or wax are used, after which the fittings are installed.
Panel structure
Do-it-yourself panel wooden entrance door is quite easy to assemble. To get a high-quality product, during the work you need to control the corners so that they are straight and the sides are even. The panel door can have a solid or finely hollow leaf. In the first case, low grade wood is used to make the shield. For the second option, a structure is assembled from the same material, only there are gaps between the frame elements.
Related article: Where are fire doors installed?
It is necessary to decide on the manufacturing technology, since you can make a wooden door with your own hands in one of three ways:
- Assemble the harness, inside which mount a finely filled or solid shield.
- Make a shield, then tie it around it and veneer the product.
- Make the shield and frame separately, assemble them into a single structure and veneer them.
The procedure for assembling the door in the first way is as follows:
- For tying, select a beam of a suitable cross-section (for example, 30*120 mm), cut it in accordance with the measurements of the length and width of the web.
- To connect the frame elements to each other, notches are cut out in the end parts of the timber for a “half-tree” or “foot-to-foot” joint.
- Wood glue is applied to the prepared grooves and connected to each other. At this stage, the degree of all angles is controlled.
- After drying, through holes with a diameter of up to 10 mm are drilled at the joints, into which dowels are driven, having previously lubricated them with wood glue.
- When the manufactured shield has dried at the joints, one side of the structure can be lined with fiberboard or plywood. The material, cut to the size of the blade, is laid on a flat surface, and the location of the frame is marked. Those places where the cladding will be connected to the frame are well coated with wood glue, after which the frame is laid and pressed with a press until it dries.
- Next, you can fill the inside of the frame with low-grade wood, timber, and pieces of MDF. The filler elements are connected with wood glue and placed on the lower facing sheet between the beams of the strapping frame.
- The top cladding is installed after the filling layer has dried.
- Finally, milling is performed on the surface of the blade and the end parts of the frame.
How to make wooden doors with your own hands? The answer is simple: it is not necessary to have extensive experience and special education. Making entrance doors from wood is a process that requires a little free time, skill and the desire to make a good thing with your own hands. Spending a few hours will allow you to learn carpentry and save money.
Door assembly
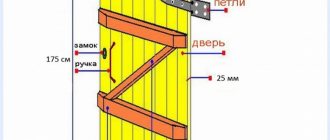
As you may have guessed, we begin assembling the door itself. The frame of which will be assembled from a bar - 40 by 40.
Similarly, we cut the corners of each bar, minus 5 mm. in length and width. That is, the frame of the future door must fit inside the frame, and be several millimeters smaller, for the doors to open and close freely. For me it's 2-3 mm on each side. If difficulties arise, you can look at the size of any interior door.
Hinge thickness and door. I immediately estimate two long bars so that, minus the gaps, I can measure the upper and lower bars. They will be the same...
We measure, cut, check. Excellent - everything is clear!
Opposite bars are the same in size. Almost down to a millimeter. Small errors are allowed. After all, assembling doors with your own hands at home...
Similarly, apply a square and twist the frame:
Let's drill...
Twist it and place it inside the door frame. If a couple of millimeters are missing or the gap is too small, you can recess the screw and carefully plan it out...
The center of the frame was divided using a block, which was also screwed onto screws at the ends.
We continue assembling the door, and inside we mark another block with a thickness of 2 cm. The point is that both sides of the door will be covered with plywood 10 mm (1 cm) thick, and these 2 cm between the plywood, we will lay penoplex of this thickness... Here is a simple assembly of the frame doors... We apply plywood so that they are flush on the outside of the door leaf. Next we drill and screw it on, also using foam...
In this case, I did not use foam, but a sealant that is glued... But you can use foam.
In total, the door frame is ready. This is what it looks like:
Next, the plywood is marked and screwed. The edges also foam to the adjacent bars. That is, plywood is inserted inside the frames:
Next we pen again:
We lay PENOPLEX inside the frame on one piece of screwed plywood (that is, we turned the doors over). We foam all the cracks and apply foam on the outside...
Place the second piece of plywood directly on the foam. This will glue the doors together, and everything will be perfect:
This is what we got...
Doorway or jamb
Homemade doors, if you have the necessary tools, will cost much less than those purchased or ordered from a workshop. The consumption and quality of the material will depend on the functionality of the room and the type of structure being manufactured. A door for insulated rooms will cost more than a simple door for a barn, but still, making it yourself will result in significant savings compared to those purchased in a store. For more complex designs, it is necessary to have some experience and a set of tools.
The front door for a house is a rather complex structure and must be manufactured with the proper quality. In the absence of the necessary experience, it is advisable to purchase it in a specialized store.
For the manufacture of doors, it is necessary to use well-dried material. During the manufacturing process and after final assembly, the product must be coated with protective solutions against moisture. Otherwise, the door will change its size depending on weather conditions.
Coating the door with protective solutions against moisture
To make the simplest door for a summer house, you will need the following tool:
- wood hacksaw;
- electric or manual plane;
- screwdriver or hammer;
- emery cloth;
- meter ruler or tape measure.
Before starting work, you should determine whether the doorway needs to be installed or whether the door can be fixed to the wall. You also need to consider which way the door will open, outward or inward. If the room has wooden walls, in some cases door hinges can be attached to the wall. It is advisable to install a stop on the second side so that the door does not fall in the opposite direction.
Manufacturing should begin with the doorway, if there is a need for it. From a block of the required section you need to cut two vertical posts and horizontal crossbars. When determining the size, be sure to take into account the type of connection of the bars: end-to-end or half-timber. A door made of boards can be made recessed; the outer or inner surface of the door must coincide with the corresponding plane of the doorway. To do this, quarters are selected in the block - special grooves where the door will fit. This operation can be performed on an electric plane or woodworking machine. If you have some experience, the grooves can be cut with a circular saw, precisely adjusting the depth of the cut. It is advisable to plan all lumber before cutting. For planed surfaces, the consumption of protective coating is less. If it is impossible to plan the whole material, you can process cut pieces.
Installing a doorway
With an overlay design, when closed, the door rests on the surface of the doorway.
The blanks for the opening must be connected to each other using the chosen method. For fastening, you can use wood glue, screws or nails. When using glue, you need to wait the required period of time for it to harden. During assembly, it is necessary to strictly control the position of the corners of the structure.
How to make a door leaf without outside help: recommendations
Today, many companies offer door manufacturing and installation services.
As a rule, they are paid separately and sometimes increase the order amount significantly. Few people would want to pay a master for something that can be done well at home. For this reason, enterprising owners try to do some types of work themselves. Thousands of people are thinking about how to cut a door so as not to damage it, and experienced craftsmen are interested in how to make the door leaf itself. Stages of creating a door
Despite the apparent complexity, such work only requires patience and care. Even in the absence of professional tools, they make do with their manual counterparts. It will take a little longer, but the result will be no worse.
Simple door for unheated rooms
Upon completion, you can begin making the door from the boards. The prepared material must be cut into elements of the required length. The number of parts will depend on the width of the door and boards. The boards are laid in the grooves or on the surface of the jamb until completely filled. If there is a shortage of whole boards, it is not advisable to make an insert from a narrower piece. It is necessary to calculate and cut the parts so that the door consists of elements of the same width. Layed boards can be tightened using clamps or wedges. To connect the parts into a single structure, you need to cut out three connecting elements: two cross members and a diagonal. Transverse connections are located at the top and bottom of the canvas in a horizontal position, the diagonal between them in any convenient direction. The shape of the fastening is similar to the letter “Z”. Then the entire structure is fastened with screws or nails. The attachment points should be located asymmetrically, preferably in the shape of a triangle or trapezoid. This will provide additional structural rigidity.
Making a door from boards
Making a door with your own hands is quite simple. All that remains is to fasten the hinges, handles, and, if necessary, the lock or latch. Some of these operations can be performed yourself after installing the product in place.
Classification of insulation
The construction market offers the following types of insulation:
- Felt is processed animal wool. It has excellent properties to retain heat and is absolutely safe for human or animal health.
- Polystyrene foam - it is sold in sheets. Easily cut and fixed on the door leaf. Does not slip, does not absorb moisture. It is both insulation and soundproofing material. Can only be used for insulating metal doors. When installing foam plastic, the gaps are closed with mounting foam or using liquid nails.
- Foam rubber is a soft material. The main disadvantage of this material is that if it is used to insulate a wooden street door (private house), it will soon crumble due to temperature changes. Foam rubber is produced either in rolls or in sheets.
- Mineral wool is a soft insulation with positive characteristics. It has high thermal insulation properties and also creates sound insulation. The material has its drawbacks - moisture absorption. If you insulate the door from the street side, then you need to use polyethylene. When moisture is absorbed by the cotton wool, the door will become heavy, which will lead to deformation and improper operation of the door leaf.
- Isolon is sold in rolls. One of the most expensive materials. The base of the insulation is foamed polyethylene. The disadvantage of this material is the pricing policy. But, given his qualities, this can not be taken into account.
- Polyurethane foam is foam that can be pumped into the door cavity. The hardening time is less than a day. The only drawback of this material is that it is not possible to pump the foam yourself. You should call the experts who will do this carefully and quickly. The insulation retains heat, creates silence, and is not poisonous.
Selecting insulation thickness
The thickness of the material depends on the size of the door. Let’s say if the door is empty inside, then you should simply put insulation there and cover it with the top layer of the door leaf.
If the door does not have voids, then you need to stuff an additional frame on the inside of the door, which is filled with material and then sewn up with upholstery (leather substitute). The nuance here is the fact that the thickness of the insulation should not exceed the thickness of the door leaf.
Door for rooms with insulation
A do-it-yourself wooden door for a heated room (for example, for a bathhouse or a warm garage) can be made from boards 40-50 mm thick. The best option is a tongue and groove floorboard.
Manufacturing begins with the doorway. The sequence is the same as in the previous version. The timber for the opening must be at least 75 mm thick or correspond to the thickness of the walls of the room. It is advisable to make the front door recessed.
For the door, you need to cut the blanks to the required length and fill the doorway with them. The width of the opening must be calculated in advance so that filling occurs in as complete sections as possible. Adjustment in width can only be done using the outer boards.
Door blanks of the required length
The workpieces must be aligned, compressed and secured in the doorway. To connect the structure, you need to make two keys. Dowels are wooden blocks, the length of which is equal to the width of the door. In cross section, the bars should have the shape of an isosceles trapezoid. The width of the base is 40-60 mm, the width of the upper part is from 40 to 30 mm. The dowels can be secured to the door with screws or nails overlay. A more reliable option is to cut grooves for them. To make the grooves you will need:
- hand-held electrified circular saw;
- chisel;
- mallet;
- emery cloth.
Related article: Is it possible to break a door lock?
Grooves are marked on the fixed boards. The width of the cut along the surface of the wooden doors should be equal to the width between the hips of the trapezoid at half the height. You need to set the required angle of inclination on the saw and make two cuts according to the markings. Then the mass between the cuts must be removed using a chisel and mallet. Smooth out any resulting unevenness with sandpaper.
Hammer the dowels into the grooves with a mallet and secure with screws or nails. It is advisable to seal all joints of wooden doors with wood glue before assembly.
Assembling a wooden structure
Making and installing various designs of entrance doors with your own hands is quite easy if you have a little experience working with wood. In the absence of any skills, it is advisable to start with the simplest designs, gradually moving on to more complex and advanced ones.
A warm door is obtained by covering one or both sides of the product with a layer of felt or other insulation.
Manufacturing of paneled sashes
Making a full-fledged panel door at home is quite difficult. Since the elements are joined using grooves, tenons and various cutouts, you will need woodworking equipment - a machine or a circular saw.
To reduce the cost of assembly, make a drawing of a simplified design with two large panels and contact craftsmen who have the necessary machines. They will cut the required parts from the boards, and you will do the assembly yourself.
The technology is similar to the production of frame fabric:
- Fasten the frame from planed boards by placing the tenons in the grooves with wood glue. Place all 3 jumpers - top, bottom and middle, secure the joints with clamps.
- After the glue has dried, the joints need to be reinforced with wooden dowels (round pegs) driven into holes with a diameter of 8 mm.
- Cover the two resulting openings with panels made of any suitable material - lining, 25 mm thick solid wood or laminated chipboard. You can make a glass insert in the upper opening.
- Secure the panels with glazing beads.
When finished, thoroughly sand the finished canvas and seal it with varnish. If you want to darken (age) the wood, it is better to perform the operation before installing the panels. This way you can avoid gaps and light stripes in the corners. Watch the process of assembling a simple panel door in the next video:
Paneled entrance and interior doors
The next most difficult thing to make with your own hands is a paneled wooden entrance door. This type of door is the most common. To work with such a design, in addition to the above tools, you will need:
- electric drill;
- milling machine, stationary or portable;
- grinding machine.
The designs of paneled doors are quite varied. In appearance, they differ in the shape and number of panels; by type they are divided into entrance ones with insulation and internal ones. A door made of solid wood with panels installed in the middle is considered interior or internal. A product with panels installed overlapping on both sides and insulation located between them is considered entrance or external.
Solid wood door with panels
If you need a wooden entrance door with your own hands, how to make it with panels so that it lasts for a long period? For doors of this type, it is important to use high-quality, well-dried material. For the manufacture of the frame and door leaf, it is advisable to select material from hard wood; for internal parts, you can use cheaper wood.
The step-by-step process of making doors looks like this:
- Cut the pieces to the required size. If the dimensions of the source material are smaller than the dimensions of the workpieces, cut several parts for subsequent gluing.
- Treat all surfaces of the workpieces with a plane or sandpaper.
- Glue all the blanks of parts cut into parts. The glue must be applied in a continuous layer to both workpieces and kept in a compressed state for the required time.
- After hardening, re-process the surfaces of the parts and give them the required dimensions.
- In accordance with the chosen design, use a milling machine to cut grooves and tenons on all parts.
How to make a wooden panel if the dimensions of the material are smaller than the dimensions of the product? You need to cut several elements from which you can glue a workpiece of the required size. After connecting with it, you need to mark the required shape and carefully cut it out.
After preparing and checking all the parts, you can begin assembling the product. After assembly is completed, the door must be compressed with clamps or wedges and left until the adhesive has completely cured.
Making wooden doors with your own hands is quite possible. Basic rule: the quality of the product and its service life largely depend on the quality of the material used.
Insulation and sound insulation
Insulation is used to carry out thermal insulation work. With its help, the part of the canvas that is covered with fiberboard is pasted over. If the foam extends beyond the frame, it is cut off with a knife. The finishing material is fixed on top - fabric or leatherette. A stapler is used to secure the material. Read more about this in the article “How to insulate a wooden entrance door.”
Door insulation scheme
External doors made of wood - do it yourself
To begin with, it is worth recalling that a wooden door consists of two main elements: the door leaf and the door frame. In addition to the basic wooden structures, for the normal functioning of the door the following are required: locks, handles, hinges, and metal fasteners.
To make a wooden front door you will need lumber: timber for lining the frame; boards; bars; wide board for the threshold (if provided); platbands. Insulation may be required to insulate the door leaf. You need to carry out work on making a door using various tools:
- roulette;
- construction level;
- hacksaw, set of chisels;
- sandpaper for sanding;
- fastener
Carpenter's glue, fittings, chipboard - these materials should be prepared in advance before starting work on the door.
Advice! When choosing lumber for making a door block, you should pay close attention to the quality of the wood, the presence of knots, the degree of humidity, and geometric dimensions. The wood must be dried, otherwise deformation changes are possible after the door is manufactured.
Features and models
Entrance doors are installed both in apartments and in private houses.
Regardless of the location of this structure, its direct purpose is considered to be reliable protection of housing from cold, noise and burglary. Therefore, when choosing this or that front door model, you need to take into account many nuances. Recently, homemade structures made of metal and wood have become extremely popular, while metal doors are distinguished by their functionality and design features; they are resistant to explosions, burglaries, fireproof and bulletproof. Today there are many types of entrance doors. According to their purpose they are:
- Fireproof and bulletproof. Such products are made of high-strength metal. In addition, these types of doors are additionally treated with reinforcing compounds.
- Shockproof. They are the most reliable option for protecting your home.
- Soundproofing. Prevents noise and sounds from entering the house.
- Sealed. Often installed in outbuildings.
Entrance doors can open in different ways. There are swing and sliding models of structures. In addition, doors are classified by the number of leaves and are:
- Single leaf. Made from solid fabric.
- One and a half. They are a structure consisting of two parts, where only one opens.
- Bivalve. Large doors with two opening leaves.
All entrance doors differ in appearance and shape, so a distinction is made between rectangular and arched products. Designs with a blind transom are also popular.
Panel door panels
These are quite simple structures, assembled from individual boards, equal in parameters: length, thickness, width. After taking the required measurements to determine the dimensions of the door leaf, you should begin preparing the boards for the door. The material is sawed down to the required size and processed with sandpaper. If a panel door made of separate boards is finished with chipboard, then a blank of the required size is cut out of the sheet.
To assemble the door leaf, you should prepare strapping bars - dowels and a strut. The dowels serve to secure the shield assembled from boards and are installed at the bottom and top of the door leaf. In total, you need to prepare 2 keys. The strut is installed diagonally to the door; the part prevents premature distortions and deformations of the door structure.
Then the board blank is sheathed with chipboard, if additional finishing of the door leaf is provided. To hang a door, you need to choose reliable, strong hinges that can withstand the weight of the door leaf and repeated openings of the door leaf.
The assembly of a panel wooden door from pre-prepared boards is as follows:
- The cut and sanded parts are laid out on the floor.
- Using a hammer and nails (screws and a screwdriver), the boards are assembled into a shield, and at the same time the canvas is strengthened with dowels and a brace.
Advice! When assembling a panel door, it is necessary to carry out control measurements using a level and a tape measure.
Panel doors include structures assembled from whole sheets of plywood or chipboard, with a layer of insulation inside.
Chipboard sheets prepared to size, timber, dowels and struts are connected in the following sequence:
- The frame is assembled from beams.
- Dowels are installed along the perimeter of the box, and strut beams are installed diagonally.
- An outer sheet of plywood or internal combustion engine is fixed to the frame, insulation is put inside, the second side of the door is covered with a prepared sheet of chipboard.
- After completing the assembly of the door leaf, hinges are hung on the door structure and door fittings are mounted.
How to make a door frame
Making a box is considered a rather troublesome and time-consuming process, but in fact, doing it yourself is very easy and simple. When all dimensions are known, sawing of the box parts begins.
List of necessary tools for assembling the frame:
- Hammer;
- Chisel;
- Construction knife;
- Roulette;
- Pencil;
- Screwdriver;
- Square;
- Plane;
- Hacksaw.
First, two bars are prepared equal to the height of the opening and two bars equal to the width. All bars need to be sanded from three ends, then there will be the front sides of the door frame. According to the width of the door frame, a gap is made into which the door leaf will be inserted. The gap must be made on the side from which the door will open. If the door will open in both directions, then the gap must be made on both sides. Now, using the same principle, we process the transverse parts. After all the parts are cut out, you need to fit them to each other, and also make slots for installing hinges.
Paneled doors
Paneled doors are more reliable designs of entrance doors, and at the same time they have a high degree of decorativeness. The base of the door consists of high-quality timber, which is called frame. The central part of the door consists of an insert made of wood, plywood, chipboard (the actual panel). The panel insert is strengthened into the strapping grooves, which are provided when cutting the timber.
The panels can be solid or composite, and may have decorative elements or glass inserts. To securely fasten the panel in the grooves, wood glue is used.
To make a paneled door you should prepare:
- timber for strapping posts;
- panel;
- accessories;
- fastener
The tools needed are the same as in the case of making a panel door.
The bars, pre-sawed to size, are connected into a single frame: grooves are provided in the strapping bars to strengthen the panel. Places for strengthening hinges, door handles, and locking devices can be strengthened by installing additional bars.
The assembled paneled part is strengthened in the grooves and fixed with glue. It is possible to strengthen the panel by installing glazing beads, although this method does not guarantee a strong and durable connection. The finished door leaf is hung into the door frame in the same way as a panel door.
External doors with glass inserts – it is allowed to insert glass inserts into the entrance doors. To do this, you should carefully measure the dimensions of the insert and cut the sheet of glass in accordance with these dimensions. To install glass inserts, it is necessary to perform additional strapping of the frame for installing glass, and also use glazing beads to strengthen it.
Having minimal skills in working with wood, you can save a lot of money by making your own front door.
Panel assembly technology
Making frame doors is simple and profitable - little materials are consumed, and defects in wooden elements will be hidden by the outer cladding. Moreover, the inner part can actually be made up of uneven and cracked beams; the main thing is to accurately maintain the dimensions and make a strong frame.
The manufacturing procedure for a panel door looks like this:
- Cut 2 long and 3 short timbers to fit the door frame with a 5mm gap.
- Make a frame from the beams, fastening them together and clearly aligning the 90° angles. The method of fastening is arbitrary: in half a tree, tongue and groove and simply end-to-end with self-tapping screws. The third beam is placed as the middle jumper between the posts.
- Coat the joint with wood glue and let the product dry.
- Cover the frame on one side with the selected material - clapboard, plywood or laminate, screwing it with screws or nailing it.
- Fill the inside of the frame with sound insulation, insulation or other low-quality boards. In the place where the lock is inserted, the frame pillar should be reinforced with an additional block.
- Sew up the other side of the door and install the hardware.
Recommendation. If the cladding is done with clapboards and similar individual elements, it is advisable to strengthen the frame from the inside with bevels. When facing with a solid sheet of plywood, it is not necessary to provide rigidity.
Further cladding is carried out at your request. It is enough to cover the lining with two layers of varnish; the plywood should be finished with laminated fiberboard, plastic panels or other decorative material. How to make a simple panel door with foam insulation, watch the video:
How to insulate?
One of the purposes of the entrance structure is considered to be good thermal insulation, so the canvas should be well insulated. Various technologies are used for this. If the box is made of metal, then first of all you need to fill its internal unused cavity. In this case, it is filled with a special insulating material in the form of mineral wool or polystyrene foam. Also, to keep the door warm, it can be covered with wooden beams. The only drawback of this technology is the formation of cold bridges.
The front door is well insulated with dermantine. With this technology, the door leaf is upholstered on only one side, and a thin layer of insulation is applied to two openings. Thermal insulation is glued directly to the door, and then it is decorated with dermantine or genuine leather.
Equally important is protecting the structure from drafts. There are two ways to do this:
- Insulating the gaps between the frame and the canvas. A rubber or foam seal works well as thermal insulation. It is attached using a self-adhesive base and applied both to the box itself and to the canvas.
- Opening the door frame. The outer and inner sides of the slopes are upholstered, and the gaps between the opening and the structure are filled with insulating material.
If none of the types of thermal insulation are suitable, an alternative solution may be to install a second entrance door.
Installation
First, install the box using polyurethane foam. After hardening, begin installing the canvas. For wooden structures, it is better to choose removable hinges. They can withstand heavy weight and are easy to install. Such hinges are suitable for a barn door, entrance or interior structure.
Adjustment
If the door cannot be closed due to the frame being skewed, you should remove the panel and check the joints of the beams. An angle of 90° must be maintained. If necessary, the box is corrected. When hinges become the cause, the attachment point is deepened or completely changed. The last option is suitable when there is no way to correct the current location of the loops.
Preparation stage
Personally designing or assembling something requires careful analysis of many factors and selection of the most appropriate option.
Material
Considering the organization of production at home, the best option is wooden doors. There are interior models on sale made from different materials - plastics, glass, aluminum - but working with them requires not only experience, but also special tools. In addition, wood has an undeniable advantage - it is able to “breathe”, which has a beneficial effect on the microclimate in the house.
Engineering solution
Interior doors are divided into several types - hinged, folding, sliding (compartment). The models also differ in design - single-leaf, double-leaf, and one-and-a-half-leaf. Some of them have an upper extension - a transom. What is it advisable to focus on? Without professional skills, special tools, or machine equipment, you should choose a swing interior door with one leaf.
These are the most popular varieties installed inside apartments and private houses. If you study the step-by-step instructions for constructing doors of all types, then it is the swing “one-room doors” that are easier to manufacture. In addition, preparing the opening for their installation does not require complex technological operations.
Blade type
- Paneled. The advantage of interior doors in this category is their relatively light weight. The canvases consist of a wooden frame and inserts, which differ in size, material, and shape. The difficulty is that the panels will have to be fixed to it, and for this you need to select quarters in the tree. Even with professional tools (equipment) at hand, independent production of interior doors of this type (if we mean quality) is a big question. To achieve the desired result, you will have to spend a lot of time and material, the consumption of which will be significant, since the volume of rejection will increase.
- Shield. This solution is optimal. The only downside is the weight. But this problem can also be solved if you choose boards of small thickness. Since we are talking about interior doors and not entrance doors, the strength of the door leaf is not a primary factor. But there are many more advantages: ease of assembly, the possibility of any finishing (varnishing, tinting, brushing, lining with plastic, decorative film, natural veneer - different design styles are practiced), high maintainability.
In addition, the door dampens noise well and is characterized by low thermal conductivity. There is another factor that many people overlook. Wood is prone to deformation (it “plays” under the influence of changes in humidity and temperature in the house). A solid door is less susceptible to this than a paneled model, especially if the inserts are made of a different material. For example, glass, plastic.
Lumber
- The type of wood does not play a big role if subsequent finishing of the canvas and frame is planned. You can partially save on this by choosing inexpensive products. But if you decide to make a door from boards while maintaining their texture, then the answer to the question of what to buy is obvious.
- Degree of wood drying. According to SNiP, lumber with a moisture content exceeding 22% cannot be used in construction. When applied to doors, experts advise focusing on 10 - 12. Wet wood will shrink and the structure will “lead.” If the samples are thoroughly dried, then, firstly, they will cost more, and secondly, there will be difficulties with cutting them. In addition, excessively dry wood easily splits, and this will cause problems with fastening fittings and inserting locking devices.
Varieties and dimensions
- Frame. A beam with a side of 40 - 50 mm is sufficient for the frame of the canvas. It is necessary to take into account the installation location of the door, that is, how intensively it will be used. Plus - the specifics of the room at the entrance to which it is installed; Is the door supposed to be equipped with a lock, and if so, what type. The latter fully applies to canopies.
- Canvas. To reduce the weight of the interior door and facilitate the manufacturing process, it is advisable to use MDF for covering the frame. Another argument in favor of this solution is that the slab material (if it is of high quality and carefully processed) is inert to humidity and temperature. If you want to make a door from solid wood, 10 boards with a width of 150 are suitable.
- Box Rarely does anyone leave an old joint in place. If a new door is being assembled, it must be completely complete. When choosing timber, you need to take into account the thickness of the wall (partition) at the installation site. There is no other recommendation for this item other than sufficient strength of the jamb.
The choice of material is largely determined by the door drawing. The interior door leaf is made in different ways; it can be solid, hollow or “cellular”. The last option is called small-hollow.
Door diagram
- Dimensions. The initial data for calculations are the dimensions of the opening. For accuracy of calculations, its width is measured at 3 levels; similarly with height - at three points (on the sides and in the center). It is worth considering that a technological gap of 4±1 mm is left between it and the box around the perimeter. This is the outer contour of the jamb. Provided that the width of the canvas is of decisive importance, then everything else is calculated based on its required dimensions. In this case, the gap between it and the jamb (within 1 mm) is also taken into account.
In practice, it is difficult to make wooden doors with your own hands, without experience, in exact accordance with the specified values, but it is advisable to adhere to these values. And the main thing is the correct shape (rectangle) of the door frame. The slightest curvatures, distortions - and problems with a tight fit of the canvas are guaranteed.
- The direction of opening the canvas. When determining it, the location of the opening in the room is taken into account; The pictures explain this well.