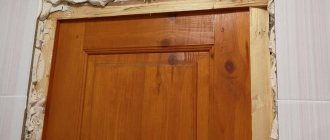
The platbands on any doors have a common important purpose - closing the mounting seams between the wall and the door frame. This design has no other purpose. Without trims, the door functions the same as with them. However, thanks to the platbands, a pleasant appearance of the structure and the room as a whole is ensured. When choosing platbands, you should take into account that not all walls are the same in thickness and you often have to come up with a way out of the situation when the walls are wider than the frame. One solution to the problem is to build up a narrow frame, but such actions significantly spoil the overall appearance. The best way out of the situation is telescopic door frames.
Cashing options: what types of cash are there?
Platbands are decorative strips. They are installed around the doorway. Close the installation gap between the wall and the door frame. It depends on them what the door in the passage will look like. They give the structure a complete look. The set consists of side trim and top trim.
Before attaching platbands to interior doors and entrance doors, you need to understand what types of such products there are. This will help you choose the right version of the plank and install it correctly.
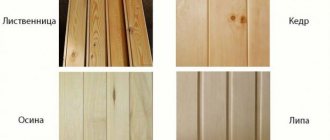
Manufacturers produce products in a wide variety. According to the material of manufacture and features of the strips for interior doors, there are:
- wooden;
- from MDF;
- plastic;
- gypsum;
- ceramic;
- telescopic;
- metal.
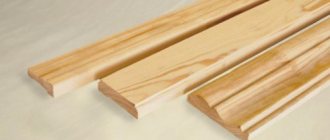
According to their shape, the planks are divided into flat, semicircular, teardrop-shaped, with decorative stucco molding, and figured. These features of cashing must be taken into account before attaching cashing to interior doors.
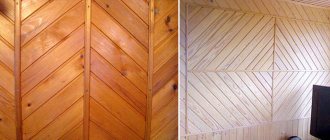
Wooden
Wooden trims are the most common for door blocks. They are characterized by attractiveness, environmental friendliness, durability and reliability. Pine is usually used to make them. In rooms with temperature changes, it is better to use oak or maple options. Decorative planks made of wood are suitable for structures made in different styles. They complement the look of the door. Available in standard and atypical designs. There are smooth, embossed, carved and semicircular products.
MDF
MDF planks are a cheaper analogue of wooden planks. They look like they are made of wood. In terms of performance characteristics, they are no worse than wooden planks, and in some respects even better than them. For example, products made from MDF are not subject to rotting. This has a beneficial effect on their service life. One of the disadvantages of such products is their low resistance to water. MDF planks absorb moisture and swell because of this. Therefore, they should not be chosen for door leaves that are installed in rooms with high humidity levels. MDF planks are mostly produced in flat form. Some products may have slight roundings.
Plastic
Plastic products can be called one of the most practical. They do not fade in the sun and are resistant to high humidity. They do not deform over time. These planks are very easy to maintain: clean with a cloth, water and soap. Plastic products withstand temperature fluctuations well. They are often chosen for finishing doorways in bathrooms and kitchens. Plastic slats are available in different colors and textures. There are options that accurately imitate wood. Plastic trims are inexpensive.
Plaster
Gypsum products are used in rooms whose design is dominated by wall and ceiling stucco. They have an attractive appearance. They are usually made to order seamless. Plaster strips can be painted in the desired color. But they are difficult to attach. Therefore, the installation of plaster door frames should only be trusted to a specialist. Not everyone knows how to install cash on interior doors correctly with their own hands and make serious mistakes. This leads to damage to the planks and inaccurate fastening. Among the disadvantages of gypsum products, it is worth highlighting the low resistance to mechanical damage and the complexity of restoration.
Ceramic
Ceramic planks look beautiful. But they are not particularly popular. This is due to the limited scope of their application. Such products are usually used to decorate doorways in rooms lined with artificial stone. They also look good in bathrooms. They are used to trim the doorway from the inside. They allow you to create an interesting composition.
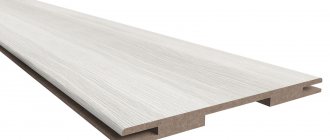
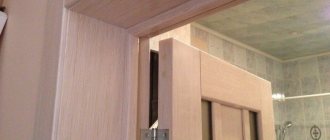
Telescopic
Telescopic platbands are products with a protrusion with a locking connection. They are firmly fixed in the shared grooves of the end surface of the box. Telescopic trims must be fastened correctly. Then they will be practically invisible, and the door will take on a complete look.
Made of metal
Metal strips are usually used for finishing entrance doors. They are installed on the outside of the opening. Sometimes such planks are used for finishing interior doors and passages. They are perfect for interiors designed in loft, minimalism, and hi-tech styles. Metal products are usually made from aluminum or stainless steel. They are resistant to water and mechanical damage. Durable and fireproof.
Manufacturing
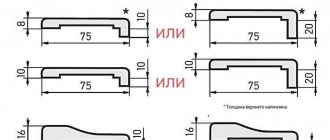
When the material for the manufacture of door trims has been selected and the necessary tools are at hand, then you can move on to the active phase of work on the manufacture of door trims. First, the workpieces are cut to size , which must be determined in advance. Their dimensions are selected individually for each door product. Note that a high-quality result is possible only if there are cutting knives on the machines used for work.
When the door trim is ready, it is sanded. This work is carried out in two stages:
- the first is performing rough grinding using an electric machine;
- the second is manual processing, during which they resort to the use of fine-grained sandpaper.
It should be noted that at the second stage it is necessary to remove circular scratches that occurred when working with an electric machine. When the platband is ready, it is covered with a layer of protective composition.
Required set of tools, materials
Before installing decorative strips, you need to prepare everything you need. The set of tools, equipment, and consumables depends on how the installation is planned. The following materials and tools will be useful:
- miter box;
- hammer;
- screwdriver;
- jigsaw;
- roulette;
- construction square;
- chisel;
- wax and construction pencil.
How to attach platbands
Before installing the trim, you need to do everything necessary to prepare the doorway. If there are defects or transitions of more than 5 mm, alignment is carried out. Otherwise, the bar will move away and a noticeable gap will appear. Due to the curvature, it is also possible that the edges at the junction of the top and side trims may not match. The methods for attaching trim to interior doors are different, as there are different types of fasteners. The most popular are listed below:
- nail;
- fix with liquid nails;
- fasten with self-tapping screws;
- secure with beaks.
The fastening method is selected based on personal preferences, available materials and structural features of the door block. You can also use products with a snap. They are easier to install.
Before installing trim on interior doors with your own hands, it is worth watching a video in which a professional or home craftsman installs the strip with his own hands and draws attention to possible problems. When installing platbands on interior doors, it is necessary to take into account the features of interior structures. First, the upper casing is attached, and then the side products.
How to nail with finishing nails
You can nail the strips to the door frame. But you need to choose the finishing varieties. The finishing nails are practically invisible on the planks. To attach platbands with their help, no special skills are required. The finishing nails should be driven in carefully at a 90 degree angle. If necessary, the finishing nails can be easily removed along with the strips.
Installation with liquid nails
Installing platbands using liquid nails is the easiest way. Liquid nails are applied to the plank. She then presses herself against the door frame. For more reliable fixation, you can additionally use self-tapping screws. They should be selected in increments of 0.5 m.
Fastening with self-tapping screws
The method of fastening decorative strips with self-tapping screws is characterized by simplicity, reliability and low time consumption. Self-tapping screws with a diameter of 6 mm are used. You need to screw in the screws in increments of 50 cm. To attach them to the platband, marks are made and small holes are drilled. Then fasten the bar with self-tapping screws. The hats are recessed. Many home craftsmen have a question about how to install platbands on interior doors if the platbands are made of iron. In this case, metal screws are used.
Fastening with beaks
To secure the slats with beaks, follow the instructions that come with this product. The method is easy to use and does not degrade the appearance of the door block. But it is not suitable for MDF trim. When the beak is removed, such products delaminate.
Using clasps with a latch
You need to know how to install platbands on interior doors with grooves, because the installation of such products is simple and convenient. Telescopic models have a special design. Therefore, there is nothing complicated in attaching them. The elements are connected using the tongue-and-groove principle. The first part is fixed with self-tapping screws or glued on.
Telescopic box assembly process
In order to install the telescopic box you do not need to make any special efforts. Step-by-step algorithm of actions regarding the assembly process:
Reference! The additional strip and telescopic box are assembled separately from each other, and then connected.
- first of all, the box itself is mounted in the opening;
- the canvas is hung on the frame. At the same stage, the presence of gaps is checked;
- the door is being installed;
- They are connected using inflatable foam.
Reference! After the foam has completely dried, its excess must be cut off with a stationery knife.
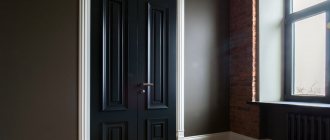
Options for installing platbands on interior doors
On the door frame, the platbands can be joined at a right angle or an angle of 45 degrees. The last option is used most often. Each docking method has its own advantages, disadvantages and features. The choice should be made taking into account the type of decorative strips used.
Docking at an angle of 45
When choosing the option of joining and fastening the platbands, it is better to place them at an angle of 45 degrees. This method will hide the ends of the planks. The design will look better. You need to act like this:
- Cut the side strips at an angle of 45 degrees.
- Place the blanks against the wall.
- Cut off the heads from the nails. Hammer them into a box slightly above the floor.
- Place the strip against the wall at the location of the nails. Tap the surface with a hammer to seat the product on the fastener.
- The upper parts of the products are folded back. A horizontal bar is placed under them. A line is drawn on it at an angle of 45 degrees. Trim off excess.
- The upper parts of the trim and the horizontal strip are fastened with nails without heads.
It is important to understand how to correctly install platbands on interior doors at 45 degrees, because this is often how to properly install the trims.
Docking at an angle of 90
Joining of platbands at right angles is performed with vertical or horizontal seams. The option is chosen at your own discretion. Straight models are used for joining. Attach the planks with glue or nails. The cut areas are treated with varnish or acrylic paint.
Docking at 90: with imitation jumper
This option for installing platbands is chosen to give the interior originality. The vertical strip is cut so that it protrudes beyond the boundaries of the door frame. Attach it with nails or glue. Measure the distance from the edges to the bottom. Cut the side strips to the required length. They are fastened in the chosen way.
Telescopic trims
When installing platbands on their own, many people have a question about how to install telescopic strips. In general, there is nothing complicated. The main thing is to trim the products accurately so that no gaps form. The installation itself consists of inserting the strips into special grooves in the extensions or door frame.
Choosing a repair method
If the platband has moved away from the door (wall), then the situation can be corrected by additional fastening without removing the element or by complete dismantling and subsequent more reliable fastening.
The first option is used when there is a small gap resulting from loosening of the fasteners. To fix it, just tighten the screws tighter or add more fasteners.
In case of a significant defect, repairs are carried out with the dismantling of the platbands. In this case, several techniques are used depending on the type of fastening. When fastening was done using nails (regular or decorative), dismantling is carried out using a knife with a strong, thin blade.
- The blade is carefully inserted into the gap in close proximity to the nail.
- With light pressure, the trim strip is pressed away from the box or door frame. Do not use excessive force, which may damage the element.
- This procedure is carried out evenly around the entire perimeter of the door. You should not try to pull out the nail at once - it is better to make several passes.
When fastening with self-tapping screws, masking of the caps causes a problem. Putty and putty can be removed using sandpaper. After removing the masking, the screw is simply unscrewed with a screwdriver or screwdriver.
A special approach is required when fastening with liquid nails (glue):
- To begin with, the attachment point is heated with a hair dryer, which softens the glue.
- Next, using a knife, the plank is carefully, gradually torn off from the base.
If you don’t have a hair dryer, you can use the mechanical method:
- To do this, a hacksaw blade for metal is carefully inserted into the resulting gap.
- The adhesive layer is simply sawed through with care.
- After separating the casing, all remaining adhesive must be completely removed with sandpaper.
Important ! In case of significant deformation and damage to the casing, repairs involve dismantling it and replacing the element with a new strip.
DIY installation: step-by-step instructions
It is not difficult to install the platbands yourself. You need to act wisely, taking into account the rules and nuances of installation. The most commonly used are plastic and wooden planks. The order in which they are installed will vary.
Plastic
The installation of plastic strips has its own nuances. Installation is carried out as follows:
- Measurements are taken and markings are applied to the mounting profile.
- The workpieces are cut at an angle of 45 degrees. To do this, use a power saw or grinder.
- Fasten the mounting profile to the wall with self-tapping screws.
- Measure the facial profile. In this case, the thickness of the connecting elements is taken into account.
- Vertical strips are cut at an angle. Fix them on the mounting profile.
- Connecting elements are inserted into the ends of the vertical cut products. A horizontal board is sawed off on one side and inserted into the profile. Mark the place for cutting the second end.
- Cut the front profile at an angle of 45 degrees. They put him in his place.
Wooden
Wooden frames are most often used. Their installation is carried out according to the following algorithm:
- Clean the surface of the doorway from the mounting foam with a knife.
- Indicate the places where the planks are attached.
- Vertical strips are applied to the marks and marks are placed on them for cutting. Saw off at the desired angle.
- Vertical trims are attached.
- Apply a horizontal strip, mark the cut points, cut and install.