Replacing interior doors always leaves behind a damaged doorway. Previously, it was sealed with plaster mortars, and then painted or wallpapered. Today they have abandoned this practice and started using extras. Their installation does not require special knowledge or expensive tools and is completed quickly. The result of this work: very beautifully decorated walls around the door frame.
Even a professional in his field will not be able to perform even a simple technological operation without knowledge of its features. The same goes for extras. Therefore, for beginners, let’s talk about how to properly install extensions on an interior door.
Why extras
When choosing the type of finish, first of all look at the following characteristics:
- issue price;
- how practical;
- how it fits into the interior design concept;
- Is it possible to do it yourself?
Additional strips fully meet the above requirements:
- a set for one door with a budget option will cost only 500-600 rubles;
- easy to clean;
- serve for at least 10 years;
- fasten easily and quickly - installation can always be carried out by the owner of the premises;
- installation technology occurs without “wet” and dirty processes;
- look impressive, bringing into the interior elements of solidity and fundamentality (cheaper options) or wealth and respectability (expensive, made from natural materials);
- a huge selection of sizes, designs and types of materials from which they are made;
- serve as additional protection for the door frame from distortions;
- have high mechanical strength - it is quite difficult to damage.
Choice of equipment
Stores offer several configuration options that affect the speed and complexity of installation:
- door leaf, to which you will have to select everything else (frame, trim, hinges, handle, lock, extensions);
- canvas with box, ready for assembly and installation;
- complete unit with box and hanging hinges.
- door leaf, frame and trim.
Types of interior doors Source domstrousam.ru
The options differ in price; if you want to save money, it is better to purchase all the parts separately, and if you want to do everything faster, then it is better to buy a ready-made block.
Having chosen the models, you need to decide not only how to install the door, but also when to do it.
Types of extensions for interior doors
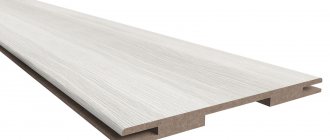
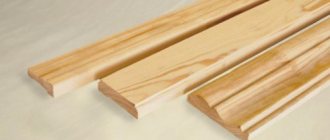
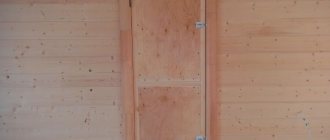
Door trims are small strips made of solid wood, laminated chipboard, MDF or plastic (PVC), which cover the ends of the walls of the doorway. They are used only if the width of the wall is significantly greater than the thickness of the door block. They are two vertically installed boards, on which lies a third one at the top of the door.
There are several types of accessories available for sale.
Regular (no edge)
The simplest type of addition is a plank made of chipboard or MDF laminated with a protective film or covered with veneer, but with an open edge - there is no cladding along the entire perimeter. Many experts believe that it is not needed there (a waste of money), since all the ends will be closed during the work: on one side with a door frame, on the other with a platband. In principle, this is how it is.
However, when doing the work yourself, the slightest distortion when attaching the platbands, even by a couple of millimeters, will reveal a gray, untreated piece of trim that will hurt your eyes. Therefore, on the side of the casing, it is better to glue an edge tape matched to the color of the surface of the additional strip. You need pennies to buy it, but you can glue it with a simple iron.
This problem looks a little different in doorways to the kitchen, bathroom and toilet. Here, the open edges actively absorb moisture, which can lead to swelling of the MDF or chipboard planks. Therefore, the question of the need to seal the edges of the trim along the entire perimeter should not arise here.
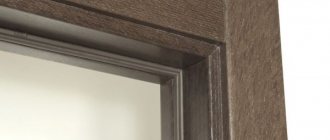
With edge
When the end of the additional board is closed at the factory, we have a second type of additional board - with an edge. Here, the same material is used for cladding, which eliminates discrepancies in the color and texture of the end with the surface.
Telescopic
The word telescopic immediately brings up associations with the words telescope and retractable. However, in relation to extensions, it is neither one nor the other, which, by the way, causes bewilderment among people who come across the phrase “telescopic extension” for the first time. They do not understand how the board can extend or stretch.
In fact, the word telescopic began to be applied to the extension after milling a groove in it for fastening the platband. Therefore, the platbands with a tenon (ridge) for connecting to the additional board also became telescopic.
Attention: when purchasing telescopic extensions, you should remember that the trims with the door frame must also be telescopic. Otherwise, you will have to remove the tenon from the extension with a plane.
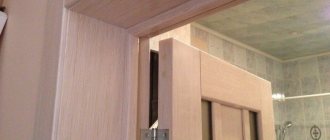
Combined
The latest type of addition appeared several years ago. It is an extension combined with a platband into one whole. This is very convenient for small wall thicknesses that need to be covered (decorated). The wide partition significantly limits the use of such types of additions.
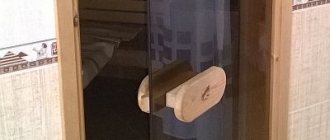
Attaching the handles
Handles and latches are installed in the center of the door, that is, at a distance of 1000 mm from any edge.
- Use a simple pencil to mark the end. Using a square, draw a line at the end and extend it to both sides of the canvas. Mark a hole for the handle square.
- The latch is applied for measurement to one of the sides of the door so that its central axis runs along the drawn line, and the strip is flush with the end.
- A mark is placed on the door leaf exactly in the middle of the square hole. Using this mark, make a hole for the square of the handle. Use a 16-24 mm feather drill. Start drilling on one side of the canvas at a right angle. As soon as the tip of the drill appears on the back side, drill a counter hole right through.
- A hole is drilled deep into the end in the center according to the depth of the latch. Use a feather drill, the diameter is selected according to the width of the latch.
- A latch is inserted into the resulting hole and the bar is traced. In order not to damage the veneer in adjacent areas of the canvas, cut along the intended border with a knife and remove a piece of veneer.
- Make a sample for the bar. Install the latch and secure it with self-tapping screws.
Then install the handles:
- The slot in the square should go under the locking screw of one of the handles.
- Hold the handle on the square using a hex wrench and tighten the locking screw.
- Place the square in the latch slot.
- Place a second handle on the opposite end of the square and tighten the locking screw.
- The handles are secured with self-tapping screws and decorative elements are put on.
The mating part of the latch is installed after installing the box, hanging and aligning the canvas. To do this, mark the middle of the latch on the false beam, and then make a recess. Insert and screw the mating part.
To install interior doors without a threshold, you will need certain skills. However, having studied the instructions and prepared, you can cope with the task yourself. If you need to install several doors, then with each new installation you will gain experience and skill, and the quality of work will increase.
Required materials and tools
Installing extensions on interior doors with your own hands is one of the simplest construction operations. However, its implementation is impossible without the necessary materials and a set of simple tools. Materials purchased:
- additional boards made of MDF or other materials with a length of at least 2.1 m, width - 7-25 cm, thickness - 6-30 mm. Specific dimensions depend on the width of the slope and the thickness of the door frame. If you plan to make the extensions with your own hands, then you need to buy boards or pieces of MDF (chipboard) of the same size as the finished extensions;
- drywall;
- foam;
- self-tapping screws (small nails or glue);
- construction tape;
- putty.
The given list of materials is universal, for all possible methods of finishing slopes. The specific shopping list depends on the chosen technology for attaching the board to the door frame or wall.
Most of the necessary tools are available in the household. As a last resort, you can borrow them from friends, acquaintances, neighbors, or rent them. You will need:
- jigsaw - for adjusting the trim strips to size. You can also use a hand saw with a fine tooth so that the cut is without burrs or a grinder with a special cutting wheel. If you have a circular saw, there is no need for the above tools;
- milling machine for making a groove in the box and forming a tenon in the extension. But this is the case when “you can’t spoil the porridge with butter,” which means: you can do without this tool;
- clamps - needed only when the only cutting tools available are a grinder;
- plumb line;
- level;
- roulette;
- construction corner;
- hammer;
- plane - will be required if the wall has a blockage of more than 5 mm;
- pencil, construction knife with replaceable blades.
Clearance requirements
The gap between the door leaf and the top crossbar, as well as the side vertical bars, should be 3 mm.
The bottom gap depends on whether the door is installed after laying the flooring (laminate, linoleum, carpet, etc.) or before. In the first case, the gap between the leaf and the door leaves 10-15 mm. If it is intended to lay a covering, then the thickness of the material is added to the specified value.
It is necessary to leave gaps between the frame and the opening. Here wedges will be inserted to level the box and polyurethane foam will be laid.
In modern houses, builders take into account the size of the doors when making openings. In old buildings, openings may be of non-standard sizes. In this case, too wide ones are bricked. If the size of the opening is slightly less than the required size, use a plane to cut off the outer part of the counter beam. The hinged beam should not be made too thin, since it bears the weight of the door hanging on its hinges.
Preparatory work and calculations
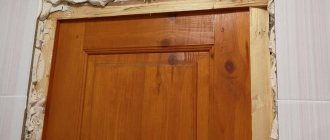
The preparatory work before installing the extensions comes down mainly to taking measurements of the opening. The only exception is a large gap between the wall and the frame or a crooked end of the wall. In this case, partial plastering of the slope is performed either to reduce the gap or to level the opening.
To determine the size of the additional strip, you first need to take measurements of the end of the wall, and then calculate the parameters of the extension. The work is performed in the following order:
- using a tape measure and a construction angle, measure the distance from the box to the plane of the wall (when working with one ruler, there will be distortions due to the angle between the surface of the wall and the box). Measurements are taken at least 4 times vertically and 3 times at the top;
- the width of the extension and the number of planks are calculated if the wall is wide. It is advisable to take the planks a little wider - you can always adjust them with a plane.
For information: the most meticulous ones check the results of calculations using the “Pythagorean triangle” method, which, in the opinion of the editors, is unnecessary when doing work with your own hands.
Box installation
The assembled box is mounted in the opening strictly vertically, using a level and plumb line. At this stage, you will need pre-prepared triangular wedges. With their help, they level the box by hammering it deeper or replacing it with a more suitable wedge.
- On the hinge beam side, the wedges must be installed at the level of the hinges, where the box will be fixed to the wall. This is where the wedges will remain.
- On the opposite side, a wedge is placed in the upper part.
- A small amount of polyurethane foam is laid on the side of the room. The foam is placed behind the counter beam in sections so that the beam can be adjusted after the door is hung.
Instructions for installing accessories
In practice, the extensions are attached:
- in the groove (telescopic);
- on small carnations;
- on foam;
- on self-tapping screws.
In addition, some professionals prefer to attach the extensions to a box that has not yet been installed.
Into the groove
The simplest method of attaching extensions is in a groove. This means not only the telescopic system, but also the quarter selected in the box. The presence of a quarter (but not a telescopic groove) allows you to move the extension deeper into the box or, conversely, push it outward to find the most optimal position for the extension strip. The installation process includes the following operations:
- The panels are cut to size using a jigsaw or other cutting tool. However, two points should not be overlooked:
- the top plank is laid on the vertical panels of the extension (when assembled it forms the letter “P”), and therefore its length should be greater than the thickness of the vertical planks;
- When marking the width of the extension, you need to take into account the size of the groove.
After cutting, the edge should be perfectly smooth so that there are no gaps - not very beautiful and drafts. This is achieved using a plane;
- the top bar is wound up at a quarter. Using a level and wedges, it is leveled horizontally, after which it is glued to the wall and box with construction tape;
Attention: the telescopic system is assembled as a construction kit. To ensure the stability of the door block, the ends of the additional boards are placed on PVA glue (the best option) or “liquid nails”.
- side panels are installed. Using a system of wedges and spacers, they are fixed inside the opening. The remaining cracks are foamed with polyurethane foam.
Important: when working without spacers, only with wedges and tape, foaming is carried out in stages so that the expanding foam does not squeeze the extensions into the middle of the opening.
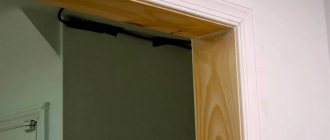
The work is completed by removing the exposed foam and installing platbands.
On carnations
Now let’s look at how to install fittings on an interior door without a groove. In this case, installation can be done using small nails, screws and foam. The first operations are the same for all fastening methods:
- additional strips are cut to the required size. There is no need to add width, since there is no groove (quarter);
- the cutting areas are trimmed with a plane;
- The edge tape is glued to the prepared ends - under a hot iron, the glue on the wrong side of the tape melts, ensuring reliable adhesion of the edge tape to the additional board.
Then the technologies diverge. For fastening with nails, small nails (halfway) are driven into the ends of the extension from the side of the box in increments of 200-250 mm. If additional glue is used, then 3 pieces are enough for vertical posts, and one for horizontal posts. The caps are bitten off with pliers at an acute angle.
The side strips are installed close to the frame, after which they are nailed to the door block with a hammer (with nails nailed to the frame). It is necessary to nail it evenly, otherwise skew may occur. The process ends with the installation of a horizontal board: they are placed on the nailed boards, the corners and horizontal are checked, and then they are nailed with a hammer.
Self-tapping screws
After bringing the extras to size (as in the previous example), they are placed close to the box. A hole is drilled on the back side of the door block using a screwdriver or drill so that the drill goes a few centimeters into the additional strip. The diameter of the drill should be 1 mm less than the size of the fastener. After drilling all the holes, the extension is attached to the box with self-tapping screws. Their heads will then be hidden by platbands.
You can do it another way: drill through the additional strip, which is more difficult.
On the foam
The sized extensions are placed close to the box. Using wedges, spacers and construction tape, they are aligned vertically and horizontally. The gap left is filled with polyurethane foam - an ideal adhesive.
Box assembly
The door frame bars are fixed together in several ways:
- At an angle of 90° . When connected at an angle of 90°, the beams are fastened together with screws at right angles. It is necessary to remove (cut out) part of the protrusion at the place where the vertical beam and the crossbar are attached; a kind of groove is obtained.
- I washed it down at 45° . The upper edges of the vertical posts and both edges of the horizontal strip are filed at a strictly 45° angle, and then connected at the upper corners of the box.
- Tenon connection . The tenon joint is durable. But due to its complexity, it is used very rarely.
The most popular and aesthetic way of fastening is at 45°.
Before assembling the box, you need to take careful measurements:
- The length of the vertical bars on the inside is calculated by the formula: door leaf length 2000 mm + floor covering thickness 30 mm + bottom gap 15 mm + top gap 3 mm = 2048 mm.
- The width of the top beam on the inside is equal to the width of the door leaf + 6 mm (3 mm for gaps on both sides).
The length of the false and loop beams may differ if there is a difference in floor level between the sides of the doorway. Therefore, before cutting the beams for the box, you need to measure the level.
When using a laser level, marks are made on opposite sides of the opening and the distance to the floor is measured from them. When the floor is lower on one side, this difference is added to the length of the beam. If you do not take this point into account and make the racks the same height, then the door will warp during installation.
Craftsmen recommend first making a cut in the upper part of the beams at an angle of 45°, and then cutting the lower edge to the required length. This is done so that if the cut is unsuccessful, it can be repeated below. If the beam is already shortened, then it will not be possible to correct the defect.
A 45° cut is made either on a miter saw, setting the platform to the desired mark, or using a miter box and a hacksaw. On the vertical elements, one cut is made in the upper part, on the horizontal bar - two cuts.
For convenient connection of parts, hidden holes are made (recesses where the screws will be hidden). Then, using a drill whose diameter is smaller than the diameter of the screw, holes are drilled. They are directed at an angle of 90° to the cut. Two recesses are made on the side posts, and 1 in the middle on the top posts. Thus, the fixation will be with 3 screws - 2 of them on the side of the vertical posts, and 1 on the side of the horizontal.
To level the box, the beams are laid on a horizontal surface and twisted. It is important to ensure that the elements do not move relative to each other.
For convenience, before attaching the loop beam to the crossbar, the location of the loops is marked on it and selections are made for them.
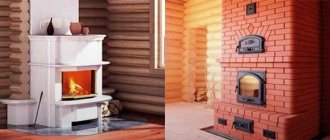
How to make planks with your own hands?
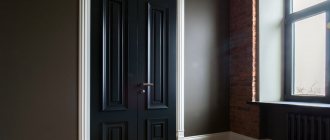
These strips are installed to maximize the perimeter of the doorway. They consist of two vertical supports with one horizontal bar. Such a modification is needed in two cases: if the width of the door frame is smaller than the wall, or simply to frame the opening and design the slope. They often come complete with a door block and have a not at all complicated design, which means you can try to make them yourself. Moreover, this skill will come in handy on the farm more than once. They are made from different materials, such as MDF, fiberboard, metal, wood, which allows them to fit any furniture, wallpaper, or interior.
Material for door extensions Extensions are a good alternative to other ways to modify an opening. Their installation takes place in the shortest possible time, and for installation there is no need to use substances with water, which will reduce the likelihood of significant shrinkage of the wood around the door. In addition, these elements do not require frequent repairs. You can purchase designs in a store or make them yourself. Especially if you plan to use wood for cladding. To make them, you first need to decide on the product components and dimensions. The width of the plank is calculated very simply: take the thickness of the wall, subtract the width of the box and add the dimensions of the fastenings. The simplest extensions are made from straight boards. You just need to buy the material, cut off the excess from it, and adjust the connections for the fasteners. A groove mount would be best. On the front side of the board, mark the contours for cutting. Using a router, chisel and drill, cut down unnecessary material. Then sand the surface with sandpaper. We make a tenon on the wrong side; to do this, you need to remove the wood from the marked mark. Now about aesthetics. To obtain the required shade, you will need a stain, which will also protect the material from aging. Then you should varnish them several times or paint them in the desired color. If the structure needs to be installed in a bathroom, then the coating must protect against high levels of humidity.