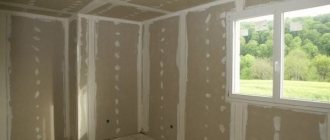
The desire to decorate a log house from the inside with sheet material can hardly be classified as a tradition. It doesn’t often occur to owners of country bathhouses, which are enchanting with their folk-like folded crowns and wonderful wood structure. However, there is still a point in constructing a flat plane of bath surfaces. For example, covering log walls with plasterboard will provide the opportunity to decorate a washing room or shower with tiles. Ceramics will protect the log house from the intense effects of alkali, evaporation and water, but to lay it on top of the logs you need a rigid and even base, which is easier to build from durable sheets.
The catch is to find a method according to which it would be possible to make two qualitatively different materials work for the common good. Drywall has a constant size. But log houses are characterized by instability of geometric data. A couple of years after construction, the log structure will actively decrease in height:
- a hand-hewn log will settle by approximately 15 cm;
- rounded lumber approximately 10 cm.
These are really approximate shrinkage figures, the adjustment of which is influenced by too many side factors, such as the height of the building, the season of harvesting and construction, the initial moisture content of the logs, the weight of the roof, etc.
More or less systematic information about the size of lumber shrinkage can be found in GOST number 6782.1-75, but in practice they rarely coincide with actual readings. Therefore, it is recommended to leave the laid crowns alone for at least a year, but better for a full two years, and then cut openings in the log house and carry out finishing.
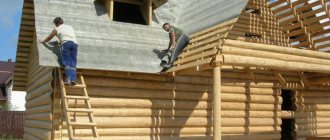
It is worth noting that any structure made of wood needs time to shrink. Even laminated timber will show its “wooden” character. Albeit not as quick as a log hewn in the old-fashioned way. And upon completion of the active shrinkage process, the log houses will react sensitively to increasing levels of atmospheric and operational humidity, either increasing in size or shrinking. There will be no end to the movement of wood, unlike the stable solidity of drywall. It's unshakable, but these two disparate materials need to work in tandem. What needs to be done to unite them?
- 2 Construction of a frame from wooden blocks
- 3 Installation of a metal frame on a wooden sheathing
Installation of a metal frame on a wooden sheathing
This method will consume more space and money, but will surpass the previous option in terms of reliability. In addition to the gypsum fiber board itself and the timber for the sheathing, you will need a galvanized profile designed for installing plasterboard sheathing. The timber can be purchased in one size, because the wooden sheathing constructed from it has a slightly different function. According to this scheme, the preliminary wooden frame is rigidly attached to the frame. But the metal frame system will be attached to the preliminary wooden sheathing with sliding fasteners, allowing the wall to move.
Algorithm for constructing a double frame for plaster covering:
- Vertical wooden posts are rigidly attached to the log wall. The step of their installation is 59-60 cm. As usual, the beginning of the work will be the installation of the outer posts, between which a cord is stretched for reference. It is not very easy to ensure a tight fit of the timber to the log wall. To do this, you need to either modify the surface of the block adjacent to the logs by chipping, or fill the voids between the stand and the log with a sand-gypsum mixture. To make homemade putty, first plaster is diluted and kneaded to a dough-like consistency, then sand is added to it. The composition sets in 5 minutes; you should not prepare it for more than a liter.
- The position of the vertical elements is constantly controlled by a building level or plumb line. The entire subsequent process as a whole and the result of efforts will depend on the correctness of their installation.
- We screw horizontal strips to the vertical parts of the frame using fasteners with oval grooves. The installation step of horizontal elements is 40 cm.
- We “divide” the horizontal planks with a hacksaw into two or three independent sections. The cutting lines must be removed from the attachment points of the vertical and horizontal slats.
- We install the upper mounting beam at a distance of 2-3 cm from the ceiling. We will then screw a metal guide profile for GVL to it. We use fasteners with oval holes, screw in the screws without fanaticism.
- Having “raised” 1-1.5 cm above the floor plane, we mount the lower fastening beam using sliding fasteners.
- We screw the galvanized profile to the upper and lower beams.
- We mark on horizontal slats, then install vertical metal profiles in increments of 40 cm.
- We install plasterboard sheets on the prepared double base, taking into account the above rules for fastening gypsum boards.
For those who doubt the reliability of the structure, slats can be nailed along the edges of a plasterboard false wall.
The described methods of covering log walls with plasterboard will allow the log house to move freely without causing damage to the finish made on top of the rigid false wall.
Reinforcement and puttying
A wall or partition covered with plasterboard is not yet ready for finishing: the heads of the screws and the seams between the sheets must be hidden with putty. In addition, the seams and outer corners of the walls need reinforcement and reinforcement.
To reinforce the seams, serpyanka - a self-adhesive fiberglass mesh with a cell size of about 2 millimeters. It is glued along the seam, after which it is filled with putty directly through the mesh cells. You have to putty at least twice: gypsum putty gives a small but quite noticeable shrinkage when drying.
Reinforcement of the seam between sheets with sickle tape.
External corners are reinforced:
- Galvanized perforated corner profile;
- Plastic profile with mesh.
The corner is sunk into the putty applied to the corner, after which it is covered with another layer of it.
The corner profile will be completely closed when the wall is puttied.
However: I prefer to use a decorative plastic corner glued with silicone sealant after puttying and painting to protect the corners.
The photo shows a corner of the partition protected by a decorative plastic corner.
What putty should I use to level the surface?
The most common gypsum putties in Russia produced by the German company Knauf are HP Finish and Fugen. However, I liked the cheaper and less common ABS Saten : the mixture lives noticeably longer (at least 45 minutes versus 25-30 for Knauf products), if necessary, can be diluted with water (which increases its life time to an hour or more) and does not lumps during mixing.
Finishing gypsum putty ABS Saten.
How to prepare putty correctly?
- Water at the rate of 1 liter per 1.6 kg of dry gypsum mixture is poured into a wide bowl (I use a plastic paint bucket);
- The mixture is poured into water, distributed as evenly as possible over its surface;
- After 3-5 minutes, the swollen putty is mixed - manually (with a spatula) or with a mixer attachment for a drill.
How and with what to properly putty seams, corners and screw heads?
- The caps are covered with two movements of a spatula 10-12 cm wide, crosswise. The first sliding movement fills the recess with putty, the second (“scraping”) removes its excess;
- The seams are also filled with cross-shaped movements of the same spatula. In this case, the seam is filled with putty as tightly as possible. Cavities in it increase the likelihood of cracks. In the second pass, the seam, together with the serpyanka reinforcing it, is covered with longitudinal movements of a spatula 30 - 35 cm wide;
Puttying with a second pass should completely hide the texture of the reinforcing material.
- To align external and internal corners, it is better to use special corner spatulas.
After filling the seams and masking the heads of the gypsum board fasteners, they are often puttied over the entire area. A layer of putty about a millimeter thick completely masks the seams and does not allow the base to show through the paint.
The next stage is grinding . GKL is sanded with grids No. 80 in the first pass and No. 120 - 160 in the second pass. It is better to sand in bright, oblique lighting, which will highlight the slightest irregularities due to the shadows they cast. I use an inexpensive oscillating sander for sanding.
Vibrating sander with attached sanding mesh.
By the way: if necessary, intermediate sanding can be performed after filling the seams and sealing the screws. Its necessity is determined only by the condition of the surface.
The smooth surface of the gypsum board is dust-free (I clean it of dust with a regular broom) and primed with penetrating acrylic primer. The primer will stick the remaining dust and improve the adhesion between the surface of the drywall and the final coating - paint or wallpaper.
Deep penetration acrylic primer from Ceresit.
Wallpaper can be glued immediately after the soil has dried, but painting will have to wait at least two weeks after puttying. If you hurry, the seams will show through any number of layers of paint due to the moisture that has not completely evaporated.
How to properly cover walls with plasterboard in a wooden house
If the interior walls of a wooden house do not look like they should be left untouched, you should think about covering them. A variety of materials are used for this today, but drywall is still considered one of the popular ones.
This is due to the fact that the sheet material does not allow for wet work, and immediately after interior finishing of the walls, you can proceed to decorating them. Before covering the walls of a wooden house with plasterboard, you should choose the right material and also become familiar with the technology for carrying out the work.
Let's sum it up
As can be seen from the above, if you follow some basic rules and general knowledge of the sequence of actions, it is quite possible to make a frame for the subsequent installation of drywall on it with your own hands. This fairly simple job will be better and easier done if it is done by two people, or if you use additional equipment, such as a drywall lift. With this simple device, you can prepare them yourself or buy them ready-made. With its help, not only the ceiling plasterboard is attached, but also the upper markings and fastening of the guide profile to the ceiling are carried out.
Frame structure
The number of frame elements is calculated taking into account the fact that the distance between its vertical and horizontal parts must exceed 400 mm, and also that the perimeters of door, window and other openings must be framed by frame elements. Let’s calculate how many linear meters of elements are required to assemble the frame.
If, nevertheless, a decision is made to make a wooden frame from slats, it should be taken into account that along the perimeter plasterboard sheets are attached to slats with a cross-section of 80 x 25 mm (two adjacent sheets are fixed on one such slat), and intermediate ones are used with a cross-section of 40 x 25 mm .
What profile is needed to build the frame?
- Rack profile (PS). It has a U-shaped structure. The rear plane of the profile is called the “back”. Its size can be 50, 75, 100 mm. The side ribs, which are called “shelves,” have longitudinal grooves. Their size is 50 mm. This profile is used to create vertical posts on which the guides are attached.
- Guide profile (PN). The width of its base or “back” is the same as the rack - 50-100 mm, and the “shelves” - 40 mm. This profile serves as a kind of frame for the future wall structure. It is attached to the floor, ceiling or above door and window openings transversely to the pillar guides.
- Angular profile (PU). It is made of perforated metal and has an 85 degree angle. Designed for corner joints, both internal and external.
- Arched profile (PA). Used for building bent structures and building arches.
All profiles are available in lengths from 2.75 to 4 meters. This is due mainly to consumer demands. If a larger length is required, then the existing dimensions are spliced using a special coupling called a “crab”. To install the entire structure, you will also need hangers.
Construction of a brick partition
How to make partitions in a brick bath? This material is quite common and is often used for the construction of buildings in the bathhouse.
The construction is made using half-brick spoon masonry.
To make work easier, some specialists use hollow material.
Preparatory procedures
Before starting work, you need to carefully prepare the surface. The plank covering is removed from the floor to the very base, after which it is cleaned with a wet broom. The place where the construction will be carried out is equipped with good lighting. All foreign objects are removed from the premises and the outlines of the building are outlined.
To work you will need to prepare the following tools:
- level;
- sander;
- trowel;
- plumb line and rule;
- cement-sand mortar. For more information about the construction of a partition, watch this video:
Creating a partition
The process of erecting a brick partition consists of the following stages:
- A string is stretched and used as a guide. The solution is laid and leveled using a trowel. The level checks horizontality. You will need to wait until the solution begins to dry.
- Another layer is applied on top of the dried mixture. After which the first row of brick screed is laid.
- The mortar is applied to the end of the first brick, after which it is laid by pressing down. It is tapped and leveled according to the string; the remaining mixture will need to be removed immediately before it has time to dry.
- If an opening for a door is planned in the partition, it will need to be positioned first. The door frame is installed using spacers. The evenness of its location is checked and, if necessary, this parameter is adjusted.
- The brick is laid close to the box. To tie the partition together, special metal strips are used; they are folded and attached to the side surfaces between the bricks. Instead of strips, you can also use reinforcing rods.
- After laying the first row is completed, the brick is divided into 2 parts with a pick. One half is used to start the second row. The string that served as a guide is moved higher so that you can easily navigate. Laying the third row is carried out in the same way as the first. For more information about the process, watch this video:
Building any kind of partition between the steam room and the sink is a rather labor-intensive procedure.
Not every beginner will be able to do this kind of work on their own.
But, as a result, this will ensure a high level of comfort in the bathhouse, which is why the construction of such elements has recently become popular.
Also useful for repairs:
- How to knit a hat and snood with braids
- Diamond cutting wheels for metal
- DIY flowers in a dhow
Some additional nuances
The rest of the profiles can be placed inside the main frame, closer to its middle. This will make the structure more reliable and will allow various interior items to be attached to the locations where these scraps are located.
When insulating the under-frame space, it is better to use insulation in slabs, since it has sufficient density for vertical installation and will not sag during operation. If it is not possible to buy exactly this type of thermal insulation material, then you can use the rolled version. In this case, it will have to be rolled out onto the wall before the frame is assembled and secured using plates and dowel-nails directly to the wall. This point must be taken into account before installation work begins.
How to choose the right materials
When selecting materials for finishing a house made of timber with plasterboard, several fair questions arise:
- Is it possible to attach drywall directly to wooden walls inside the house?
- If you use a frame, can it be assembled from wood or should you prefer a metal profile?
- What type of drywall should I use: wall, moisture-resistant or fire-resistant to improve fire safety?
The answers to these questions will determine the further choice of material, as well as the techniques for finishing a house with plasterboard.
Frame or frameless methods
The frameless method of mounting plasterboard sheets to the wall surface is simpler and faster, but requires compliance with many factors.
And in this case, laying communications becomes much more difficult. For example, you will have to directly drill the supporting structures for the wiring.
Metal or wood
In timber houses, both wooden slats and metal profiles can be used as frame material. Moreover, in the first option, it is permissible to build a simpler structure by attaching the beams under the gypsum board directly to the walls (again, taking into account differences). But the quality of lumber must be at a high level. Only wood that is well dried and treated with protective compounds is used. The cross-section of the racks of such a frame must be exactly 50×25, the same criterion for the crossbars, but the guide bars are no less than 75×25!
Mounted wooden frame under plasterboard in a timber house
The process of attaching wooden frame posts
Metal profile types are also suitable for use in wood construction. With their help, you can build a solid foundation that is resistant to influences such as humidity and temperature changes.
Choosing timber for sheathing
If you decide to assemble a frame for drywall made of wood, then you need to approach the choice of material very carefully. The list is as follows:
The wood must be very well dried. In most cases, you can only buy raw timber at the sawmill, which you will have to dry yourself
The ideal option is considered to be a maximum moisture content of the construction timber of 14%. Each lath and beam must be inspected for defects: uneven and knotty material will create problems during assembly or sheathing. It is important that the lumber is of the same cross-section. For guides and frame posts, you can use the same type of timber 50×50, 40×40, 50×40 mm and others
It is advisable not to use smaller widths, because sheets of plasterboard will be joined and secured with self-tapping screws on the racks.
After purchasing the material, all slats need to be inspected again and treated with protective impregnations or at least painted
This will protect the forest from moisture penetration. It is important to remember that the timber and slats must be stored in a horizontal position, otherwise, over time, vertical storage will result in curved racks
The main mistakes made when covering walls with plasterboard
To get a good result and an even coating prepared for finishing work, the main thing is not to make mistakes during the installation process. A list of common mistakes when you decide to cover walls with plasterboard yourself:
- Incorrect installation of profiles. The profile should have its smooth side facing down. It is worth cutting it carefully and only with metal scissors in order to preserve the opposite shelf, where the drywall will be attached next, without damage. The use of hangers cannot be neglected;
- choosing the wrong types of profiles;
- unbending of parts of the profile, which leads to a decrease in the strength of the entire surface;
- installation of gypsum boards on the wrong side. Especially if a waterproof profile is used, for example in a bathroom, then installing it with the reverse side facing the room, all waterproof properties are simply lost;
- improper fastening of the sheets, they should be fastened at intervals, only then the structure will be reliable.
The profile should have its smooth side facing down.
You can cover the walls with plasterboard yourself. But you need to strictly follow the work technology, not missing out on details that may seem insignificant, but in the end will play a big role on the quality of the resulting surface. Doing the work yourself will reduce the cost of repairs.
Where to start building a frame?
Before building the sheathing itself, it is necessary to complete the installation of electrical wiring and check its functioning. Next, you need to decide whether the wall will be insulated. If so, then under the insulation it will be necessary to leave a space between the profiles and the wall equal to the thickness of the insulation material itself.
Installation of drywall is carried out in stages - from one wall to another. The sheathing on the next wall does not begin until the installation of gypsum boards on the previous one is completed. In this case, special attention should be paid to the fact that when leveling the general plane of the frame relative to existing window sills or communications, one must take into account the need to form a right angle relative to the next wall. If this is not observed, then the wall that will be mounted next may either go into the plane of the wall or, conversely, move far from the wall. Or you will have to make an angle that is not 90 degrees. And this can be greatly reflected in the future when arranging furniture, laying floor tiles or laminate.
If the room has windows, then the construction of the frame begins from them.
Tools that will be needed when installing sheathing on drywall:
- metal scissors;
- long level;
- laser level (it can be replaced by a plumb line and a spool of thread);
- cutter;
- perforator;
- screwdriver;
- roulette.
Tips and tricks
For installation, it is better to immediately take care of the availability of the necessary materials and tools. You will need screws for wood and metal - the quantity depends on the area of the walls and the type of frame. For cutting and marking you need a tape measure, a level, a marker, a long ruler and a painting knife. Wooden guides will require a hacksaw, and metal profiles will require metal scissors or a grinder. For fastening to walls and profiles you need a drill and a screwdriver.
If the fastening method is frameless, then you need to have a container for mixing glue, a mixer, and a spatula. In any case, a deep penetration primer will be required. For joints you need reinforcing tape with a width of at least 50 mm. You should immediately take care of the required amount of putty for further finishing of the walls.
Often, when attaching sheets of drywall to a frame, beginners are faced with the fact that the place under which the profile is located is not visible; the screws are screwed into the void. Therefore, it is necessary to mark in advance on the surface of the gypsum board the places for tightening the screws.
There is no need to tighten the screw too deeply into the sheet; if it breaks through the paper layer, the fastening will be ineffective; over time, such a base may collapse. It is necessary that the head of the screw is pressed exactly against the paper, not higher and not deeper than the surface. Therefore, you should work with a screwdriver as carefully as possible.
For an overview of finishing a wooden house with plasterboard, see the following video.
See below for finishing the house with plasterboard.
Sheathing
How to install drywall on a wooden frame?
For wall cladding, wall plasterboard with a thickness of 12.5 mm is used. The ceiling is usually sheathed with 9.5 mm thick ceiling plasterboard. In dry rooms, regular plasterboard (white) is used, in wet rooms - moisture-resistant (blue).
Color coding makes it easy to distinguish between different types of drywall.
Let me remind you once again: in rooms with high humidity, the wooden frame must be sequentially impregnated with an antiseptic and drying oil.
To fasten the sheet, wood screws 32 mm long are used. The length of the screws exceeds that used when mounting on a profile. The step between adjacent attachment points is 15-20 centimeters; The average fastener consumption is 100 screws per sheet measuring 2500x1200.
Phosphated wood screws.
When installing additional sheets (if the height of the wall exceeds the length of the sheet), an additional block is placed under the seam perpendicular to the posts. Instead, you can use a piece of board or thick (from 12 mm) plywood. The main thing is that the edges of adjacent sheets are attached to a common frame element.
Where the wall or partition does not experience deforming loads (for example, under the ceiling), you can do without laying a block under the transverse seam. In its absence, it is especially important to correctly perform the reinforcement, which I will talk about a little later.
In rooms with high traffic or with expected significant loads on the walls (kitchen, hallway, etc.), it is better to sheathe the frame in two layers . The gypsum board of the first layer is secured with self-tapping screws 32 mm long; fastener consumption - 20-30 screws per full-size sheet. The second layer of gypsum board is installed with ligation of horizontal and vertical seams; For fastening, wood screws 45 mm long are used at the rate of 100 pieces per sheet.
The arrangement of sheets when covering the frame in two layers.
How to cut gypsum board to the required size?
- Curvilinear parts are cut out with a jigsaw and a wood saw. It cuts plasterboard very quickly and without any effort, but when cutting, a huge amount of gypsum dust rises into the air. It settles on all surfaces in the room. Gypsum is especially destructive for bearings in cooling systems of computers and laptops, so during repairs they must be kept turned off and covered with polyethylene;
To cut curved parts and holes in them, use a jigsaw with a wood saw.
- Along straight lines, the plasterboard is cut with a sharp knife along a ruler to a quarter of the thickness, after which it is broken on the edge of a table or any other suitable elevation.
After breaking off the sheet, you need to cut the kraft paper from the back side.
After installation, the seams between the sheets cut to size are unstitched: a chamfer is removed from the edges with a sharp knife at an angle of 45 degrees to half the thickness of the sheet.
Correctly sewn seams between adjacent sheets.
What is drywall
Drywall is a building material used for cladding surfaces and is produced in the form of sheets. The middle of the product is made of plaster, covered with cardboard on both sides. Cardboard layers are necessary to give the material the necessary rigidity and protect the gypsum base from environmental factors. In addition, these layers create a barrier against abrasion during transportation of drywall.
More often used for interior work, less often for exterior work. It can be used to quickly level walls; it is also used to create multi-level ceilings, niches, columns, partitions, doorways and other design ideas.
Drywall is a building material used for cladding surfaces and is produced in the form of sheets.
Properties
Drywall is easy to cut into the required pieces; when wet, it can be bent. These properties help to create various textures from it for interior decoration. Finishing walls with gypsum plasterboard will provide additional sound insulation; it also absorbs excess moisture, which it releases back when dry. This side of it makes the indoor microclimate more comfortable.
It is also a fireproof material, economical, and does not require the application of several layers of putty because it has a smooth surface. The versatility of use can also be noted as a positive property of plasterboard sheets.
Finishing walls with gypsum plasterboard will provide additional sound insulation, and it will also absorb excess moisture.
Purpose
The technology for working with this material involves only “dry” working methods. GCR is most often used for the following types of work:
- to level ceilings and window openings, this requires a minimum amount of time, but at the same time all imperfections of the surfaces are hidden and an even coating is obtained;
- for creating multi-level ceilings, various columns. The ability of the material to take on a variety of shapes makes it so popular among designers, because at an affordable price you can build original decor;
- for constructing partitions. Sometimes it is necessary to zone the space in a room, the use of brick walls is problematic and impractical, because such structures can create an extra load on load-bearing walls, and drywall, which does not weigh so much, is convenient for creating such fences, and saving time is also a plus;
- its heat and sound insulation characteristics are taken into account when choosing it for surface finishing.
The ability of the material to take on a variety of shapes makes it so popular among designers.
It is necessary to note for what purposes it is better not to use gypsum boards:
- use it as cladding for damp rooms where heating is not provided; in such conditions it will quickly become unsuitable;
- create partitions with capital loads from it, it simply will not withstand such heavy loads;
- It is also undesirable to cover the facades of houses with it, the harmful influence of the environment will quickly damage the material, it will gradually collapse;
- When finishing interior decoration, it is also advisable to finish it with something to increase its shelf life.
It is undesirable to sheathe the facades of houses with it; the harmful influences of the environment will quickly render the material unusable and it will gradually collapse.
Finishing rules
I counted three such rules that are not found when facing brick or concrete walls.
The first is preventive treatment
It is associated with the instability of wood to moisture, insects, fire and other aggressive factors. If bugs or mold appears under the sheathing, we simply won’t know about it until the walls begin to rot and crumble.
Therefore, the first thing to do is:
- It is good to caulk cracks and large cracks in which bugs can appear and moisture can accumulate;
- Treat the walls with fire retardant (fireproof) and antiseptic (antifungal) compounds;
Treatment with special means will prevent many problems
And the insulation under plasterboard in a wooden house must be covered with a vapor barrier film so that moisture from the house does not penetrate the wood. Although it is recommended to do this even when insulation is not used.
The second is the sliding frame device
The fact that new wooden houses experience significant shrinkage during the first one and a half to two years, I think, is not worth explaining.
This is natural, since the tree dries, loses moisture, and with it its original size. It "shrinks".
Shrinkage of one floor can reach 15-20 centimeters
- At the same time, it also leads to it: the beam can bend in one direction or another, and the initially smooth walls become far from smooth. Of course, this cannot be pleasing, so the walls need to be leveled.
- Dry profiled timber is subject to much less shrinkage, but houses made from it are more expensive. And in those that we can afford, the instructions do not recommend starting finishing until complete shrinkage, either inside or outside.
- But even after the drying process is completed, the wooden walls continue to “walk”, since, depending on the air humidity, they either absorb moisture or lose it. The scale, of course, is not the same, but if the frame for plasterboard is firmly fixed to the walls, then the seams between the individual sheets may crack.
Therefore, the frame must be independent and not move with the supporting base. And the ceiling cladding should not be rigidly connected to the wall cladding. This is precisely the main feature of the finishing of wooden houses. The installation of the drywall itself, as well as its putty, is carried out in a standard way.
Third - electrical safety measures
There is one more nuance related to the electrical wiring. Finishing a log house with plasterboard allows you to hide it behind the cladding. But this is fraught with a fire in the walls due to the slightest damage to the wire caused by a screw screwed into it or a short circuit. I’ve seen how quickly such houses burn down.
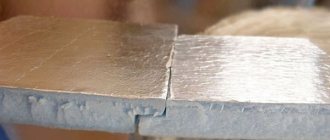
Ceiling distribution in metal sleeves
That is why the wiring in them is made open, hidden in cable channels. But there is another solution: tighten all the cables into special metal sleeves. Not into plastic corrugations or plastic water pipes, as is often done, but only into metal ones.
Installation of various types of lathing
GKL sheets can be mounted directly on the wall, but this is not always possible - it will not be possible to straighten out serious curvatures. The best solution would be to install sheathing. It comes in two types: wooden or metal.
Wooden structure
It is arranged in houses that have long stopped shrinking. That is, it can continue, but the indicators are completely insignificant.
Installation of wooden sheathing
- The required lumber is selected and treated with antiseptics and fire resistance compounds.
- The beam for the racks must be at least 75*30. The rest is from 50*25 mm.
- The necessary markings are made.
- A horizontal beam is attached to the floor and ceiling. On opposite walls - it is mounted vertically. Thus, a closed square or rectangle is obtained.
- Vertical posts are installed into the resulting profile. This is done every 60 cm.
- Attach horizontal ties.
- Insulation is placed in the resulting squares and a vapor barrier is made.
- We must not forget about communications.
Everything needs to be leveled well; a level is suitable for this. The reference point is the largest protrusion of the wall. Self-tapping screws with washers are used for fastening. This completes the installation of wooden sheathing inside the house; next will be the installation of gypsum plasterboard sheets.
Metal structure
The metal frame is mounted quite simply. It's easy to do it yourself. For this purpose, a special metal profile and additional fittings are used. The profile is cut to the required size.
Installation of lathing from metal profiles
- Careful markings are made from the inside of the house.
- Before installation, all necessary values are measured.
- 10 cm retreat from opposite walls.
- Using plumb lines, determine the mounting location of the upper and lower guides.
- Racks are installed, 60 cm apart. They are secured using hangers.
- Cross members are attached.
Advice! For new houses, a movable type of sheathing is used. It differs in that the fastening takes place on a wooden sheathing, and the crossbars are attached through grooves in the supporting profile.
Requirements for lumber for sheathing
Wooden sheathing made from plasterboard may have high humidity during the purchase process, which can subsequently cause warping of the material. The shrinkage percentage will be less if the moisture content of the material is below 22%. It is this value that indicates that the material in front of the consumer is dry. When purchasing bars with natural moisture, you may face the risk of their geometric parameters changing over time. This will certainly affect the evenness of the drywall installation.
As for the wooden sheathing for drywall, the lumber may belong to the first or second grade. The material in this case should not have increased strength. An important factor when choosing is the deviation from the curvature and cross-sectional dimensions. It is important to exclude material that has wane. But if after purchase it is still detected, you should additionally use an antiseptic. It is applied in several layers, sparing no composition.
Recommendations for choosing the size of bars
The timbers for the frame can be selected with different sections to save on lumber. Thus, support posts must be made of products with a minimum cross-section of 75 x 25 mm. Guides and horizontal struts can be installed using 50 x 25 mm minimum lumber. Values greater than those specified are permitted, but less values are not.
The material must be selected taking into account the equivalent thickness. When cutting the bars to length, you should be guided by the fact that they should be 4 cm less than the height of the walls. This will provide a compensation gap between the sheathing and the ceiling. After completion of the installation work, these gaps will be covered with skirting boards or shaped slats.
Expert advice
- The moisture content of the lumber used in the work should vary from 12 to 18%.
- If you plan to install a partition with a height of up to 4.2 m, you should use a beam with a section of 60 x 50 mm. The thickness of the sheet will vary depending on the height of the wall. If this value is 2.8 m, the sheet thickness should be 12.5 m. As the wall height increases to 4.2 m, an 18 mm sheet should be used. And as an intermediate value there is a 14 mm sheet, which is suitable for a wall 3.6 m high.
- When carrying out fire retardant treatment, it is necessary to achieve the indicator of the first group regarding fire safety.
- The step between the rack bars should not be more than 60 cm.
- If the master cannot choose between self-tapping screws, tenons and nails, the second option should be preferred - with its help you can achieve a rigid connection.
- The minimum thickness of the wall on the frame can be 85 mm.
Attention! Before starting installation work where a wooden beam is used, it should be left for acclimatization in the room where it will be installed.
Step-by-step installation of gypsum boards on wooden walls
Installation begins with drawing up a project plan.
- Preparation of materials and tools.
- Surface marking and preparation.
- Installation of the frame.
- Installation of heat insulator.
- Cladding with gypsum board sheets.
Stage No. 1
- GKL or GKLV sheets (in rooms with high humidity).
- Profiles: PN guides (UW).
- Rack-mounted PS (CW), if you subsequently plan to hang heavy objects on the structure, it is better to take reinforced profiles, or put them in rack-mounted wooden blocks.
- Screwdriver or drill with carrying device.
- Marking thread, pencil.
- Level.
- Spatulas.
- Construction knife or jigsaw.
- Metal scissors.
- Abrasive mesh.
- Roller for priming (“coat”).
- Roulette.
Stage No. 2. Marking and surface preparation
The first step is to prepare the base surface. This stage includes the removal of protruding and crumbling elements, sealing cracks and holes.
Often the wiring is laid inside the frame, but it is better to do this on top of the plasterboard in the case of wooden walls.
Using a level, determine and outline with a pencil (or mark with a tapping thread) the lines of passage of the guide profiles on the floor, walls and ceiling.
Mark the lines for the vertical posts - every 40–60 cm.
Make outlines of the location of the hangers to which the rack profiles will be attached - every 50–60 cm.
Stage No. 3. Installation of the frame
According to the markings made, install the guides with a screw pitch of 50 cm. Since the planes of their location are wooden, they need to be fixed with self-tapping screws, not dowels. The starting ones are installed with shelves to the base. Next, screw the hangers along the marks.
Insert rack profiles into the slots of the lower and upper guides, every 40–60 cm and secure with piercing screws with a 13 mm press washer. Pull the horizontal control threads (with a distance between them of 100–120 cm) to control the level, and, focusing on them, screw the profiles to the hangers (bent in the shape of the letter “P”) with metal self-tapping screws. Bend the excess edges of the hangers back so that they do not protrude beyond the outer surface of the profiles.
Stage No. 4. Installation of heat insulator
At this stage, it is also possible to place insulation in the inter-frame space, providing the profiles with transverse jumpers, according to the cell principle.
Stage No. 5. Cladding the gypsum board frame
Before screwing the gypsum board you need to prepare it.
- Calculate the plasterboard panels so that the edge of each of them falls on the middle of the shelf of the rack profile. If you need to trim, use a pencil to draw a mark on their surface and make a cut along it in the top layer of sheets.
- Then break the panel where the cut is made at an angle (so that the gypsum core bursts) and cut through the back cardboard side.
Screw the gypsum board to the frame with self-tapping screws with a screw pitch of 25–30 cm, with a distance of 2 cm from the edges. After installing the sheets, you need to remove the edge at an angle of 45 degrees, if the edges of the drywall do not have a factory chamfer.
Stage No. 6. Putty
Before applying putty, the wall should be cleaned of installation dust and primed. After the primer has dried, you can continue working.
Start by gluing the serpyanka to the seams, as well as covering it and the screw heads with putty mixture.
Then apply a starting layer of putty using a 20–25 cm rectangular trowel. After it dries, carefully prime the surface.
Layers of finishing putty are applied peel or overlap with a minimally thin layer on the surface. Usually one or two layers are required, with the second applied in a transverse direction relative to the first layer.
After drying, sand the walls with an abrasive mesh until smooth, and then apply primer again.
So, the surface is ready for decorative cladding. It can be painted, covered with wallpaper, and decorative panels can be attached to it.
As you can see, installing gypsum boards on wooden walls is not that complicated, and even a novice master can do it.
GKL against plaster
First, let's decide whether it's worth messing with drywall at all or whether it's better to use plaster the old fashioned way.
Here are the arguments in favor of gypsum boards:
- High finishing speed due to the large sheet area (3 square meters with a size of 2500x1200 mm);
- Possibility to eliminate significant unevenness of the base at minimal cost. Let's say, if the height difference between adjacent elements of a slab floor is 8-10 centimeters (yes, yes, this also happens), leveling the ceiling with plaster is very expensive and unsafe: the fall of peeling plaster of such thickness can cause a lot of trouble.
But for gypsum boards on the sheathing, the condition of the surface underneath does not matter at all - as long as there is something to attach the frame to;
It is easier and cheaper to level an uneven and littered wall with plasterboard.
- The surface of kraft paper (gypsum core shell) has excellent adhesive properties. You can glue wallpaper of any density to it using any wallpaper glue; tiles also adhere perfectly to cement tile adhesive or homemade cement-based mortar.
Interesting: I used spot-applied silicone sealant to adhere the tiles to the drywall above the bathtub. It was also used to seal the seams between the tiles and to connect the apron to the bathtub. All seams maintain absolute tightness for three years of active use of the bathroom; The tile holds more than securely.
Ceramic tiles adhere perfectly to drywall using any tile adhesive. And not only them.
How does drywall compare to plaster?
- Mechanical strength. Let me clarify: in this parameter, gypsum sheet material is second only to cement plaster. Using gypsum board to decorate walls in a gym or workshop is a dubious idea;
- Resistant to water with constant contact with it. Alas, even moisture-resistant drywall only tolerates high air humidity. If you immerse a gypsum core in water, it will get wet just like any other gypsum product. Accordingly, it would be a bad idea to use gypsum board without protection with a waterproof finishing finish for the construction of shower walls;
- Occupied usable area of the room. It is better to level walls with minor unevenness in a small room with a thin layer of plaster: even when glued directly to the wall, without lathing, a sheet of plasterboard, taking into account the thickness of the glue, will shift the surface of each wall by at least 20 mm. When mounted on a frame, each wall will move towards the center of the room by 60 - 80 mm.
The space under the sheathing is wasted.