Standard door sizes suggest an opening depth of 75-80 mm. But we know that this parameter can be greater. In country houses, office premises. What to do if the depth of the doorway is 200-300 mm? ]doors[/anchor], of course, provided for this nuance. And long ago they came up with a special decor for a neat and beautiful design of the opening. They are extras. From the name it is clear that they “get” the rest of the opening. And you don’t need to invent anything else. They are installed together with the door frame and no one will guess that additional elements were used for your opening.
Dobor is...
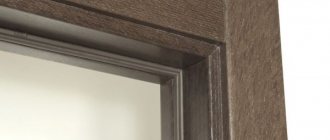
An extension is a strip 10-16 mm thick and 100 mm wide, which is located in the opening and attached to the door frame. Materials for manufacturing are similar to the door material. This is natural wood, MDF base + PVC film or eco-veneer. If your doors are covered with enamel, then it is advisable to make the same additions to the kit.
Dobor
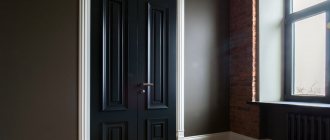
Platbands on the front door
If the extensions are a continuation of the box, filling the slope of the opening, then its completion can be called the platband. There is also a large selection here.
Purpose and varieties
The immediate task facing such an element as the platband is to frame the doorway. These interior elements are decorated with them. Modern door frames can be divided into the following categories:
- Flat;
- Rounded;
- Curly.
Forms of platbands
The first option allows joining in any form. But rounded and figured platbands can only be sawn at an angle of 45 degrees. In this case, it is necessary to have a special device called a miter box.
Decorating corners with platband
In addition to the shape, platbands can be divided into:
- Monolithic;
- With built-in cable channel.
The use of monolithic elements can be considered a classic option for framing modern doorways. But cable channels began to be placed in platbands in order to hide the wires well from prying eyes.
These structural elements are made from PVC. Typically, they consist of two parts. One is attached to a wall or box, and the other serves as a decorative cover that well covers the wires laid inside.
Preparing for installation
Before you begin installation, it is important to understand the dimensions of the extensions themselves.
And understanding will appear after measuring the installation site. The first thing you do is install the door frame. And only after that do you measure the actual dimensions of the extensions themselves. How to do it? Take 2 regular rulers (preferably one of them is angled). Hold one on the wall surface, the other in the extension position. In the installed box there is a place where the addition will “come”. Your task is to use a ruler to simulate the installation of future extensions in order to understand the actual depth dimensions. And the second ruler on the face of the wall will draw a parallel for you and determine the exact value. The end of the installation will be at the level of the wall. It is impossible for the addition to extend beyond its limits. Take these measurements at several points along the width and height. And be sure to write it down so you don’t have to try again.
Once you have determined the exact dimensions, all that remains is to cut the extension blanks. Use an electric jigsaw or a fine-toothed hacksaw. On the boards, if you cut them with a saw with large teeth, chips will remain, which will then have to be decorated and covered with putty to match the color.
We measure the depth of the opening from the door frame
| Before you begin installation, it is important to understand the dimensions of the extensions themselves. And understanding will appear after measuring the installation site. The first thing you do is install the door frame. And only after that do you measure the actual dimensions of the extensions themselves. |
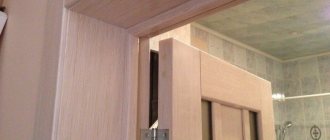
How to attach the extension to the door frame if it is thicker than the selected quarter
Often the extra is thicker than the quarter selected in the box. What to do then? How to make sure that the extension rests without cracks and holds tightly? There is a simple way - drill holes diagonally, screw in self-tapping screws, then close the holes with matching plugs. Here everything is more or less clear, but not very beautiful - the stubs are still visible.
There is another way. Need drywall hangers. Only they should be the strongest and thickest. We separate the perforated parts of the tape from the hangers. Each one makes two pieces. You will also need small screws (fleas). We screw the perforated tapes onto the door frame around the perimeter - at the corners at a distance of 10-15 cm, also at the bottom, and in height at a distance of 40-50 cm.
How to secure the addition
We screw in the screws at a distance of 1.5-2 cm from the edge of the box (middle photo). One self-tapping screw per piece of metal tape is enough. When you install the door frame, the tape will stick out. These strips are thin, so there will be no problems with even the smallest gap. If the extension to the interior door is the same width, simply insert it. Due to their elasticity, the plates press it tightly.
How to install extensions if they are thicker than a quarter
If the extension is wider, first we bend them to the front part, then return them back. Due to the fact that they are not fixed at the edge, they bend and become like an arc.
This is how it can work out - without the slightest gap
Now we insert additional strips, placing them between the plates and the groove. They will press the bar tightly. The cracks will not be visible even upon closer inspection.
Installation of accessories
Installing the extensions is very easy to do yourself. It is only important to understand what kind of door frame you have. They come in two types:
- Built-in groove in the box
- Monolithic block without groove
A box with a groove immediately makes it easier for you to install the extensions. It is enough just to try the extension into the groove, adjust the position and secure it. In the version without a groove, you will have to accurately measure the geometry of all height deviations. This factor increases installation time.
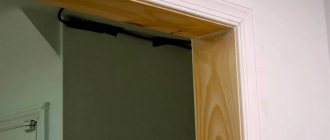
Installation using self-tapping screws
Before attaching the extensions with self-tapping screws, make holes with a wood drill. This is necessary to ensure that the material does not split. All holes and fastenings in this case will be beautiful and neat. Select a drill 1 mm smaller than the diameter of the self-tapping screw. The length of the screws is usually 25 mm. Their task is to attract and strengthen the fittings in the door frame. Therefore, there is no need for long screws.
To make a hole, install the drill into the end of the extension at an angle of 45*. And drill right through. You will end up with a diagonal hole. After this, feel free to screw the extensions to the door frame. First the vertical elements, then the top horizontal.
| A box with a groove immediately makes it easier for you to install the extensions. It is enough just to try the extension into the groove, adjust the position and secure it. In the version without a groove, you will have to accurately measure the geometry of all height deviations. This factor increases installation time. |
Types of products
Door extensions are additional strips that cover the wall in the opening, “adding up” its thickness, which is lacking in the width of the frame.
Reducing the doorway
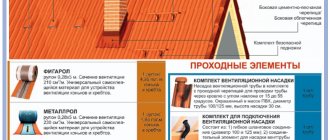
The main types of additional payments are presented in the table:
| Type of addition | Peculiarities |
| Plain without edge | This is a strip of laminate or MDF that does not have a facing edge. In this case, the installation of doors with extensions by yourself must be done with special care. A deviation of even two millimeters will reveal the gray raw edge of the part. |
| Simple with edge | The end of the part is pre-closed with an edging tape matched to its tone, which will make minor flaws invisible. The price of the edge is very small, it is glued quickly using a regular iron. This method protects MDF boards from swelling under the influence of moisture, which is especially important for door blocks installed in bathrooms and kitchens. |
| Telescopic | This is the most complex construction of the extension. Its peculiarity is the presence of special grooves that allow installation without the use of screws and nails. In this case, the extension fits perfectly with the door frame and trim. The width of the element is adjusted by the depth of the groove. |
| Combined | The peculiarity of the combined design is the addition + platband. In appearance, the product is a decorative corner with deep grooves. Doors with extensions of this type are installed only when facing a small amount, up to 45 mm. |
The advantages of installing extensions are:
- High speed of finishing process of doorway.
- The room can quickly be given an aesthetically complete look.
- The absence of exposure to moisture on wood and MDF protects the structure from deformation and peeling of the outer layer of the finishing coating.
- The planks hide the joints between the wall and the frame.
- When the sash moves, vibration on the frame leads to cracks in the plaster or wallpaper. The extensions camouflage this area, as in the photo.
Adding a box when installing a door
Materials for additions
In the manufacture of elements, the following are most often used:
- Tree. This is an environmentally friendly material, but its disadvantage is that it can deteriorate due to unfavorable conditions encountered during operation, which requires additional processing.
Additional wooden element
- Plastic. But for arranging extensions, ordinary cheap material will not work; you need to choose high-strength plastic, preferably reinforced with metal.
Plastic extensions reinforced with metal
- MDF. Due to low mechanical strength and instability to moisture, such materials are most often used for arranging interior openings. During installation, cracking of the planks is possible, for example, when driving nails. Therefore, it is first necessary to drill a mounting hole to install the fastener.
MDF additions
- Chipboard. It is of lower quality, but can be used to decorate the interior entrance door of a house and has a low cost.
Chipboard addition
Installation with nails
This method is easier than installing with screws. Requires less skill and has invisible fastenings. And the fastening strength is excellent.
To begin, drill small holes in the end of the extension for the nails. We remember that the board may split if preliminary holes are not made. The depth of the hole is equal to half the length of the nail.
“Bite off” the caps of the nails and place them in the holes with the sharp side facing out. Next, place this entire structure in the installation location and, hitting the door, drive it into the door frame. Voila, installation is complete.
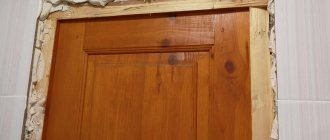
Self-production
You can purchase a complete set of materials for decorating the opening along with the front door. However, you can do everything yourself. This is especially true when using natural wood as a finishing material. Working with such material is simple and convenient, and it looks great even in combination with a metal door.
Since most metal panels are decorated with a wood texture, using wood for trims and platbands is a very advantageous option.
Let's look at how to make extensions and platbands for the front door with your own hands. First you need to decide on the type of elements and their sizes. In order to calculate the width of the extension, you need to take the thickness of the wall as a basis, subtract the width of the installed door frame from it and add the dimensions of the fasteners.
The simplest extensions and platbands are made from straight planks. All you need is to buy suitable material and cut off all the excess. You can use folded boards. In this case, it is important to adjust the joints for the fastenings.
Materials for making door panels
The ideal option is to arrange a groove connection. To do this, you need to take a board and mark the contours from the end for cutting. You can get rid of excess material using a hand router, chisel or drill. You need to select the wood evenly and sand the surface. For the reverse side, a tenon is cut out. In this case, you need to remove the material along the edges of the mark.
To give the wood the desired shade, stain is used; it will additionally protect the material from damage. You should also open the surface with two layers of varnish. For non-standard door design options, the door trims and trim can be painted in the color you need.
Installation with foam
The fastest installation method. The main thing here is not to overdo it with polyurethane foam. Otherwise, the extension will lose its geometry due to high pressure from the wall. So, for this method you do not need to drill any holes.
Install the extensions into the opening and secure them in place with wooden wedges. The additions must be in the position of the final result. Eliminate all gaps between the frame and the extensions. Next, at the base of the contact between the extensions and the frame, draw a line of polyurethane foam, and then horizontally in several places. Align the extensions again so that they are fixed with foam in the correct position.
Classification of additional strips
By location on slopes
By material
By degree of protection
Accessories with or without lamination.
According to the specifics of installation
Installation of telescopic extension
In such an installation system, not only the extension is telescopic. The box, the extensions, the platbands - all these elements are elements of the puzzle. You simply place the strips into the grooves. You will find out that you have exactly such a system when you purchase it. Salon managers recommend it. And they have reasons for this:
- Tight connection with the entire structure
- Easy to install
- It is possible to adjust the height and depth
- During the installation process, you can correct irregularities that were not taken into account initially.
Telescopic accessory assembly diagram
Advice from an installation specialist
When installing extensions and trim on the front door, you may encounter a problem when the frame is not able to cover the width of the opening. This part can be covered with wallpaper, covered with plaster or trimmed with plastic. But the use of add-ons allows you to achieve a better result, because the elements look more attractive, but are cheaper and do not require repairs.
The box beam may have a selected quarter for installation. If there is none, then the extensions can have any thickness. If this mounting recess is present, then additional extensions can be installed on the front door, the dimensions of which are 1 cm in thickness.
Due to the fact that the extensions will not be subject to mechanical load, only liquid nails are used for fastening. However, most often you can find galvanized self-tapping screws as fasteners. If fastening is carried out externally, then the caps should be closed with plugs or mastic.