Restoring wooden structures is a measure resorted to by owners of private houses with a long service life.
The decision to repair a window is made based on a number of factors that directly indicate that it is necessary. This may be the unsightly appearance of the opening, the appearance of deformation, the formation of cold bridges or condensation at the corners of the frame.
A careful visual inspection of the internal and external surfaces of the window, checking the functional ability of the sashes (opening, closing), assessing the condition of the frame elements, joints, slopes, ebbs, and fittings allows us to develop an effective restoration plan.
You can carry out repair work yourself or invite a specialized specialist. How to do this correctly, and what is needed for this, read more in the presented article.
For what and why is it necessary?
Repairing wooden structures is considered an appropriate solution. With a “good attitude” towards the material (care and maintenance of operational ability), it can last for quite a long time, providing its owners with heat retention and protection from external temperature and atmospheric manifestations.
In addition, wood is a hard material with good density and strength, and is also an environmentally friendly product.
Wooden windows
are easy to process :
- antiseptics;
- polymeric substances;
- LMB.
They also adhere well to any materials, and the joints are sealed with suitable insulation and sealants.
The construction market is represented by a huge number of affordable materials that make it possible to completely restore windows and extend their service life. Moreover, any type of repair significantly saves the family budget.
Structures can be repaired using cosmetic or major restoration, after a thorough visual inspection, measurements taken and determination of functional (operational) characteristics. To do this, they preliminarily outline a work plan, purchase building materials and prepare tools.
Cosmetic repairs are needed to improve the appearance of the window:
- painting it in the chosen color;
- sealing joints, lubricating fittings for opening and closing sashes;
- replacing old worn parts.
Major repairs concern the complete replacement of elements (parts) of a window if they have crumbled, broken, do not open well, let in a lot of cold, or if the glass unit is broken.
Deep restoration helps restore any parts of a dilapidated window, with the exception of completely rotten elements. Repairing wooden windows will be unsuccessful only in the following cases :
- looseness and dents were noted when pressing on the wood;
- window frames are very loose;
- the paint does not hide dark spots, which indicates internal decomposition of the wood;
- The convexity of the frames and their deformation are visually striking;
- severe damage to the frame (split).
You can repair a wooden window structure with or without dismantling, but always with preliminary preparation of the surface and performing successive step-by-step actions, each of which has certain features.
Cosmetic or major repairs begin only after thorough drying of the wooden window parts.
Door refurbishment
Cosmetic repair of a door comes down to eliminating visible defects and renewing the paint layer. It helps extend the service life of the product and helps avoid serious defects.
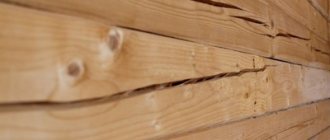
To eliminate the problem of peeling veneer, timber and paint, you must:
Since the veneer began to peel off, it was completely removed
The separated beam is connected to the remaining parts of the door with self-tapping screws
To fix the hardboard, use short self-tapping screws
For minor defects such as scratches, use furniture wax. Instructions for its use are usually indicated on the packaging.
If there are chips, deep scratches or cracks:
So, any problem with the door can be solved. This does not require any drastic changes. You can put the door in order by picking up a few tools and doing the work in accordance with the instructions given in our article.
Source
What parts need updating?
To determine which parts need restoration, visual diagnostics are necessary.
The technician carefully diagnoses:
- inspects surfaces;
- checks the glass unit;
- condition of glazing beads;
- current functions of the structure, noting shortcomings.
Also in the diagnostic process :
- the sashes are removed;
- glass is removed;
- low tides;
- the sealant is removed;
- insulation and old paint;
- fasteners and metal corners are unscrewed.
All parts that look unsightly, are broken or are out of order require mandatory replacement. This also applies to drains, window sills, slopes - the elements are installed new. Particular attention is paid to the frame with sashes and the glass unit itself. A window with a large number of layers of paint, broken glass, worn-out fasteners and fittings does not look attractive.
Even a rotted section of a frame can be repaired or replaced by using new parts, sanding down the damaged surface, and using an epoxy putty designed for wood.
Damaged parts are freed from paint and dust, and the surface is primed and sealed with putty, covering existing cracks and recesses. The created missing part is formed several mm larger than the required dimension. Extra millimeters are removed by grinding.
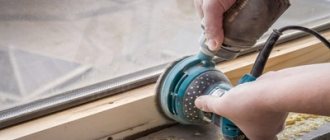
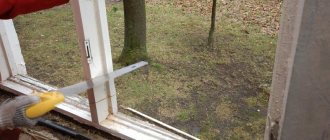
Layers of old paint are removed using a hair dryer, a spatula and a homemade stripping device. As soon as the surface softens and the layer begins to bubble, it is scraped off the surface. Removing old paint allows you to assess the condition of the windows, for example, detect rotten parts of the frame. But this drawback can be removed if it is removed and a specially cut liner is glued onto the missing part with construction adhesive.
Sections are replaced in such a way that not only the appearance of the window is improved, but also its functionality. Rusty corners, fittings, dowels and handles are replaced with new, modern ones. At the same time, the cracks are sealed and slopes are formed.
Broken glass is carefully removed after removing the beads and disassembling the frame. New double-glazed windows are installed in their place. Don’t forget about waterproofing windows and drainage systems. The latter can be purchased on the construction market - their price is low.
When repairing an old window, do not forget about impregnating the surface with polymer and antiseptic compounds.
Paint removal
There are two ways to remove old paint from windows: thermal and chemical. An industrial hair dryer is used for cleaning with heat treatment. Don’t try to do this at home: it won’t reach 200-250 degrees. And do not set the temperature on the hair dryer to more than 250 - you will get a low-temperature burn of the wood without charring, and it will lose its quality. The same thing happens if you heat it with a blowtorch or propane torch.
The part to be cleaned is placed on the butt and heated in 25-30 cm sections. When the paint begins to bubble, peel it off like plasticine with a shoe knife or palette knife. A spatula with a straight blade, even sharpened, either cuts into the wood or slips across the paint.
Main defects of wooden windows
Windows in an apartment or house require restoration in cases where :
cold air begins to blow out of them (blowing);- during the winter season, the structure freezes;
- when temperature changes, condensation forms on the window;
- precipitation enters the room (leakage occurs);
- cracks form on the surface of the structure and parts of the frame;
- there were problems with closing and opening the doors;
- The glass unit is broken (needs replacement).
Also in need of repair :
- curved areas of wooden surfaces with broken geometry;
- loose, loose frames (for example, after man-made disasters or earthquakes);
- fittings damaged by corrosion when they fail.
Windows are also subject to repair in cases where :
- components with located fasteners and fittings are damaged;
- when mold and mildew form, which indicates the need to create thermal insulation, vapor barrier and waterproofing, eliminate cold bridges and the formation of condensation on the window.
All problems are resolved during the restoration process. You can do a number of jobs with your own hands after following the instructions and operating principles.
TOP 7 mistakes when installing interior doors and ways to eliminate them
Author of the article: Alexandra Ivanova January 30, 2021
Installing interior doors is not as easy as it might seem at first glance. Self-installation or turning to incompetent professionals leads to disastrous consequences: gaps, creaking, damage to the door surface, and operational problems.
Do-it-yourself restoration of old frames
It is advisable to carry out repairs yourself if you have the desire, free time, skills, materials and the necessary tools are prepared. In all other cases, it is best to contact specialists who will quickly and efficiently carry out any restoration work for a small fee.
Pros of deciding to do the repair yourself:
- Saving money.
- Control over the amount of material consumed of all types, including fasteners.
Disadvantages of deciding to do the repair yourself:
- Making mistakes.
- Failure to comply with technical requirements.
- Lack of professional skills.
It’s easy to carry out cosmetic repairs with your own hands - replace fittings, perform thermal insulation, deal with mold, apply primer and paint the window. Major repairs require a more serious approach to repairing serious damage.
The choice of the most suitable method for restoring a wooden window is individual, and depends on the degree of deterioration of the structure.
Read more about the restoration in the article at the link.
TOP 7 installation mistakes
In addition to the installation technique, it is important to think through many little things in advance that can result in unpleasant surprises:
Incorrect finishing algorithm
The most common mistake is the incorrect sequence of work during repairs.
For example, apartment owners purchase new doors, install them, and only after that start decorating the walls. But new wallpaper is not the biggest problem. The difficulties begin further when the craftsmen arrive to level the floors and fill the screed. In the best case, the door will not close; in the worst, they simply cannot install it. How to eliminate the consequences of improper repairs can only be decided on the spot. But it’s very easy to avoid them - you just need to follow the correct sequence of finishing work.
Advice! Repairs should begin with dismantling work, then connect electricians, pour screed on the floor, level the walls, plaster corners and slopes, hang wallpaper, install suspended ceilings if desired, lay laminate, parquet or other flooring. Only when the renovation is actually completed can interior doors be installed.
Gaps big and small
Another cause of problems with doors is gaps that are too large or too small.
Because of them, the door becomes impossible to close; it begins to touch the frame. Too large gaps lead to poor thermal and sound insulation in the room. Incorrect installation of the door leaf or frame causes gaps to appear. There may be several reasons for a gap to appear:
Incorrect fastening of door hinges
One of the main reasons that interior doors no longer close is improper fastening of the door hinges.
If they are too recessed on the counter or door, or, conversely, are not fully recessed, the door stops closing normally. Subsequently, the decorative lining of the door will suffer, cracks, chips and scratches will appear on it. To solve this problem, you should remove the incorrectly installed hinges and correct the defect. If the door starts to open too tightly, the problem may be sagging hinges. You can try to fix the problem by placing cardboard under the hinges, or replacing them with new ones. Also, if the hinges sag, they need to be lubricated.
Advice! It is not recommended to use sealant on self-adhesive paper. The door seal must be made of durable and high-quality rubber. It is installed in the groove.
Incorrect installation of the door frame
To properly install the door block, you need to use a plumb line and level.
Using wooden wedges, the box is wedged, the side with the hinges is secured, checking for verticality and opening. After this, polyurethane foam is poured, installing spacers so that the foam does not deform the box. The main indicator that the door frame is installed incorrectly is the doors opening or closing spontaneously.
If the door opens on its own, then the reason should be looked for at the very top of the door frame. Typically, this is where the top of the post tilts to the right from vertical. Doors that close spontaneously indicate that the lower part of the box has deviated to the right of the vertical. Problems associated with installing a door frame are very difficult to resolve.
There is only one solution to this defect - dismantling the door along with the frame. After this, you need to correctly align it vertically, measuring with a level, and reinstall the door leaf.
There is one more way out of this problem - to get by with little expense, you can try to install platbands according to the European standard: joints at 90 degrees, and not at the usual 45.
Incorrect hanging of the canvas
Improper door hanging leads to premature wear of locks, hinges, and misalignment in the block.
Gaps resulting from this error disrupt the connection between the door frame and the opening. The mounting foam holding the box in the opening begins to crumble. Professional carpenters and installers always make the edge angle of the blade on the hinge side less than 90°. This is especially important if the doors are made of solid wood. When hanging doors made of chipboard and other factory materials, you need to ensure that the hinges do not “press” when closing. The door leaf, hung correctly, should not touch the frame when closing, even from the hinge side. The only point of contact is the seal.
It is very easy to check whether the door is installed correctly: just take a sheet of paper and insert it between the frame and the leaf - if the paper passes smoothly along the entire length of the door, then the installation was successful. If not, you need to rehang the canvas, having first found out the causes of the defect.
Important! The more the door leaf weighs, the more hinges need to be installed. It is important that all the hinges are in their grooves. There should be no play or gaps.
Cheap polyurethane foam
Even after purchasing an expensive door and high-quality hinges, the owner cannot be sure that an unscrupulous craftsman will not ruin the door using cheap polyurethane foam.
Polyurethane foam replaces screws and self-tapping screws. It is used for good adhesion of doorway elements. And yet this is the invisible material on which people often save, mistakenly hoping that nothing depends on it. In fact, due to low-quality foam, the door frame may become skewed. To avoid this problem, it is recommended to use polyurethane foam only from trusted manufacturers, and do not forget about spacers during installation.
Poor quality materials and errors in measurements
To avoid numerous problems with the operation of interior doors, you should take the choice of door leaf seriously, taking into account the characteristics of both the door itself and the opening.
It is necessary to measure the dimensions, find out the weight, composition and density of the door. For example, if the installation takes place in a room with brick walls, then you will first need to strengthen the doorway. Factory trims and boxes from inexpensive MDF are made according to standard measurements. Such platbands use cheap and simple materials, which is why they cannot withstand a heavy door.
Tools and Supplies
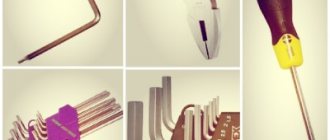
In the process of carrying out restoration work on wooden windows, the master may need the following manual and electrical devices :
Construction hairdryer.- Grinding machine, emery.
- Spatula, shoe knife, miter box.
- Hammer, rubber mallet.
- Putty, brushes, paintwork, liquid nails.
- Epoxy adhesive.
- Chisel, hammer, nail puller.
- Saw band, square, plumb line, tape measure.
- Drill with core drill, screwdriver.
- Jigsaw, saw, grinder, plane.
- Simple pencil, bubble level.
- Parts of wooden beams.
- Fastening element, glazing beads.
- Sealant, waterproofing material, vapor barrier.
- Antiseptic solution.
- Acrylic primer.
- Industrial vacuum cleaner, rags.
The master will also need special clothing (a robe), safety glasses, a respirator and gloves. He must organize his workplace in such a way that he does not slip during dismantling or injure himself on glass and wood. To do this, it is recommended to lay plywood sheets near the work site.
The provision of services from a construction company includes the availability of tools and consumables, so the owners will not need to incur extra costs for their purchase. Purchased consumables must be indicated in the estimate when paying for services.
Consequences of improperly installed doors
Unstable fastening of the door frame, excessively tightened hinges, poor-quality mounting foam, illiterate sequence of repair work, incorrect ratio of the weight of the interior door and the strength of the opening, coupled with installation errors, can lead to unpleasant consequences, such as:
In order for interior doors to last without breaking, serve for a long time and not cause inconvenience to the owners, it is necessary to periodically carry out preventive inspections for them. If you inspect the doors in a timely manner, you can detect minor defects that arose both during operation and due to improper installation, and remove them in a short time yourself.
General recovery principles
Eliminating any problems with your own hands or with the help of a specialist, to restore the window structure when opening and closing, freezing, etc., are united by general principles, which include the following actions :
- Preparation and diagnostics of repairs, determination of its type (cosmetic, major). If necessary, dismantle the window.
- Cleaning the old paint layer, thoroughly cleaning and sanding the wooden surface. If necessary, remove parts of the fittings. Coating the wooden surface with an antiseptic solution, checking the condition of the insulation and sealing cord, and replacing them. Then comes the application of primer and paintwork. After drying, install the fittings, lubricate the moving parts with special oil, check the functionality of the window sashes.
- Replacement of a double-glazed window is carried out both when the frame is installed and when it is dismantled. But then the master must have a work table at hand on which he can carry out the restoration. Here the glazing beads are removed, and the damaged glass is carefully removed, then others are installed, which are strengthened with new material and fasteners.
- If it is necessary to cut off an unsuitable layer, it is disposed of, and the surface is thoroughly cleaned and dried well. Then a hardener intended for wood is applied to the dry surface and secured with a preservative. After the dry layer, putty is applied, which may require several layers. Each of them is thoroughly dried. Before painting, the surface is sanded.
- Parts that have fallen apart and must be completely replaced from the frame are removed. New elements are placed in their place and secured tightly. The ebb tides are replaced with new ones after dismantling the old ones. To do this, the fasteners are removed, and instead of them, self-tapping screws, nails, and corners that have not been in use are used.
- If the insulation has fallen off or the vapor barrier membrane and seal have deteriorated, new material is installed instead. It is securely fixed with glue, and the joints are sealed with sealants.
- When it is necessary to level the geometry of a window structure, after dismantling it is laid on a flat surface, measured, and trimmed using a chisel, plane, jigsaw, or grinding machine, cleaned in the right place, and then returned to its original place. Here the condition of the joints must also be checked - they must be completely sealed.
- All types of fittings, dowels, glazing beads are replaced, if necessary, with new ones, not forgetting the use of special substances (oil, glue) that improve their functions. To do this, the old parts are unscrewed and thrown away along with the fasteners, since they often have elements of erosion over time. The dowels are knocked out with a hammer; a nail puller can handle the rest of the fasteners.
During the work, if damaged parts are cut out, be sure to mark the places that require repair. The accuracy of the measurements will allow you to carefully glue in the missing part, which is clamped for 24-36 hours with clamps.
During the restoration process, frames are often treated with drying oil . This oil-based material cares for the wooden surface, strengthening it and providing additional protection against water. Drying oil is also the basis before applying paintwork.
To prime wooden surfaces, several layers of acrylic primer are used. Good fittings from old paint are cleaned by firing using a conventional gas burner, followed by sanding with sandpaper. Cutting glazing beads of specified sizes is entrusted to professionals.
If you have the simplest skills in handling wooden surfaces, there is nothing difficult in repairing a wooden window yourself, but specialists will make this process much faster and more professional, providing a guarantee for their work.
What to do if it does not open or close?
Checking fittings for wear and damage.- Checking the condition of the valves.
- Checking the tightness, visually identifying the main problem.
- Cleaning and preparing the surface, removing fittings or restoring the sash.
- Checking the functionality of the structure.
- Lubrication of mechanical moving parts.
What if they freeze?
- Definition of a cold bridge.
- If these are slopes, pull them up and foam them along the edges.
- If the problem is in the sashes and fittings, they repair and replace the elements.
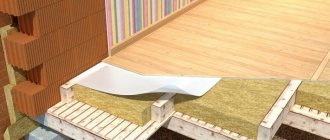
- If necessary, the structure is dismantled, steam and waterproofing is carried out, and the window opening is insulated with mineral wool.
- It is allowed to use Swedish insulation - an ideal solution to the problem.
- Broken glass is replaced with a new double-glazed window.
Assembling the sashes
The prepared sashes are placed on the shield and carefully aligned to a rectangular shape. The details of the window require special attention: a 1 mm difference in diagonals will provide a 0.7 mm gap.
The leveled area is secured with glue or nails, carefully driving them into the shield near the sash. They look through the old dowels (“chopiki”).
When assembling the sashes, it is necessary to strictly observe the rectangularity
Drill them in the middle of the corner using a larger diameter drill. If one of the dowels is shifted to one side, then you need to:
- Secure it along the border with a few drops of “Super Glue”;
- Drill the correct location;
- Pass the saw blade through the gap between the fixing lugs and saw through the old dowel.
After assembling all the corners, you should get a fairly rigid structure. Now you can take the frame and install the sashes into it. They will fit more tightly if plywood strips of the appropriate width and thickness are glued to the frame.
Place all parts on a leveled surface and press down with a weight (approximately 100 kg). Leave to dry and level for 2-3 days.
Prevention
Methods of preventive measures related to the care of wooden window structures and the prevention of breakdowns include the following measures:
- periodic diagnostics (visual inspection) of surfaces;
- timely replacement of glass, fittings, insulation;
- sealing joints (primary, secondary);
- creation of vapor barrier and ventilation;
- restoration of paintwork;
- cleaning windows from dust and dirt.
It is also necessary to pay attention to the formation of condensation (this means that the integrity of the system has been compromised somewhere). It is necessary to check the functions of the fittings and lubricate them with machine oil at least once a year.
If existing problems are identified in a timely manner, it is very easy to eliminate any defects.
Average prices
For construction services, official Russian companies provide price lists on official websites. They do not depend on seasonality or urgency factors, but prices may vary depending on regions. Moscow and St. Petersburg, as well as the northern regions (Novosibirsk, Yamal-Nenets Autonomous Okrug, etc.) are considered the most expensive.
The average prices for repair services for wooden windows with consumables and company tools in rubles were:
complex deep restoration – 8-18,000;- double-leaf window – partial repair – up to 8,000, major – up to 15,000;
- three-leaf window - up to 10,000, full - up to 16,500;
- cleaning, priming, painting windows – from 2,000;
- replacement of fittings – 300-1000;
- repair of slopes and window sills – from 1,500;
- glass replacement – 2,000.
Prices may fluctuate and vary depending on market conditions. Many companies immediately negotiate and coordinate their services with the customer, providing discounts. Private individuals charge half the listed prices for work, but do not provide an official guarantee for the services provided.
Any repairs are best carried out on a dry, sunny day.