One of the most suitable materials for individual construction is wood. Wood is available, easy to work with, and in terms of cost, lumber has a more justifiable price compared to other building materials. Another advantage of wood is its relative lightness, which reduces the cost of building a strong foundation for a house.
These and other advantages of wood have led to the fact that wooden private construction is relevant and in demand. And if there is demand, supply also appears. Moreover, the natural disadvantages of wood as a building material are offset by complex manufacturing technologies of modern lumber, one of which is profiled timber.
Advantages of a house made of profiled timber
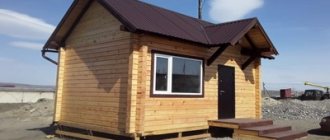
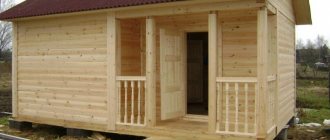
Building a house from profiled timber with your own hands
- can be quickly built. A company (team) of three people, having minimal skills in using carpentry and plumbing tools, is able to assemble a box at home within a season;
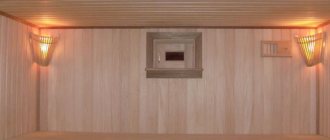
- The log house is environmentally friendly and has a unique microclimate. In addition, good air flow through the wood will ensure a sufficient level of air exchange;
- timber is an excellent heat insulator and allows you to conserve heat and save on heating;
- no need to immediately invest a lot of money in construction and finishing. These processes can be separated in time;
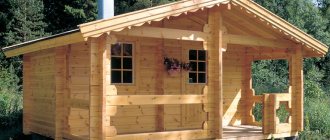
- a house made of timber has natural beauty, presentability and style.
Stages of building a house made of profiled timber
We will briefly list all the stages of construction, and dwell in detail on the key ones that directly relate to working with timber.
Step-by-step instructions for building a house from profiled timber with your own hands:
| Stage number | Name | Content |
| 1. | Design | – standard project of a house made of profiled timber; – individual project (unique). |
| 2. | Foundation | – determination of the type (tape, pile, slab); – calculation of characteristics; - excavation; – formwork installation; – installation of reinforcement frame; - pouring concrete; – strength gain. |
| 3. | Construction of a box house | – waterproofing; - the first crown. |
| 4. | Subfloor | – fits into the period of wall construction. |
| 5. | Box assembly | – subsequent crowns; – interior partitions; – interfloor ceilings. |
| 6. | Installation of the rafter system | – roof truss system; – insulation of the under-roof space; – laying roofing material. |
| 7. | Installation of individual elements | – installation of columns, supports and other vertical elements; – installation of window and door units; – arrangement of stairs to the second floor (attic, attic). |
| 8. | Interior finishing | – connection of communications; – decoration (cladding) of the room. |
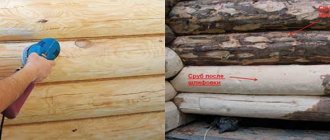
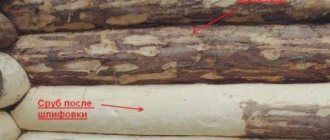
| 9. | External wall treatment | – grinding; – treatment with antiseptic, primer, fire retardant, painting. |
Material prepared for the website www.moydomik.net
Finishing work
The final stage of construction is finishing work, which should preferably begin no less than 12 months after the phase of active shrinkage of the house. Finishing works include:
- A casing block is cut into the door and window openings, a casing is made from a 50x150 mm board around the openings and windows and doors are inserted.
- Next, the floors and ceilings are insulated. After insulation, you can install a heating system at home. Only after this can you begin finishing the floors and ceilings, as well as installing platbands and baseboards.
After all the above work has been completed, you can move into the house.
Insulation of a house made of profiled timber
Any joint in a timber is a place through which air flows faster than through solid wood. This means it needs insulation. Manufacturers took care to minimize air flow by profiling the timber in different ways. It is the complex profile that allows a house made of profiled timber to achieve heat conservation and minimize the use of thermal insulation material.
The method of insulation depends on the type of beam profile, because some of them do not allow the use of insulation between the beams, and when installing others, the presence of insulation is a prerequisite.
- without interventional insulation . This German profile (“comb”) allows you to make such a tight connection between the beams that insulation is not required. This, however, does not exclude the need to use insulation for caulking the outer part of the wall. In particular, after the final shrinkage of the house;
Assembling a house from timber without inter-crown insulation (comb profile)
- with inter-crown insulation . The Finnish profile provides this opportunity. In this case, the insulation is placed between the ridges of the profiled timber, which provides additional insulation at high installation speed.
Assembling a house from timber with inter-crown insulation (Finnish profile)
For laying between the crowns, predominantly natural materials without synthetic fibers are used, as a rule, jute (jute felt) or flax (eurolinen, jute-flax). These are tape materials that are made from jute and flax in a certain proportion. Strip width 50-259 mm, thickness 5-10 mm.
When choosing a material, you need to make sure that it is not very thick, because... Excess thickness can cause poor adhesion of the beams. The insulation should also not get on the ridge (for the same reason). It is convenient to install jute by rolling it over the surface of the timber. The cost of insulation per roll (20 m.p.) is indicated in the table:
| Density, g/m2 | Thickness, mm. | Width, mm. | Cost, rub/roll. |
| 350 | 5-6 | 100 | 105 |
| 150 | 145 | ||
| 200 | 165 | ||
| 550 | 8-10 | 100 | 145 |
| 150 | 195 | ||
| 200 | 235 |
Linen rope is often used for caulking.
Inter-crown insulation for timber - jute, linen (tape)
Thin jute is convenient for making caulk and insulating openings.
Caulking of timber walls and insulation of openings (windows, doors)
Moss, despite the fact that it is an environmentally friendly raw material for caulking, is not in particular demand in our area.
Less common today is tow. Although this material has currently undergone a number of changes. Tow intended for caulking a wooden house is softened with an emulsion (chemical composition), which makes it softer.
A distinctive feature of natural insulation is its environmental friendliness and the preservation of good ventilation. Among the disadvantages: the complexity of caulking, attractiveness to birds and insects, the integrity of the seam must be constantly checked and corrected, the likelihood of chips appearing on the timber after caulking (marks from a tool). In addition, natural materials are not hygroscopic.
Insulation with synthetic fibers is also available on the market, but their efficiency is lower compared to natural thermal insulation materials.
Another category of insulation is sealants for timber seams. They are used to seal small cracks and between crowns. Joint sealants are not afraid of moisture, are resistant to atmospheric factors, and allow you to obtain an aesthetic thermal insulation joint. They are more expensive than natural materials, but more durable in use.
Sealant for sealing joints in walls made of profiled timber
Good user reviews about such sealants for sealing cracks and seams in timber:
- Perma-Chink . Acrylic sealant with a wide range of colors. Cost 30,500 rub. per bucket 19 liters or 925 rubles. per cartridge 325 ml.
- Remmers Acryl 100 . Acrylic rubber sealant. Price 377 RUR/600 mm. Sold in tubes, compatible with most paint materials.
- Check Mate . Elastic sealant for cracks. Cost 925 rub. per cartridge 325 ml.
- Latex sealant . Excellent adhesion, wide range of colors. Cost 26,000 for 18 liters.
- Accent . Can be applied to a damp surface. Price 3,942 for 15 kg.
- Atacamast . Cost 1,800 for 15 kg. Users note the inconvenient packaging and application of this sealant.
Joining the frame, drilling holes, insulation
Dowels made of wood or metal are used to connect each crown. From the end of the beam they are located at a distance of at least 25 cm, and then every 0.9-1.5 m. For any part, even the smallest one, at least two dowels should be used, the length of which is at least one and a half times longer than the beam. The dowels must be buried several centimeters into the tree.
The holes are slightly smaller in diameter so they fit snugly. The depth of the hole is several centimeters greater than the dowels used. For drilling, use a drill with a limiter so that all dimensions are the same. The seal is carried out with a special insulation tape. The tape is stretched over the entire surface of the beam in several layers and secured with staples. On the outside, if the wall is not sheathed, the gasket is made at a distance of several centimeters so that it does not get wet.
The beams are laid overlapping each other, the edges are secured with dowels Source rwhouse.ru
Construction of a house from profiled timber - video
Cost of building a house from profiled timber
The construction of a house from timber on a turnkey basis or with your own hands consists of such factors as:
- material;
- fare;
- consumables;
- complexity of the project;
- house dimensions;
- project cost;
- payment for the services of a construction team, if they are hired to perform any work or consultations;
- costs of obtaining permits for connecting communications, etc.
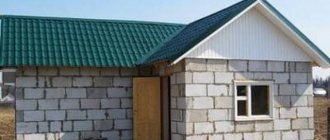
Foundation preparation
For building a house, the optimal foundation is considered to be a strip foundation. To arrange it, stones and vegetation are removed, mounds and holes are leveled. When the site is leveled, the territory is marked. After this, a trench is dug, the depth of which depends on the height of the future building and the soil, the width is at least 25 cm. The profiled beam is quite light, so for a one-story building you can use a shallow foundation.
For multi-story construction or construction on unstable soil, the foundation must correspond to the freezing level of the soil. On average, this figure reaches 1.2-1.5 m.
The following materials are needed for the foundation:
- concrete, sand, crushed stone;
- formwork;
- reinforcing rods.
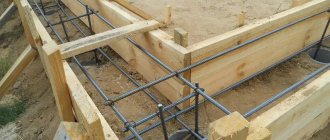
Any house begins with preparing the foundation Source penza-press.ru
The trench is filled with sand and crushed stone, and a mesh is laid with rods to reinforce the foundation. It is recommended to use tying wire rather than welding to connect the rods. The formwork is laid out, and then everything is filled with concrete. To make concrete mortar, cement, sand and crushed stone are used - all components are thoroughly mixed. The ratio of materials is 1:3:4, cement grade is at least 400. The foundation stands for about 2 weeks.
Nageli
Dowels play an important role in the process of assembling timber walls. Their task is to connect the beams together and prevent them from twisting. Pins are most often made with a diameter of 3–4 centimeters from oak or birch wood. Instead of wooden dowels, it is possible to use a metal tube, but this is quite expensive. For dowels, 3 beams are drilled with a through hole in depth in a checkerboard pattern and they are inserted without effort. Instead of wooden and metal dowels, it is possible to use 25-30 centimeter nails. In this case, we must remember that its cap must be recessed 3-4 centimeters deep into the beam, since shrinkage of a house built from timber is inevitable.
Material selection
It is not possible to create this type of house from every type of tree. If you want this structure to stand for many decades, you need to select tree species that are especially durable and not very expensive. Coniferous trees such as pine, larch, as well as linden, willow, oak, aspen and birch have such measurements.
Installation of timber frame crowns.
Here it is necessary to take into account the fact that the construction of a log house will be carried out from logs whose diameter is not less than 20 cm, but not more than 26 cm. You must use even logs, of the same thickness along the entire length and without cracks.
You can make a log house from timber from 2 materials:
- profiled timber;
- rounded logs.
The creation of a rounded log is made by processing an ordinary log into a shape in the form of an ideal cylinder. In this case, a special machine is used. It is capable of removing the very top, not very durable layer of the log.
Making log houses from timber with your own hands begins with the development of a project and the choice of material. And if we leave the building plan to your discretion, since everything depends on specific wishes, then regarding the timber it is quite possible to give a number of general recommendations.
Structure and advantages of laminated veneer lumber
The difference in the functional parameters of these materials is also quite significant:
smooth parts that are cut from logs in the shape of a square or rectangle are cheaper, but do not provide proper tightness when connecting the crowns. So if you want to get maximum thermal insulation of walls even without finishing, choose profiled timber with special locks on the connecting surfaces;
Please note! Some models of profiled timber even have a special selection for laying inter-crown insulation. The use of this thermal insulation technology significantly increases the level of energy saving of the wall. As for the structure, the most common is solid material
However, when drying, long beams can become deformed, so sometimes timber glued together from lamellas with multidirectional wooden fibers is used for construction. Of course, the price of such products will be higher, but by choosing glued blanks, we practically guarantee that their geometry will remain unchanged;
As for the structure, the most common is solid material. However, when drying, long beams can become deformed, so sometimes timber glued together from lamellas with multidirectional wooden fibers is used for construction. Of course, the price of such products will be higher, but by choosing glued blanks, we practically guarantee that their geometry will remain unchanged;
Any of these combinations can be successfully used to build a log house. And yet, lately craftsmen have given preference to solid profiled products that have undergone air drying. According to most experts, it is these raw materials that have the optimal combination of cost and operational parameters.
We invite you to familiarize yourself with the thickness of timber for bath walls: the correct choice of material size
Expenses should be taken into account at the project stage
It is profitable to order a ready-made standard project for the construction of a cottage from timber with reference to the region. It is up to the designer to select from savings on the network and adapt the technical design to the request. What are the advantages of the project:
- Get a detailed cost estimate for materials, components, and work costs;
- Issues of material shortages or sale of remaining surplus will not arise;
- Detailed drawings and subassemblies will lead you out of the maze of errors;
- Transport costs are optimized;
- Laying pipes and cables will not cause any difficulties;
- The maximum cost of a standard project is 20 thousand rubles.
But the implementation of the idea depends on the need to hire a team of qualified carpenters. The level of responsibility, skill of specialists and the seriousness of hidden defects will become clear during the first wintering.
What should an ordinary person, inexperienced in construction, decide to build a warm house from profiled timber with his own hands? Order a house kit from a local house-building plant and save a significant amount of money with this step and speed up your move-in date.
Essentially, a house kit is a kit for the builder. The profiled timber is cut to size, the dovetail type connecting locks are made without gaps using precise factory equipment, which eliminates the appearance of cold bridges.
In the attached video, craftsmen use a chainsaw for this purpose. But are they capable of reproducing the precision of a machine production line? It can be seen that the cuts were made approximately, with a margin. Will they definitely caulk or foam the inconsistencies in the cuts? Doubt encourages self-building. And the cost of the work will amount to no less than factory processing.
Video:
Do-it-yourself house made of profiled timber
The benefits of purchasing a house kit made from profiled timber
A technological worker has replaced a carpenter - that’s what machining means.
The developer is limited in time, looking for an opportunity to reduce the cost of building a timber house. Let’s look point by point at whether the costs of cutting and sampling are reasonable:
- You receive chamber-dried wood with 10–16% humidity in sealed bags;
- End processing with film-forming stabilizer INDULINE. This means that the main channel for moisture absorption is blocked, the web of cracks will not disfigure the cut;
- Each part is numbered, the instructions indicate the location of assembly;
- Adjustments and modifications are excluded, time is spent only on the process of assembling the house;
- Check prices at wholesale stores per cubic meter of long profiled timber. It turns out that the cost of a similar unit of a house kit is the same or up to 10% more expensive - this is where the benefit is hidden;
- A set of timber for a house with an area of 120 m2 will cost approximately 650,000 rubles, for 190 m2 – approximately 950,000 rubles;
- The average assembly cost will be 25% of the cost of the timber. Manage the reserve fund at your own discretion;
- The thickness of the log house will be offered according to the climatic zone: the common size of timber 150 x 150 mm is suitable for Voronezh. In Siberia, wall thicknesses less than 220–250 mm are unacceptable;
- Installation will speed up twice;
- The material is 100% treated with antiseptic and fire retardant.
100% complete from base to ridge, this is the construction service
Video:
Ready-made house kits from the manufacturer
How to make your cherished dream of owning your own home come true?
It's easy to do it yourself. It is easier to build a house with your own hands from wooden beams. Wood is a traditional material with time-tested quality.
The production of finished softwood timber in our time is represented by a wide number of options. If you have a ready-made project, it is possible to order material for the template.
Production will take a long time, but will be compensated for during installation.
7 steps to realizing your dream
After making a decision to build housing, it is necessary to carry out a number of preparatory measures.
The best time for this is considered to be late autumn and winter. It is necessary to spend a lot of time on all actions and it is advisable to time this period by the beginning of the construction season from mid-Vienna to early autumn:
- Decide on the choice of site.
- Order or buy a ready-made standard project for your home.
- Order and purchase basic material.
- Carry out preparatory work.
- Prepare consumables.
- Purchase a tool.
- Conclude agreements with contractors.
Additional points
When building from sawn timber, there are even more analogies with logs. Here the corners of the log house can be assembled both into a paw and into a bowl. The cutting of internal walls, beams and floor joists is done with a frying pan (in visual appearance, such a connection is similar to a dovetail connection).
In this case, it is mandatory to fasten the crowns with dowels (spikes) and pins. This also affects the partitions, since they must be maximally strengthened not only by the structure itself, but also by themselves.
When building from such material, walls inevitably shrink. And periodically it is necessary to tighten the nuts on the studs.
Regardless of the type of material used, when building a house from timber, a number of rules must be strictly observed:
- During the installation process, each beam must be installed in its place and fixed to it using fasteners of design features or auxiliary devices. It is necessary to strive for the highest possible installation accuracy.
- All fixing structures must ensure free shrinkage of the walls of the house and prevent changes in the geometric parameters of the beam.
- All work related to the installation of dowels must be carried out after securing the timber.
- The holes for the dowels must be made strictly vertical. This is possible when using rack jigs for drilling.
- The use of screw ties is highly recommended. This will avoid deformation in the vertical direction.
- After completing the assembly process, the crown joints must be caulked using a natural sealant or protected with a special sealant.
Compliance with the listed rules allows you to get a reliable, warm home that will not have to be patched and repaired periodically and which you can rightfully be proud of.
Walling
The log house can be tied in several ways:
- in a paw or bowl - for round logs;
- on the main tenon - for a rectangular section, a labor-intensive method, but it ensures a high density of joints.
The dowels used can be made of wood or metal. Standard sizes are 12-15 cm high, 2.5 cm thick, the holes for them should be a few centimeters deeper. The laid row is adjusted in the corners, the insulation is laid and the next crown of logs is placed on top, then the dowels are driven in. The insulation can be tow, felt or jute. The materials are fixed with a stapler. When several rows have been assembled, openings for windows and doors are cut out, and holes are made on the cuts to ensure air exchange. On the last two rows, grooves are made for the ceiling.
At a sufficient level of timber laying, openings for windows and doors are cut Source iskona.org
When assembling walls, one must take into account the fact that virtually all the beams will differ by millimeters from each other, which can negatively affect the result. Therefore, you can make a flat side only from the inside or outside. Sometimes you will come across a bent or twisted beam. It is recommended to cut the former into small pieces, and use the latter for various outbuildings on the site, bathhouses, or use for other purposes. A beam curved in one plane cannot be used for walls, expecting that it will level out under the weight of other materials - this will not happen. Curved timber can be laid into a wall only by leveling it horizontally and sequentially fixing it with dowels.
During operation, the assembly is constantly checked and the following parameters are monitored. If any deviations are detected, further work is stopped until the problems are resolved. Particular attention is paid to the height of the corners and verticality. In case of problems with verticality, the problem is eliminated until the beams are replaced. In this case, the height of the corners can be adjusted by spacers between the rims.
All corners in the house, vertical and horizontal, should be 90° Source cocinandote.com
The assembly of a log house can be carried out in two ways of laying the timber - with or without residue. In the first case, you can get a warmer and more stable house with the simplest possible construction scheme. However, the material will be consumed with more waste, increased installation costs and a smaller building area. In addition, such a house is very difficult to insulate or cover with siding. In the second case, there will be no convex walls, so additional finishing and insulation can be carried out, and the total space inside increases. But it is very important to adhere to all the technology so that the house is not blown out.
Where to start?
When the project is selected, the assembly of the log house begins. The foundation of the house is being prepared - the foundation. Since the material is light, any type of foundation is suitable:
- Columnar;
- Tape-grillage;
- Tape.
We do not recommend monolithic, as this is the most expensive option, which will only be profitable if the soil is moving and very crumbling. For loose soil with high groundwater levels, a pile or columnar foundation is suitable. How to build a house if the soil is swampy and mobile? It is wise to use screw piles.
They are easy to install with your own hands, and the log house will be less likely to “walk” in the future. But when choosing a columnar or pile foundation, you should understand that in the future the base of the house will have to be additionally surrounded by a frame and insulated. Otherwise, there will be no basement or cellar in the house, and heat loss after insulating the basement will be reduced by 15%.
One of the most popular types of foundation for a wooden frame is strip foundation. It got its name from its resemblance to a concrete strip rolled out on the ground. The height of the foundation is selected individually and is related to the characteristics of groundwater.
If the level of groundwater is high and freezing in winter is more than 1.2 m, the tape-grillage option can be used. The design combines a concrete strip, but on piles every 1.5 - 2 m. Moreover, the piles are poured first, then the formwork is made for the strip. Before pouring, it is recommended to calculate the cubic capacity of the foundation; this will reduce the cost of concrete.
The detailed technology for assembling a strip-grillage foundation is disclosed in one of the previous articles.
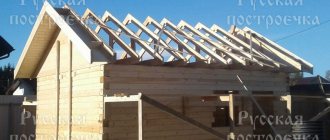
Roof assembly
The beams are laid at a distance of 90-110 cm from each other; if the attic is used as a living space, then 15-20 cm beams are used, non-residential ones - 10-15 cm. Then the support posts and rafters are fastened. For the lathing, boards approximately 15 cm wide and a maximum thickness of 2 cm are used. The distance between the rafters depends entirely on the weight of the ceiling, the standard is 1.2 cm, fastening is carried out with self-tapping screws or nails. Maximum attention is paid to the fasteners of the support posts. Waterproofing is applied to the sheathing, and then the roofing covering.