There are rooms where you need to install non-standard doors. At the same time, it needs to be installed as soon as possible... If we are talking about plastic, then you will have to wait until it is made to size. Yes, and plastic does not always fit into the interior. Or imagine a situation where it makes no sense to buy a plastic door assembly for 5 - 10 thousand rubles. no, if you can fit it into 1 thousand rubles, and do it faster with your own hands. And this will be justified, and a more correct decision.
I’m not talking about difficult-to-manufacture interior doors made of solid wood. We are talking exclusively about a simple door and speed of assembly at home. At the same time, a door assembled with your own hands must satisfy a number of requirements - be accurate in size, and fit snugly against the shutter of the wooden frame when closing.
Another situation is that outside the door there can be frosts of -30 degrees, and in the room where it is installed the standard room temperature is +24 degrees. It serves as an exit to the cold attic space, and will be opened very rarely. In simple words, you need to make a door so that it does not freeze. And even if frosts down to -40 degrees in winter are not constant... and the door itself will not stand on the street. And if it’s -40 degrees outside, then in a cold attic it’s no more than -30. The only difference is that there are no winds that can complicate the use of such a door in difficult conditions. The main problem is frost and street noise, which needs to be significantly muffled with a simple door.
Let's just say that everything should be as accurate as possible using a home tool. After all, every home has a standard set of tools, such as a square, a hacksaw, and a screwdriver. This means that you can assemble a simple wooden door with your own hands.
DIY plywood doors
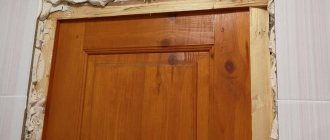
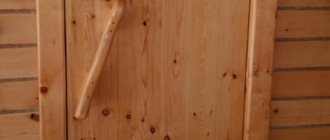
Let me show you a photo at the finishing stage, where this door is already installed. No one sees her, she is in the dressing room on the second floor, and merges with the wooden wall. In one of the blog articles, I’ll tell you how this room was sheathed. Do not miss…
Installed inside a sliding wardrobe (or inside a dressing room with louvered doors).
By the way! There have already been severe frosts for a week, the door kept more than -20 degrees, and did not freeze. It's all about the seals that are glued to the door frame. But there are other points that significantly preserve heat and sound insulation. Let's look at the steps of assembling a door with your own hands from the photo...
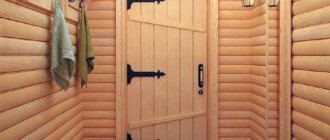
It all started with a not entirely standard opening, the essence of which was to be able to walk full-length into the attic space, and at the same time, the door should not be wide. Significantly smaller in width than standard interior or entrance doors. In the attic there is an electrician and a small warehouse - toys, boxes and the like...
Photo of the opening:
In what cases is it better to install
Sliding doors and sliding doors are installed between rooms. They are especially relevant in the following rooms:
- Kitchen where there is never enough space
- Interior space when two rooms are separated from each other
- Toilet and bathroom
- Dressing room, mirrored doors are often installed here
Doors can be made not only from plywood, but also from solid wood. However, plywood is preferable if you need to make a door leaf of a curved shape. Such designs are in demand mainly for dressing rooms. Plywood bends well, so giving it the desired shape will not be a problem. Radius doors are attached to the same curved profiles.
In addition, plywood is lightweight, it is resistant to high humidity and temperature changes, and is not afraid of direct sunlight. Plywood is easy to care for, as the material tolerates synthetic detergents well.
Door frame
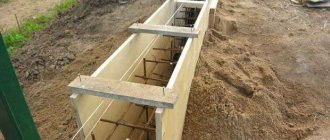
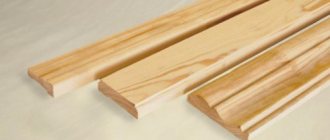
I initially wanted to buy a door frame from Leroy Merlin, but they were all crooked and with knots. Therefore, I assemble the box myself, from the following slats:
Just being in the store, I immediately figured out what it would all look like. Both the thickness of the door and the frame - everything should be almost even when closing. And there is nothing complicated about it. Like this, if you attach the bars one to the other, then the door frame is almost ready:
To keep everything tight and not freeze, I use polyurethane foam. Apply to one part of the bar:
We press the second block and twist it onto the screws. First, we drill holes so that the block does not crack when twisted...
The photo below shows a drill and screws. Use a drill that is not thick so that the self-tapping screw is tightly screwed under load... And the length of the self-tapping screw is determined visually, depending on the thickness of the bars. In my case - 55 black wood screws:
Similarly, I assemble the top and bottom for the future door frame... The frequency of twisting is approximately every 20 cm, so that the bars fit tightly to each other.
Next, I set the angle to 45 degrees, and saw to the size of the opening, minus 2-3 cm for foam on top.
An interesting point... The foam holds the bars so tightly that they are practically one whole:
As you can see, the essence of assembling the box is as simple as shelling pears. It is enough to make the dimensions 2-3 cm smaller than your finished opening. These voids will then foam, and in fact will serve as heat and sound insulation. If you do it closely without gaps, you won’t be able to foam, and there will be siphons (cracks). And so, everything is tight. The foam will then hide under the trim. The procedure is standard, as with interior doors.
To be sure, I check each corner with a square, and then drill and screw in 2 screws per corner. And one more check from the ends... The most important thing is that the door frame is accurate along the diagonals, with right angles. Because if there are strong discrepancies, the door will fit crookedly, and there may be extra cracks.
But again, leveling accuracy is not necessary. Everything can be cut with a standard wood hacksaw, using a “corner cutter” tool.
The corners are also on foam:
It is convenient to check the length by applying opposites. If one is longer, you can file it...
Conclusion
Making plywood wooden doors is beneficial from an economic point of view, and in addition, doing something yourself is always interesting. However, for this you need to stock up on time and patience, since the work must be done carefully and slowly. Only in this case the product will turn out beautiful and durable.
The video in this article contains some additional information on the topic discussed. If after reading the material you have any questions, you can ask them in the comments, and we will be happy to answer them.
Door assembly
As you may have guessed, we begin assembling the door itself. The frame of which will be assembled from a bar - 40 by 40.
Similarly, we cut the corners of each bar, minus 5 mm. in length and width. That is, the frame of the future door must fit inside the frame, and be several millimeters smaller, for the doors to open and close freely. For me it's 2-3 mm on each side. If difficulties arise, you can look at the size of any interior door.
Hinge thickness and door. I immediately estimate two long bars so that, minus the gaps, I can measure the upper and lower bars. They will be the same...
We measure, cut, check. Excellent - everything is clear!
Opposite bars are the same in size. Almost down to a millimeter. Small errors are allowed. After all, assembling doors with your own hands at home...
Similarly, apply a square and twist the frame:
Let's drill...
Twist it and place it inside the door frame. If a couple of millimeters are missing or the gap is too small, you can recess the screw and carefully plan it out...
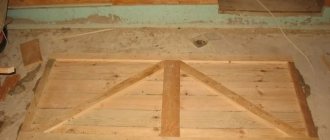
The center of the frame was divided using a block, which was also screwed onto screws at the ends.
We continue assembling the door, and inside we mark another block with a thickness of 2 cm. The point is that both sides of the door will be covered with plywood 10 mm (1 cm) thick, and these 2 cm between the plywood, we will lay penoplex of this thickness... Here is a simple assembly of the frame doors... We apply plywood so that they are flush on the outside of the door leaf. Next we drill and screw it on, also using foam...
In this case, I did not use foam, but a sealant that is glued... But you can use foam.
In total, the door frame is ready. This is what it looks like:
Next, the plywood is marked and screwed. The edges also foam to the adjacent bars. That is, plywood is inserted inside the frames:
Next we pen again:
We lay PENOPLEX inside the frame on one piece of screwed plywood (that is, we turned the doors over). We foam all the cracks and apply foam on the outside...
Place the second piece of plywood directly on the foam. This will glue the doors together, and everything will be perfect:
This is what we got...
Required materials and tools
Installation of sliding plywood doors begins with preparatory work. You need to stock up on the necessary materials and tools so that nothing later distracts you from your work. To create a simple door you will need the following materials:
- Beams in the amount of 5 pieces, length 3 m and cross section 45 x 20 mm.
- Waterproof plywood, coniferous varieties are suitable. The dimensions of the sheet depend on the size of the door leaf.
- Insulation or filler. For a regular interior door, you can choose an inexpensive option that does not have noise and heat insulation properties. But even in interior structures, inexpensive mineral wool or expanded polystyrene can be used as insulation.
- PVA construction adhesive
- Rail
- Profile to be used as guides
- Rollers
- Wood putty
- Acrylic sealant for wood
The tools you need to prepare are:
- Circular saw, hand or electric
- Jigsaw
- Sandpaper
- Spatulas of different sizes
- Screwdriver
- Electric drill
- Fraser
- Ruler
- Pencil
- Masking tape
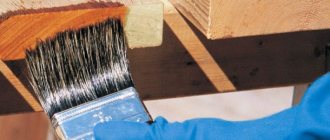
- Tassels
If you are planning decorative surface treatment, then a milling machine and a miter box will be useful to you.
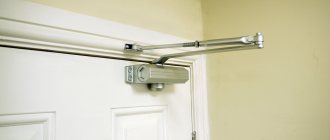
Installing butterfly hinges
Mark 25 cm on each side and attach a hinge. The butterfly hinge is convenient because it does not need to be cut into a box. And this greatly simplifies assembly.
Thickness 3-4 mm. Great!
On the opposite side, just 1 mm is missing. It will be fine though. The main thing is not to touch the box when opening it. If something happens, this tree is 1 mm thick and can be planed. Not critical.
Conveniently, the angle is just the right thickness to support the size of the door leaf inside the frame.
In general, this is the only lock for assembling the door with your own hands. But again, there is nothing complicated about it. I open the door and put it on the bars so that it looks like this. The hinges have already been marked where they will be located. I only figured out the seal to raise the canvas approximately by the thickness of the seal. I do everything by eye...
Modeling the door open...
I start installing the hinge from the bottom. That is, to the box. So that the upper part of the mechanism is slightly higher above the box by 2 mm. Thus, when closing the doors in the future, it will not be pulled. But here the factor of how you install the box will also play a role. I'll show you a photo. Nothing complicated!
We tighten it with 2 screws, do not rush. Everything needs to be checked. In theory, one hole can be left to secure the frame when installing the doors. That is, there will be long screws that we will screw into the opening.
Next, we have a 40mm door. And the box is 45 mm. In addition, there is also a seal of a couple of millimeters. I take measurements and lift the door a couple of millimeters from the hinge mechanism.
I look approximately at the size, and see that with a seal minus 2 mm.
...these 2-3 mm. and raise it as shown in the photo below:
Drill and twist:
To be sure, I screw it on with 1 self-tapping screw. And on the other, the hinge is similar to 1 self-tapping screw, to check how the door fits into the door frame. It turns out perfect, and you can screw in one more screw:
We make a single-layer product - subtleties for craftsmen
Interior plywood doors are made according to a simple design. It is given below:
- Take a sheet of plywood 1–1.2 cm thick. Cut it according to the parameters of the door.
- Attach the slats around the perimeter of the sheet using wood glue or wood screws. Instead of slats, it is allowed to use planks that are made of plywood.
- Make jumpers on one side of the structure. You add additional slats to the door leaf to increase the strength of the door, and fasten them with furniture tongues or using a tongue-and-groove connection. Do the same with the second side of the single-layer product.
- Use a router (if you don’t have one, use a chisel) to make holes for installing door hardware (handle and lock).
- It is advisable to smooth out the transitions from planks to plywood by installing putties (profiled). Then the appearance of the product will be much more attractive.
- You sand the finished door, putty it, paint it in the desired color or varnish it.
How to install doors yourself
The walls are level. The frame and door were also assembled out of the blue, on the floor. Thus, the door sits evenly along the shutter, and there is no propeller... Which means that its further installation will be a piece of cake. The top of the planks can be screwed diagonally so that the corners are level with the wall. I am attaching a photo:
In the lower part, I similarly make a temporary strip along the width of the opening, against which the box will rest. Also, align the gap on the left and right. It's approximately 2 cm long:
Great. You can space the corners to adjust the internal shutter. Sometimes it happens that a few millimeters need to be added by recessing one or another corner.
At the same time, check the level by applying it to the box.
I haven’t glued the seal into the box yet... Initially it was measured at a couple of millimeters, specifically for the seal. The point is that when closing, the door fits equally against the shutter, and thereby maintains the same gap of a couple of millimeters for the future seal. To check the shutter, simply close the door smoothly until it first touches the frame. If one of the corners of the door has already touched the frame, but the other has not yet, then you need to adjust the corner so that it evenly fits against the frame.
And only after the fit of the door to the frame is uniform, you can carefully secure the door frame into the opening. To do this, drill a hole and screw it to the opening with long self-tapping screws. Someone is in a hurry to foam the door without correctly positioning it. Or they are attached only to foam, as a result of which the door either begins to touch the frame, as the foam swells... Or, when closed more forcefully, the foam cannot withstand it and the door moves. At this stage, it is important to do everything once and correctly. Thus, there will be no rework.
Please note the insert. This is an important point. Because if you foam a door without an insert, the door frame may be pushed towards the door. Thus, you will have to redo it by cutting off the frozen foam.
The foam expands as it dries. And it can squeeze out not only the box from one side towards the door, but also the other corner of the story. Therefore, I set all 4 corners with the backing, controlling the gap. The backing fits in quite tightly.
In the end, I put 4 pieces on each side. In the places where the hinges are and opposite, I screwed the box into the opening using long self-tapping screws.
We use polyurethane foam and foam the gap between the frame and the opening from bottom to top. After 2-3 hours, you can cut off the excess foam and remove the corner strips.
Next, we attach the cash for the doors. I decided to do it as shown in the photo below. It was possible to cut it at 45 degrees, but it would be more interesting. How do you think? Attached it to the door frame using galvanized small self-tapping screws.
Main advantages
With minimal carpentry skills, you can make a door out of plywood with your own hands. It can be made in absolutely any size, choose the desired design of the canvas.
Quality and strength depend on the thickness of the material, which ranges from 0.3 cm to 2.1 cm.
Almost any interior structure can be made from plywood: hinged, sliding or sliding doors.
Plywood as a material has many positive aspects, so the products are not only beautiful and comfortable, but also inexpensive.
Advantages:
- Light weight;
- UV resistance;
- Not afraid of moisture and temperature fluctuations;
- Easy to use - you can use a variety of detergents.
Comparing plywood doors with a door made of natural wood, one can note the poor quality of assembly of the former. Disadvantages also include poor sound insulation and relatively low strength.
Do-it-yourself doors inside the cabinet
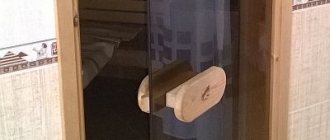
For me, this is an ideal option for a door that leads to a “secret room.” A door that no one can see, since it will be inside the dressing room. Next, I'll paint it with wood oil when I finish the walls. But I’ll write about this later. Do not miss!
I could have used the sander again. But this is at your discretion. Now, the most important thing is to glue the seal...
Similarly, I assembled a small door to the attic space on the other side of the roof, where access to the electrics is also required. The second door is 2 times smaller in height, and assembly was even faster. All that remains is to cut off the foam.
Sliding
The sliding door opening mechanism has the following advantages over standard swing structures:
- Doesn't take up extra space
- Do not accidentally open when there is a draft
- They do not slam shut on their own, which is important in families with small children
Plywood sheets are also lightweight, so the load on the walls is minimal.
Main advantages
With minimal carpentry skills, you can make a door out of plywood with your own hands. It can be made in absolutely any size, choose the desired design of the canvas.
Quality and strength depend on the thickness of the material, which ranges from 0.3 cm to 2.1 cm.
Almost any interior structure can be made from plywood: hinged, sliding or sliding doors.
Plywood as a material has many positive aspects, so the products are not only beautiful and comfortable, but also inexpensive.
Advantages:
- Light weight;
- UV resistance;
- Not afraid of moisture and temperature fluctuations;
- Easy to use - you can use a variety of detergents.
Comparing plywood doors with a door made of natural wood, one can note the poor quality of assembly of the former. Disadvantages also include poor sound insulation and relatively low strength.
Features of wood of various species
When producing wooden doors, you need to know the advantages and disadvantages of the material. The final result depends on this. The main difference between wood is its hardness. Soft woods are easy to work with, but are less resistant to moisture. This material is suitable for interior doors. It is difficult to process hard wood with hand tools, but the material is more resistant to moisture. This wood is suitable for making entrance doors.
When talking about wood species, it is worth considering the resin content of the material. Larch takes first place in this regard. A product made from it will withstand dampness for a long time. Resin protects against rotting.
The following requirements apply to choosing a board:
- minimum number of knots;
- wood moisture content no more than 15%;
- perfect evenness.
For outbuildings, used material taken from the dismantling of old buildings is suitable. It is better to make beautiful doors to the house from a new board.
Hardwood
- Birch is quite hard and difficult to process, but has an attractive texture.
- Beech is characterized by increased strength, but deforms when humidity changes.
- Alder is soft and rots quickly in high humidity.
- Oak is hard, tends to split, but is resistant to dampness and beautiful.
- Walnut has an interesting texture, is easy to process, and is not afraid of moisture and mechanical stress.
- Maple is moderately hard, can be processed well, and has moderate resistance to moisture.
For the manufacture of wooden entrance doors, oak or beech is most often used.
Conifers
- pine is considered the most popular . Soft wood is easy to process, but does not withstand moisture well. The material is best used in the manufacture of wooden interior doors.
- Larch is characterized by a beautiful texture and high resin content. Solid wood perfectly resists moisture, which makes it possible to use the board for assembling entrance doors.
- is knotty, lighter and softer than pine, and slightly inferior in strength.
Decor
Decorating a homemade wooden door begins with sanding. Next, the treatment is carried out with an antiseptic that protects the wood from dampness and pests. After drying, the surface of the door is covered with two layers of primer or putty. The final layer is paint or varnish.
If you have a professional tool, as well as certain skills, the canvas is decorated with carvings, stencils are cut out, and even a mosaic is made.