Category: Repair ( 1 ratings, average: 2.00 out of 5)
Published 03/19/2020 · Comments: · Reading time: 9 min · Views: Post Views: 12,179
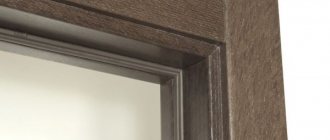
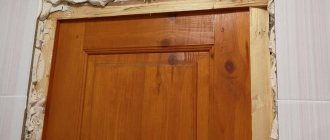
The repair work can be completed by installing cashing on the door openings. They hide minor flaws that appear during installation, such as cracks in the door leaf and wall. Racks come in various shapes, from different materials and mounting options.
Why do we need platbands - advantages of use
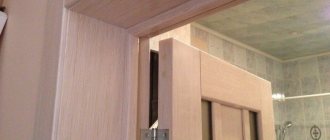
When the installation of the door leaf is completed, there are always gaps between the wall and the frame. And the platband on the door allows you to hide these defects. The racks are installed on the wall on all sides of the doorway. They cover up all the sloppiness, and the result is a beautiful composition. Advantages of use: 1. Allows you to smooth out the loss of verticality, if there were shortcomings during installation - it visually makes it smoother. 2. Hides communications (cables, wires) in different rooms. 3. Hides cracks and hangers that appear at the edge of the frame and wall. 4. Acts as a decorative element. For example, curly or teardrop-shaped ones emphasize different interior styles.
Important! Installation begins after the door is installed, but before the baseboards are installed.
How much does it cost to install extensions on the front door in Kazan
Our website will help you quickly find an experienced craftsman or team to install doors in Kazan. Place a request on YouDo and verified performers from our database will offer you their services without intermediaries.
Featured Artists
| How much does it cost to install extensions on the front door in Kazan | 1,500 rub. |
If you are interested in the question of how much it costs to install extensions on the front door, fill out an application on the Yudu website, and experienced Kazan specialists will answer you. Professional craftsmen will install doors and fittings as quickly as possible, observing technological requirements.
Applications for the installation of entrance and interior doors with all fittings are accepted seven days a week, 24 hours a day. It is possible for a specialist to travel to any point in Kazan at a time convenient for you.
Types of door trims
Extensions are part of an interior door that connects the frame with hidden trim. Experienced Kazan craftsmen install all types of fittings, including the following:
- metal
- plastic
- wooden
- MDF planks
The choice of strips depends on the type of door, its design features and size.
What types are there
There are various options for overlay strips. They differ in functions (to support the structure or for decoration), color palette, installation method (telescopic or overhead), shapes (rounded, flat, curly), sizes, materials (wood, metal, aluminum), texture (simple, carved elements, made according to a template). The finish is selected according to the style of the interior, the installation location and the volume of hidden elements (for example, a lot of cables and wires).
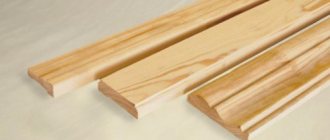
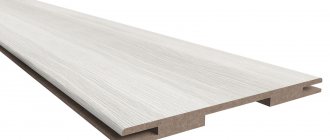
Made of wood
The wooden panel is made from soft linden, spruce, pine raw materials (budget models), from hard (expensive products) - ash, oak, Karelian pine, walnut, beech. They are suitable for any door materials, easy to install, environmentally friendly, adapt to any interior design, have a long service life (with proper care) and can be repaired in case of minor damage.
They are mainly used for interior door frames because they are not resistant to changes in room humidity and temperature. Strong changes lead to swelling or drying of the material.
If the surface is poorly processed, it may darken and lose its original shade. The cost of a wooden plank may be more than a door leaf if there are brass or copper elements. They are present only in designer products, but even without them the cost is higher than other types of cash.
From MDF
MDF paneling is almost no different from wooden types, so it often replaces its competitor. MDF panels are laminated with PVC film or covered with veneer, obtaining a good imitation of the structure of wood. MDF is safe for humans, because it is environmentally friendly. Wear-resistant, resistant to mechanical damage. But it can swell from high humidity. For example, in the bathroom. Materials laminated with PVC film are not expensive, but those covered with natural veneer are the opposite.
Made of plastic
Plastic paneling is made from a strong plastic mass that does not change under various negative conditions. They do not require special care products or frequent cleaning (once a week is enough), they do not melt and do not fade in the sun. The cost is low, so paneling is often used to complete repair work on installing door panels.
Don't miss: How to choose an electromechanical lock - features, pros and cons
The disadvantage of the material is the small palette of colors and models. Usually ready-made ones are available in white and brown, other colors are made to order. In addition, plastic trims must be secured carefully, because they cannot be repaired and are easily scratched.
Made of metal
This type is used for installing steel doors. Usually they are placed on the side of the street or corridor, then they are combined with the box. This allows you not to worry about how to install the panel, because the installation is carried out simultaneously with the box. But there are also separate metal racks, because there are interior steel and aluminum doors that require a metal design.
It has many advantages: resistance to moisture, sunlight, and mechanical stress. They can also be used forever, because they do not wear out like other types.
Important! People without experience may have difficulty sizing. To get everything straight, they hire craftsmen.
Methods for finishing slopes
You can trim slopes in different ways:
- Cement and carefully putty;
- Install slopes from a sandwich panel. This is an inexpensive type of finishing. But sandwich panels are fragile and short-lived.
- Install MDF slopes. This is a more expensive and at the same time reliable method of finishing. MDF slopes are more durable. In addition, they can be matched to the color of the door. Torex produces slopes that fully match the selected door model in color and texture.
You can perform any of these options either independently or with the help of professionals. You can order the installation of MDF slopes from a certified Torex team. In this case, we guarantee high quality of work performed. Since installing MDF slopes is the most complex and time-consuming, you need to know a number of nuances. If you decide to do this yourself, use our instructions.
Necessary equipment for installation
Good fastening of platbands is impossible with insufficient preparation. The technician must have all the required equipment on hand before installation:
- miter saw, hacksaw for cutting metal;
- for measuring panels - a tape measure, for drawing a simple pencil or chalk, a plumb line, a square are required for planning;
- a miter box is the best thing you can use to cut out a beautiful corner. Used for even cutting of the workpiece at an angle of 45 degrees;
- a level for installation on the wall, a hammer, if attached to nails, for tapping on the structure and identifying empty spaces.
Stage 2. Setting aside and marking the required dimensions of the extensions
Photo 4. Preliminary markings
After we have measured the required dimensions of the additions, we set them aside on the blanks of the additional elements. We make preliminary markings directly on the panel.
Photo 5. Gluing future cutting areas with masking tape
Using masking tape, mark future cutting lines.
On one blank for additional elements, you can put two parts - the threshold and the upper part of the additional elements.
In the same way, we set aside the dimensions of the second part, make preliminary markings on the workpiece and glue it with masking tape.
Photo 6. Re-mark
We re-mark the length of the extension directly on the masking tape.
If you do not glue the edge of the additional element with masking tape, chips may appear on it during sawing.
Photo 7. Checking dimensions
Once again we check the correctness of the markings.
Photo 8. Postponing the cutting angle
Use a miter angle to mark a cutting line perpendicular to the edge of the panel.
Mounting Instructions
After selecting the fastening material, the process of installing platbands on interior doors begins. First you need to determine how level the walls are and what shape the panel has. There should be no gaps when joining.
If the walls are perfectly level, you can attach them using adhesive mass (liquid nails). If the walls have slight irregularities, then it is better to use finishing nails or self-tapping screws.
The design of gaps at the door frame and wall begins at the opening point. There are hinges on the opening side that prevent the box from closing completely. Therefore, equal indentation is left on all three sides.
Interesting! At doors located in the corner, cashing is done in the shape of the letter L. For symmetry, some install a narrow strip of the same shade and material in the corner.
For doors located in the corner of the room, an additional narrow strip for symmetry may not be installed when finishing the slopes with decorative stone or tiles.
Do you do the cashing yourself or call a professional?
I call the master myself
At an angle of 90
There are 3 options for sawing the casing at 90 degrees: vertically, simply horizontally or horizontally with an overlap. A vertical type connection involves the placement of the top board inside the side boards. Horizontal means that the plank will not be located between the racks, but will complete the design with one line.
For vertical it is necessary: 1. Attach the stand at a distance of 3mm. up to 4mm. from the loops and from the top on the inside, mark a line for the beginning of the top element. The same is done on the opposite side. They need to be marked somehow so that you know where the right and left are (the floor may not be level and you may accidentally install a rack of the wrong length). 2. Then the length of the top post is determined from the marks on the wall. Moreover, you need to align it as much as possible with the door frame. 3. Then a cut is made along the marked lines with a hand saw with a miter box or a jigsaw.
For a simple horizontal cut, apply the top strip to the box. Focusing on the bottom edge, find the exact mounting location and draw lines to determine the exact length of the right and left trim. The size of the vertical board is also determined based on the length of the side boards.
Expert opinion
Sergey Dymchuk
Expert of our site. He has been working in the field of door production and installation for more than 10 years. Implemented hundreds of different projects. Helps make the content of our site interesting and useful.
Ask a Question
You can first secure the trims on the sides, and then measure the missing top element.
Designers use horizontal design of the door space with an overlap. To do this, the top one should protrude slightly at the edges. It is installed after installing the right and left racks.
Don't Miss: Smooth and Textured Walls
At an angle of 45
Joining a panel with a shape in the form of a semicircle or any shape is more difficult. After all, you need to know how to cut material at an angle of 45 degrees. This type of joining helps hide the gap and allows you to create a beautiful door frame. 1. Determine the length of the side panels. To do this, attach the casing at a distance of 3mm. up to 4mm. from the loops. Then mark the bottom cut point. 2. Then the planks are marked with a pencil. The lower cut point is increased by the width of the panel and a cut line is drawn. 3. Cut the cut with a hand saw. Moreover, the material is fixed in a miter box so that the mark is visible. If you cut with a jigsaw, a drawing is required. 4. Side strips are installed. 5. Similarly, we measure the top bar, make a drawing and sawdust. The top panel should coincide with the edge of the side board. 6. Mount the upper part. 7. Seal the joints with sealant containing acrylic or silicone, and after drying, paint with a corrector.
Nuances of the work
Every job has its secrets. Here are some tips from professionals.
How to join the platband to the baseboard
The platband is installed close to the floor. The length of the plinth is adjusted to it. The plastic baseboard has a beautiful cap at the end. Wooden ones are processed: the end adjacent to the baseboard is beveled at an angle of 45o.
I wonder who would like this connection between the casing and the baseboard.
How to trim the platband
When working with a jigsaw, all cutting lines must be very clearly drawn. If you only have a hand saw, then it is advisable to have a miter box on hand. Another important point concerns the width of the cut. It can eat 3 mm from the length of the platbands. Therefore, when applying markings, the easiest way is to raise it by 1.5 mm, and cut exactly along the line.
For a jigsaw, the cutting line must be well drawn.
How to align the plane of the platband with the wall
When installing a door block, it is not always possible to achieve the same plane of the wall and frame. In this case, preparatory work is carried out to eliminate the defect, as discussed above.
A few more tips
Finally, here are some more tips.
- Platbands are installed after finishing the walls.
- Significant wall defects are well hidden under wide, about 12 cm, platbands.
- Errors when joining platbands at an angle of 45o can be eliminated with putty, tinted after drying with a corrector to match the tone of the panels.
To eliminate the gap you will have to work hard: first putty and then paint over it with a corrector.
- Visible gaps between the platband and the frame are sealed with acrylic sealant, and then tinted to match the materials with a corrector.
The main problem when installing platbands is not the technological process, it is simple, but the correct choice of strips in color, width and shape of the front surface.
Features of installation of wooden and plastic platbands
Home owners who are making renovations are interested in how to install door frames with their own hands from various raw materials: wood, plastic. In order to understand how to attach platbands to interior doors for greater reliability, you need to start from the weight and structure of the material.
Wooden racks weigh a lot compared to plastic ones. Therefore, the question of how to securely fasten them does not arise - select nails for finishing, self-tapping screws. The tree can also be simply repaired if any defects occur. For example, a wax pencil for furniture or special pads. Gaps between joints can simply be eliminated with putty.
Plastic models can be glued to liquid nails. Moreover, you need to be very careful during installation, because scratches cannot be covered up with a furniture wax pencil, and the paint will be very visible. Plastic is often used for doors, so there are other ways to eliminate the shortcomings. For example, different types of film for pasting furniture: select the desired color, texture and paste over the damaged surface.
Stage 4. Assembling the accessory box
Before installation, we assemble the extensions into a solid, rigid box.
Photo 11. Drilling holes for self-tapping screws
Using a drill, we drill holes for self-tapping screws - for fastening from the inside. This is a mandatory step so that when screwing in the screw does not split the MDF panel.
Photo 12. Drilling holes for self-tapping screws
We make several holes at a distance of 10–15 cm from each other.
Joining and alignment with the baseboard and the wall
In order to connect the racks well with the baseboard and walls, the installation of platbands on interior doors should end in the floor.
If the plinth is already installed, then it is dismantled and adjusted to fit the bar. There are various decorative plastic plugs that allow you to neatly decorate your plastic baseboard. For wooden skirting boards, a 45 degree cut is made. and you get neat rounded edges.
Size standards
The finishing of doors with platbands is necessarily determined by the requirements of GOST. First of all, this concerns the dimensions, which are taken into account when preparing decorative finishing materials. If we are talking about a standard door leaf, the dimensions of the platbands should be 200x800 mm. Depending on the type of entrance door and the material used to create the trim, the width of the product can vary between the following values:
- For standard platbands - from 60 to 100 mm (the most often used figure is 70 mm).
- For strips made of metal and wood - 40 mm (a narrow strip is chosen so that the trim does not rest against the doorway, which is located too close).
- For models with decorative elements - 50-80 mm (64 mm wide plates are common).
- Semicircular strips - 70 mm.
The width of the curly strips is determined by the texture and pattern used. The main thing is that the platbands do not rest against the door jamb and do not interfere with opening/closing the door, which will interfere with their practical component.
Attachment by beaks
This one is different in that it does not use any of the above mountings. The casing itself is equipped with a latch, shaped very similar to a beak. Hence the name. This fastener is inserted into a recess on the door frame. Thus, the fastening is not visible from the outside. But over time, the joints may collapse, and then they will need to be treated with glue.
Liquid Nails
For a flawless appearance, without visible fixation elements, use a special glue - “liquid nails”. However, this method is characterized by weak fixation and difficulty in dismantling. In addition, it can only be used on perfectly smooth walls. But if you decide that this mounting method is the most suitable for you, then apply adhesive to the back side of the casing and lean it firmly against the wall. In the case of an interior door, it is enough to hold the bar in this position for about a minute.