When installing doors, we simply cannot ignore such elements as platbands. The latter perform decorative functions and hide the frame structures, as well as seals and fasteners. And how good the door will look depends on this final stage. Today we will talk about how and what is the best way to cut various types of platbands.
Working with this essential component of any door begins with choosing the type. Now we will try to list them and talk about their features.
Kinds
To correctly install platbands on interior doors, you first need to select the appropriate elements. First of all, pay attention to the material of manufacture:
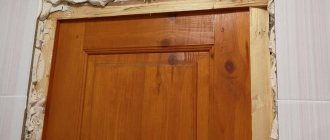
- Products made from natural wood are considered universal. The strips can be painted to match the color of the doors. The wooden elements are fastened with nails without heads. If the walls are well aligned with the door frame, the platbands are placed on an adhesive composition - “liquid nails”.
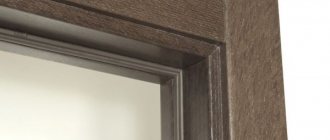
- Laminated MDF planks resemble natural wood in appearance. Decorative elements are matched to the color of the door. The platbands are secured with adhesive or nails without heads, having previously drilled blind holes.
- PVC cashing is more suitable for plastic doors. The planks are glued or mounted on the mounting profile.
- There are also aluminum and steel cash registers, but they are usually installed on entrance doors.
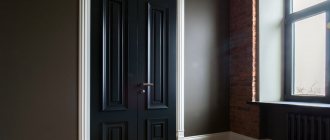
Most planks are given a standard flat, rounded or curly shape .
Depending on the mounting method, cash can be overhead or telescopic. The first type of elements is fixed directly to the door frame. The second one is equipped with mounting grooves.
Door frame division
Platbands can be made from:
The selection of cashouts based on material is based on what the interior doors are made of. If the structure is wooden, then the frame should be made of wood of the same type. And if the interior is designed in high-tech style. then metal trims will look great.
According to the format, it is customary to divide cash deposits into:
Flat elements are most often used. And figured (sculptural) cash is used as decoration, if the interior designer’s idea requires it.
Tools for work
To ensure that the installation of door trims is successful, the tools must be prepared in advance.
- To make accurate markings you will need a pencil, tape measure, plumb line, square and level .
- A miter box will help you cut the workpiece perfectly evenly at an angle of 45 degrees .
- It is better to cut the planks with a miter saw . If you don't have one, you can use a hacksaw . The fine teeth of the blade will not leave chips on the product.
- A hammer is used to drive nails or tap cash elements .
Tips and tricks
Before installing the door, leave a supply of wallpaper in case there are gaps left after installation - small ones can be easily masked with them. To make the opening look better, it is recommended to choose special nails with a small head. In this case, a small hammer is also used so as not to damage the lining. The carnations are covered with matching mastic.
Trimming in place - applying the trim to a doorway, floor or wall. This is not the best option, because the walls and floor are never perfectly level. The error that appears with this approach is large.
To file the casing, a protractor is also used - the corners are already marked on it.
Advice! Installing planks is not always necessary. It is unacceptable for rooms with tiles - it is better to use plaster.
Installation of platbands is a mandatory stage in the design of a doorway. The right choice can even delay the installation of the door, because the view will be good anyway.
How to cut off the platband?
After marking the angle of the cut and the length of the workpiece, the trim is cut with a miter saw. A special feature of the power tool is the adjustable table, which is installed at the desired angle. In order to saw off the door frames correctly and without chipping, the side edges of the workpiece are pressed tightly against the stops on the frame. If a gap occurs, the cut will be uneven.
If you don’t have a power saw, a miter box will help you cut the edge of the casing at 45 degrees. It is better to buy a quality tool. The cheap one made of plastic has deformed thrust elements that distort the size of the angle. A hacksaw for cutting is used with fine teeth that do not leave chips.
Final part
Installing platbands cannot be called too simple, especially if the home craftsman does not have experience in this area. However, with due diligence and accuracy, anything is possible. If a home master doubts his abilities, it is better to seek help from specialists. After all, by sawing off the extra half a centimeter, you can completely ruin the platband fabric. However, it is not a fact that the store will have the desired color. If the master decides to do all the work himself, then the best option would be to first practice on unnecessary boards.
We hope that the information presented today will be useful to novice home craftsmen. The editors of our online magazine will be happy to answer your questions if any arise during the reading process. All you have to do is state them in the comments below. There you can share your method of washing down the platbands at the desired angle. If you liked the article, do not forget to rate it - your opinion is extremely important to us. And finally, as has already become customary, we bring to your attention a short video that will help to more fully reveal today’s topic. Take care of yourself, your loved ones and be healthy!
Rate this article
Loading...
How to attach platbands to interior doors?
Simple fastening of flat platbands is performed at an angle of 90 degrees. The vertical planks fit tightly at the top with the horizontal one. When installing wooden or MDF elements of complex shapes, the ends are cut at an angle of 45 degrees. There are 4 methods of fixing the planks.
Using finishing nails
Wooden or MDF door casing is easier to nail with nails with flat heads. The fastening is reliable, and if necessary, the planks can be easily dismantled. You can use nails of a different configuration, and so that the heads are not visible, they are removed with side cutters. The length of finishing nails for platbands is about 40 mm. The size can be calculated individually, taking into account the thickness of the cash. Having passed through the bar, the nail must enter at least 20 mm into the body of the door frame.
Attachment points are marked on the workpieces, maintaining the same distance. Typically, a pitch of 500 mm is maintained. Using the markings, drill through holes with a diameter corresponding to the thickness of the nail. After joining to the door frame, the platbands are carefully nailed. For aesthetics, hats are painted over with a wax pencil.
Liquid nails
To attach cash to interior doors without nails, use an adhesive - liquid nails. The advantage of this method is that there is no visible fixation site. The downside is the weak fastening, as well as inconvenience during dismantling. In addition, liquid nails are only applicable if the adjacent walls are perfectly level.
The door frames are installed after sawing and fitting of the blanks. The plank is lubricated on the back side with adhesive and pressed tightly against the wall. To glue platbands for interior doors, it is enough to hold each strip pressed for no more than a minute.
Fastening with self-tapping screws
The method is similar to fastening with finishing nails, only instead of them, wood screws 25 mm long and 6 mm thick are used. Places for holes are marked on the workpiece in increments of 500 mm. A drill of the same diameter or with a margin of 1 mm is used.
It is advisable to recess the hats into the body of the plank. On the front side of the workpiece, the hole is expanded with a drill of a larger diameter to a depth of 1–1.5 mm. Now all that remains is to attach the trim to the interior doors with self-tapping screws. You need to tighten the hardware so that the head fits into the recess. The place of fixation is painted over with a wax pencil.
Attachment by beaks
The method does not require the use of screws, nails or adhesive. The cash box is equipped with a beak-shaped lock. The connecting pin is inserted into the recess on the box and pressed until it clicks.
The advantage of this method is ease of installation and invisibility of the mounting location. A negative point is the delamination of MDF trims during dismantling. Over time, spontaneous destruction of the joints may occur, which requires additional treatment of the joints with glue.
Cutting with improvised means
It is not always necessary to do a large amount of work. Why waste money if you need to cut several tiles. In this case, you can use the following tools:
- ordinary glass cutter;
- sharpened nail or drill;
- assembly or stationery knife.
Important! It is recommended to use a drill bit with pobedite tip. Thanks to it, you can better apply a deep scratch to the surface of the ceramic.
How to cut ceramic tiles with a glass cutter? The algorithm of actions is as follows:
The extra fragment is measured. Markings are applied to it. A metal ruler is placed along the length of the fishing line
It is important to do this perfectly evenly. All that remains is to use a glass cutter or other sharp material at hand once along the ruler. During the process, the ruler should be held well
The result will be a noticeable scratch. The tile is placed on the edge of a table or workbench. The scratch on it should coincide with the edge line of the table. With a strong, confident and sharp movement of your hand, press on the edge of the tile.
The required piece will break off. It is clear that it will not be possible to make a perfect cut. But you can save money. And after that, it’s enough to rub the cut with sandpaper. In addition, if you put the tiles in clean water for just an hour, the cutting process will become better.
Note! Some people ask whether it is possible to cut ceramic tiles with a jigsaw. Yes, but the cut will not be as high quality as we would like
The use of an electric jigsaw is rational when adjusting tiles laid in an inconspicuous place. But, there are special diamond-coated saws for manual or electric jigsaws. This option is allowed.
Figured breaking out
Sometimes it is necessary to make curves in the mowing line. The mowing line can be not only straight, but also semicircular. Such breaks are more problematic when they do not start from the edge. In such cases, you will have to first make a hole and then break it out.
For figured breakout, it is recommended (if possible) to apply a deep mark along the entire breakout border using any method. This will reduce the number of possible chips.
Figured breaking out of tiles.
There is a special tool for breaking out - pliers with a wheel. But for one-time work it is not advisable to purchase a special tool. Therefore, you can get by with ordinary pliers.
The breaking technology is very simple. The pliers (or tongs) are strongly compressed, causing the material to crumble, or they are compressed and sharply turned (only far from the cutting line, at least 5 mm). Small pieces break off. If you try to break off a large piece at once, you can ruin the whole job. A part may break off behind the line of marks.
Long, straight, narrow pieces across the entire tile are broken off by sharply turning the pliers to the side. Preliminarily clamping them along the mowing line marks (a scratch, of course, must be caused). In this case, the entire length of the tile may not break off and the procedure will have to be repeated on the remaining part. Then the remaining sharp protrusions are also carefully broken off.
The simplest way is to apply a mark and hit it on a sharp corner. In this way, you can easily and quickly prepare most of the elements.
How to install platbands on interior doors?
When installing interior doors with your own hands, glue, nails or self-tapping screws are used to fasten trim made of wood or MDF. However, the evenness of the walls and the shape of the planks are taken into account. There should be no gaps at the joints. If the walls adjacent to the end of the door frame are uneven, then it is better to refuse gluing.
Installation of cashing begins from the side where the interior door opens. This is due to the presence of hinges that prevent the strip from being fixed flush with the box element. You will need to make the same indentation, and on all three sides for symmetry. Where there are no loops, there is no need for mandatory indentation.
If the door is in a corner, installation is carried out using the letter G. If desired, you can saw the element vertically and use a narrow strip.
The platband on one side is installed when the slopes on the other are decorated with tiles or other wall materials.
Docking at an angle of 45
When it is necessary to install trim on the door at an angle of 45 degrees, use a miter box for marking. This joining of elements is usually used for shaped and rounded planks. If there is no miter box, the markings can be made with a protractor.
The installation procedure consists of the following steps:
- The height of the vertical elements is measured from the floor. The planks from below are placed on the floor covering, which is why the joints of the baseboards and door frames are on the side. When installing cash on the door from the hinge side, take into account the width of the indentation. The indicators are measured on the workpiece and a mark is placed. This will be the bottom point of the 45 degree angle.
- Having inserted a bar into the miter box, mark a cutting line at an angle from the set point. The excess part is sawed off.
- First, the blanks are baited in two places so that they can bend from above. The heads of the nails are removed with pliers and hammered into the door frame: one just above the floor, the other at a distance of 1 m.
- The length of nails without heads should not be greater than the thickness of the strips. It is optimal to make the protrusion of the pins 5 mm. The platbands are attached to the door frame. At the location of the nail, a wooden beam wrapped in fabric is applied to the workpiece, and vertical strips are placed on the pins with light blows of a hammer.
- To properly make platbands for the entire door, the corner must be given an even shape. The upper unfixed parts of the cash are folded back, and a horizontal element is placed under them. At both ends of the workpiece, mark lines at an angle of 45 degrees with a pencil, after which the excess part is cut off.
Docking at an angle of 90
The platbands are fastened at 90 degrees with horizontal or vertical seams. The choice depends on the preference of the owner. When installing a door cashing with your own hands at a right angle, only flat-shaped blanks are used. The cut areas are treated with varnish or acrylic-based paint.
To install platbands on interior doors with imitation lintels, the upper element is extended. The joining is obtained at an angle of 90 degrees with horizontal seams. The top bar extends beyond the vertical.
Telescopic trims
Telescopic trims are attached to interior doors without nails. Decorative elements are equipped with a special lock consisting of a slot and groove. Fixation occurs at the end of the box. The main requirement for proper installation of platbands is the presence of a protrusion. It forms when the door frame is narrower than the thickness of the interior partition. The adjacent walls must be level, otherwise you will get an unsightly gap.
Installation instructions for plastic trims
Glue is used very rarely, the connection is unreliable. Basically, plastic trims are installed on interior doors using a profile. This installation method consists of the following steps:
- A special profile is cut to fit the dimensions of the door frame. The blanks can be made 5 mm shorter. This will not play a significant role; they will still hide under the cash.
- 4 long and 2 short elements are cut off on two sides of the interior door. The connecting ends are sawed off at an angle of 45°.
- Fix the mounting profile with self-tapping screws to the door frame. This option will not work with cheap Chinese doors. The box is made of thin metal; it is impossible to tighten the screws firmly. In this case, the mounting profile is fixed to the wall, but it must be strong, preferably without plaster.
- They begin to screw the profile with self-tapping screws from the middle, moving in both ends. Using a plumb line or level, correct any distortions.
- After installing the mounting profile, measure the height of the side cashing elements and saw off the ends at an angle of 45 degrees. The process is identical as for planks made of wood or MDF. The workpieces are inserted into the groove of the vertical mounting profiles, where they can move.
- Connectors - corner fittings - are placed in the cut of the platbands. The top bar is measured and sawed off at both ends at an angle of 45 degrees. The workpiece is joined with connectors to vertical trims, snapping into the mounting profile. Corner fittings completely hide the joint, even if there is a gap.
If the plastic cash is placed on a wall lined with clapboard, then a wooden strip is fixed around the perimeter of the doorway, and the profile is already attached to it.
Installation is possible using special nipples and screws.
Warranty conditions
The RF Doors store provides a 1-year warranty on all products, covering manufacturing defects. If within 12 months (i.e. the warranty period) manufacturing defects are revealed during use of the products, we will exchange the purchased design or refund the money paid.
Liability cannot exceed the cost of the door leaf on which the defect is found. Claims regarding a product whose design has been changed will not be considered.
According to Art. 476, responsibility for the delivery of a defective product falls on the seller, provided that the buyer can provide evidence confirming that the defect in the goods appeared before its transfer, or as a result of factors that occurred before that. The following tips will help protect you from such misunderstandings:
– after the product is delivered, carefully examine it to make sure that it meets the parameters of quality, configuration, and there are no external defects;
– before installation, be sure to inspect the product again, and only after completing the inspection, proceed with installation and throw away the packaging.
If there are traces on the surface of the door leaf resulting from mechanical damage and there is no packaging from the factory, the product cannot be returned or exchanged.
Elimination of defects
An unpleasant moment is the visibility of the nail head or screw. They are slightly recessed into the body of the cash, and sealed on top with sealant of the desired color. You can use a wax corrector.
On uneven walls, due to the curvature of wooden planks, joints diverge. During installation, the joining elements are additionally connected with a finishing nail.
Wide strips from 100 to 120 mm help to hide large defects around the door frame.
About telescopic cashing
Such frames are suitable for installation without fastening parts. Telescopic products do not require the use of additional extensions, since it is possible to straighten the gaps between the device and the width of the doorway by aligning the sliding frame. In this case, the tongue in the form of a beard is inserted into the recess on the door frame.
You should read about the existing differences in the operation of a particular telescopic product in the instructions attached to it: the diagrams and installation technologies for products from different manufacturers may vary.
How to join the plinth with the platband?
There is no need to cut the door trim; it should reach the floor. Otherwise it won't look very nice.
The plinth itself is adjusted, the method depends on the material.
- The plastic ones have decorative plugs, with the help of which you can neatly and beautifully join the end of the plinth and the door casing.
- A cut is made on the wooden one at 45 degrees to align the adjacent side of the plinth with the thickness of the door casing.
If you don’t have a miter box at hand
Having a protractor, which is in the arsenal of any schoolchild, we can make a kind of template with the angle we need, then attach it to the platband and make a neat cut.
If you don’t have a protractor, just alternately apply the two interconnected platbands to the wall, drawing lines along them. Be careful and apply them where they will be after installation. After this, the point of intersection of the lines is transferred to the platband and a line is drawn from it to the opposite corner, along which the cut will be made.
Dismantling
Removal of platbands is usually required when cash is replaced. There is no need to worry about their safety, but the work is done carefully. Taking an ax with a sharp blade and a hammer in their hands, they begin to dismantle:
- To remove the trim carefully, the interior door is placed in an open position. Positioned in the doorway, the tip of the ax is inserted in the upper corner between the bar and the frame.
- The hammer is used to hit the butt of the ax until the blade plunges under the cash.
- By pressing the handle on the ax, the bar is separated from the box. The further procedure consists of similar actions. They use an ax in a circle until the dismantling of the platbands is completed completely.
The procedure must be carried out carefully so that no dents are left on the door frame. Instead of an axe, homemade sharpened strips of durable metal or other similar devices are suitable.
Restoration of the cutting site
After the work has been completed, the cutting area must be thoroughly cleaned with sandpaper. This will allow you to sand the surface at the end of the casing and make it smooth.
At the final stage, you need to give the cut end of the platband the appropriate color shade. To do this, you need to use paint, varnish, sealant or self-adhesive tinted film. If all actions are carried out correctly, you will not be able to notice the cut site with the naked eye. The most important thing is to carry out the work with the utmost care and only using the required tools.