- home
- Construction and renovation
- Floor
>
>
⬎
Along with its simplicity and reliability, a conventional screed made from a cement-sand mixture (hereinafter referred to as CSP) has a very low cost compared to other rough foundations. Along with cheap materials, the work is also quite simple. The screed is compatible with all floor coverings. Thanks to this, this flooring device is the most popular for repairs. Let's consider the process of installing a subfloor using a DSP in stages.
Features of cement screed
A cement-sand screed is not only a well-leveled floor lying on top of a concrete floor or brick. Using a mortar of cement and sand, a foundation is often created where there is none initially. For example, on ordinary soil.
After leveling the surface, laying the finishing floor covering becomes much easier. This is especially important when using laminate, parquet or ceramic tiles. And although the screed is called a universal subfloor, it is often used as an independent covering. But, as a rule, they do this only in utility rooms.
Some inexperienced craftsmen mistakenly equate the screed with a self-leveling floor. But the latter is distinguished by a more complex installation technology and a wealth of components. In addition, any self-leveling floor requires a prepared surface. And this role is played by a separate cement screed.
Self-leveling polymer floor Source m.asninfo.ru
Leveling the horizontal plane is only one of the main tasks when arranging the floor. Filling with cement mortar creates a reliable and durable foundation. Which also acts as an excellent stabilizer of humidity and temperature. And this significantly increases the comfort in the room.
The construction of a cement-sand screed often includes various communications. The installation of heating elements is very common. “Warm floor” serves as an excellent addition to the main heating when the temperature outside the window drops especially low.
The thickness of the poured layer starts from three centimeters. The maximum value can theoretically be anything. But since the weight of the cement-sand screed is considerable, they try to lay no more than 8 cm of mortar on the floors. And to prevent the surface from cracking, the base should not vibrate.
Thickness of screed based on cement and sand Source cement-i-smesi.ru
Advantages of floor screed:
- The ability to give the floor almost perfect evenness.
- The service life of such a surface reaches 50 years.
- The floor can withstand significant loads.
- Possibility to hide any engineering communications from sight.
- The cement layer does not conduct sounds well. And if you put additional insulation underneath, the noise reduction increases significantly.
- The same can be said about thermal insulation.
- The shrinkage rates of the screed during hardening are extremely low.
- Acts as a low-budget technology.
Serious disadvantages include the large mass of the coating. The weight of cement-sand screed per 1 m² reaches twenty kilograms with a layer of only one centimeter. This is a significant obstacle when it comes to leveling floor slabs. But if work is carried out on the ground, then the thickness of the layer practically does not matter.
See also: Catalog of companies that specialize in finishing materials and related work
Dry mixes
Do-it-yourself cement floor screed can be done using ready-made dry mixtures. Their main advantage is the absence of the need to calculate the proportions of the components included in the composition and, as a result, stability of characteristics and excellent results. The manufacturer prepares the mixture, the foreman’s task is to calculate the required volume of the mixture to complete the work and mix the solution on site, adding water.
Dry building mixtures are also distinguished by their ease of preparation, density, plasticity - they are comfortable to work with, they often demonstrate improved characteristics due to the introduction of various additives, plasticizers, etc. into the composition. All you need is to look at the mixture consumption in the instructions, purchase the required number of bags (25-50 kilograms each), add water according to the instructions and work.
Mixtures for screeding using dry and semi-dry technology are available on the market. Thus, the polycement mixture is more convenient to work with due to its elasticity; it is often used in industrial and civil construction to create new structures and restore existing ones.
Self-leveling mixtures for floor screed are very popular - you just need to pour this solution onto the surface, it will distribute itself evenly and perfectly evenly. True, it does not guarantee high strength and is inferior to dry mixtures reinforced with metal fiber fiber. The self-leveling mixture option is ideal for residential premises where the load on the floor is light. Lightweight concrete mixtures are also used here.
The modern market offers a large selection of dry mixtures of domestic and foreign production. The range is very wide and choosing an option even for fairly specific requirements is not difficult. While cement for floor screed one way or another assumes certain properties and parameters, ready-made mixtures can give very different effects due to the introduction of various components into their composition.
An example of such a product would be the Knauf Ubo mixture from one of the best manufacturers in the segment (German company Knauf). This is an ideal option for preparing CSP, which has a density that is 4-5 times greater than that of classic concrete. The screed is resistant to any temperature changes and is perfect for installing underfloor heating systems. Provides good sound insulation due to the introduction of polyethylene modifiers into the composition.
To fill one square meter you need about 5 kilograms of the mixture. And this choice is justified for pouring in a residential area due to the ease and simplicity of installation and the excellent performance characteristics of the floor.
Types of screeds
The simplest type is called base-related. Because the cement mortar is laid directly on the floor slab. And in addition to leveling in the horizontal plane, the base is strengthened. The slab is dust free and must be primed. The latter will protect the solution from dehydration. The layer thickness should not be less than 3 cm.
Types of floor screeds Source siteapi.org
If waterproofing is laid between the base and the screed, then the minimum thickness increases to 4 cm. A separating layer is needed in two cases. When it is not possible to prime the base or there is an increased risk that the solution will dry faster than the standards provided for by the technology. The material most often used is a polyethylene membrane.
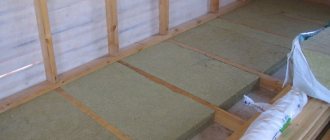
For residential premises, as a rule, a floating screed is used. In this case, the cement mortar is separated from the base by a layer of various insulation. The latter serves both for noise reduction and for maintaining heat in the room. If reinforcing mesh is used, the layer thickness can be within five centimeters. Without reinforcement, the minimum layer should be at least 7 cm.
Fill
To reduce water absorption of the base and dry out too quickly, the base is carefully primed.
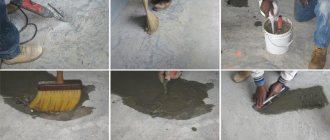
Pouring does not require any special skills, the main thing is to follow a few simple rules. First: you don’t need to add a lot of water to the batch. There should be enough water so that the solution can be easily leveled. For greater plasticity, you can add liquid soap (feri) - 1-2 tablespoons per bucket of water.
It will also be useful for you to learn: “Why cracks form on the screed, how to avoid it.”
When leveling the solution, voids and empty hard-to-reach places should be avoided. To remove air, use a trowel or trowel, piercing the thickness of the solution. Avoid breaks between batches of more than 30 minutes; the joint between the old and new mortar will be weak.
Do not forget: where the layer is less than 30 mm, you need to use special mixtures, self-leveling floors, which are declared by the manufacturer for thinner layers.
It would be a good idea to grease the places of the “cakes” from the beacons with PVA glue. In general, it should be understood: delaminations can form at all joints of fresh and dried or setting mortar. These seams should be kept to a minimum if possible.
When pouring expanded clay concrete, first cement is added to the water, and then expanded clay. Only after the expanded clay has been soaked is sand introduced into the solution. The first layer is laid the main mass, which does not reach the level of the beacons 1-2 centimeters, the second layer without expanded clay is laid the missing solution. There should also be no breaks of more than 30 minutes between layers. When laying the top layer, expanded clay stones may float up, so as not to spoil anything, you should not pay attention to them. After setting, the protruding stones are cut off using a rule.
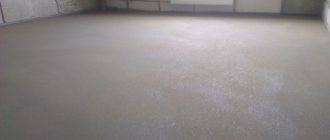
The next day, when the screed has set, all small irregularities and sagging are usually cut off. The screed is swept out and primed. It will not be a bad idea to water the surface with a small amount of water for several days.
Proportions and calculations
For a regular screed, it is enough to take cement grade 400 and add 3 parts of sand to one part of it. Water must be added until the solution reaches a creamy state. Moreover, it is positioned as thick and tough. Excess water will lead to deterioration in quality.
Proportions of materials for screed Source oboiman.ru
Floor leveling methods
The procedure has its own characteristics and rules, following which will achieve the desired result. The following methods are used to obtain:
- alignment by beacons;
- floor filling;
- building up.
Each of them has its own positive aspects and problematic factors.
| Way | Advantages | Flaws |
| Alignment by beacons | The result is a high-quality and smooth surface even with significant floor unevenness. | The screed dries from ten to thirty days, taking into account the temperature and humidity in the room and the thickness of the screed |
| Leveling with self-leveling floor | Dries faster The base layer is thinner Self-leveling base gives a smooth surface | Cannot be used on large uneven floors. |
| Leveling with floor extensions | Leveling floors with significant unevenness Possibility of floor insulation Dries quite quickly | Requires significant physical effort |
Floor leveling technology must be selected individually
Step-by-step execution
The whole process can be divided into stages:
- The base is cleaned and primed. The insulation is distributed. A waterproofing membrane is laid on top of it. The pieces are overlapped, and all seams are taped to ensure a tight seal.
- The plastic film should extend onto the walls by ten centimeters. It is attached to them with polystyrene foam tape, 1 to 2 cm thick. You can use foam inserts.
- The general level of the entire screed is set. The easiest way is to use a laser level. If it is not there, then marks on the walls are made using a water level.
- Beacons are installed based on the marks made. A strong material (pipe, corner or profile) is selected for them. Place them on piles of mortar and level them at the same level in a horizontal plane.
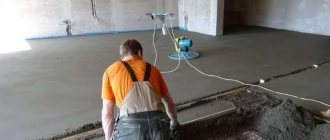
- Pouring the cement-sand mixture begins from the far corner. Leveling the solution between the beacons as a rule, they gradually move towards the door. The mixture is added in the right places.
Distribution of the finished mortar over the area Source stroikairemont.com
Installation of beacons
Many designs and methods can be used as beacons. Let's look at three, the most practical in my opinion. The first design is a standard beacon profile laid on mortar islands. The second is made from a PP guide profile; it does not require drying of the solution and the screed can be poured immediately after installation. The third is the formation of a beacon from the solution itself, the method is relevant on very thin layers of 0-10mm.
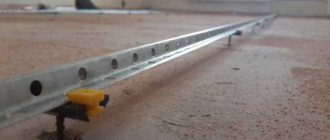
Beacon profile
The most common beacon profiles, convenient for use in screeds, are 6 or 10 mm thick. For these purposes, it doesn’t matter at all whether they are aluminum or steel. 10 mm beacons are more practical - they are more rigid and require fewer attachment points. In most cases, you can get by with this profile.
Installation consists of setting the control screws to the desired height of the screed minus 10 mm (-6 mm) after 60-70 cm. The screws prevent the profile from sliding below the specified level and significantly simplify installation, and also increases accuracy.
Regardless of the type of beacons, the lines where the profiles will pass are first marked. The distance between the beacons is taken to be slightly less than the length of the rule, so that at any point on the floor the rule lies on at least two profiles. Standard 3 m profiles can be extended in length if required. It is most convenient to use the 1.5 m rule, with a distance between beacons of 1-1.2 m.
When the beacon lines are marked, holes are drilled along the lines for dowels with self-tapping screws. The screws are screwed to the required height, taking into account the thickness of the profile. It is better to do the alignment of self-tapping screws using a laser level. In the absence of a laser, the outermost screws are placed on the line using any available means, a thread is pulled between them and the remaining screws are already aligned along the thread.
When all the screws are exposed, mortar cakes are placed on them and the beacon profile is recessed into the mortar until it touches the screws. The solution protruding above the profile is carefully removed. Installation is complete and pouring is done the next day.
There is an alternative to the “wet” installation of the beacon profile - installation on clips. The profile is installed on special plastic fasteners without fixing with mortar. The disadvantage of this installation is that the fasteners do not have the proper strength and need to be installed much more often, ideally every 30 cm. And yet, the beacons turn out to be “thin”.
First of all, self-tapping screws are installed, as in the “wet” version, only more often. When installing self-tapping screws, similar to the first option, you need to take into account the thickness of the profile itself, but now you also need to take into account the thickness of the plastic clip - 1-2 mm. Then the main parts of the fastener are put on the screws, the profile itself and the whole result is fixed by the second part of the clip.
Quick installation on PP profiles
The method is used when there is no time to wait for the beacons to set. The disadvantages include a minimum layer of 30 mm and the need to dismantle the profile after pouring, followed by sealing the seams. It should also be taken into account that the solution will be separated by beacons and the seams are a weak point. The method is not applicable in floating screeds.
The process of setting the screws is identical to that described above, with the difference that the caps are installed to the entire height of the screed being poured, without taking into account the thickness of the beacons. In addition, next to the exposed screws, one hole is drilled for the fixing screw. When the limiting screws are in place, the ceiling PP profile is laid on the caps, and the profile is secured on top with fixing screws. You can fill the screed immediately. The next day the profile is removed and the seams are sealed.
Lighthouses from solution
To be more precise, from tile adhesive or a thickly applied self-leveling floor, the usual mortar is too weak to abrasion. The material is selected based on the speed of setting and availability at hand. Mortar beacons are relevant for layers of 0-10 mm, when the beacon profile is too thick.
For the work you will need the same PP ceiling profiles. The algorithm of work is the same, with the difference that the profile is installed in the form of an inverted letter “P”. The solution is poured into the resulting gap between the profile and the base. After setting, the profiles are removed and poured.
Beacons for thick layers
When pouring expanded clay concrete into layers of more than 10 cm, the limiting screws are needed too long, the mortar cakes are huge. You can get out of this situation by using bricks, placing them in the places where the beacons are attached.
Since the bricks must be laid on the mortar, to save time on setting, self-tapping screws can be eliminated. However, without self-tapping screws, accuracy can deteriorate significantly; it all depends on the skill of the master.
Preventive action
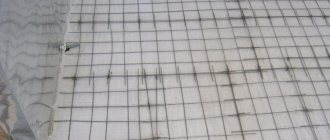
A large area of the screed will inevitably crack in the future under temperature and mechanical stress. To avoid such problems, expansion joints are used. To do this, shallow slits are cut out in the still uncured solution.
The entire area of the room is divided into small sections. And the width between the seams should be between 3 and 4 meters. And in long and narrow rooms this figure decreases to 2. Seams are extremely necessary in the area of passages from room to room.
If a board or laminate is used as a finishing coating, then the cracks can be left empty. When tiling, the seams are filled with sealant. Otherwise, they will take all the moisture from the solution. And when screeding for “warm floors,” it is necessary to use reinforcing fiber and plasticizers.
Permissible deviations according to SNiP
The poured screed should not have significant defects: potholes or large cracks. According to SNiP standards, minor errors are allowed after pouring and curing the solution. In particular, Article 3.04.01-87 SNiP stipulates the following requirements:
- The difference between the design and actual thickness of the screed cannot exceed 10%;
- DSP under laminate or parquet can have a height difference of 2 linear meters. meters no more than 2 mm;
- Height differences for concrete screed under waterproofing cannot exceed 4 mm per 2 linear meters. meters.
Particular attention is paid to the arrangement of floors in industrial premises. According to Article 2.03.11-87 of SNiP, a screed that will be exposed to acids or alkalis must be chemically neutral, i.e. contain certain plasticizers or be coated with a special impregnation.
Proper pouring of a concrete screed does not guarantee the excellent quality of the rough foundation. The strength, moisture resistance and density of the formed coating also depends on compliance with the proportions of sand and cement in the prepared composition, the presence of plasticizers, the correct mixing of the CPS, as well as the compliance of the formed coating with the requirements of SNiP.
Briefly about the main thing
When choosing a screed based on cement-sand mortar, you must decide in advance on its type. The minimum layer thickness will depend on this. This will help make correct calculations of the required amount of raw materials.
And before pouring, special attention is paid to finding the general level and installing beacons according to the given marks. It is important to fully comply with all technology requirements when drying screed. This will help avoid cracking of the surface.
Ratings 0
Stage V. Preparatory work
To separate the screed from the walls, attach a damper tape. It’s easy to calculate its quantity: this is exactly the perimeter of the room.
The process itself is simple. Lighthouse slats need to be placed in a row. Install the first beacon from the wall at a distance of several centimeters, and each subsequent one in increments of 50-100 cm. After installing the beacons, lay out the mixture and level it using the rule. Once the mixture is so hard that it can be moved freely, remove the slats.
You can make beacons for the sand-cement mixture yourself. To do this, buy inexpensive 10 mm plaster beacons and 30 kilograms of gypsum plaster for them at a hardware store. For each lighthouse we make four supports from plaster - and this will be enough so that nothing bends while working with the rule. And the most durable adhesion of beacons is from Rotband, if you mix it in small portions. Just place the mortar in small slaps next to the screws, between them, and a little higher. Then attach the beacon, slowly lowering it until it touches everyone. Check the resulting plane.
You will be surprised, but many masters of their craft manage to arrange such screeds without beacons at all:
We prepare the base for different types of coatings
Often, leveling the floor is done to lay floor coverings on it that require a perfectly flat base: laminate, linoleum or PVC tiles. In this case, it is necessary to additionally level the concrete by grinding the surface layer with special machines. If you want to get a perfectly smooth decorative floor, use a polymer self-leveling coating made of epoxy resins. Even thin self-leveling epoxy floors, along with perfect leveling of the sublayer, strengthen it, increase resistance to abrasion and mechanical damage, and increase service life.