Selection and installation of pipes in the bathhouse
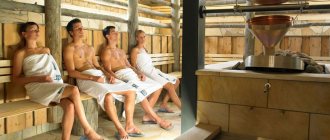
A comfortable microclimate in a bathhouse depends on how correctly the chimney is installed.
After all, a pipe for a bathhouse is not only a means of removing carbon monoxide, but also fire safety and the health of people in the room. Stainless steel pipes for sauna stoves
The device itself can be installed with your own hands; there is nothing complicated in the process. The main thing is to prepare properly: choose the right material and follow all installation recommendations.
Basic requirements for sauna stoves
A chimney for a sauna boiler not only removes combustion products from the room, but also ensures optimal use of fuel in the heating unit. At the same time, a properly constructed channel for removing furnace gases should guarantee the safe operation of the heating device. This factor is ensured not only by the correct selection of materials and chimney design, but also by the organization of the boiler room infrastructure. It must have sufficient supply and exhaust ventilation to ensure the supply of oxygen for combustion of the stove and the removal of combustion products or the gas itself that enters the room.
To remove flue gases from a bathhouse, an external wall chimney is often built, since it does not take up space in the room and provides better fire safety
Gas boilers are the safest to operate and cheap compared to other types of heating units. They do not give off the smell of burnt fuel and do not leave debris in the form of ash or slag.
Gas boilers are more economical and safe compared to thermal units using other types of fuel
When using a gas boiler in a bathhouse, you need to follow some recommendations:
- If there is no gas supply from the central line, you can use fuel from cylinders. They must be placed outdoors in a specially equipped cabinet.
- For safe operation of the gas unit, you need to use an automatic control system that will control the heating mode, as well as a gas analyzer in case of leakage.
- The base made of refractory materials for the stove must be at least 10 centimeters larger than its external dimensions.
- To install a gas pipeline, you need to use only steel or copper pipes.
For more information about why a chimney for a gas boiler is so important, as well as how to install it yourself, read our article - How to choose and install a chimney for a gas boiler.
Choosing material for the chimney
The stove pipe in the steam room can be made of various materials, but it is most advisable to opt for stainless steel products. Important characteristics that allowed stainless steel chimneys to become widespread:
- High temperature resistance;
- The structural elements are lightweight, which simplifies DIY installation;
- Resistance to condensation;
- Resistance to aggressive environments (various acids that make up carbon monoxide);
- Good traction thanks to the perfectly round cross-section;
- No accumulation of soot on the internal walls of the chimney;
- Easy to operate;
- Affordable price.
Chimney for a bathhouse made of stainless steel
Installation of asbestos-cement pipes is undesirable, since they do not meet fire safety standards for a bathhouse. When exposed to high temperatures, they can collapse and thereby cause a fire in the room. The result is dubious savings with health risks.
A ceramic chimney is a reliable and durable design that can withstand temperatures up to 600 degrees, but it is not suitable for a bathhouse. This is due to the excessive weight of the device, which only a capital building can withstand.
Stainless steel is the best choice of material for a sauna smoke exhaust. Reliability, durability, ease of installation with your own hands - these are its main trump cards.
The main mistakes when insulating a chimney
Installation errors that affect the heating system and also shorten its service life.
- There are no windows for cleaning soot and condensation.
- The entrance and the overlap of the cladding are not assembled correctly, which allows moisture to enter and destroy the metal walls.
- Condensation accumulates inside the rain cap, flows down the walls, and inhibits draft.
- The 90° angles in the composite “elbows” are not smoothed, and the slope of the boiler outlet is reduced.
- Insufficient insulation layer.
Video about the main mistakes made when installing and insulating a chimney from a solid fuel boiler:
Proper installation of the chimney pipe and its insulation will help keep your home warm. The heating system will work efficiently.
High-quality thermal insulation will not allow the chimney to collapse and allow carbon monoxide to enter the room. The price of insulation depends on the characteristics and its manufacturer.
You should not buy cheap, low-quality insulation - this will lead to additional costs for dismantling and repairing the chimney.
Performing device isolation
Installing a stainless steel chimney with your own hands is very simple - you just need to connect the elements in series from the bottom up. Manufacturers of modular stainless steel systems provide a bell at the end of all component parts. It is also necessary to ensure that all elements that go outside have high-quality thermal insulation. The easiest way is to select ready-made modular “sandwich” elements for installation on the street, as well as in places where the roof or wall passes through.
You can make insulation yourself. To do this, the chimney must be wrapped with a layer of basalt wool, and an external contour made of any metal must be installed on top; the cheapest option is galvanization. Essentially, you need to make a homemade sandwich.
Properly performed thermal insulation is necessary for the following purposes:
- Reducing the temperature of the outer pipe;
- Reduced risk of condensation;
- Acceleration of the pipe heating process;
- Increased traction.
Where to place
Chimney pipes for a bathhouse can be placed both inside and outside. Each of the methods has both disadvantages and advantages.
External method
This method is simpler than the internal one, since it does not require wires through the ceiling and roof; it is enough to just bring the pipe out through the wall.
The external chimney structure is safer because it does not come into contact with roofing and ceilings.
In addition, in this case there is no need to install safe insulating transitions.
The disadvantage of this option is the need for extensive insulation of the pipe, since condensation will inevitably appear inside it.
Due to the fact that the heat from the pipe is not used to heat the room, fuel consumption increases.
Arrangement of the internal structure
In this case, the chimney pipe is installed on top of the sauna stove, rises to the ceiling and is passed through the attic and roofing floors.
This design allows the pipe to transfer all the heat to the room, which will significantly save on heating costs. In addition, the oven will take longer to cool down, and the formation of condensation will be reduced to zero.
A significant disadvantage is the need to wire the pipe through the structural elements of the bathhouse, since this is quite difficult, expensive and not always safe.
However, if you properly arrange all the passage units, as well as joints and connections, the chimney will serve uninterruptedly for a long time.
Organization of passage through the roof
The most critical stage of installation is the passage through the roof. After all, cutting a hole in the roof of the steam room can disrupt the hydro- and thermal insulation of the roofing pie, resulting in leaks and destruction of the rafters of the building. Following these recommendations will help you make the right passage through the roof:
- The hole on the roof must be designed in such a way that the distance between its walls and the pipe is about 10-13 cm.
- Make a wooden box on the roof in the place where you plan to install the chimney.
- Fill the entire space that separates the chimney from the inner duct with non-combustible material. In this case, stone wool is suitable.
- Press the waterproofing layer with sheathing bars.
For proper waterproofing, small cracks in the roof can be sealed with silicone-based sealant. Larger cracks can be sealed by installing a special element - a passage, which is located at the point of exit through the roof.
Chimney passage through the roof
The roof passage is an apron-cap, which consists of a steel base and a rubber tip.
The passage is put on the pipe and securely fixed to the roof. Too much effort when shrinking the apron onto the pipe is not required; it can break the tightness of the connection and cause a roof leak.
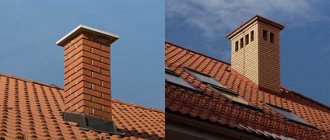
Fire insulation options for smoke exhaust systems
The simplest and most reliable, but expensive way to insulate a chimney is to install a sandwich-type chimney made of metal or ceramics.
There is another option used when installing a stove unit - the construction of a brick chimney. Due to the low degree of thermal conductivity of bricks, its walls will not heat up to extremely high temperatures and, as a result, additional measures related to its insulation will not be required (for more details: “How to insulate a chimney, what insulation to use”). It will only be necessary to correctly carry out the fireproof cutting of the floors and roof.
When such work is performed for single pipes, boxes made of non-combustible materials can be used. Chimneys of this type are allowed to be operated without thermal insulation, but fireproof cutting is required in accordance with the rules.
Cleaning a stainless steel chimney
No matter how good the material used to make a chimney is, there will come a time when it becomes necessary to clean it. To carry out continuous cleaning of the smoke channel, you can use various methods:
- Clean the pipe mechanically using a specially designed brush.
- Using chemical cleaning agents.
- Cleaning the chimney is a simple but effective method - pour boiling water, and then heat the stove for a long time to separate the soot.
Types of smoke exhaust structures
The chimney for a steam room can be external or internal. In our country, you can often find internal options. Among their advantages is the absence of violation of the architectural style, as well as saving heat in the room.
External systems are more like American traditional chimneys. They were previously used by Americans on their ranches. They have a rather interesting appearance. If you decide to build an external solution, then there is no need to make a hole in the roof and ceiling, which definitely has advantages. The wall for the chimney inside must be no less than 12 cm thick, and for the outer wall the thickness must be at least 38 cm.
Assembly Features
There are two methods for collecting smoke exhaust system elements. They differ in the placement of the lower and upper parts.
For single-wall chimneys, when assembled “by condensate”, the upper end is inserted into the lower end. For sandwich-insulated structures, this rule applies to internal assembly. The outer part is collected “by smoke”.
Ignoring the formation of moisture leads to disastrous consequences. Condensate, mixing with soot, forms acids that corrode the surface of the pipe.
Types of installation
Installation can take place on brackets through the wall or straight through the roof.
In the first case, the entire system is carried into the wall, and then rises, adjacent to the bathhouse, but without passing through it. This looks more aesthetically pleasing, and has the following advantages:
- the free space of the steam room is not used;
- there is no risk of getting burned on steel or stone;
- less chance of fire;
- It’s easier - you don’t have to make a hole through the entire attic.
- cases of smoke are easier to detect, as well as to track the general condition.
But at the same time:
- heat loss increases, since steam actually immediately enters the outside;
- the installation itself is more difficult due to the need to comply with the dimensions of the connection between the hole in the wall and the parts of the product;
- The heating of the pipe is greater due to the fact that the gases escape in the horizontal direction. With this arrangement, the resistance of the flue gases when moving through the channel increases;
- In terms of the number of elements, this option is 10% more expensive than the usual one.
When installing smoke exhaust systems in a straight line through the roof, the chimney is located straight, without bends, it departs from the boiler and goes upward, where it crosses the ceiling and exits on the back side of the roof. Advantages of such a connection:
- Stable draft due to the location of the chimney closer to the roof ridge.
- The condensate container is kept warm, so its cleaning pocket is dry and clean. This extends the service life.
- Cold bridges do not form in the walls, and thermal insulation is not compromised.
- The stability of the smoke exhaust duct is higher due to the fastenings to the roof. The fasteners themselves can be chosen cheaper than for the option on the facade.
- The aesthetics of the structure are not spoiled by side smoke outlets.
- Only a small part of the structure is located outside, which deteriorates over time from snow and rain. You can inspect and clean most of it without leaving the building.
- You can use non-insulated parts of the chimney that are located inside the bathhouse.
- This option is easier and 10% cheaper to install than when outputting through a wall.
- Flue gases go up, there is no obstacle to their exit. Heating is less than with a horizontal connection, since the resistance to smoke flow is minimal.
However, there are also weaknesses:
- The probability of “missing” the occurrence of a fire is higher, since smoke occurs in the ceilings that are located in the attic and on the roof, and they are simply not visible until the fire appears.
- Heat loss through the roof. Tightness is restored when waterproofing is installed before coating.
- Reduction of usable area, since according to safety requirements there should be nothing around the stove pipe for a bath.
- Increased costs for changing the roof and ceiling of the steam room, in particular, after finishing the final finishing.
- If the integrity of the smoke exhaust structure is damaged, the bathhouse begins to smoke.
- Condensation leaks and accumulated soot spoil the appearance of the roof.
- Burns from heated parts are possible in emergency situations.
When deciding on the installation method, the following nuances must be taken into account:
- dimensions of the building - if it is very small, then it is logical to make an external structure;
- the steam room is built from scratch or in an old room - in the first case, you can immediately think about the issue of insulation;
- Do you need to heat adjacent rooms?
Popular schemes for installing sauna chimneys
How is the smoke exit structure arranged? Any element is a structure made of pipes, flanges, and fasteners. The main requirement for this building is the ability to operate at high temperatures without any changes in the properties and emissions of combustion products.
To prevent the chimney for a bathhouse from losing large amounts of heat, it is located as close as possible to the inner wall.
When there is more than one stove in a steam room or bathhouse, then each of them must be equipped with its own chimney. Otherwise, the thrust will lose strength. Smoke exhaust system specialists recommend the following. In cases where it is impossible to build several systems for stoves, a cutting system must be installed at a height of approximately 75 cm. It is also important to ensure that the inner surface of the future chimney is as smooth as possible. If there are any roughness inside, soot will accumulate on the walls. This may increase the risk of fire.
The simplest chimney
This element will be based on a stainless steel pipe. In addition to this, you need to prepare one elbow with a diameter of 20x120 cm from galvanized steel, two elbows of 16x120 cm each, three of stainless steel of 16x10 cm each. You will also need a tee with a diameter of 16 cm and a plug for it. You also need a fungus that is the right size. The diameter of the chimney for the bathhouse in this particular case will be 16 cm.
The prepared pipes should be connected to each other using self-tapping screws.
The section of pipe that will be outside is wrapped with basalt wool. The layer should be approximately 16 cm. You should also additionally wrap the cotton wool with asbestos cord. Then a pipe with a diameter of 20 cm is connected, which is fixed and thoroughly coated with bitumen mastic. An asbestos cord is placed in the gap between the two pipes. This is necessary for protection from rain.
This is how you can independently design and install stainless chimneys for a bathhouse. This is a very affordable solution.
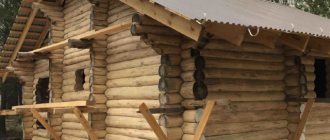
Protective materials for wooden structures
Due to the fact that the chimney and stove heat up quickly, a fire may occur. Moreover, according to tradition, the material for the bathhouse is wood. Back in the old days, it was customary to insulate the walls, ceiling, stove, chimney with an asbestos layer, clay and other available materials that conduct thermal energy rather poorly and are resistant to elevated temperatures.
So how to cover the stove pipe today? Insulation of the chimney structure is necessary both for fire safety and protection from condensation, so that cooling occurs more slowly and the smoke exhaust system lasts longer.
Red brick is not always needed for pipe lining, although it is endowed with excellent thermal insulation properties. The reason is that such a design does not match the design of every bathhouse.
To better understand how to wrap a chimney pipe against fire, consider two options for insulating materials in the form:
- thermal insulation;
- folgoisol.
Installation of chimneys for a bathhouse for a metal stove
After the installation of the stove is completed, you can immediately begin installing the chimney. The first step is to attach several expansion supports to the pipe. It’s good if these are pipes made of asbestos or “Sandwich”. The latter can withstand significantly higher temperatures, unlike other analogues. However, such a pipe should not be exposed to direct flame. That is why a steel pipe is installed first, and then, after the first bend, a sandwich or asbestos-cement structure is installed.
Now all that remains is to organize the protection of the upper part from the rain. A plug may be suitable for this. Another one is mounted on the pipe below, which will then facilitate the process of draining condensate and cleaning.
The importance of insulation
Creating high-quality insulation for stoves or other round flue pipes is an important preventative process. Of course, this procedure will not 100% protect the structure from the negative effects of rain and other precipitation. However, insulation of metal flue ducts can significantly extend the service life of all systems.
This operation must be carried out in order to:
- Eliminate the possibility of condensate, which contains hazardous chemical elements, getting on the walls of pipe products. The presence of an insulating layer will ensure their complete evaporation along with the rest of the smoke.
- Reduce the likelihood of temperature changes in the system.
- Create an energy-saving effect. Installing insulation reduces energy losses. The presence of this layer reduces the fuel consumption of boilers or furnaces.
- Increasing the strength of the gas duct. Insulating steel pipes helps strengthen the design of the smoke exhaust system. The frame becomes more resistant to wind loads.
If the oven is brick
This chimney for a bathhouse is easy to build with your own hands. When the row of masonry covers the stove, the construction of the chimney system begins.
So, on the 21st row of brickwork it is necessary to form two channels. They will then be merged. Next, on the right you should block the space above the core. The gap between the core and the masonry will be 2-3 cm. Any voids are filled with mineral wool insulation. With the 22nd row of masonry, the opening will already be closed, and after that you can begin to lay and shift the channels to the middle. To prevent this ceiling from cracking in the future, it is advisable to lay another row of masonry above the stove core.
Next, the chimney will begin to narrow. Valves are installed here. They are made one above the other. Now the brickwork will go into fluff.
For those who have managed to build a brick oven, making a chimney will not be difficult. The main thing is that no cracks arise. Also, the standard for the cross-section of the pipe should not be exceeded. Otherwise, the gases will cool quickly.
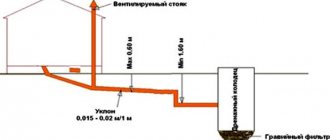
How to make a chimney for a bath through the ceiling
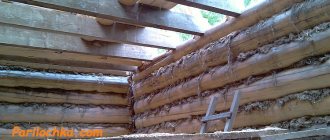
Often modern baths are built from pine. This wood sometimes overheats. The process of smoke passage must be created with maximum attention. The wall must be fenced with any non-combustible materials. You can strip steel sheets; mineral wool or brickwork will also work.
Another effective method of protection is a special ceiling-passage assembly.
At the next stage, the pipe is erected above the roof. Its height must be at least 1.5 m. When it passes through the roof covering, it is necessary to apply a sealing cover. Using this operation, you can hermetically connect the chimney pipes.
In order to get good traction and long service life, you need to clean the pipe from accumulated soot and debris once every six months. And then the bathhouse will delight its owner for a very long time.
System design
Before presenting a step-by-step guide to equipping a chimney with your own hands in a bathhouse, let’s note the main points of the device:
- correct choice of pipe diameter and design shape;
- optimal placement location (closer to the inner wall of the bathhouse, this will ensure good thermal insulation);
- chimney height (at least 4.5 meters);
- the pipe must rise above the roof by at least 50 cm;
- the junction with the roof is carefully insulated;
- a valve (gate) must be installed in the system, which will allow you to regulate the draft;
- the wall next to the chimney is protected with non-combustible materials;
- the outer part of the structure is whitened or painted, then if the seal is broken in the places where smoke passes through, the paint will become darker.
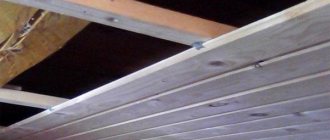
How to vent a chimney through the ceiling
Arrangement of the passage of the chimney through the ceiling is a crucial moment. Fires often occur due to improper installation. According to safety regulations, direct contact of a hot pipe with flammable materials must be avoided. For this purpose, a special unit is constructed in the form of a box made of non-flammable galvanized or stainless metal.
All work must be performed in accordance with regulations.
You can make such a unit yourself. The dimensions of the iron sheet must exceed the size of the cutout for the pipe.
How to mount a wall crossing
If the outer wall of the bathhouse is made of brick or other non-combustible material, then installation of the passage hole is easy. A round through hole is cut out, into which a metal sleeve is then inserted.
You can do without it if the opening is drilled perfectly round to the outer size of the sandwich. It will also not be possible to install a sleeve when the chimney passes through the wall at an angle other than 90°.
There should be no joints in the thickness of the wall. A pipe is inserted into the hole, and the space around it is filled with a fire-resistant seal. All that remains is to install and attach it to the vertical section. If the bathhouse is built of wood, then you should follow the same rules as when installing a ceiling-passage assembly.
How to choose the size and shape of a chimney
The most optimal pipe configuration for a chimney is a cylinder. This shape will not create obstacles for smoke to escape and less soot will be deposited on the walls.
The external design, in addition to practical, has a decorative value. It is done in such a way as not to disrupt the overall design of the structure.
Pipe diameter
The cross-section of the chimney depends on the power of the stove and is strictly specified in SNiPs. Below are written the main dimensions of the exhaust vent depending on the power of the oven:
- 140×140 mm for furnaces up to 3.5 kW;
- 140×200 mm for furnaces 3.5 - 5.2 kW;
- 140x270 mm for furnaces 5.2 - 7.2 kW.
The diameter should not be less than the outlet of the furnace or boiler.
Pipe height
The height of the chimney is calculated taking into account the height of the building, the type of roof, and the size of neighboring buildings. When designing, it is especially important to take into account the height of the pipe located above the roof of the building. So, according to SNiPs, it should rise above the roof no less than:
- 0.5 m above the ridge when the pipe is located at a distance of up to 1.5 m from the ridge below;
- level or slightly above the ridge, if it is located at a distance of 1.5 - 3 m from the ridge downwards;
- at a distance of more than 3 m from the ridge, the chimney pipe should be at the same level or slightly higher than a line drawn down from the ridge, at an angle of 10° to the horizontal;
- the height of the ventilation duct for flat roofs is 1 m;
- if the pipe is 1.5 m above the roof level, it must be additionally secured with guy wires.
The pipe joints should not fall into the space between the ceiling and the roof. They are fastened with clamps and coated with sealant. The outer pipe must exactly match the design size, otherwise the draft will be poor.
Bath pipes
The chimney plays a very important role in creating a comfortable microclimate. The choice of pipe material for it is also important. A chimney is not only a smoke exhaust system, but also safety in case of fire, as well as health. Let's find out which chimneys are best for a bathhouse.
The pipe in the steam room can be made from a variety of materials. However, it is best to use stainless steel for this. This material has a lot of important characteristics, such as resistance to high temperatures, light weight, ease of use, good traction, and resistance to aggressive environments. The best chimney for a bathhouse is made of stainless steel.
Asbestos cement pipes are not very desirable. They poorly comply with fire safety standards.
Ceramics are reliable and durable. Such chimneys can withstand high temperatures up to 600 degrees. But these pipes are also poorly suited for a bathhouse. It's all due to the heavy weight. They are definitely not suitable for wooden structures.
This is a modern option. Chimneys for wood-burning saunas are assembled from it.
These are the types of chimneys for sauna stoves, and anyone can make such a design with their own hands.
The best stainless steel chimneys with roof passage and top outlet
These are structures for connection to boilers and fireplaces that have an outlet for gases from the combustion chamber in the upper part of the body.
From there, the system is mounted directly onto the roof, which requires partial dismantling of the roof, but requires a minimum of materials for transitions and connections, due to the straight trajectory. To select, it is important to calculate the length of the structure with the elevation above the ridge.
Ferrum set 115 mm, 0.8 mm - for any fireplace
This is the best stainless steel chimney for a home fireplace due to its direct connection and the optimal diameter for connecting to the outlet of 115 mm. Inside there is stainless steel with a sealed weld that will not allow condensation to pass through.
This is followed by a thick layer of mineral wool with a density of 120 kg/m3, which protects the attic floor and roof from fires. The outside of the chimney is wrapped in laser-welded galvanization, which eliminates damage to the galvanic layer.
Pros:
- all parts for installation in the kit, including ceiling elements for the roof;
- the insulating layer is resistant to temperatures of 700 degrees;
- an insulation thickness of 40-50 mm will prevent the surrounding materials from igniting from hot smoke and heat from the pipe;
- suitable for burning wood (rising ash will not damage or burn through the inner layer);
- screws included;
- stainless steel head that protects the outlet from blocking with snow;
- the package comes with a sealant that can withstand 1200 degrees;
- the box contains 7 sheets of basalt wool and 5 clamps for connecting high structures;
- pre-furnace sheet and stainless steel screen;
- AISI 439 steel on both parts of the pipe (on the one in the room and on the one outside on the roof).
Minuses:
- the thickness of the stainless steel connecting to the fireplace is 0.8 mm, and the cross-section of the pipe wall on the street is 0.5 mm;
- the pipe leading from the fireplace is not covered with insulation (protection starts only from the ceiling), so you can get burned on it;
- the cost of the entire set is 27,000 rubles.
Set Dymok 115mm, 0.5 mm - the most affordable option
This is the best stainless steel chimney at the most affordable price of 11,000 rubles for a complete set. Inside the sandwich structure there is stainless steel with a wall section of 0.5 mm, which is resistant to deformation thanks to the dense winding of Rocwool basalt wool and a galvanized layer on the outside.
The pipe connection is made using TIG welding technology, which provides a strong seam with minimal soot collection on the protrusions.
Pros:
- the price is one of the most attractive 11,000 rubles;
- The set includes an insulated umbrella that protects against precipitation;
- 4 stainless steel clamps for assembling a long pipe into a single unit;
- adapter from single-circuit structure to double-circuit structure;
- roofing adapter (master flush) included;
- 1 m of starting pipe without insulation and 3 m of double-layer pipe for leading to a high roof;
- sandwich thickness 40 mm;
- high quality AISI 439 stainless steel.
Minuses:
- there is no roof insulation, so you will have to purchase additional materials separately;
- only one fastening to vertical structures;
- metal thickness along the entire length of the pipe is 0.5 mm;
- Suitable for burning with coal or gas, but it is better to use wood rarely, so as not to heat up the thin walls too much.
Ferrum set 200 mm, 0.8 mm - for a powerful heating system
This is the best option for installing a heating system not only in a private home, but also in an office building, because the internal flow diameter is 200 mm, which can satisfy the needs of a serious boiler. The wall thickness of 0.8 mm has sufficient rigidity for long-term performance.
Pros:
- insulator filling density 120 kg/m3;
- high-strength stainless steel;
- withstands temperatures up to 700 degrees;
- simple assembly of the socket system;
- sealed internal seam;
- insulation thickness 50 mm;
- 7 meters of pipe for high reach;
- flange for passage through the ceiling;
- a large head covering not only the inner pipe, but also the outer one;
- 8 basalt wool slabs for attic insulation;
- 2 fasteners and 9 clamps included;
- stainless steel screen 1x1 m.
Minuses:
- the large outer diameter of the pipe 280 mm requires a large hole;
- price 42,000 rubles.
Folgoizol
It is a two-layer material consisting of a heat-insulating component and foil. Thanks to the reflective layer, the room does not cool down so quickly, because up to 90% of the heat is retained inside the bath, so it is a very high-quality insulator.
Folgoizol is highly environmentally friendly, because thick food foil is used as a raw material. This material is not afraid of ultraviolet radiation and strong temperature changes - the operating range is from -65 ºС to +175 ºС. Therefore, it will be a completely worthy choice for wrapping a pipe in a bathhouse.
Note that foil insulation is often installed not only around the chimney, but also on the walls and ceiling of the steam room. It serves for high-quality vapor and waterproofing, and also insulates the bathhouse well.
The best stainless steel chimneys with roof transit and rear exit
Such designs are suitable for boilers and furnaces that do not have a direct upward outlet of exhaust gases, and the exhaust channel is located on the side. To connect the chimney, you need a kit with a side inlet and the ability to attach a high vertical stand (without loading the boiler).
Phoenix 120 mm, 1 mm - good for a bath
This is the best option for a stainless chimney for a bath due to the wall cross-section of 1.0 mm, which allows you to transfer high heat from a nearby boiler, where wood burns at high temperatures. The rear connection provides open access to the rock laying area.
The diameter of 120 mm promotes strong draft, which will allow you to heat the bath to the desired maximum level. The upper part has a narrowing and an umbrella that prevent the hole from clogging.
Pros:
- wide insulation board that can easily be adjusted to the contours of slate or tiles to cover a hole in the roof;
- stainless steel stand to hold the side outlet from the boiler and the high mast; adjust the distance from the partition;
- internal flow diameter 120 mm;
- stainless steel wall thickness 1.0 mm for high heat;
- strong connection of all longitudinal joints using argon welding;
- the socket system is easy to assemble with your own hands;
- environmentally friendly insulating material inside;
- can withstand temperatures up to 1000 degrees;
- guarantee of operation with regular use for up to 15 years;
- Includes pre-furnace sheets and passage parts for floors;
- two sealants with a temperature range of 260 and 1200 degrees for high-quality sealing of adjacent parts;
- 8 clamps for assembly;
- tee for collecting condensate;
- The total length of the chimney is 6 m, suitable for outlet to a large height, which will provide good draft even with closely spaced houses.
Minuses:
- the cost of the set is 29,000 rubles;
- The insulating fiber is 30 mm thick, which is smaller than similar models.
Which one to choose - main criteria
First, let's identify important indicators that you should pay attention to in order to avoid surprises in the future:
- The affordability of the price consists of the cost of raw materials and manufacturing method. Savings shorten service life, and artisanal, outdated production technologies create maintenance problems in the future.
- Possibility of replacing chimney elements without significant expenses. Thus, the modular type is easy to assemble, replace, and adapt to different architectural features of buildings.
- The ease of installation of a smoke exhaust structure depends on the material and method of pipe outlet. In some cases, additional construction of a reinforced foundation is necessary.
- The ease of maintenance of the chimney depends on the internal surface and cross-sectional design. The fewer obstacles the flue gases encounter on their path, the less soot will settle in the “dead zones.”
- Durability depends on the ability to withstand negative influences for a long time: condensation and high temperatures.
- The safety of the chimney is determined primarily by the production technology: the accuracy of the product geometry and the reliability of the seams. As well as the choice of steel and thermal insulation material and pipe installation. If installed incorrectly, problems such as back draft and smoke in the room often arise. Some varieties pose a health hazard because they release toxic substances when heated and are easily destroyed at high temperatures.