Features and location
Before you begin building a 6 by 4 bathhouse, you need to do some serious preparatory work. Its quality determines how the process of construction and arrangement of the premises will proceed. The following nuances need to be considered:
- location on the site;
- installation of all necessary communications;
- choosing a stove option;
- selection of materials for building construction and interior decoration;
- preparation of a project where all details and dimensions will be indicated;
- selection of suitable style and design elements;
- thinking through the overall interior - selecting furniture, textiles and other components.
As for the location, it should be thought out so that the building stands at a sufficient distance from the house itself, but at the same time not close to the fence.
The ideal location is in the corner of the plot. At the same time, the area nearby can be improved. Putting up benches for relaxation or a small gazebo, setting up flower beds, and an artificial fontanel wouldn’t hurt either. Or maybe there is enough space near the bathhouse to equip a small pool. This will be ideal.
The design of the bathhouse building and the house itself must be in the same style. This way all the buildings and the site as a whole will look harmonious. A pre-thought-out design for a 6x4 bathhouse will allow you to draw up an approximate estimate, from which it will be extremely clear how much money will be spent on each stage of construction. And so that the construction of a bathhouse does not drag on for many years, perhaps even at the stage of drawing up the project, you should think about what work can be made cheaper, what objects are extremely necessary, and which ones can be dispensed with or replaced with more budget-friendly options.
Construction works
In order for the service life of the bath to be long, the norms and requirements must be observed during construction. The whole process consists of several stages:
- Selecting a location and marking the site.
- Purchase of building materials.
- Construction of the foundation.
- Walling.
- Installation of doors and windows.
- Roof and roof installation.
- Finishing facilities.
Choosing the location of the bath
The ease of use and service life of the steam room depend on the correct choice of place for construction. There are several features:
- A bathhouse with your own hands should be built on a hill. If it is not there, then it is recommended to erect an artificial hill. In this case, it takes a year for the soil to settle.
- Water pipes. The best option for quickly drawing water into the steam room is a well.
- Delivery and storage of fuel materials. Storage space should be selected at the planning stage.
Selecting materials for the foundation, walls and roof
The foundation should be arranged taking into account the building material chosen for the walls:
- For log, timber and frame buildings, a pile or columnar foundation is suitable.
- For heavier buildings made of bricks and blocks, a strip is required.
Corrugated sheets or metal tiles can be used as roofing material.
Marking and foundation
When the bathhouse diagram according to the drawings is ready, you can begin marking the site. To do this, in strict accordance with the project, pegs with a taut rope are installed in the corners. If you plan to install a pile or columnar foundation, then in this case it is necessary to install pegs in all places where the supports will stand.
In the case of a strip foundation, a trench is dug taking into account the depth of soil freezing. To prevent swelling, the bottom of the trench is filled 10 cm with a “cushion” of gravel and sand.
After installing the formwork, the trench is filled with concrete and reinforcement elements.
Professionals warn: with such dimensions, the baths with a relaxation room are a five-wall structure. For this reason, the partition is laid at the foundation stage.
Walling. Windows and doors
The first stage of brickwork, foam blocks or crown (when erecting a building from logs and timber) is considered extremely important. The entire further course of work depends on the correctness of its implementation. After finishing the laying of the first row, it is worth checking it using a level. If there is a distortion, it is better to redo it right away. The second row begins to be laid from the corner.
Already at this stage, the location of windows and doorways is noted. You need to remember: frames and doors can only be installed in a finished building. These elements for steam rooms are best made of wood.
Roof of the bathhouse
After the walls are erected, the roof must be installed. This work can also be done without the involvement of specialists:
- After the walls are built, ceiling beams are laid and covered with boards.
- The next stage is the installation of the rafter system and sheathing.
- The roof can be represented by corrugated sheets or tiles.
- The final stage of installation includes installing a drain.
Floors
Floors in a Russian bathhouse are installed in several stages:
- Rough floor.
- Waterproofing layer. With its help, they block moisture from entering from below.
- Insulation. This layer is required in all rooms except the washing room and steam room. Mineral wool can be used for this purpose.
- Another layer of hydro- and vapor barrier is laid on top of the thermal insulation.
- The final stage is laying the finished floor.
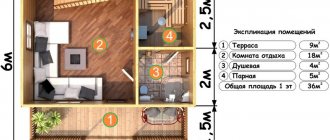
Layout
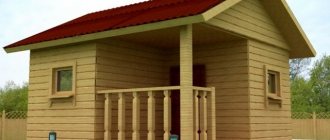
The 4x6 sauna layout is not only a steam room and a washing room. It can be equipped with a closed veranda for comfortable spending time in the cold season, and an open terrace for relaxing in the summer.
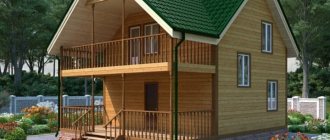
If the bathhouse has a second floor with a bedroom where guests can spend the night, it turns into a real bathhouse complex. In addition to the bedroom, a swimming pool, billiards, and a recreation room can be located on the second floor. The first one is then allocated for the steam room and washing department.
When drawing up a drawing of the future building, it is necessary to think in advance about the location and size of the rooms. For example, the area of the dressing room, which prevents cold air from penetrating into the room, is measured at 1.3 m² per person plus the space where things and bath accessories will be stored.
For the steam room there are different standards. There should be at least 1 square meter of area per person, plus the distance between the stove and the walls, plus passages. The optimal height of this room is considered to be 2-2.1 m.
In general, the standard plan for a 4 by 6 meter bathhouse consists of:
- dressing room;
- steam rooms;
- washing department;
- rest rooms.
Veranda, terrace, attic - this is at the discretion of the owners. The dimensions of the building make it possible to “play” with the size and placement of rooms.
Whether the bathhouse is built with your own hands or to order - the project is necessary in any case. It will allow you to pre-distribute rooms, designate their sizes, figuratively imagine where everything will be located, and make the most efficient use of space.
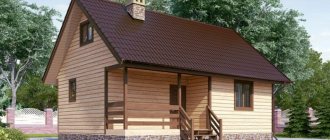
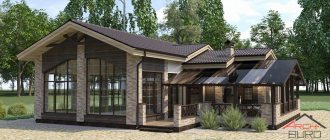
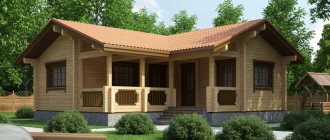
The roof can be single-pitch or gable. The second option looks more impressive and aesthetically pleasing. A bathhouse with a gable roof will also allow you to use the space to equip a recreation room or store things.
It is better if the bathhouse is made of the same materials, in the same style as the house - this will preserve the integrity of the style and create a harmonious ensemble on the site. In general, when building a bathhouse, you should not forget about the overall design of the estate. The building should fit into it, and not stand out from the overall picture with its design.
It’s good if the site is equipped with a well - this will ensure the constant availability of fresh water in the bathhouse and save you from unnecessary costs.
Bathhouse made of modern materials
Yes, wooden baths are great, natural and rustic. But along with baths made of logs or timber, other materials are also in demand.
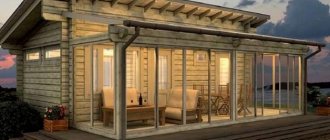
- Frame bath. It is built in production to adjust the material and find out whether all the details are taken into account. Then the bathhouse is dismantled and delivered to the place of order. The construction is light and can be erected quickly. It does not require a reinforced foundation. The only negative is that it is undesirable to build a two-story bathhouse or make a bathhouse with an attic, especially a residential one. And the issue of additional space will be solved by the plan of a bathhouse with a veranda, which can be glazed and heating equipment installed in it.
- A bathhouse made of foam blocks is suitable for cottage areas designed in a modern style. This is an environmentally friendly material that perfectly retains heat, does not burn, does not smoke and does not emit toxins when heated. For beauty and comfort, the inside walls can be decorated with wooden lining. Here you can already build a bath-sauna on two floors with an attic or a full second floor. The internal layout will increase and give more room for imagination: steam room and shower room, relaxation room and billiard room, swimming pool, kitchen, dressing room and everything that can fit into a 6x4 meter bathhouse.
The bathhouse is considered a simple building to construct. However, the internal layout and material must be thought out. Then the wish “enjoy your steam” will be sincere and pleasant.
Finally, we suggest you see what a completed bathhouse project made from 6 by 4 timber might look like.
( 5 votes, rating: 3.40 out of 5)
Nuances of construction
If you decide not to involve professionals to help, but to do everything exclusively with your own hands, you should carefully prepare for this process and listen to useful advice.
- A brick bathhouse must have a solid foundation. Therefore, they often choose to install a strip foundation, sometimes a columnar or pile foundation. But at the same time it is necessary to produce monolithic reinforced concrete piping. And then after waterproofing, brick walls are laid.
- If logs are chosen as the material, you should immediately keep in mind that it will not be possible to build a bathhouse alone. The logs are quite heavy, and therefore at least one assistant will be required. The logs should first be prepared - mark all the joints, and then cut them in a convenient way. More often grooves in the form of a semicircle are used.
- If the joints between the parts do not adhere well to each other, it is recommended to use a natural insulation such as tow or moss. If the parts fit exactly, felt or jute tape will do.
- When building a bathhouse from timber, you need to take into account a very important point. If the timber is not properly dried, shrinkage can take a very long time, up to 3-5 years. Therefore, it must be thoroughly dried before construction. Then insulation and finishing can be done immediately, without waiting even several months.
- When building a bathhouse from blocks, they are held together with special glue. If you use ordinary concrete mortar, you will have to additionally insulate the bathhouse. So you won’t be able to save money on this anyway. When erecting walls across a row, it is necessary to lay a metal mesh (for example: 1,3,5,7 or 2,4,6,8).
Log sauna
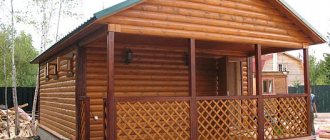
A log sauna is a classic. And the most popular are rounded logs. Village steam rooms were built from logs.
The beauty of such complexes is that wood is a healthy, environmentally friendly material. Such a bathhouse is being built in record time. If the logs are processed mechanically rather than manually, their cost is low. You can also save on interior decoration - wood itself is beautiful. And for fire safety and resistance to fungi, logs are treated with special solutions.
Disadvantages will appear if the company that volunteered to install the bathhouse did not dry the logs, so after a while the building will “lead”, or if the tree was chosen incorrectly: conifers “cry”, oak can crack from the heat.
Advice: aspen baths have proven themselves well. This is a durable, beautiful tree, which also has aromatherapy qualities.
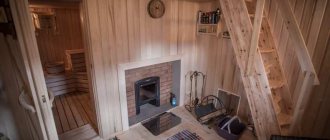
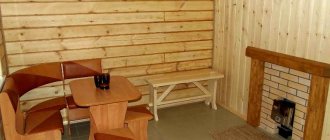
Interior arrangement
The interior decoration of the bathhouse depends only on the personal preferences of the owners of the site. This can be a classic design with natural wood, or modern materials can be used.
For example, in a washing room you can often find shower cabins or simply trays that provide rapid drainage of water and prevent water from getting on other objects. This is a good solution for a bathhouse decorated in a modern style.
The interior of a relaxation room may include not only a table and chairs, but also comfortable sofas, a TV, and cabinets for storing bath accessories.
In a steam room, shelves are a necessary attribute of the interior decoration. They should be wide enough to allow you to sit comfortably while enjoying the steam. The optimal shelf size is from 40 to 90 centimeters.
In this room, wood is preferable. It is durable, withstands high temperatures well and does not emit harmful substances. Some wood species, such as aspen, emit special substances that are beneficial to human health and have a positive effect on his emotional state.
Do not get carried away with metal surfaces, especially in the steam room and washing room. Hot metal can cause burns and injuries, which will not only ruin your mood, but may also have serious consequences.
In general, the main criterion for interior decoration is comfort and safety. Everyone has their own idea of comfort, so there can be many interior design options. A bathhouse is a place where a person relaxes body and soul. Natural materials will help make your vacation safe, and proper room design and sufficient space will add comfort.
Although building a bathhouse is considered a fairly simple task, it is necessary to carefully consider the layout, interior finishing materials, and its style. Then visiting the bathhouse will bring maximum pleasure and benefit.
Options and photos of 4x6 bathhouse layouts with separate steam room and sink
Having determined the conditions in which the bathhouse will be used, you can begin to draw up a preliminary design. You need to put in it everything that you want to fit inside. To do this, display to scale all the furniture and equipment that are planned to be used in the building. This will allow you to understand what you need to keep and what you have to give up.
Bathhouse for a family of 3-4 people
If only family members will use it, there is no point in making the dressing room large - it will be more difficult to warm it up, it will cool down faster, especially in winter. As the air temperature drops, the relative humidity will rise, causing fog and condensation to form on furniture and clothing. It is uncomfortable to be in such a room; either additional heating or good ventilation will be required.
It is more logical to limit the room to the required volume in which to install a table and a couple of benches or chairs sufficient for all guests at the same time. Separate the rest of the area with a partition and make a vestibule in it, in which to organize a locker room. It will be more convenient to change clothes, since the air is dry and clothes do not stick to the skin. In winter, this will protect against cold air entering the dressing room when opening the front door. On the remaining area it is worth placing a toilet. Although the bathroom is not the main room in a family bath, if it is not nearby at the right time, it will cause inconvenience. There is no need to allocate a large area for it, 1-2 square meters is enough. m.
In the given task, the total area is 24 square meters. m. From the minimum requirements, it turns out that for a family of 3-4 people, 3-4 square meters is enough. m for the steam room, sink and dressing room. But if you increase each room to 6 square meters. m, it will become more spacious. It will be possible to receive a couple more guests, and there is enough space in the sink even for a small font.
Another 6 square meters will remain vacant. m, which is enough for a vestibule-dressing room (4 sq. m.) and a bathroom with an area of 2 sq. m. m. These rooms will be used for a short time, so there will be enough space to spare. In reality, the numbers will be slightly lower due to walls and partitions, but not significantly. The result is a spacious bathhouse for a family holiday, ready to accommodate two additional guests.
Bathhouse at a tourist base for 8-10 people
The number and composition of guests in such a bathhouse will be different, and you need to be prepared to accept the maximum number. Most likely, the main communication will take place at the table in the waiting room. There is no need to split the area of the dressing room into a vestibule and a locker room; lockers along the wall or hangers are enough. A bathroom is required.
So that guests do not feel cramped, the steam room and sink should simultaneously accommodate at least half of the total number. This means that their minimum area should be 4-5 square meters. m per room. Since part of the walls will be occupied by partitions, you need to take a small margin - 6 square meters each. m.
There will be 12 square meters left. m, from which you need to subtract 1.5 sq. m for a bathroom. The dressing room will be 10.5 square meters. m, which is enough for free communication at a table of 8-10 people at the same time. To store clothes and personal belongings, it is worth organizing lockers at the entrance. A small refrigerator and microwave oven for drinks and snacks would be useful. A TV and speaker system will not take up space on the floor, but will add comfort to guests.
The examples discussed show that there is no universal layout. Each owner must formulate his own wishes and requirements for the bathhouse. It is advisable to draw them up immediately in the form of a sketch, this will help in the future to communicate with the designer and builders. There is no need to try to fit many small rooms into a small building at the expense of comfort. When construction is completed, you may want to add a terrace or even an enclosed veranda to the bathhouse. In this case, do not worry - such extensions can be made at any time.
Details to pay attention to
- the door to the steam room should be opened from the inside - this will allow maintaining the desired temperature in the dressing room and relaxation room;
- do not chase the height of the room - 2 meters will be optimal for a steam room, otherwise there is a high probability of steam dissipation and discomfort for those steaming;
- think carefully about the layout of the dressing room and provide a place in it where you can store coal or firewood - this will allow you to quickly and conveniently increase the temperature in the steam room at the right time;
- if there is a shortage of square meters, then combining a dressing room and a rest room is an excellent compromise, however, it is worth taking care of a comfortable temperature in the room;
- Recently, shower boxes have become popular - especially if they include a tropical shower, allowing you to relax under a diffused water flow.
Terrace
For deck flooring, it is better to use boards impregnated with antiseptics. Nowadays you can buy special boards for terraces; they are made from wood sawdust and plastic.
Their performance characteristics are superior to all existing floor coverings. But they have two drawbacks. First, the appearance does not at all resemble natural boards. This does not harmonize with the overall design of the bathhouse. Secondly, the price of such boards makes many developers think about the advisability of purchasing them.
Terrace board, cost
Balusters and railings can be fixed on spikes or using metal corners. In specialized stores you can purchase finished products; the choice in linear dimensions and appearance is huge. The railings are attached to vertical wooden supports.
How to attach balusters on a terrace
After installation, you need to carefully sand all surfaces and fill the gaps at the joints. It is better to make the putty yourself; purchased putty will always differ in color. Putty is done very simply. Collect a small amount of small sawdust and mix it with waterproof PVA glue. The sawdust should be from the type of lumber that you plan to putty.
To finish the terrace structures, use only varnishes or paints intended for external use.
Beautiful examples
We offer several beautiful examples that will clearly demonstrate the subtleties of the layout of a 4x6 m bathhouse.
- Universal layout of a bathhouse 4 x 6 m - shower room 2x2 m, steam room 2x2 m, entrance to the locker room from the street 2.5 x 1.2 m. From the locker room you can go to the rest room 2.5 x 3.8 m, door to the shower room on the left, door to the shower on the right – on the attached terrace 1.5x4 m.
- Layout option with a narrow rest room: dressing room 1.5 x 4 m with doors to the right to a room 4 x 2 m and to a washing room 2.5 x 2 m. A steam room of the same volume is located in the farthest corner from the front door, you enter it through the sink.
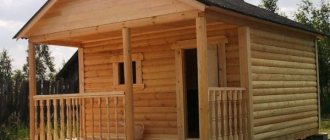
- From the outside, the bathhouse may look like this.
- You can create such a bathhouse yourself from logs.
Bathhouse made of timber
A bathhouse made of timber is practically no different from a log bathhouse. Wooden beams are also environmentally friendly and, due to their natural aesthetics, do not require either internal or external finishing.
The differences between timber and log house are in the method of processing the material. The log is round when cut, and the timber is square. The fit of the timber is more precise, the material consumption is less, which somewhat reduces the cost of construction.
Projects
Before drawing up a plan, you need to choose the right site and soil for construction. For fire safety reasons, it is not advisable to attach a bathhouse directly to the house. For construction and finishing work, you should choose materials that are resistant to high temperatures. Construction of a separate bathhouse is quite expensive, but comfortable and safe.
Let us note the main nuances when choosing a location:
- The most convenient place is on a hill: this way the dirty water will leave the bathhouse by gravity.
- It is better to exclude wet areas with possible groundwater immediately.
- The distance to the well or the nearest body of water must be at least 5 m.
- The nearest residential building should not be closer than 8 m.
- The bathhouse should be located as far as possible from the toilet (if it is outdoors) and the compost.
The type of soil determines the design of the bathhouse foundation. Most often, foundations with a slight depth are used: strip (in areas with sandy soil) and columnar types. Before construction, you need to clear the area by digging it up to remove bushes, roots, and small stones.
What you should immediately consider
Everyone’s needs are different, so it’s worth starting to design a bathhouse with a steam room, sink, relaxation room, bathroom, terrace, swimming pool, etc., with how exactly you are going to use this bathhouse in the future.
The second point is what the climatic conditions are like where your bathhouse will be - there are specifics for areas with particularly harsh winters, for example.
The third point is what opportunities you have, from budget to the geology of the site.
And if there is certainty at least on the points:
- number of persons;
- frequency and seasonality of use;
- type of bath (Russian or Finnish, iron or brick stove);
- wall material (logs, beams, bricks, blocks, frame);
- dimensions of a geologically suitable area;
- allowable costs,
- then you can start designing.
We will show you options for what a bathhouse can look like given certain given dimensions - these are not the only options for plans, you can build on them and make any necessary adjustments.
Let's put it this way: our article is for those who have already figured out in their minds what size of bath they are expecting and would like to get acquainted with ready-made plans so that in the end they can either choose a ready-made one or make their own based on the existing ones.
IMPORTANT! When looking at the plans, take into account the fact that we did not take into account the thickness of the walls and insulation, and this can significantly reduce the area of the room from the inside. Therefore, calculate in advance the thickness of the walls and the insulation cake, and then subtract it from your plan (or, conversely, add it if you want to maintain the dimension inside)
You will learn how to calculate the power of the stove for a given cubic capacity of a steam room here, and you will learn the dependence of the size of the steam room on the number of people here; we will calculate the optimal size of the steam room in this article.