SHARE ON SOCIAL NETWORKS
FacebookTwitterOkGoogle+PinterestVk
On the websites of construction companies, you can find thousands of beautiful and practical projects in the public domain. But each owner of a summer cottage has his own idea of what a bathhouse with an attic should be like: starting with the material on which the building will be built, ending with the layout, arrangement of the internal space and dividing it into functional zones. This article will help you create a truly comfortable and convenient project.
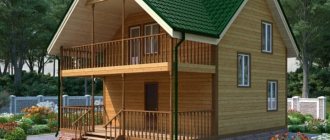
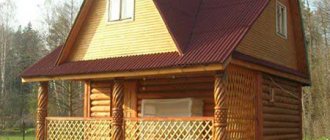
A bathhouse with an attic is a fully functional relaxation place for the whole family or with friends
Bathhouse projects with an attic
The location of the rooms in the bathhouse will be the same, since the purpose of the structure requires a sequence of rooms, but the choice remains.
Most of all, builders are tied to the area allocated for construction, which will determine the main parameters. Let's look at several successful types of this structure. Since there will be a lot of rooms inside and it is necessary to install a staircase, 4 meters is considered the minimum possible length and width of such a structure, unless, of course, there is a desire to walk over each other’s heads. And then, everything turns out to be trimmed down. The terrace is designed as an external extension to the main building.
There was not enough space inside for many of the rooms listed earlier. The terrace can only be built from the outside. There is also no vestibule, which is why the bathhouse will cool down faster, but there is nowhere to go when saving space.
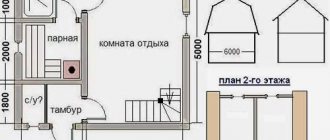
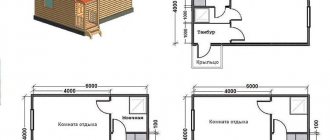
The smallest bathhouse with an attic
Upon entering, you immediately find yourself in a relaxation room. The staircase immediately begins, due to which the usable area is significantly reduced.
Then there is a passage to the washing room, from which you can go to the steam room. On the second floor, the layout is not specified, but we suspect that there is one partition there and the space is divided into two rooms - a common one and a private one.
If you add 1 meter in length, then it can be used to increase the area of the rest room, or you can make a small vestibule and even a bathroom. In the diagram below, everything was done according to the first scenario.
Bathhouse 4*5 with attic
The plan differs only in that the staircase is located differently and the entrance is made from the other side. In the attic we see one large bedroom with two windows.
As you can see, this area is not enough to make a bathhouse with a veranda. Let's look at more massive types of projects.
The minimum size of the bathhouse to include all rooms should be 6 * 4 meters. This project can be seen in the following picture.
Bathhouse project 6*4 meters
And then there is not enough toilet here. However, the presence of a vestibule and a small terrace, in general, makes the structure more convenient and attractive for construction. In fact, the layout has remained the same - which is what we wrote about earlier (don’t expect a huge choice in the placement of premises). If we compare it with the previous project, the wall moves half a meter inward, and the freed 1.5 meters goes under the terrace and vestibule.
Advice! The space under the flight of stairs remains unused; you could try to fit a small bathroom into it.
On the second floor everything is just as simple. The room can be arranged with partitions as you please.
In the next project (5x5 meters), the developer used a very advantageous technique - he moved the stairs from the rest room straight to the vestibule. Thanks to this, there is more space in the rest room. We also managed to accommodate a small bathroom, which can be accessed directly from the shower.
The terrace is presented in the form of a small porch. You won’t be able to use it as a place to relax if you don’t extend it across the entire width of the façade.
This arrangement of the stairs has a serious drawback - the vestibule will be connected directly to the attic, and cold air from the street will penetrate there. To avoid this effect, the porch must be made closed, but then the length of the structure will be increased to 6.5 meters.
Drawing of a bathhouse with an attic 5*5 meters
It will not be possible to make a bathhouse project of 6x4.5 meters as multifunctional, since the absence of these 0.5 meters will not allow installing a bathroom, or you will have to sacrifice the size of the remaining rooms, which is unjustified. The following picture shows an example of such a project. There may not be a 1.5 meter terrace - now we are only looking at the dimensions of the building box, but if you want to make an extension, the width of the bathhouse will grow to the standard 6 meters.
Design of a bathhouse 6*4.5 meters
Although, if you look closely at the picture, it becomes not entirely clear why the wash room has 5.5 square meters of area. You can fit a small toilet here. Or take away the space under the stairs for it, because there is quite a lot of it, since its design is one-flight.
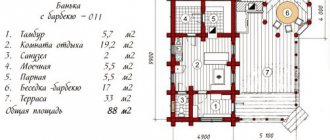
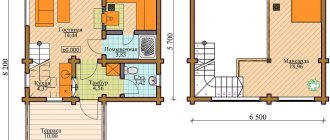
The next project fits all the rooms that are important to us, including the terrace, but there is not enough toilet, although it can be easily accommodated in the shower room. The size of such a bath is 6x5 meters.
Project of a bathhouse with an attic 6x5 meters
The layout in this diagram is significantly different from the previous ones.
- It all starts with the terrace, which you need to climb up a short staircase. Its dimensions are 1.5 * 2.5 meters. Not very much, but you can fit a small table and a couple of benches.
- Next is the entrance to the vestibule, which has enough space to install a good wardrobe for things.
- From the vestibule we find ourselves in the rest room. According to the plan, it has 10 square meters, however, the staircase takes up quite a lot of space. Again, it is completely incomprehensible why not give this space for a toilet, because anyway it will not be used in any way
- Next, according to the standard, there are washing and steam rooms in sequence.
Overall, we rate this project as very successful for its size. If you make some modifications to it, it will become almost perfect.
We don't stop and move on. Next in line is the most common and popular solution - a 6x6 bathhouse with an attic and a terrace, the layout of which should not leave out any necessary rooms.
Bathhouse 6x6 with attic and terrace, projects
A competent layout of the premises made it possible to create a very large recreation room on the ground floor - as many as 18 square meters. However, there is no vestibule on the plan, since the space for it was allocated for the cooking area.
It is quite possible to add a vestibule if the entrance to the house is moved to the point where the gas stove is located in the drawing. In this case, the rest room loses its correct shape, but this is not critical. The ladder can be moved to the place of the sofa, which will completely free up the far corner and install a large table and benches there.
The terrace has a fairly decent area of 6 square meters, but it is elongated and you cannot place anything large on it. But a new room appeared that was not there before - a locker room. This is very convenient - you don’t have to change clothes in a cold vestibule, washroom or rest room.
The first combined bathroom among the projects we reviewed. On an area of 3 square meters we managed to place both a shower stall and a toilet - convenient and practical (you can find out how to make a sewerage system in a bathhouse from the article on our website).
Bathhouse project 6x8
The last project that we will look at today will have dimensions of 6x8 meters. Such a building is already very large, so it can be planned with all the amenities.
Let's go through the floors in order:
- It all starts with the terrace, which in this case is 2 meters wide. This is quite enough to install benches on both sides and place a large table in the center. There is also enough space for armchairs and even a sofa, because the total area is 12 m2.
- We go into the hall, which replaces the vestibule. There is a convenient two-flight staircase, under which you can place a convenient wardrobe for outerwear.
- There are two doors on the left: one to the bathroom, and the second to the rest room. The first plumbing points are spaced apart from each other in opposite directions.
- From the living room we get into the sink and then into the steam room.
From the author! In principle, everything is convenient, but your humble servant would make some changes here too. The main reason is that the toilet is located a long distance from the shower room, which will require running water supply and sewerage systems, and these are additional, completely unnecessary costs and labor. What if the bathroom and stairs were swapped. In this case, it can be connected, if necessary, to the shower room, although the entrance can also be left from the hall.
If two rooms are not required on the second floor, you can make a comfortable and spacious balcony. This will significantly save costs on building materials. To do this, you should direct the stairs in the other direction and make an approach from the wall separating the hall and the rest room. As a result of this, room 1 in the attic increases, and room 2 decreases. We are replacing it with a balcony that will match the size of the terrace.
A bathhouse is a specific structure that must meet certain requirements. The materials suitable for it are different, but each of them requires its own measures for insulation and vapor barrier.
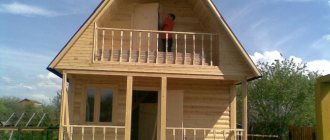
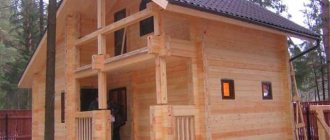
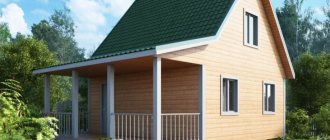
Bathhouse with attic and wooden terrace
Let's look at the most popular materials today.
Projects and drawings of bathhouses with a built-on room, created in our time, include the most modern and progressive technologies that make it possible to create a very functional structure and at the same time save a lot. The plan of a standard Russian bathhouse, as we are used to seeing it, is a dressing room and a steam room.
Project of a wooden bathhouse with an attic measuring 6 by 6 meters
However, modern solutions make it possible to achieve more from the bathhouse, combining in it both a place for water procedures and a room where you can relax and have fun. One of these solutions is the attic. There are a huge number of bathhouse projects with a built-on attic. You can choose a project suitable for a plot of any size. Let's look at the most popular standard sizes for baths with an attic, drawings of which can be easily found on the Internet.
A real Russian steam bath with a wood-burning stove, which will be discussed in the article, can be combined with a house under a common attic roof. Such a design for a bath house with an attic can have a number of advantages and disadvantages.
The main advantages of the building:
- the versatility of such a room. Its area allows you to place a living room on the second floor and a kitchen on the first floor. There will also be bathhouses and a relaxation room;
- if guests arrive, the living room above the bathhouse can be easily transported to the guest apartment;
- it becomes possible to steam in a large group, which can comfortably sit in two relaxation rooms and not disturb each other. In addition, it becomes possible to install a billiard table, fireplace, solarium and even a massage room in the attic.
But such ready-made projects of bathhouses with an attic also have their pitfalls:
- The plan for a bathhouse with an attic should include a good ventilation system so that moisture from the steam room and sink does not leak into the living spaces (read: “Layout of a house with an attic, what to consider”). In addition, waterproofing the bathhouse will require special attention;
- the air conditioning system in summer will require additional load, since as it cools down, the bathhouse will transfer heat to all living spaces;
- Special control over fire safety will be required, since a wood stove is an increased source of danger. Of course, any stove requires careful attention to itself, but the project of a wooden bathhouse with an attic will require additional attention from the owners to this issue.
Premises equipment
A stove and shelves are placed in the steam room. Screens must be installed to protect against fire, and people must be protected from getting burns.
In a shower room equipped with running water, a stall or corner is installed. If this is not possible, and the water is heated in the tank, then the shower is replaced with a large ladle or a vertical watering can on a support.
The bathroom is located in the boiler room or separately. You can use a bio-toilet or organize a full-fledged toilet if there is a sewerage system.
A stove and shelves are placed in the steam room
In a small bathhouse, you can combine a washroom with a steam room, without separating them with partitions, and dispense with the bathroom.
The dressing room in small buildings serves as a locker room, resting place, and firewood storage. Even a modest-sized room is furnished with the necessary furniture: a bench or sofa, a hanger, shelves for shoes, a table.
If possible, separate the dressing room and dressing room, and move the rest room to the attic. If desired, a billiard table, upholstered furniture, and a fireplace can be installed there.
The area of the bathhouse is calculated from the estimated number of visitors simultaneously taking water procedures. Each person is allocated 5 m².
Option for a rest room
A well-thought-out layout is the key to a comfortable and, most importantly, safe stay.
Electric Fireplace with live flame effect: Wall-mounted, Built-in, Floor-standing. Which model should you prefer? (230+ Photos)
Advantages
- The layout of the steam room with a built-on attic will allow you to get additional usable space. You can get twice as much space in the same area.
- The construction of an attic is more profitable than the construction of a full second floor. The savings are about thirty percent. If you build on an attic without deviating from certain building rules, you can end up with an additional floor, which will hardly differ from a full-fledged residential floor.
- The space above the bathhouse is a very versatile space; you can arrange anything here. The attic will perfectly accommodate a recreation room, a billiard room, a home spa, and even a bedroom for use in the summer. Also, if the owner does not plan to use the attic in any way, something like a storage room or warehouse can be placed on it.
Layout of a bathhouse with an attic measuring 4x4 meters - Heat from the ground floor will help minimize heating costs.
Flaws
- The layout of bathhouses with a built-on attic requires special attention to be paid to hydro- and vapor barriers between floors, since the ground floor is constantly high in temperature and humidity. The microclimate in the steam room, with its heat and fumes, should not affect the attic, otherwise the second floor will “bloom” and fungus and mold will appear. Baths in which the insulation between the attic and the steam room is poorly done require repairs very soon after construction. Therefore, when carrying out the plan for building a bathhouse, you need to install only high-quality insulating materials.
- Mandatory insulation of the attic floor significantly increases the cost of construction. However, this is only necessary if the owners plan to use the superstructure in the winter. Otherwise, there is no need for insulation, because the first floor is already protected.
The project of a bathhouse with an attic and a veranda is ready - It is not difficult to guess that the installation of the roof of a bathhouse with an attic will be more labor-intensive. For such buildings the roof area will be larger than for simple baths.
- In the summer, being on the second floor under a hot steam room will not be very comfortable. Therefore, you will have to think about air conditioning.
- For such baths, additional work is necessary to ensure fire safety.
The nuances of constructing baths with a built-on attic
If the presence of an attic in the bathhouse was planned at the stage of creating the plan and drawing of the building, this will allow the construction to be carried out more correctly. In such cases, a frame system is used. The frame consists of horizontal and vertical beams that will serve as the ceiling and walls in the future structure.
Basically, the bathhouse is used both in the warm season and in winter. Particular attention must be paid to ensuring that it is comfortable to stay in the attic in the summer. It is best to choose slate as a roofing material.
Original project of a bathhouse with an attic 4x4
The angle of inclination of the roof frame system is also important. A roof with slope angles from 30 to 60 degrees is considered optimal.
If the angle is made larger than the specified values, the usable space in the attic will be significantly reduced. If funds allow, it is best to provide a sloping roof, with a multi-layer roof structure (internal lining, vapor and waterproofing, insulation, roofing material).
It will be much more difficult to build on the attic when the bathhouse was built before. In such cases, it is necessary to decide on the location of the stairs.
Typically, such baths are built from timber, but installation can be done by combining several building materials. There are bathhouses, both brick and frame type, lined with siding material.
Installation of the rafter system
Installation of rafters
Step, No. Description Illustration Step 1. Mark the locations of the rafter legs. We have seven of them, with the length of the bathhouse the distance between the rafters will be 85 centimeters. This figure is more of an example, each bathhouse may have slight deviations along the perimeter of the upper crown, this is not scary. The main thing is that the distances between the rafters have the same values.
Making markings for installing rafters
Step 2. Check the horizontality of the top row, one cannot deviate more than 1÷2 centimeters at the extreme corners. If the spread is greater, then you will have to make cuts in the upper crown of the frame or in the ceiling beams. There is no big difference in the method of leveling the floor plane; choose what is more convenient and easier for you.
Step 3: Lift all the assembled rafters and frames into the attic and neatly stack them in one pile near any gable.
Raise the rafters up
Step 4. Begin installing the first gable structure. To do this, you will need to prepare a simple device - a board for resting on the ridge part. Make it in the form of a slingshot; this will completely prevent the structure from slipping during lifting.
Installation of a pediment
Step 5. Let two assistants lift the rafters at the ridge part to their maximum height, the third person, using a device, will rest against the ridge part and lift it to a vertical position. Helpers on the sides must simultaneously push the lower parts of the floor beams into place. As soon as the structure takes the required position, it should be temporarily but securely fixed using any corner struts.
Installation of intermediate rafters
Step 6. Using the same algorithm, lift and fix the system at the second skate
Do the work slowly and remember to be careful.
Step 7. Stretch a rope along the ridge, and install all the remaining rafters one by one along the rope. Firmly fix the legs to the upper crown, use homemade metal staples, shop corners and self-tapping screws
Use different pieces of boards to connect the rafters on the attic side. After installing the sheathing, temporary fastenings will need to be removed.
Installation of the rafter system
Installed rafters
Attic rafter system - photo
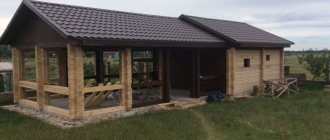
Compact and easy-to-use baths with an attic 4 x 6 m
Projects of such baths are considered one of the simplest. The structure turns out to be quite compact, but at the same time everything you need for a good rest can be placed in it. This is almost an ideal option for a small family. They are especially suitable for those who do not have free space on their site. But even despite its rather modest size, it is possible to draw up a correct plan of all the rooms inside the building itself.
On the ground floor of a 4 x 6 m bathhouse there are usually:
- steam room;
- washing room or shower;
- entrance area;
- rest room or hallway;
- veranda or terrace.
Bathhouse project with attic
You can additionally place a table and chairs on the veranda or open terrace to relax in the fresh air in the summer after visiting the steam room, which adds some simplicity and naturalness to the atmosphere. But bathhouse projects can be done without them, if someone prefers to increase the area of the entrance area, hallway or recreation room below.
On the attic floor there is a rest room or guest room. But it happens that the owner decides to equip the attic as a storage room or a small warehouse for storing something. In this case, the place to relax after the steam room is usually located below, and can be combined with the hallway. The staircase to the attic is most often located in the entrance area of the first floor, so as not to unnecessarily clutter the already not very spacious premises of buildings of this size.
Advice. When planning the attic floor, it is important to take into account the height of the ceilings in this room so that it is comfortable enough to be there. The optimal height is at least 2-2.5 m.
Veranda. Needed or not?
The question of the veranda remains open in the case of the construction of small-format baths. Of course, in all respects, a bathhouse with a veranda and attic looks preferable than without it. Still, a small space for relaxing in the fresh air seems like a small thing only on paper, but in reality it is often what is not enough to achieve maximum pleasure from spending time with family and friends.
However, if the shortage of usable space is felt more than acutely, then it is better to implement the project of a bathhouse with an attic without this element. Still, do not forget that you are building a bathhouse first and foremost - and it is better to make every effort to ensure that after visiting it you have an extremely positive impression.
If there is a lack of usable space, you can replace the veranda with a more comfortable lounge or a small balcony in the attic. In this case, you will not lose any comfort, you will see. However, we will leave several projects with the layout of bathhouses with an attic, where there was room for a veranda, here.
Bathhouse with attic dimensions 6x8
For those who do not have enough free space on the site, or do not consider it necessary to build a large bathhouse, there is a suitable option - a bathhouse measuring 6x4 meters, with an attic. Despite its modest size, everything you need for a good rest can fit here. The design of such a bath usually involves a roof with two slopes, covered with roofing material produced by the French company ONDULINE.
Bathroom and attic floor layout 6×4
Gable roofs can increase the usable space in the attic due to their design. It is best to make interior walls of the frame type, followed by covering them. It is recommended to use aspen sheathing material for the steam room.
The most popular version of 6x6 meter baths are baths made of profiled timber.
Layout of a bathhouse and attic measuring 6 by 6 meters
Let's consider the main advantages of buildings of this type:
- Low cost, which is achieved due to reasonable consumption of materials;
- Low labor intensity of the bathhouse construction process;
- Great opportunities when designing or creating a plan with drawings of the future structure. Profiled timber lends itself well to cutting, thanks to which you can add individuality to a standard 6x6 bathhouse;
- There is no need for finishing, which allows you not to waste your time and money.
The price for the construction of such turnkey baths in Russia is about half a million.
If there is enough free space on the site, and the developer has unlimited funds, a 6x8 meter bathhouse is an excellent option.
The attic area of almost fifty square meters allows you to create several rooms there. For example, in the attic you can make a bedroom and a relaxation room with a billiard table, comfortable armchairs and a sofa. In order to make optimal use of useful space, it is best to draw up a plan or drawing and mark all the necessary rooms on it.
Layout of a bathhouse with an attic 6x8 meters
Since the size of the bathhouse will be impressive, it is better to make the foundation plan for the building more powerful, for example, a strip one. In order to calculate the foundation and determine more precisely its type, it is recommended to contact professional builders.
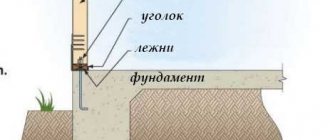
We design the foundation
Having decided on the layout, it is necessary to design the foundation. It comes in several types:
Types of foundation for a bathhouse made of logs or timber
Screw
A screw foundation is made of piles that are screwed into the ground like drills below the freezing level of the soil. From above they are connected with a grillage. The latter can be metal or wood.
Designing a screw foundation is quite simple - all piles are located in increments of no more than two to three meters. The distance between the piles depends on the load-bearing capacity of the grillage.
Diagram of a screw foundation
It makes sense to use a screw foundation in the following cases:
- The soil is unstable . The pile-screw foundation is suitable for swampy areas;
- In areas with large differences in ground level . The design of the screw foundation allows you to create a solid foundation on the steepest slopes.
Example of a screw foundation project
Compared to strip foundations, screw foundations are inexpensive. True, you will need helpers to make it.
Tape
The strip foundation is made in the form of a continuous strip, which is made under all load-bearing walls, hence its name. Depending on the depth, it is divided into two types:
- Shallow . Fills to a depth of up to half a meter. Used on stable ground for light buildings, i.e. lumber, frame, log or foam block;
- Recessed . It is located at a depth below the soil freezing level. This foundation is suitable for heaving soils.
Strip foundation project
It must be said that strip foundations are the most expensive. But it allows the construction of underground premises. For example, if you want to make a cellar under a log house, a columnar or screw base will not work.
The base of a screw and column foundation can be covered with siding to protect the foundation from weather conditions and give the building a more attractive appearance.
The strip foundation is poured under all external and internal load-bearing walls, so the design is also quite simple.
Columnar foundation
The base in the form of columns is an excellent solution for small log baths. Its principle is based on installing individual columns in increments of one and a half to two meters. As with the installation of a screw base, all posts are connected with a grillage.
Diagram of a columnar foundation
This design is the simplest in terms of design, and at the same time the cheapest. Moreover, it can be erected on the following types of soil:
- Sandy;
- Clayman.
In other words, he is not afraid of heaving. Therefore, most often when building baths, a columnar base is used.
To design such a foundation, draw the outlines of the structure on the drawing, and then indicate the locations of the pillars. As I already said, the pillars are connected with a grillage.
Example of a columnar foundation
Designing a foundation for a brick oven
If you are going to install a brick stove in a bathhouse, it also requires a foundation. The optimal solution in this case is a slab base.
An example of a project for a columnar foundation and slab base for a stove
To design such a foundation, first of all decide on the location of the furnace and its dimensions. Mark this area with a rectangle - this will be the foundation slab. Its thickness should be at least 20-25 cm.
You can learn more about how to build foundations of all types described above from other articles on our portal.
- Bathhouse project with a gazebo