A bathhouse with an attic belongs to one of the types of country houses. These baths are especially popular in small gardens and summer cottages, since they can be used not only for their intended purpose, but also as a living space.
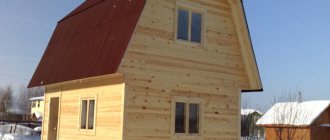
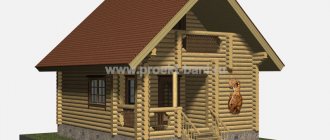
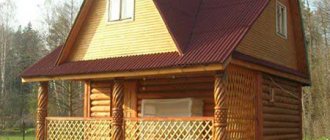
Ready-made project of a frame bath with an attic and a veranda
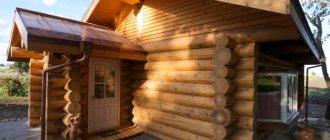
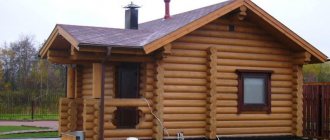
An example of cladding a frame bathhouse and attic with boards
Advantages of a frame bath with an attic
A distinctive feature of these structures is the structure frame, made of wooden beams, as well as the presence of a second attic floor - an attic. Frame baths, compared to baths built from logs or bricks, have their undoubted advantages. These advantages include:
- Speed of construction of a bathhouse.
- Simplicity of design.
- No shrinkage after construction.
- Economical construction.
- You can build a bathhouse at any time of the year, even in winter.
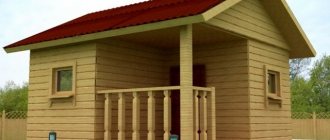
Design and layout of a small bathhouse
Almost everyone can afford a frame bathhouse with an attic on their own site. The price of such a structure is not so high. In addition, having once built such a bathhouse at home according to a standard design, you can later expand it by adding more than one room to it.
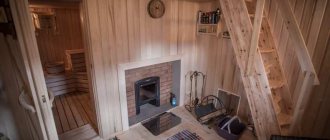
Steam room stove - stone, metal and brick
Summer construction at the dacha, and even more so winter construction, cannot be completed without a stove. It is the main attribute of the Russian steam room. The following raw materials are suitable for the construction of the furnace:
- metal. The most common option. It is cheap and quick to assemble, but is not able to maintain the desired temperature for a long time.
- fireclay brick. Its main characteristics: low thermal conductivity, fire resistance, high strength. Suitable for laying out the firebox.
- stone. A stove built from soapstone or gabbrodiabase gives pleasant steam and soft heat.
Despite the quick end result, making frame baths is a labor-intensive process. If you have any questions, a step-by-step construction demonstration can always be found on the banya-guru.ru blog.
Frame baths with attic
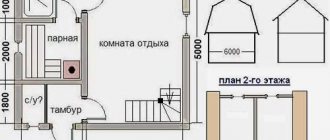
Frame baths with attics, their designs, assume a standard placement of all rooms inside the building. Namely:
- The 1st floor is a steam room with a washing room, a dressing room, and a toilet;
- The 2nd floor is an attic. There may be one or two rooms for temporary or permanent residence.
An example of the layout of the first floor and attic in a frame bath
The first floor is connected to the second by an internal staircase, usually located in the dressing room.
Ordering ready-made baths from specialized companies
The easiest way to install a bathhouse on a site is, of course, to order it from a company specializing in the construction of turnkey frame houses. This will be the optimal and correct decision on the part of the owner of the site. This choice can be supported by facts such as:
- Ready-made standard designs for frame baths from development companies are a fairly common order from ordinary citizens. Many of them first order bathhouses or country houses, and then large residential buildings.
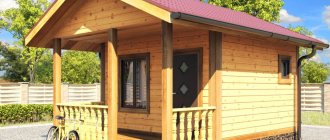
Option for a simple sauna layout with a stove location - Extensive experience in the construction of frame baths.
- When making calculations, the development company takes into account all dimensions of building materials according to the relevant standards. This helps avoid unnecessary construction costs. There will be much less waste of the materials themselves during professional construction than when constructing a building with your own hands.
- The project of the future bathhouse can be viewed both on paper and visually in 3D dimension. Such a review also helps to once again recalculate the amount of material needed for the construction of a frame bath.
An example of a 3D project and layout of a frame bath
The most common version of the project is a frame bathhouse with a 6*6 attic. These baths are inexpensive, and they take up very little space on the site.
Those who have a fairly large plot of land can install a frame bathhouse with a 6*8 attic.
Both of these projects are capable of satisfying all human needs.
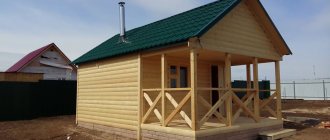
Project of a wooden structure and slate roofing
Floor
We insulated the floors in the bathhouse. The steam room and shower have tiled flooring, and the dressing room has laminate flooring. First, I’ll tell you about the steam room and shower; there are many more important nuances there.
Laying tiles
The tiles were purchased with a matte finish and rough so that they would not slip. We decided that tiles are much better than wooden floors - they don’t rot and are easy to clean. The glue was purchased with the best moisture resistance characteristics.
Waterproofing was laid on the subfloor, overlapping the walls. On top of the waterproofing, insulation was laid - EPPS (thickness 30 mm). For better adhesion of EPS to the waterproofing, assembly adhesive was used.
A screed was poured over the insulation along the beacons with a slope towards the drain funnel. Before pouring the solution, a reinforcing mesh and a set of beacons were laid. The photo shows that we attached the beacons not to the floor, but to an asbestos solution - we laid out piles and pressed profiles into them. The solution (cement with sand) was mixed in a rented concrete mixer, because
It was important to fill the entire floor in one day. The solution was laid out from the bucket with a trowel onto the grid between the beacons and leveled with a wooden plank - the rule
The floor was finally leveled with a wide trowel and grout.
The tiles were laid away from the drain gutter to make it easier to maintain the slope. Each one was pre-soaked in water. The glue was applied with a notched trowel onto the dried and primed screed. In this case, glue was not applied to the entire surface of the floor at once, but only to the space for laying 1-2 tiles. The glue hardens quickly and should not be used to cover a large area of the floor at once. The thickness of the adhesive layer was kept approximately equal to the thickness of the tile. I collected the excess glue around the laid elements with a simple narrow spatula.
First, all rows of whole tiles were laid out, then parts along the walls. We cut the tiles with a manual tile cutter. By the way, for precision masonry we pulled the fishing line and used crosses for the seams. And for better contact of the tile surface with the binder, immediately after laying, I lightly tapped each square of tile with a rubber mallet.
Laminate
The laminate flooring was installed very quickly. We covered the floor with film over the insulation, nailed down moisture-resistant plywood, and rolled out the backing.
I unpacked the package with a knife. He took out the first panel and laid it down, turning it with a small protrusion towards the wall. I inserted 2 plastic wedges between the wall and the board. I took the second strip and snapped it into the end groove of the first. I leveled it and placed the wedges again. When I reached the opposite wall, I used a circular saw to cut off the extra piece of the laminate panel. The next row began from the segment. The second row was assembled in the same way as the first, after which I lifted the entire floorboard at an angle of 45 degrees and carefully connected it to the latch of the first row, and then hammered it through the block with a mallet. The last row had to be sawed lengthwise, precisely measuring the cutting line.
Construction of a frame bathhouse with an attic with your own hands
Construction of a frame bathhouse with an attic is not as complicated and time-consuming a process as it might seem at first glance. Any person who is at least somewhat familiar with the basics of construction can handle this. That is why many people prefer to build bathhouses on their site with their own hands.
The process of constructing a frame bathhouse with an attic In this case, you can prepare the material for construction yourself, rather than ordering a ready-made kit from the factory.
The main points of building a bathhouse. Nuances worth paying attention to
When choosing wood for construction, you must first pay attention to its moisture content. It should not exceed 20%, otherwise the bathhouse may soon develop unnecessary deformation or will have to be completely remodeled.
Original design and layout of all floors of the bathhouse and attic
Before starting construction work, the following points must be taken into account:
- Possibility of connecting all communication systems (water, sewerage, electricity) to the future bathhouse.
- Possibility of draining melt and waste water from the bathhouse.
- Placing the toilet directly in the bathhouse itself.
- Possibility of placing a swimming pool or other artificial reservoir near the bathhouse.
Stages of constructing a frame bath with your own hands
The construction of a frame bath is carried out according to the usual scheme for such types of work: base, both corner and wall posts, trim, ceiling, roof. All work can be divided into several stages:
- Preparing a site for building a bathhouse. This includes removing debris, grass, and stones.
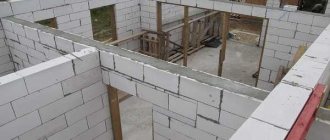
- Marking the site, pouring the foundation.
- Laying the first bundle of logs on the finished foundation. Immediately before laying the log on the foundation, you need to put roofing material on it in two layers. This method is used to waterproof the foundation.
- Laying floor joists. It is made by cutting the ends of the logs into the lower log. Before laying floorboards on them, all debris must be removed. The finished floor is insulated with expanded clay.
- Installation of racks. The racks are fixed both on the lower frame of the logs and on the top. All this is done while maintaining the same distance between them.
The process of installing frame racks - Ceiling installation. First, ceiling beams are cut into the upper logs, then boards are laid on them. Roofing felt is used to waterproof the ceiling. It is laid on the boards with an overlap, in two layers. A double sheathing is laid on top of this. Then everything is covered with metal tiles.
- Sheathing of the frame, both from the inside and from the outside. From the outside, the bathhouse can be additionally sheathed with boards or siding.
- Installation of windows and doors. For this, a special building level is used.
Calculation of the quantity of materials
It is not so difficult to calculate the need for metal frame assemblies: any seller can do this after knowing the required dimensions and design. In standard projects, the exact metal consumption is standardized, but if they are made according to an individual order, then all calculations are undertaken by the designers. But they still need to be controlled, since even with iron materials, some builders can make “mistakes” in their favor. Before calculating the wood needs, you need to choose whether timber or logs will be used in this case. Timber-based structures are preferable because:
- shrinkage is noticeably reduced;
- there are no strict restrictions on size and geometry;
- the work is greatly simplified.
The strongest timber, according to experts, is made from coniferous trees; moreover, they are less susceptible to the destructive effects of wood-gnawing insects and microorganisms. The standard dimensions of timber taken into account in calculations range from 10x10 to 20x20 cm. Volume is calculated by multiplying the length by the height and by the thickness of a single element.
Some masters claim that you need to add 10-30% to the result obtained. But this step is frankly stupid, because, on the contrary, you will have to spend less timber - it is not mounted on the openings of windows and doors.
Inexperienced customers and even builders replace the length of the perimeter with area, and then find themselves forced to stop work, purchase missing materials and spend money on their transportation. To avoid mistakes, you should also carefully check the labeling and accompanying documents. In some cases, price tags and sellers' speeches indicate slightly larger sizes of timber than they actually are.
Construction of an attic and roof of a bathhouse
After carrying out the main work on the construction of the bathhouse frame and all internal partitions, you can begin building the attic and erecting the roof. Installation of the attic begins with laying the floor beams and securing the U-shaped frames. The result is like a broken roof. This type of roof allows you to make the attic more spacious. From the outside she looks very beautiful and unusual. In addition, this allows you to significantly reduce the load on the walls of the frame.
Scheme of the structure of the roof frame and attic of the bathhouse
Drawing of the roof frame structure for a bathhouse. They make a flooring from boards on the beams and immediately begin installing the rafters and ridges.
All rafters must be the same. To achieve this, you must first assemble one rafter, and then assemble the rest along it. In this case, to eliminate differences in size and possible displacement of parts, all roof components are modified on site.
As for the roof of the bathhouse, to speed up and facilitate the procedure, a block installation method is used. In this case, the beams are laid transversely relative to each other. In this case, an element such as a pusher is additionally used.
An example of the design and layout of an attic frame bath
It is fixed above the center of gravity, and also firmly connected to the racks with a screw - a capercaillie. It has a bolt that acts as an axle. To prevent the frame from moving along the placed boards, a wire clamp is additionally used. Using these devices, you can easily lift all the roof frames up yourself, without resorting to special equipment, and secure them in place. The roof can be covered with different types of roofing materials.
Drawing with dimensions for building a frame bath with an attic
For example, such as slate, metal tiles, soft or sheet ondulin. But before using these materials, roofing felt is laid on the sheathing in two layers. The roofing materials are covered with a ridge on top. No attic is complete without windows. They can be of completely different sizes and shapes. Modern windows can be installed anywhere, even in the plane of the roof itself.
The process of assembling and covering attic rafters
Roof installation
So, what other improvements were made?
Special supports were installed. So that later, when we cover the facade, the plane of the front wall will be ready for covering the facade.
Plus, these supports strengthen the front part of the roof.
There will be quite a lot of snow lying on the roof. And according to calculations, a cube of snow weighs 800 kg closer to spring. That is, on the pediment this load can reach three tons.
Therefore, we made supports for two purposes: to level the façade and to further strengthen the roof.
We laid the film down and made it slightly slouchy.
As a good idea, you need to place a galvanized steel drip under the film so that the condensate that will accumulate on the film flows down this drip.
But my attic is cold, so in my case this is not practical.
First we rolled out the first roll of film, closer to the edge of the roof. Then the second one overlapped it by 15 cm. And the bars were already nailed on top, you can see them in the picture above.
Counter-lattice
It serves to provide a ventilation gap. Otherwise, condensation will form in the space between the film and the main lathing, which will run horizontally on top of the counter-lattice.
If there is no air circulation, the board will rot.
Final stages of construction
Particular attention should be paid to such points as the outer cladding of the building, insulation of the bathhouse, thermal insulation of the attic and masonry of the heater. On the outside, the bath frame can be sheathed with OSB or DSP sheets. These materials are characterized by increased water resistance and non-flammability, and they are also reliable and practical.
Insulation of bath walls
The key to the efficiency of any bathhouse is its insulation. After all, the longer the heat remains inside the room, the better.
For insulation, modern thermal insulation materials are used: polystyrene foam, mineral wool. They allow air to pass through very well, which allows the walls to breathe. This property can extend the life of the bathhouse by several decades. To properly insulate the walls of a bathhouse, adhere to the following installation technology:
Detailed diagram for insulating walls in a bathhouse
An example of insulation of frame walls of a building
- Upholstery of the frame on the inside with a special film. It is secured with slats.
- Laying polystyrene foam or mineral wool.
- The insulation on top is covered with film and foil. All seams must be taped.
- Wall upholstery with wooden clapboard.
Thermal insulation of the attic
Don't forget about the attic. It must be properly insulated. For insulation, materials such as glass wool, mineral wool, and foam are usually used.
Thermal insulation diagram of the attic in the bathhouse
These materials are laid on the ceiling of the bathhouse, leaving small gaps for air circulation. The inside of the attic roof is waterproofed using a vapor-proof film. This helps prevent moisture from getting into the bath itself.
Thermal insulation design of a frame bathhouse roof
All thermal insulation materials are fire resistant. Therefore, they are recommended for use specifically in a bathhouse, since there is a source of open fire, namely a stove-stove.
Furnace laying
A stove-heater is one of the main attributes of any bathhouse. Not everyone can lay it out correctly. It is best to entrust the laying of the stove to a professional stove maker.
The only thing you can do yourself is to determine its location and make a high-quality and reliable foundation for it.
Option for installing a stove in a bathhouse
An example of a folded brick stove for a bathhouse A stove for a bathhouse must meet the following parameters: compactness, reliability, safety, ease of use, and the ability to heat the air in the steam room of the bathhouse to a temperature of 100 degrees. You can also use a modern electric stove-stove instead of the usual stove. Recently, such stoves have become increasingly popular among the population.
The process of laying a sauna stove made of bricks
As can be seen from all of the above, building a frame bathhouse with an attic on your own site is not such a difficult process. Having such a bath has a lot of advantages. The first place is, of course, the bathhouse itself. It can only bring joy and health benefits to a person. It is worth remembering that a frame bathhouse with an attic, compared to a conventional frame bathhouse, requires a person to invest additional money in it. This mainly involves the purchase of thermal insulation, waterproofing, and finishing materials for the attic. Therefore, the choice in favor of one or another type of bath remains entirely with the owner of the site and entirely depends on his capabilities and needs.
Peculiarities
The layout for a family holiday will differ from the commercial option at a tourist base. But families are also different - some like to gather with a noisy group of friends, others seek solitude. Some wash with the whole family at once, others wash separately. If all requirements are taken into account, internal volume distribution will not be a problem.
For a family of 3-4 people to visit the bathhouse at the same time, large premises are not required. This allows you to include additional blocks in the layout - a bathroom and vestibule at the entrance from the street, for example. If 2-3 people go to the bathhouse separately, there is space to organize a small pool, a plunge pool or a place for pouring cold water.
A bathhouse at a tourist base should be designed to accommodate a larger number of guests at the same time. Such places are often chosen by groups of friends (colleagues) to celebrate a personal or corporate holiday. Understanding this, you should not split the internal volume into several small rooms. It is better to limit yourself to the minimum required number, giving priority to the area of each.
Important!
Conversations at the table require more time to visit, so a bathroom in a bathhouse at a recreation center is not an additional option, but a prerequisite. For the same reason, it is worthwhile to provide a way to control and change the temperature in the steam room without staff intruding into the personal space of guests.
If the stove is wood-burning, you need to provide access to the firebox from a separate room or from the street. If the stove uses gas or electricity as fuel, the temperature control machines must be moved to a separate room or outside with limited access to them.