Bath floors are an important component of the comfort system of the entire bath room. The cold ceiling makes staying in the bathhouse chilly and does not bring bright positive emotions. An incorrectly designed heated floor promises to heat up its surface to unacceptable temperatures, sometimes to such an extent that it is just right to install a good granite slab on it and use it to make pancakes and pita bread. If you are interested in the question of how to properly insulate the floor in a bathhouse, then today’s article is just for you.
Distinctive features of the washing room and the floor in it
A bathhouse is a building that is highly exposed to water. However, it is the washing room in such a structure that is the room where there is the most moisture. There is also a strong temperature difference here, which is especially noticeable in winter.
Usually a person visits the washing department several times while in the bathhouse. He constantly enters it from the steam room to douse himself with cool water. In this case, the liquid always falls on the floor and leaves through it. Therefore, moisture regularly penetrates into the pores of wooden elements of building structures.
The bathhouse is not heated regularly. For this reason, during the winter, the water in the lumber periodically thaws and freezes. Therefore, there is a gradual destruction of the wood from which the floor parts and other building structures are made.
Excess moisture negatively affects all wooden elements of the washing machine Source vip-1gl.ru
Due to changes in temperature and constant humidity in the washing room, special requirements are placed on the floor in this room:
- effective drainage of water by installing a slope to the drain ladder or constructing a leaky structure;
- high resistance to rot and sudden temperature changes;
- minimal ability to absorb moisture and greater strength;
- maximum heating and drying in a short period of time;
- anti-slip surface even when very wet.
It is possible to meet all the requirements only if the floor is constructed correctly. Therefore, even at the stage of designing a bathhouse, it is necessary to choose its design wisely. To avoid mistakes and anticipate all possible difficulties in advance, it is better to contact a specialized company.
Specialists are able to fully solve the problem. They will create ventilation in the washing room and professionally select all the necessary building materials, which will allow the use of high-quality thermal insulation.
Using high-quality building materials in bathhouse cleaning Source remontik.org
If the floor in the washing room has a lower temperature than the air in the upper zone of this room, then people will feel uncomfortable during water procedures. This deficiency also negatively affects the microclimate of the room and contributes to the occurrence of rot on the wood. To eliminate these problems, experts recommend high-quality thermal insulation of the floor structure.
Specifics of thermal insulation of bathhouse walls with penoplex
The procedure for thermal insulation of walls in a bathhouse with penoplex looks like this:
- Cover the surface with two layers of primer.
- After complete drying, we fix the vapor barrier layer.
- We apply an adhesive composition 7-8 cm thick to the foam sheet. It should cover about 40% of the surface.
- We attach the part to the wall and additionally fix it with “fungi”.
- Having completely covered the surface of the walls, we proceed to install the second layer, moving the elements to cover the seams.
- After the adhesive has completely dried, we fill the gaps with foam.
- We reinforce the surface with fiberglass mesh, attaching it with glue, and let it dry.
- We plaster the walls and carry out further finishing of the walls.
Please note that glue for attaching the material can only be used based on cement, polyurethane or bitumen.
Types of flooring in the sink
There are only 3 types of flooring in the washroom - solid and flowing wood, as well as a tiled covering laid on a concrete base. Each type is subject to insulation. However, this process is performed differently for them. This is due to the design features of each type of floor.
Solid wood floor
This type is a non-drip surface. It is most common in baths. Moreover, this design is one of the warmest floors. In addition, wooden flooring has an attractive texture, high environmental friendliness and low heat conductivity.
Solid wood flooring Source yandex.net
Non-drip decking is primarily created from softwood. This wood is resistant to rot. It also withstands other negative influences. At the same time, no resin comes out of the boards, since the air environment in the sink heats up slightly, compared to a steam room.
However, before you properly make the floors in the bathhouse in the washing room, it is recommended to always remember that when installing non-spillable flooring made of wood, you have to put in significant effort. The reason for this is the lack of removable parts, which forces us to provide effective ventilation at the initial stage of construction. At the same time, solid wooden floorings are often created on a screed made of concrete mortar or soil, which is previously well compacted.
The non-spill floor system includes not only wooden flooring, but also logs with sheathing. In addition, it is also necessary to create waterproofing between all parts. Thermal insulation material is usually laid between horizontally located joists. In this case, the slope of the wooden flooring is created by sheathing.
Continuous flooring on joists Source 9ban.ru
The insulation that is placed between the joists can be in the form of expanded clay or foam with a dense structure. Mineral wool is also often used. At the same time, no attention is paid to the hygroscopicity of the building material used when the heat insulator is reliably protected from the negative effects of water.
To prevent moisture from penetrating through a wooden floor, experts use tongue and groove boards during its construction. At the same time, they must be treated with water-repellent substances. In addition, ventilation of the space under the floor is always created. To do this, a plastic pipe is placed into the underground from the street side. Its diameter can be 50-100 mm.
poured wood floor
This type of decking is a leaky wood surface. Its installation is simpler compared to a solid floor. A distinctive feature of a pourable surface is the absence of a slope, because water is removed through the cracks between the boards. Flowing through them, it ends up in a pit. Then the water flows into the sewer through a pipe laid at an angle.
Dry floor made of planks in the washing room Source kraski-net.ru
A cushion of sand and crushed stone is also placed under the leaking floor, or the soil is simply compacted if the washing compartment in the bathhouse is rarely used. This type of foundation under the deck allows water to drain directly into the ground.
During the construction of a leaking floor, all joists are mounted on reinforced concrete columns. They are also often made from brick. This design allows you to reduce the negative impact of water on wooden logs.
If the bathhouse is often used, then a more reliable base is made under the floor. For this, concrete mortar is usually used. A screed is created from it. In this case, the drainage system with a ladder is first installed. The screed is poured with a slope towards the drain.
When installing a poured floor, the flooring itself is not insulated. The reason for this is that there must be free space underneath so that water can flow freely to the drain hole in the screed. However, to insulate the entire structure, a heat insulator is used during the construction of the concrete base. For this purpose, a heat-insulating filler for the solution or separately expanded clay is often used.
Layed expanded clay under a concrete screed Source dadai.ru
See also: Catalog of companies that specialize in home insulation
When creating a concrete base, do not forget about ventilation. They are usually provided around the perimeter. They are necessary for ventilation.
Important! Expanded clay is not used if a bathhouse is being built on poles.
In order not to add this insulation, first a rough base is made from the boards. For example, mineral wool is laid on it. In this case, the heat insulator must be protected from water on all sides.
Then the sheathing is installed at a slope in the direction of the drainage hole of the drainage system. Then the stainless steel sheets are attached. Their joints overlap. Finally, the finishing flooring is installed from boards. This type of floor requires more money and effort, but it turns out to be more protected from wind and low temperatures.
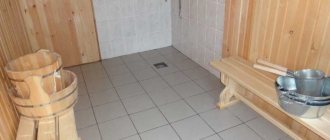
Tile and concrete floors
Before making bathhouse floors in the washing room, it is recommended not to forget that the option made of tiles and on a concrete base is considered one of the most reliable and durable. Tile is an excellent finish for a sink. It is easy to clean and does not require special care. The tile material also has an aesthetic appearance. In addition, the screed provides high strength to the floor.
Interior of a washroom in a bathhouse Source aviarydecor.com
A tiled floor on a concrete base is installed in the following sequence:
- compact the soil;
- pour gravel or broken brick in a layer the thickness of which is at least 150 mm;
- pour the first layer of cement-sand mortar;
- lay waterproofing and then insulation material;
- cover the heat insulator with waterproofing;
- spread the reinforcing material in the form of a mesh;
- pour the second layer of screed;
- lay tile material.
Making a reinforced screed on the ground Source 24aul.ru
Before creating this floor option, always install a drainage system. When pouring the solution, a slope is necessarily created. Thanks to it, water will flow into the drain. Penoplex or expanded clay are usually used for insulation. These materials can withstand the required loads, which mineral wool cannot boast of.
Frequently asked questions
Some questions that users have can be answered immediately, without waiting for them to arise:
If the floor is wet, is it necessary to install a waterproofing layer over the moisture-proof insulation?
Despite the properties of the heat insulator, it is recommended to cover it with a film to cut off waste water. Over time, the film will develop a layer of slime and can simply be replaced without much expense or labor. It is not practical to change the insulation every year.
If mineral wool is chosen as insulation, how to protect it from water?
The usual technique is used - laying a waterproofing sheet, then mineral wool, on top of which is another layer of polyethylene.
If foil insulation is installed as thermal insulation, will the polyethylene sheet interfere with the passage of reflected infrared rays?
Polyethylene does not interfere with IR rays. However, it is not recommended to use black film; it can cut off some of the rays.
Is it possible to insulate a wooden floor with a layer of expanded clay backfill?
There are no fundamental objections to this matter. Many sources even recommend this option. However, you will have to carefully protect the backfill from water, which is technically difficult and ineffective.
How to lay drain system pipes?
As a rule, they are laid even before the installation of the heat insulator. When laying the pipes, they are covered with pieces of insulation and all cracks and joints are filled with foam, eliminating the possibility of cold bridges.
Selection of insulating material
Professionals always take a responsible approach to choosing insulation for washing in a bathhouse. Typically, a material is used that has minimal hygroscopicity and is resistant to rot. The following heat insulators are most often chosen:
- Foamed polystyrene.
It is a foam plastic and is characterized by a dense structure. Therefore, it is used in the construction of wood and concrete floors. It is also water resistant and lightweight. Plates of this material prevent floor freezing because they have low thermal conductivity. However, their disadvantage is that they are attractive to mice. Therefore, foamed polystyrene is not used if such rodents are found on the site.
Foam Source a.mktgcdn.com
- Penoplex.
This material is similar to polystyrene foam, but is an improved copy of it. It withstands the negative effects of water, retains heat well and is durable. In addition, penoplex does not emit substances that are dangerous to humans and nature.
Penoplex Source namteplo.org.ua
Useful tips
An insulated wooden floor of a bathhouse is good, but such structures have the unpleasant feature of accumulating water vapor in the underground. For foam plastic and wood, this means an increased risk of fungus and a significant deterioration in thermal insulation. Therefore, vents are installed separately from the foundation for the subfloor with foam plastic. The inlet and outlet windows are closed with pipes, the section of the first is led into the bathhouse dressing room, the outlet is led into the riser of the chimney pipe. It turns out that the stronger and more often the bathhouse is heated, the drier the floor and the better the thermal insulation of the room.
Options for thermal insulation of the floor in the sink
To better understand what kind of floor to make in a bathhouse in a washroom, we’ll talk about two methods of thermal insulation of this building structure.
Floating screed
This type of floor is created on a wooden base, which is made of joists. Professionals carry out work in the following sequence:
- Measure the area of the washing room and cut out plywood sheets of the required sizes.
- Install the logs so that the distance between them is 400 mm. It prevents the plywood from bending when a person walks.
- The plywood is fastened using self-tapping screws, providing a gap between the sheet materials of 2 to 3 mm to compensate for thermal expansion. Before fixing the sheets, cut out holes for the pipes.
Laying plywood sheets Source cozy-house.su
- A box is made, which is placed around the perimeter of the washing room. It is created from plywood strips 120 mm wide. The bottom of the box is already laid sheets. The plywood strips are pressed tightly against the walls of the bathhouse using a beam screwed to the floor.
Important! Strips of plywood sheets are not attached to the walls to prevent deformation of the future screed if shrinkage of the foundation or the entire building occurs.
- Cover the plywood with mastic so that each seam is well sealed. Particular attention is paid to the joints between the floor and the sides.
- Spread polyethylene on top of the mastic layer. At the same time, make sure that it extends onto the walls to a height of 150 mm.
- Attach damper tape to all sides of the plywood box.
- Styrofoam is laid, the thickness of which is 50 mm. At the same time, they strictly ensure that there are no gaps between the plates and that they are in close contact with the sides.
- Use polyurethane foam to seal all the smallest gaps between the insulating material.
- The reinforcement is laid in the form of rods - this is the substrate. A masonry mesh is placed on top of it. Instead of rods, plastic pipes or pieces of tiles can be used.
Floor reinforcement Source remontnik.ru
Calculator for calculating floor insulation on the ground
Go to calculations
Explanations for using the calculator
First, using the proposed map diagram, you need to determine the normalized heat transfer resistance for your region. Moreover, the indicator is for floors (these values are shown on the map in blue).
Map-scheme for determining the values of normalized heat transfer resistance for your region in Russia.
Next, the general insulation scheme is determined.
Explanation No. 1.
— Floors on the ground can be insulated exclusively with expanded clay. True, the thickness of the layer has to be made serious.
— Insulation using other materials may also involve the use of expanded clay as a primary thermal insulation “cushion” under the rough screed. But it can also be done without expanded clay, only with the selected insulation.
Explanation No. 2
It is worth taking into account only the coating that will make some sensitive contribution to the overall “ensemble” of floor thermal insulation. For example, it could be a solid board or thick plywood. Laminate, linoleum, ceramic cladding - in fact, they do not add any insulation - their thermal resistance is too low. Therefore, they are ignored - the default layer thickness field is left at “ZERO”.
Explanation No. 3
Expanded clay bedding under the screed can reduce the thickness of the main insulation. In this case, the thickness of this auxiliary “pillow” is indicated in the corresponding regiment. If you decide to do without expanded clay completely, the default thickness is left in this field, equal to “ZERO”.
Calculation results
If previously a calculation with only expanded clay was chosen, then the result of the calculation is the thickness of the expanded clay layer, which ensures complete insulation of the floor.
If some kind of insulating material is selected, then exactly its thickness after pressing the button will be shown as a result of calculations. It is given in millimeters, is the minimum level, and this value is then rounded up to some standard value characteristic of this material.
Video description
This video describes how to create a floating screed in a bathhouse:
Pouring a concrete floor
This method of installing a floor in a washroom is not a complicated option. Although only specialists can handle the work professionally. They pour the concrete floor in stages. Moreover, their every movement is honed to the point of automaticity.
The work is often carried out when installing a rough wooden floor. It is created on the foundation and beams. The top of the rough base is often covered with clay, since it is a good thermal insulation material. Its ability to retain heat increases when straw or sawdust is added.
Specialists carry out pouring a concrete floor as follows:
- Level the base using a semi-dry mortar, which is mixed from cement and sand in a ratio of 1:8. It is applied in an even layer. Then the solution is compacted well. After this, check the evenness of the surface using the rule.
- Cover the dried base of semi-dry cement-sand mortar with plastic film. The edges of the waterproofing are overlapped. It is 100 mm. At the same time, plastic film is also placed on the walls to a height of 300 mm.
Waterproofing of the rough base Source krainamaystriv.com
- Secure the damper tape around the perimeter of the washing room. Folgoisol strips can also be used. Typically the width of this material is from 70 to 100 mm.
On a note! Foam or penoplex slabs are suitable for additional floor insulation. They are mounted on plastic film. When using them, it is necessary to monitor the height of the screed. It should not be higher than in other rooms.
- Place cuttings of plastic pipes on the floor.
- Rolled metal in the form of rods is laid parallel to each other on the pipe scraps. Often its cross-section is 12 mm. Typically the pitch between the rods is 250 mm.
- Place the second reinforcing layer. It is laid perpendicular to the already laid rods. The reinforcement is placed with the same spacing - 250 mm. The intersections of the rods are connected using wire.
- Lay out the chain-link mesh. It is attached to the reinforcement frame also using wire.
- Prepare a solution, which is poured onto the prepared base with reinforcement. The process is performed without beacons, because they cannot be fixed evenly to the grid.
Insulation using perlite
Perlite solution is convenient to use for insulating concrete floors. In this case, a layer of heat-insulating material is placed in the space between the rough floor screed and the final leveling fill.
Table. Floor insulation with perlite
Work stage Description
Preparation of the solution
Note! The unit of measurement in this example is a bucket. Based on the given proportions, you can prepare the required amount of solution, measuring the original ingredients in fractions, kilograms, bags, etc. Pour 2 buckets of perlite into any deep container of a suitable size, add a bucket of water to it and give the mixture time to completely shrink. Add half a bucket of cement no lower than M300 to the resulting solution, and then half a bucket of water
Important! Stir the mixture thoroughly after adding each component. Finally, you need to add a little more water (about half a liter) to the solution
The result will be a dry, crumbly mixture. Knead the semi-finished product until it becomes plastic.
Laying thermal insulation mortar
The resulting plastic solution is evenly distributed over the rough screed. The recommended thickness of the insulating layer is up to 100 mm. You can level it in any suitable way, for example, using a long rule. If you are insulating a large area, for convenience, using self-tapping screws/anchors, you can attach several guides to the floor, for example, from a profile for drywall or a wooden beam with a step corresponding to the length of the rule you are using.
Pouring the finishing leveling layer
5-7 days after applying the perlite solution (this is exactly how long it needs to harden), a finishing leveling screed is poured over the insulation. The most convenient and easy-to-use option is a modern ready-made self-leveling floor mixture. Reinforced mortars are available for sale, allowing you to create coatings with a layer of up to 8 cm or more. The developer can only prepare the mixture and apply it to the base in accordance with the manufacturer’s instructions. Helpful advice! Before pouring the final leveling layer, the surface can be covered with waterproofing material and a reinforcing mesh can be laid, but, as practice shows, the structure feels great even without such inclusions. After the leveling layer has dried, you can finish the insulated floor, for example, tiling it with suitable tiles.
Video description
To clearly see how a subfloor is made in a bathhouse, watch this video:
- The beacons are installed when the rough base is dry.
- Clear the base of debris.
- Prime the cleaned surface.
- Prepare a new solution for the second layer of screed.
- Fill the floor surface with the mixture, leveling it along the beacons.
- Prime the second layer of dried screed.
- Finish the floor in the washroom with tiles, creating the necessary slope towards the ladder.
Installation of heated floors
To make a heated floor, a cable is used that converts electrical energy into heat. Some nuances when choosing and installing:
- A cable with a power density of no more than 250 W is suitable.
- A thermostat is installed in this insulation system. It allows you to regulate the power and speed of floor heating.
- The cable can be single-core or double-core.
- For ease of installation, use a mounting grid. This makes it easier to lay the cable and calculate the step width.
- The distance from the wall is at least 5 cm. The wire is laid evenly over the entire floor area.
- Afterwards the cable is covered with a mesh and filled with a layer of screed.
If the cable is not installed correctly, it may begin to overheat, causing a short circuit and fire.
You can start finishing only when the concrete mixture has gained strength (after about 30 days).
On a note!
The main advantage of such a system is safety. Usually the bathhouse is built on a site, separate from the house with heating. It must withstand winter frosts. Electric floor heating does a good job of this. And if you install a remote thermostat in a residential building, you can warm up the room in advance before going to the bathhouse.
Briefly about the main thing
The washing room is distinguished by the presence of a large amount of used water, which constantly freezes in winter and periodically thaws in the pores of the wooden elements in the bathhouse. Because of this, they begin to rot. To eliminate the shortcoming, the floor is insulated. This also helps reduce sudden temperature changes.
The washroom has a tiled floor with a concrete base, a solid wooden or pouring floor. All structures are insulated. Depending on the type of floor, foam plastic, mineral wool, penoplex, perlite or expanded clay can be used. Often in the washing department they create a floating screed on a wooden base or pour a completely concrete floor on the ground.
Ratings 0
Insulation methods
Insulation of a concrete floor in a steam room during the construction phase of a bathhouse
The method of insulation depends on the design of the foundation and floor, as well as the materials used to construct the foundation. Typically, floor insulation is carried out during the construction of a bathhouse. During the work, the technology of laying insulation and its insulation is observed, which prevents contaminated water from entering and absorbing into the material.
When thermally insulating the floor in a bathhouse that is already in use, the facing material is dismantled. The space between the supporting structure of the floor is cleaned and treated with antiseptic impregnations. After which the calculated amount of insulation is laid and a fresh facing coating is laid.
Regardless of the method, when insulating the floor, it is important to take care of protecting the “thermal insulation cake”. Otherwise, the material used will quickly become unusable.
Material selection
Expanded polystyrene and foam in slabs for floor insulation
When choosing a material for insulation, you should take into account: type of floor, type of room, thickness of the thermal insulation layer, environmental friendliness and specific gravity of the material.
All other things being equal, it is worth choosing materials with the least hydrophobicity. The material should not absorb moisture and have a minimum hygroscopicity index. Especially in the case of insulation of wooden floors. Below is an overview table with the most popular materials for floor insulation.
Table: advantages and disadvantages of insulation
| Thermal insulator | Floor type | Material advantages |
| Styrofoam | Wooden/concrete | Does not absorb moisture, has a low thermal conductivity coefficient, long service life and low weight. It is environmentally friendly and safe for human health; when heated, it does not emit harmful substances. |
| Expanded polystyrene | Wooden/concrete | Does not absorb water, has high thermal insulation qualities. It does not weigh down the supporting structure; for thermal insulation of most types of floors, a material 10 cm thick is sufficient. |
| Mineral wool | Concrete | Does not burn, has a low specific gravity, convenient size. During installation, it is easy to cut and adjust to any floor configuration. |
| Ecowool | Wood | An effective and safe type of thermal insulation material. It is mounted by spraying, which allows you to apply the material to any surface, even in hard-to-reach places. |
| Expanded clay | Wooden/concrete | Environmentally friendly and safe material. It has high insulating qualities and low weight. Compared to other heat insulators, it is the most affordable. |
| Perlite | Wooden/concrete | Does not absorb moisture, does not burn, and is lightweight. Well suited for insulating floors when the thickness of the insulating cake should be minimal. |
Despite the described advantages, each of the materials has its disadvantages. Polystyrene foam and extruded polystyrene foam are best used for insulating concrete floors with further tiling or laying plank lattice flooring.
Glass and mineral wool in rolls for thermal insulation
For insulating wooden floors from structures on joists, foam insulation is somewhat less suitable. When laying, you will need to level the rough base and carefully insulate the thermal insulation layer from possible heating.
Mineral wool is not suitable for floor insulation in a steam room. When heated, the material may release formaldehyde. This is dangerous due to poisoning, exacerbation of chronic bronchitis and pulmonary edema.
High moisture absorption is the main disadvantage of expanded clay. When insulating a wooden floor in a washing room or steam room, it is necessary to carefully waterproof the floor. The expanded clay layer must be reliably protected from water and moisture.
Expanded clay and perlite are well suited for insulating wooden floors
Before using perlite, you should carefully study the work technology. The material is light in weight and highly volatile. To lay it in the screed, you will need to thoroughly mix the material with water and cement. When insulating wooden floors, you should use personal protective equipment and work only in rooms without drafts.
Ecowool is well suited for insulating bases in washrooms and dressing rooms. In the steam room it is better to use more hygroscopic and dense materials. And also, when exposed to high temperatures, the material can become deformed and begin to smolder.
Calculation of the required amount of material
Insulation of a wooden floor using ecowool
To calculate the insulation required for thermal insulation work, you will need to know the area of the room in which the base is planned to be insulated. The thickness of the thermal insulation material is selected individually depending on its type and temperature conditions at the work site.
Foamed heat insulators are produced in slabs with a thickness of 20 to 150 mm. For floor insulation, slabs with a thickness of 50 and 100 mm are usually used. Glass wool in slabs has a similar thickness - from 50 to 120 mm. The working thickness for floor insulation is 50–100 mm.
The minimum thickness of ecowool must be at least 20 mm. For baths in most regions of Russia, you will need to lay an 80–100 mm layer. The minimum thickness of the expanded clay layer depends on the size of the fraction. For insulation of wooden structures and floors under concrete screed, it is recommended to use expanded clay of fraction 20–40. The thickness of the thermal insulation layer is at least 100 mm.
For example, let’s calculate the required amount of polystyrene foam for thermal insulation of the floor in a steam room with an area of 8 m2. 8 / (0.5 * 1.2) = 13.33 ≈ 14 pcs., if you buy the material individually or 3 packages, since on average one package contains 7 slabs with a total area of 4–5.3 m2.
To calculate bulk thermal insulation materials (expanded clay, perlite), the formula is used: V = S * h, where:
- V is the amount of insulation required, kg;
- S—base area in the room, m2;
- h—thickness of the heat-insulating layer, m.
For example, let’s calculate the volume of expanded clay required to insulate the floor in a steam room with an area of 10 m2. V = 10 * 0.2 = 2 m3. In practice, a little less material will be required, but according to SNIP, any heat insulator is purchased with a 10% reserve.
The nuances of using penoplex and similar materials
Penoplex and similar materials are used primarily for thermal insulation of concrete floors.
Instructions for insulating a concrete floor
The procedure for independently carrying out measures related to ensuring high-quality thermal insulation of concrete bath floors is given in the following table.
Table. Floor insulation with penoplex
Work stage Description
Preparing the base
Clean the base from all kinds of dirt and dust - the presence of such can impair the adhesion of the insulation to the floor. Coat the clean base with an adhesive primer designed for treating such surfaces. Thanks to such a coating, the quality of adhesion of the glue to the base will be improved and minor floor defects will be additionally repaired. For recommendations regarding the thickness of the primer layer, please refer to the instructions for the specific product. To apply such mixtures, it is convenient to use a roller with a long handle.
Preparation of the binder composition
To attach the insulation to the base, it is recommended to use glue specially designed for such work. For recommendations regarding the preparation of glue and the required thickness of its layer, please check the instructions for your particular product - these provisions may vary depending on the type of mixture. Sometimes polyurethane foam is used to fix the “foamed” insulation in question. This option is also successful, but in practice it is often more expensive.
Applying glue
The finished adhesive is applied in a uniform layer of the recommended thickness onto the foam board. A comb spatula is usually used for application. The glue is also applied to the floor. The slab is laid on the floor and pressed firmly.
Ensuring a tight fit of the slab using fungi
Using Anchor Bolts
To ensure the highest quality adhesion of the insulation to the floor, in addition to glue, fastening mushrooms are used in combination with anchor bolts for concrete.
Use of bricks
Fixing thermal insulation boards using mushrooms and self-tapping screws is a simple and proven method
But it is important to remember that each hole in the slab is a new cold bridge, reducing the quality of thermal insulation. If possible, avoid using fungi and press down the insulation boards using another method, for example, with bricks.
After laying the penoplex over the entire planned surface, all you have to do is wait until the glue dries - also check this point in the instructions for your product.
The nuances of floor insulation on the ground using penoplex
If penoplex is chosen as insulation for the floor on the ground, the procedure will differ from that discussed earlier. To eliminate the risk of uneven shrinkage of the structure in the future, the ground level should be located half a meter below the future floor (the difference can be increased to 60 cm).
Insulation scheme
The description of the circuit is as follows:
- the bottom layer is compacted, carefully leveled and dry soil;
- a layer of dry crushed stone or gravel about 300-400 mm thick. After backfilling, the material is carefully compacted;
- a layer of sand about 10 cm thick. It is also carefully compacted. The backfill is leveled;
- foam boards of selected thickness. In the case of this type of insulation specifically, it is better to use slabs equipped with joining grooves along the edges. Additionally, the joints of the heat-insulating boards are glued with construction tape or blown with foam;
- 3 – waterproofing film.
Positions 1 and 2 in this example are assigned to the concrete screed and reinforcing mesh, respectively. Assemble a mesh with cells 15x15 cm from steel rods with a diameter of 1 cm. Fasten the rods with knitting wire or special clamps for reinforcement.
In the photo - reinforcing mesh on top of penoplex and beacons for screed
Using appropriate clamps, ensure a 5mm gap between the base and the reinforcing mesh. Without it, the rods will quickly rust. A concrete screed is poured on top of the reinforcement (standard – a share of cement, 3 shares of clean sand, about 5 shares of crushed stone and water in the amount of half the mass of cement) of the designed thickness (most often this figure is 30-40 mm). For greater convenience, you can pre-install beacons on the base, for example, from a profile for drywall.
Pouring screed over penoplex, additionally laying a heated floor system
The photo shows the laying of penoplex on a sand and crushed stone cushion, as well as the pouring of cement mortar
Good luck!