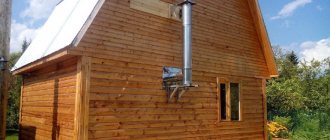
The arrangement of a chimney through a metal tile roof is calculated when developing the heating system diagram. Most often, they try to make the chimney outlet in the ridge area. With this arrangement, the pipe will be routed through the “warm zone,” thereby reducing the possibility of condensation.
The easiest way is when the exit goes through the ridge. In such a situation, the installation of the overlap of the junction unit is greatly simplified. In addition, in winter, “pockets” of snow do not appear in such a design, and as a result, there are no leaks.
Another placement option is when the chimney design is somewhat removed from the center of the roof. This happens because stoves are built in any area of housing, and it is easier to install a chimney above them. During construction, it is important to properly arrange and remove the connection between the ceiling and the chimney.
Metal tiles as a material for roofing
Metal tiles are a material designed to cover a roof. It is made from profiled metal sheets with a thickness of 0.5 to 1.2 mm. During production, sheets undergo cold deformation, galvanizing and coating with polymer protection with UV-resistant coloring.
A roof made of steel sheets of metal tiles resembles a stack of ceramic elements superimposed on each other, which are easy to cut and secure with fasteners. Unlike standard slate roofs, metal roofing is lightweight and durable with a service life of up to 50 years.
Advantages and disadvantages of coating
Like any material, metal tiles have their advantages and disadvantages. Let's take a closer look at them. The advantages include:
- Durability . The service life of a properly installed roof can be up to 60 years; some of the most popular coatings at the moment are cascade and Monterrey;
- Attractive appearance;
- Light weight of the roof , almost 2 times less load on the rafter system and load-bearing elements of the building compared to more traditional materials, for example, slate;
- Possibility of complete set of all necessary parts, completely matching each other down to color;
- Reliable protection from precipitation, wind and cold;
- Fire safety;
- Relative cheapness of the material.
There are also disadvantages:
- The roof makes a noticeable noise when it rains;
- High requirements for installation quality. Illiterate installation can provoke a corrosion process that quickly destroys the material;
- A complex roof shape means a lot of waste of material due to the need for cutting in place and adjusting the sheets to size.
IMPORTANT!
In general, the advantages of metal tiles far outweigh the disadvantages and make the material popular and preferred.
Where to place the chimney
From the very beginning, you should think about where to bypass the metal tile pipe.
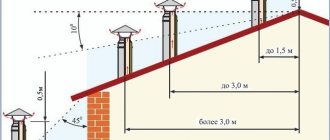
Important! The valley and a distance of about a meter near it are unsuitable places for installing a pipe due to the lack of tightness of such a roof. You should not run the pipe through the roof near the attic windows: combustion waste will be blown away by the wind into the attic or smoke will fill the rooms in the residential building. SNiP recommendations focus on the distance of skates. The pipe should be 50 cm in length when the distance is less than one and a half meters. The value from one and a half to three meters is on the same level as the roof height. 3 meters and more - a conventional line is drawn between the ridge area and the horizon at an angle of 10 degrees.
The valleys accumulate all the snow that loads the joints and gradually destroy the integrity of the roof. The chimney near the ridge does not require an elevated location. The likelihood of precipitation entering the room through the pipe is minimized thanks to a protective umbrella installed on the chimney. It is important to consider the type of pipe, its composition: made of metal, brick, asbestos cement or sandwich elements.
The arrangement of the chimney depends on the type of attic - with closed or free access to the space under the roof. The skate and ramp are places with free access. Sometimes it is not easy to reach them. The problem of closed access is solved by dismantling part of the roofing pie. Equipping the passage area is possible only after dismantling the covering, waterproofing and sheathing. The pipe is placed in a warm zone, due to which less moisture forms inside.
Note: the bypass pipe in the upper part of the roof (accelerator area) is selected without bends or turns, which promotes normal continuous circulation of air flow (draft) with the release of combustion products - smoke, ash, soot, soot - into the atmosphere.
The creation of a sandwich pipe passage is accompanied by preliminary markings on the vertical axis of the chimney.
How to arrange a pipe outlet
Let's consider how the pipe should be routed through the metal tile so that the risk of leaks at the junction areas is minimized.
Rectangular outlet
The organization of rectangular, in particular, and square output is carried out in two stages:
- installation of the internal apron before installation of the coating begins;
- installation of an external decorative and protective element after completion of the roof covering.
Schematically, installation of the output can be reduced to the sequential implementation of the following steps.
- Find out the location of the upper edge of the inner junction strip by attaching it to the chimney wall.
- Along the marked marking line, for example, using a grinder, make a groove with a depth of at least 150 mm. The groove should have a slight upward slope. At the end, it is cleaned well, it is advisable to even rinse it with water.
Attention It is imperative to inspect the rafter system, since due to a leak, the wood may begin to rot or fungus may form on it, but, say, the new roofing material will weigh quite a lot.
- The connection strip is first installed on the side of the chimney, on the eaves side, then the other three are mounted: on the sides and at the top.
- The planks are laid with an overlap of 150 mm and the edges are filled with silicone sealant. They are fixed using roofing screws.
- To form a “tie” through which water will flow, a metal sheet is placed under the bottom of the apron. It is directed either directly into the gutter or into the valley.
- Remove the waterproofing and, lifting it approximately 50 mm onto the chimney wall, secure it with special heat-resistant tape. This ensures additional reliability of the junction unit.
- After installing the coating, an external apron is installed, which is more necessary for decoration than protection.
- It is installed in the same way as the internal one, only the pipe walls are not tapped to secure the outer planks. In fact, the lower apron, bypassing the pipe with metal tiles, is sandwiched between its layers, preventing moisture from getting under the roof.
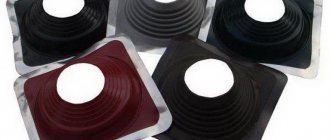
Round (oval) outlet
Providing reliable junction protection for a round exit is a more difficult task. Therefore, a special element was developed - the chimney passage. This is a combined element, which includes a flat steel base and an elastic cap on the chimney pipe. Transitional diameters are marked on it. The passage components are hermetically connected to each other.
Additionally, we recommend studying: The passage of a chimney through a wall.
The caps are made from EPDM rubber or silicone, which have increased heat resistance. Silicone can be used at temperatures from minus 75°C to plus 260°C, from EPDM - minus 55°C to plus 135°C. Thanks to their elasticity, the junction is reliably insulated. For greater effect, it is recommended to select a ring on the passage hood that is smaller than the cross-sectional diameter of the pipe by about 20%, and cut it at this level.
Advice Pass-through elements are also suitable for arranging any part of a circular cross-section that is exposed to the roof, say, ventilation.
The process of installing the passage is performed in the following order:
- It is necessary to cut a hole of the appropriate diameter on the roofing.
- After wetting the element with liquid soap, it is pulled onto the pipe.
- The sealing element is given the shape of a metal tile by pressing against the base.
- To fix the element, use self-tapping screws, after applying sealant under its edges. The screws are placed at a distance of 35 cm from each other.
Advice
If desired, you can make a passage element for metal tiles yourself. However, it must be taken into account that the roof cutting performed in this way must comply with all building codes and regulations
https://youtube.com/watch?v=O4asQV68dpM%3F
Principles of chimney outlet
Combustion products passing through the pipe heat it, so the main priority when arranging a pipe bypass on a metal roof is fire safety. Combustible elements are carefully insulated, and the pipe does not come into contact with other roof elements.
When installing a pipe outlet, it is necessary to make a through passage with a dense coating of sealant to avoid roof leakage. Waterproofing against condensation, steam and precipitation is required. The pipe gap is equipped in such a way as to compensate for temperature fluctuations, which is important for a metal tile roof.
The apron is the same valley, but with more load!
The closest functional analogue of the internal apron is considered to be a valley. This significant element of the roof is made in the form of a gutter. The main purpose of the valley is to drain water from the roof slopes.
note
If we compare the capacity of the channels of the apron and the valley of the same width, it turns out that the capacity of the valley is several times greater than the capacity of the apron. And the amount of precipitation is the same! When installing the apron, you need to be careful not to accidentally jam the flange. After all, even a slightly wrinkled flange can significantly reduce the capacity of the apron
Today, aprons are made in various shapes. Most often, structures have a uniform width along the entire length.
Although some instructions recommend making them tapering towards the bottom or with narrow elbows. Undoubtedly, such a design does not add capacity to the apron, but rather reduces it.
What material to use for the valley of metal tiles
Round chimney passage
A tight connection to the roof without the danger of leaking and losing heat - this is something you should focus on when finishing round pipes. Round section is more difficult to install than other types of pipe penetration through metal tile roofing. The pass-through element with a thin metal base and an expandable tip for sealed installation simplifies the work.
Round pipes are highly resistant to heat due to the production of silicone and rubber elements through them.
- A hole is cut in the metal roof covering, taking into account the diameter of the chimney.
- The transition element is placed on the chimney, previously moistened with liquid soap.
- Then it adapts to the curves of the roofing pie, if it is easy to press on it.
- The installation site of the sealing element is covered with sealant, then secured with self-tapping screws located at a distance of 25 cm in relation to each other.
For greater strength, roofing experts recommend making holes in the roof approximately 20% smaller than the diameter of the chimney relative to the circular cross-section.
The main difficulties of installing a chimney
The chimney pipe is used to remove combustion products of various types of fuel (gas, coal, firewood, oil products, etc.).
Its installation through the roof of the house must be carried out in accordance with the requirements of SNiP 41-01-2003, which are partially outdated. However, this document is guided by supervisory services, so it is necessary to follow the standards specified in it. The chimney outlet through the roof may be required in the following cases
:
- when building a new house;
- in the process of reconstruction of the roofing system in the presence of a heating unit;
- when installing an autonomous heat supply source in an already operating building.
If the construction of a building or reconstruction of the roof makes it possible to design a chimney outlet taking into account all the requirements, then installing a chimney pipe through a finished roof will create many problems. Typically, this situation arises when the owners of the house want to install a fireplace or stove in an already completed building. If we are talking about an automatic boiler, it is recommended to create a separate extension for the boiler room, or lead the chimney pipe through the wall of the building.
The main difficulty in installing a chimney is that the roofing pie through which the pipe passes largely consists of materials that are not designed for close contact with highly heated objects. The composition of the roofing cake includes
:
- roofing;
- sheathing;
- counter-lattice;
- waterproofing;
- rafters;
- insulation;
- vapor barrier layer;
- internal lining.
Wood, bitumen and polymer materials are sensitive to high temperatures, therefore, according to SNiP, the clearance between a brick, concrete or ceramic chimney pipe insulation and the elements of the roofing pie must be at least 130 mm. If the ceramic pipe is not equipped with insulation, the clearance must be at least 250 mm
. It should also be taken into account that at the point where it passes through the roof, the pipe must have a special thickening - an indentation. Accordingly, a hole of considerable size must be made in the roofing pie. The gap between the pipe and the roof after installing the gas duct needs to be reliably heat and waterproofed in some way.
Negative consequences
A through hole in the roofing pie significantly reduces its performance and durability, since
:
- violation of the integrity of the waterproofing and vapor barrier layers leads to moistening of the insulation, while the thermal insulation characteristics of cotton materials are significantly deteriorated;
- due to the rupture of the thermal insulation layer, the heat loss of the house increases;
- in the under-roof space, air exchange may be disrupted, which provokes the accumulation of moisture and subsequent rotting of the wooden elements of the roof structure;
- the resulting gap not only facilitates the penetration of rainwater into the building, but also the formation of snow pockets in winter;
- if the rafter system is damaged during the hole making process, this significantly affects the strength of the roof.
To avoid problems, the passage of the chimney through the roof should be arranged by erecting its own rafter system (box) around it or installing a standard modular chimney
.
Ventilation passage through metal roofing
Weather conditions expose steel roofing to sudden drops in temperature from overheating to hypothermia. Elevated temperatures deform steel sheets of metal tiles and weaken the attachment points with joints. Reduced temperature contributes to the accumulation of condensation - winter ice, which overloads the roof.
The passage of ventilation through a metal tile roof increases the service life of the roof, prevents the penetration of moisture into the wooden parts of the roof structure, preventing their deformation, rotting and corrosion of steel tile sheets. Ventilation ducts prevent roof tiles from getting wet, thereby saving money on heating costs for a residential building.
Installation of ventilation elements in stages:
- Using metal chisels and scissors, a hole is cut in the roof for the exhaust hood.
- The cut blank is used to do the same with the layers of the roofing cake.
- Markings are made according to the template and the screw hole is drilled.
- The roof around the drilled area is cleared of debris.
- The sealing gasket is installed on the previously applied sealant.
- The passage elements are secured with self-tapping screws, and a ventilation pipe is placed vertically in their place with screws secured.
- The inner side of the roof is equipped with a sealed outlet.
A sure sign of properly installed ventilation is excess sealant at the base of the chimney.
Where to install the ventilation pipe
The location of these elements must be determined at the planning stage. To ensure good ventilation, you will need to consider the following:
- point ventilation pipes should be located at a distance of 60 square meters. from each other;
- the number of ventilation pipes is determined based on the complexity of the design;
- the location of several pipes should line up in one line;
- outlets of ventilation pipes must be tightly insulated;
- The pipe should not be placed further than 60 cm from the ridge.
Markings for the location for installing ventilation pipes should be marked by tracing the template with a pencil.
It is included with the purchased material. It is advisable to place ventilation pipes under the riser, since this method can ensure maximum air circulation. In some cases, corrugated adapters are used for this. When installed, the base of the corrugation is kept warm, which will result in minimal wind resistance. The height of the ventilation pipe riser plays a significant role, since if the pipe is small, the draft will be poor, and if it is too long, fastening devices will be needed. Building codes provide clear indicators for the height of ventilation elements:
- for a flat roof - the height of the ventilation pipes should not exceed 30 cm;
- for sloped roofs - no more than 50 cm.
If the roof provides additional areas for recreation, then the height of the ventilation pipe will reach 2 meters.
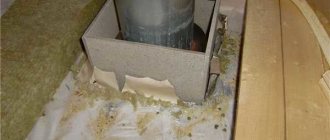
Sandwich pipes
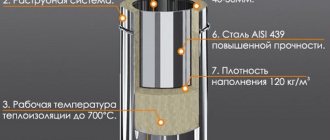
For convenience, when installing the passage of a sandwich pipe through a metal tile roof, a ready-made ceiling-passage assembly is used for balanced thermoregulation and filling the space with balsate wool or other non-flammable material around the installed passage, surrounded by a corrosion-resistant or galvanized box, which will be replaced with a steel sheet during final installation. . The walls of the sandwich chimney are made of either galvanized steel or mineralite.
Installation of a sandwich pipe passage with a slope involves cutting an oval hole on the inside of a steel sheet with further fixation with self-tapping screws. Pre-installation of the sheet is accompanied by insulation with non-combustible material. The final touch is to install the lead strip on top of the roofing sheet.
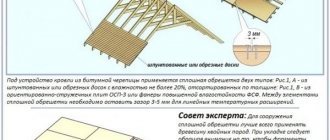
Strengthening the rafter system
Often when installing a chimney, the question arises about strengthening and strengthening the rafter system, because it is necessary to form a hole in the roof pie for the pipe. That is, you will need to install a couple of spacers. When creating a roof made of metal tiles, the pitch between the rafters is rare, and the formed opening or the distance between the rafters may be too large. Therefore, it is necessary to install vertical spacers.
Sometimes you have to break the integrity of the rafter leg, that is, cut it. Then, in certain situations, purlins or crossbars are also sawn. In this case, at the place where the rafter leg was cut, it must be fastened to adjacent, undamaged ones. For this, additional spacers are also used, between which bars are inserted vertically. Their function is to replace the rafter leg at the chimney passage.
On a note! Strengthening the rafter system with supports is rarely used. This method is advisable when the angle of inclination of the slope is more than 35 degrees, if it is necessary to cut out sufficiently large fragments of the rafter system.
Chimney passage with a square or rectangular cross-section
The classic stove is equipped with a brick chimney with a square or rectangular cross-section. The passage of a pipe with a square or rectangular cross-section must be sealed and made of aprons - inner and lower thin sheets of steel. The inner apron is installed first. Then the outer one, covering the top layer of roofing.
The lower apron is designed on the roof surface after a well-thought-out design with all the elements. Then a grinder with a shtoba is used, running along the marked contours to a depth of 150 mm. The apron strips are installed with the corners inserted into the frame and covered with sealant. They are attached to the chimney with roofing screws. You can overlap part on part within 15 cm for greater tightness.
Manipulations with markings, grooves and roofing screws are completed with the formation of a “tie” to which water will flow after precipitation. The “tie” is installed with the expectation that moisture will immediately enter the drainage system. A sheet of metal is installed at the bottom of the apron. The drainage system rises 5 cm above the pipe and is fixed with construction tape for a more durable connection.
To decorate the roof, a lower apron is often used, which, in addition to decorating the surface, also serves as a waterproof element under the roof. Installing the bottom apron is similar to installing a “tie” without the need to groove the pipe walls to secure the outer strips.
Carrying out penetration depending on different types of roofing
The roof penetration will vary depending on the shape of the chimney and the material that covers the roof. Thus, to install a sandwich pipe, installation of a heat-insulating box is not required, since the insulation here is laid during manufacture. To penetrate the roof of a brick or ceramic chimney, it is necessary to construct a thermal insulation box to protect the building from fire.
Elastic penetration for round pipe
The simplest but most universal penetration exists for a sandwich pipe. It is a rubber or silicone pyramid that is put on the pipe and fixed to the roof. Moreover, the smoothness of the roof covering in this case does not matter much - the elastic insulating apron is equally hermetically attached to the ribbed surface of the profile, wavy tiles, and soft ondulin. Manufacturers offer ready-made flexible penetrations for sandwich chimneys of any cross-section.
Installation of elastic penetration is carried out as follows:
- A hole is cut in the roof for the pipe outlet so that at least 38 cm remains from the pipe wall to the combustible roofing materials.
- A galvanized metal sheet with a hole for the chimney is fixed to the inside of the roof. The distance from the outer wall of the pipe to the edge of the sheet hole is at least 14 cm.
- Remove the pipe and secure it in the desired position.
- The elastic penetration pyramid is cut to a level corresponding to the diameter of the pipe and put it on the pipe through the top.
- The protective apron of the penetration is applied to the chimney passage, having previously coated the edges with fire-resistant sealant.
- A metal mounting ring (flange) with holes is placed on top and secured with self-tapping screws.
For roofs with a steep slope angle, manufacturers produce special elastic penetrations, where the slope of the pyramid and apron is more pronounced.
Metal penetration for round pipe and smooth roof
A metal feedthrough for a round pipe can also be purchased ready-made. It is a metal cone, the upper hole of which corresponds to the diameter of the chimney pipe. When choosing a metal penetration, you need to know the angle of inclination of your roof.
Installation diagram for metal penetration:
- the hole in the roof and the inside of the protective structure are designed as for elastic penetration;
- a passage pipe is put on the chimney, the edges of the lower part are coated with fire-resistant sealant;
- secure the protection with self-tapping screws with rubber caps to seal the mounting holes.
Penetration for rectangular pipe
Exiting a brick chimney through the roof has its own characteristics. To complete the penetration you will need a grinder, a screwdriver, metal scissors and galvanized iron sheets or stainless steel.
The installation of the brick chimney penetration begins with the construction of a box for thermal insulation. Its size is calculated based on the cross-sectional size of the chimney plus 15 cm on each side. The material for the box must be non-flammable. Sheet iron or asbestos is used.
The space between the pipe and the walls of the box is filled with basalt wool. This material can withstand significant temperatures and has excellent thermal insulation properties. The lower part of the box is decorated with a metal sheet.
Street protection has a complex composite design. The roofing material for a brick pipe is not of great importance, since in any case it has to be removed when removing it. The drainage tie is installed on top of the roofing covering, regardless of its type.
The penetration-casing consists of the following elements:
- four (according to the number of sides) internal protective wall profiles;
- four external decorative elements;
- drainage tie.
If the protection is installed on top of a flat roofing material, then it is glued with a fire-resistant sealant. When installing under a corrugated pipe (profile, slate, tile), a wall profile is installed on the pipe, securing it into a pre-made groove on the pipe. The upper parts of the apron are placed under the roofing material, the lower parts are secured on top.
The nuances of finishing a chimney pipe on a metal roof
Bypassing a pipe on a metal roof using standard elements and standard sizes is not particularly difficult. Tightness is ensured by compact dimensions. In non-standard cases, it is more flexible in terms of making interesting decorating shapes and designs.
Sealing a pipe on a metal roof involves not only fighting moisture, but also snow. There is a risk of pipe damage when snow comes off the steel roof sheets. Experienced roofers have long used snow guards installed above the pipe along the slope of the roof. It is optimal to place the snow retention system at an angle so that the snow cap disappears gradually or at least its contents fall off on different sides from the junction of the chimney pipe to the roof.
Sealing rectangular and square pipes
To ensure the reliability of the roof in the areas of valleys and junctions, a tie made of metal parts (junction strips), which are inserted 150-200 mm under the covering, will help.
The junction of the apron with the corrugated sheet around the chimney is sealed with roofing sealant. Eaves outlets are installed at the bottom and sides, directing the flow of precipitation onto the roof slope.
Before applying corrugated sheeting, it is necessary to seal the passage of the riser with a membrane.
- A cross-shaped cut is made in the material and glued to the walls of the chimney at a height of more than 5 cm.
- Self-adhesive “Vakaflex” tape is attached under the upper junction bar: from below, from the side, then from above.
- Sometimes a chimney is installed in a finished roof, cutting a hole in the corrugated sheeting with a margin of 1.5-2 cm. To do this, the metal sheet at the junction of the rectangular pipe is bent, a waterproofing membrane is glued and a lower and then an upper sheathing is installed, tightly pressed against the roofing pie and the chimney.
Safety precautions when installing a chimney must be strictly observed
Plastering a pipe
To avoid the formation of a thick layer of plaster, you should know how to properly insulate pipes:
- First, seal all existing irregularities in the pipe with cement mortar;
- Then cover the walls with reinforcing mesh;
- The final stage is applying plaster.
Important! Before covering the first layer, bring the solution of lime, cement and slag chips (or sand) to the consistency of sour cream, spray without leveling. The second coating is denser; it is applied with a trowel, rubbing until a smooth surface is obtained.
The reinforcing mesh will allow the plaster to adhere well to the pipe and not crack when drying
Strengthening the pipe with asbestos cement
Lining a chimney with asbestos cement requires the use of a cement-lime mixture applied to the surface of the slabs.
- The chimney is reinforced with mesh and the first layer of solution is sprayed.
- A new layer of the mixture is applied to the insulation sections and attached to the surface of the chimney.
Asbestos contains carcinogens that are dangerous to humans, so experts do not recommend using it in residential areas.
Sheet iron cladding
When insulating a metal pipe, you should maintain a distance of 60 cm from the chimney to flammable materials.
- The structure is wrapped in mineral wool 5 cm thick, overlapping, and clamped with steel wire. The top is wrapped with a metal sheet.
- Rivets are inserted into the previously prepared gaps, and the heads of the clamps are closed with a special tool.
What is the goal?
When preparing drawings, it is important to provide for the direct location of the pipe coming from the furnace.
- The maximum heating temperature of the outer wall of the chimney should not exceed 50 degrees.
- Waterproofing a brick chimney on the roof allows you to comply with established standards, and metal elements will require additional insulation to prevent the formation of condensation.
After installing the pipe, it is enough to carry out plastering followed by laying millite silica, thermal insulation wool MKRR-130 or rolled felt MKRF-100.
If the outer part of the pipe is 2 meters or more in height, it is strengthened with additional braces
External apron system at the junction area
Experts highlight the connection of the chimney to the metal tile as a very important factor. To ensure the tightness necessary in this situation, an apron is built outside. Installation work begins with the installation of the internal apron. In this case, they place a bar or steel sheet at the top and bottom and the same elements on the sides.
The bar at the bottom is applied to the walls and a line is drawn with a marker.
The remaining parts are also used as a template for subsequent marking. When the line around the perimeter is completed, they begin to make grooves. It is better to make them with a grinder, going deeper by 15 cm.
At the end, they are washed with water, the brick dust is washed off, and they wait until everything dries.
In order not to break the tightness when connecting the smoke exhaust structure to the metal tile floor, it is important to ensure that the grooves pass exactly where the brick is laid
When installing the outer apron of a smoke exhaust structure through a soft roof, heat-resistant waterproofing protection is used. It is inserted onto the pipe blank by 5 cm.
The cut itself is glued to the pipe product using construction tape. And the place where the pipe extends beyond the soft roof is wrapped with film. To securely adhere to a soft roof, it is recommended to use Ecobit.
How to choose a cut
There are two types of roof trims - for chimneys with a round and rectangular cross-section. In the latter case, the sealed apron is assembled manually from roofing iron. Despite the complexity, this option is considered the most reliable. Cuttings for a round pipe are made at the factory; they look like a corrugated cuff with a wide brim. For a high-quality and hermetically sealed connection, the pipe passage must be insulated with two aprons: an internal and an external decorative one.
To pass round pipes through metal tiles, flexible grooves made of heat-resistant synthetic rubber are used. A more exotic option, mainly made in Europe, is composite aluminum trims. In both cases, the essence of their work is that they repeat the complex profile of the metal tile and are attached to it both mechanically and with a sealing adhesive connection.
Making cuts yourself requires a certain skill and a simple set of tools for roofing work - a mallet and a right-angle mandrel. Both the bottom and top aprons consist of four Z-shaped strips. At the corners, the planks are joined either with a hem or with folds, which is preferable. Cutting strips of roofing steel must be done without overheating the edges; in addition, the edges adjacent to the chimney and roof must have a fold, that is, single rolling.