Modern man is a very heat-loving creature, and cannot exist in a house without heating. A heat generator with a chimney is the most complex and potentially dangerous engineering system. A chimney is a rather bulky and complex structure, and if the stove or fireplace is located near the outer wall of the house, then the most practical option is to install the chimney through the wall.
We welcome our regular reader and offer him information on how to make a chimney outside near the wall of the house with your own hands.
What is it and what is it for?
A chimney is a vertically located structure that has a cavity inside through which hot combustion products are discharged into the atmosphere. In fact, this is a box made of non-combustible material (brick, metal, ceramics, asbestos cement, concrete), which serves to remove flue gases upward from the combustion chamber (furnace) under the influence of draft.
A chimney is needed to remove waste combustion products outside the home. Smoke poses a significant danger to humans:
- Exhaust gases contain carbon dioxide and carbon monoxide, which are toxic to humans.
- Smoke contains oxides of sulfur, nitrogen and some other elements; when the oxides combine with water vapor, aggressive and harmful acids are formed.
- Smoke carries soot particles, which, without smoke removal, will settle into the room, on the ceiling, furniture, things and in the lungs of humans and animals.
- Smoke contains a lot of water vapor produced by the combustion of hydrocarbons - the steam will also condense on walls and windows and create high humidity, promoting the formation of fungi and mold.
- In addition, hot gases can cause a fire.
The health and even life of you and your household depends on how the device is properly executed and high-quality materials are selected.
Principle of operation
The principle of operation of a chimney is based on the tendency of hot combustion products to rise upward. Hot gases expand, their density decreases, and they tend to “float” into a higher layer of the atmosphere with the same density. When the waste combustion products rise in the furnace, a vacuum is formed and fresh air is sucked in. Thrust ensures a continuous supply of oxygen to the fuel.
Many factors influence cravings:
- Chimney height.
- Cross-sectional area of the internal channel.
- Insulation of the channel.
- The location of the head relative to the top of the roof (ridge).
- Sufficient air supply.
How the chimney works
The traditional brick chimney differs in design from modern chimneys, which are assembled from ready-made factory-made elements.
Any chimney has a vertical box, a head, valves, hatches for cleaning, and sometimes a foundation.
A typical brick chimney has the following parts:
- If necessary, a foundation.
- The neck is used to connect to the furnace firebox.
- Riser (box) with valves.
- When retrofitting, a stainless steel liner is often inserted into the brick frame.
- Slope.
- Otter - expansion of brick walls above the roof, covering the gap in the roof from precipitation and leaves; A galvanized steel molding is often attached to the otter.
- At the point of passage through the roof structure there is a neck.
- Headband.
- In recent decades, the top of the structure has been covered with a metal cap.
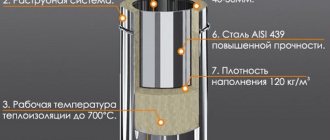
A chimney made of asbestos cement and steel consists of pipes, adapters for connecting to the firebox, a cap, insulation, and sometimes an outer lining made of galvanized sheet.
The most modern and promising types of chimneys are made from three-layer sandwich pipes and prefabricated ceramic ones. These types of pipelines are assembled from ready-made factory-made elements; a wide range of elements allows you to quickly install structures of any configuration.
The main parts of ceramic and sandwich pipes are straight and rotary elements (elbows), tees, elements with inspection hatches for cleaning, elements with a container for collecting condensate; transition elements for connecting the heating unit, cone, deflector.
Sandwich pipes consist of two layers of metal and insulation between them. Ceramic chimneys are assembled from an external expanded clay concrete frame, an internal prefabricated ceramic duct and a layer of insulation between them.
Modern chimneys are not installed without deflectors - they increase draft and protect the smoke channel from precipitation.
approximate price
The cost of brackets depends on the standard sizes of devices, materials of manufacture, metal content and surface finish of the products.
Prices for domestically produced wall fasteners made of ferrous metal start from 260, and for stainless steel products - from 360 rubles, and go up to 750 rubles for large-sized fasteners.
Telescopic devices are more expensive: from ferrous metal - from 450 rubles and above, from stainless steel - from 1000 rubles.
Imported models start from 750 rubles. Products finished with special polymer coatings will cost from 2.5 thousand to 4.5 thousand rubles.
Types and designs of external chimneys
Structurally, chimneys installed outside the building near the wall are:
- Wall-mounted – mounted on the wall of a building.
- Root - installed on a separate foundation near the building.
According to the material of manufacture, chimneys are:
- Brick.
- Single-layer steel (including modular).
- From sandwich pipes.
- Asbestos-cement.
- Cement (used in industrial furnaces).
Self-construction of a beautiful, level free-standing brick pipe is difficult - the skills of a qualified mason are required. Asbestos-cement products are fragile, components for them are not produced (with hatches, tees, bends, modules for collecting condensate), they are destroyed under the influence of condensate and require insulation. Single-layer steel pipes require insulation - and it is impossible to independently insulate a monopipe as well as a sandwich or factory-made ceramics. The aesthetic qualities of steel or asbestos-cement structures with insulation also leave much to be desired.
What type of chimney can be routed through the wall?
Any chimney can be brought out through the wall. In practice, the choice of chimneys installed outside the building comes down to ceramic, sandwich and brick structures.
Passing a chimney through a wooden wall using modern passage units is also not very difficult.
How to properly arrange a roof outlet?
The most difficult stage in installing a sandwich chimney is, perhaps, the correct installation of the structure on the roof. For this purpose, a special element is used, which is called a roof cut. This is a metal structure that prevents the chimney pipe from coming into contact with the materials of the roofing pie.
When choosing a roof cut, you should definitely take into account the angle of the roof. Standard options allow you to bring the chimney onto the roof with a slope of 15-35 degrees or 35-55 degrees.
When installing a sandwich chimney on the roof, you should take into account the slope of the roof, and also ensure a sufficient distance between the roofing pie materials and the pipe
First, you need to mark with a marker or a construction pencil the place where you plan to install the chimney through the roof. After this, in accordance with the intended markings, a hole is made on the inside of the roof. It should be wide enough for the pipe to pass through it freely.
After this, the under-roof sheet is fixed from the inside, and a roof trim is installed on the outside, the conical part of which is adjusted in accordance with the angle of the roof. The cutting edges should be placed under the roofing sheet or under the ridge.
After the sandwich pipe is installed on the roof, care should be taken to ensure that the structure is of sufficient height, and also to decorate the edge of the pipe with protective elements
To improve the tightness of the joint between the cutting and the chimney, use a special adjustable apron. After installing it, you can install the next structural element. All that remains is to increase the pipe to the required height and install the necessary elements on its edge: a spark arrestor, a fungus, a weather vane, etc.
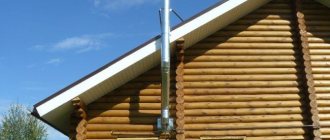
Advantages and disadvantages of venting the chimney through the wall
Advantages:
- The most important advantage of venting the chimney through the wall to the street is the greater fire safety of the room with the heating unit and the building as a whole.
- An external chimney is safer in terms of smoke from the part of the pipe facing the wall, leakage of exhaust gases and poisoning of residents with carbon monoxide or carbon monoxide.
- Absence of holes in the roof, violation of the rafter system, or passage of structures in the ceiling. The passage of a chimney through a wooden ceiling always creates an additional fire hazard. The absence of holes in the plank sheathing of the roof and the absence of additional reinforcement of the rafters with timber makes the work easier and strengthens the roof.
- Saving space in the room, the bulky design inside the room does not always fit well into the interior - installing a chimney outside the building makes it possible to decorate a room with a stove or fireplace to your liking.
- When modernizing a building, installing an external chimney is much easier and faster than an internal one.
- Exterior structures are also much easier to repair and upgrade.
Flaws:
- A ceramic chimney requires a separate foundation.
- Sandwich pipes must be securely fastened, especially in the upper part - the structure, despite its low weight, has a fairly significant windage.
- In many cases, water from the roof slope pours onto the chimney when it rains, and in the place of the eaves it is necessary to install special flashings or install additional storm gutters.
- The chimney outlet through the wall must be very carefully insulated with non-combustible materials.
- Sometimes an external chimney disrupts the overall design of the building. And sometimes it gives it some color:
General characteristics of tiles as a roof
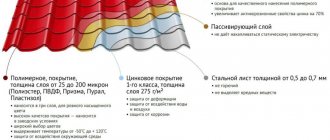
Using metal for roofing allows you to get a reliable and durable roof that can stand for many years without additional investment. Today, metal tiles, as a roofing material, are preferable for roofing than roofs made of slate or euroroofing material.
Metal tiles are produced from metal with a thickness of 0.5 to 1.2 mm. The length of the metal strip of metal tiles can vary from the standard 1.2 meters to 6 meters or even larger if the order is made to a custom size. Metal painting is usually done with UV-resistant paints. According to manufacturers, the paintwork can withstand a 50-year service life without mechanical damage.
What does an installed chimney look like through a metal tile?
In addition, metal tiles are not only sheets of profiled metal, they are also a whole set of different additional elements that allow you to assemble a roof that meets all regulations and standards. These additional elements also include several specific parts intended for arranging roof passages for internal communications and systems through the roof. These elements include:
- Antenna leads;
- Ventilation duct outlets;
- Dormer windows;
- Light tunnel windows;
And of course, such additional elements include a set of parts for arranging the passage of the chimney through the metal tile.
The service life of such a chimney
The service life of chimneys depends on the designs and materials from which they are made.
A ceramic chimney will last up to 40 years. Manufacturers declare 50 years or more, but no one has checked it yet. A brick one can last longer, but stainless steel liners will have to be replaced after 15-20 years. The service life of the liner primarily depends on the thickness and grade of steel. The thickness of the liner steel should not be less than 0.8-1.0 mm. Galvanization will not last long.
A good quality sandwich will last for 15-20 years or even more. The service life depends on the material and thickness of the inner liner - a good stainless steel inner liner with a thickness of 1 mm will last 20 years. Enameled liner made of carbon (“black”) steel – 15 years.
The service life of the liner depends on the type of heating unit (more precisely, on the type of fuel and the heating temperature of the exhaust gases). The shortest service life is for chimneys for fireplaces and coal boilers, which release very hot gases during intense combustion. The service life of chimneys from boilers and fireplaces using peat, briquettes and wood is slightly longer. Chimneys for pellet and gas boilers will last the longest.
Manufacturing materials
Fastenings are made mainly from the following materials:
- stainless steel;
- aluminum alloys;
- ferrous metal followed by galvanizing or painting.
Stainless steel has an aesthetic appearance and goes well with the material of sandwich chimney pipes. Such structures are strong, durable and not subject to corrosion. The disadvantages include high cost. Independent production of stainless steel brackets is difficult due to the complexity of the technology for welding stainless alloys.
Aluminum structures are lightweight and have a pleasant appearance. They have not yet received wide distribution in our country due to their high cost.
Regular structural steel is very inexpensive and can be welded in a home workshop using a regular welding inverter. This makes it an ideal material for making DIY brackets.
Do it yourself or order it?
You can only make a brick chimney yourself or a structure from an insulated single-layer steel pipe. But laying smooth and beautiful walls of a brick pipe is more difficult than laying just a brick wall, and you must have the skills of an experienced mason. Single-layer pipes will have to be insulated; the quality of self-insulation is much worse than that of ready-made factory-made pipes.
You can independently install a chimney made of ceramics and sandwich pipes. It is impossible to manufacture elements of such chimneys on your own, but the industry produces many modules that allow you to assemble a pipeline of any design.
The question of whether to install a pipe yourself or hire a team of professionals is quite complicated. Installing a chimney is quite a complex job, and it is worth thinking about and carefully assessing your capabilities: is it possible to take prefabricated scaffolding or scaffolding of the appropriate height, will you have assistants, do you have the skills to install building structures, how do you react to height.
Advantages and disadvantages
Compared to brick chimneys, sandwich chimneys with wall brackets have the following advantages:
- speed of installation;
- high qualifications in stove work and masonry are not required;
- low cost;
- light weight, no capital foundation required.
The disadvantages include:
- shorter service life, after 5-8 years of constant use the metal chimney must be replaced;
- brackets are prone to sagging;
- dubious aesthetic value; a metal pipe does not harmonize with every architectural style.
Building regulations
Chimneys are designed and installed in accordance with SP 60.13330.2012 “SNiP 41-01-2003. Heating, ventilation and air conditioning.”
Chimneys must meet the following requirements:
- The height from the mouth to the grate must be at least 5 meters.
- The internal channel should not have narrowed areas.
- The height above the flat roof is at least 0.5 m (preferably 1 m).
- Head height for pitched roof:
- At a distance of less than 1.5 m from the ridge (parapet) - no lower than 0.5 m from the ridge.
- If the distance to the ridge is from 1.5-3 m - not lower than the level of the ridge.
- If the distance to the ridge is more than 3 m, the height should not be below a line drawn from the ridge at an angle of 10° to the horizontal (down from the horizontal).
- When calculating, you should take into account not only the height of the ridge closest to the chimney, but also the height of the highest ridge of the building (or the highest part of the building).
- Pipes may have inclined sections at an angle of at least 30° to the vertical, with a horizontal pipe displacement of no more than 1 m. The cross-sectional area of inclined sections should not be less than the cross-sectional area of horizontal sections.
Fire safety requirements for chimneys
The distance between the outer surface of brick or any other chimneys (with insulation) and the structures of walls and roof slabs must be at least 130 mm. The distance from the structures to the wooden wall must be at least 260 mm.
If the chimney in the area of the roof overhang passes close to rafters, sheathing and other combustible materials, the passage must be insulated with non-combustible materials.
The chimney of solid fuel, wood and peat heating devices must necessarily have a mesh spark arrestor with a mesh size of no more than 5x5 mm if the roof is covered with flammable materials (bitumen tiles, roofing felt, ondulin) or leaves fall on it. When installing a chimney in a wooden house, be sure to install a spark arrester.
Traction and height
The height of the hog is the main parameter that determines the traction force.
Other factors affecting traction force:
- Sufficient insulation of the pipeline.
- Smoothness of the walls of the chimney channel.
- The thickness of the soot layer on the walls.
- The presence of a head or deflector (which does not interfere with the free exit of smoke).
- Air supply to the firebox.
- Closing the canal with valves, condensate or ice frozen at the mouth.
- Correctly selected internal cross-section.
How to choose a diameter
The diameter of the internal chimney channel must necessarily coincide with the diameter of the boiler outlet pipe (information from the heat generator’s passport).
In SP 7.13130.2013 “Heating, ventilation and air conditioning. Fire Safety Requirements" shows the cross-sectional dimensions of the internal channel depending on the power of the heat generator:
- Up to 3.6 kW – 140×140 mm (diameter not less than 158 mm).
- 3.5-5.2 kW – 140×200 mm (diameter not less than 189 mm).
- 5.2-7.0 kW – 140×270 mm (diameter not less than 219 mm).
How to choose sandwich pipes
To select and purchase a modular kit, you need to resolve the following issues:
- Find out the working (internal) diameter of the channel. Be guided by the cross-section of the boiler outlet pipe; the size of the chimney pipe should correspond to it or be larger.
- Choose the external cladding material depending on your budget (stainless steel or galvanized metal).
- Draw up a diagram of the structure.
- Determine the thickness of the insulation. For heat generators with high efficiency and low temperature of combustion products, a layer of 5 cm is sufficient. Solid fuel boiler systems, stoves and fireplaces require insulation of chimneys of 100 mm.
Outdoor chimney is the most popular option
The installation diagram of the chimney largely depends on the location of the heating unit. There are two options for laying pipes:
- outside the house, when the horizontal section from the boiler immediately penetrates the wall and connects to the vertical section (attached or wall chimney);
- the flue trunk goes inside the premises and is led out through the ceilings to the roof.
When it is necessary to bypass the roof overhang, this scheme is used
To ensure sufficient natural draft, the length of the horizontal section cannot be more than 1 m. Then it’s simple: the boiler needs to be placed closer to the outer wall and a street chimney installed, since this scheme will be cheaper. If the heater is located deep in the room and cannot be moved, implement the second option with a passage through the roof.
Internal version with floor passage
Important point. The total height of the smoke exhaust, counting from the grate (or burner) to the upper cut of the pipe, must be at least 6 m. Condition two: it is unacceptable for the upper end of the duct to fall into the leeward zone of the roof, which leads to a sharp deterioration in draft. The further the flue is located from the ridge, the higher it must be installed, as shown in the diagram.
When you have hand-drawn a sketch of the future chimney, all that remains is to select straight sections, fittings and a condensate collection block. To do this, we suggest using the presented standard diagrams and listening to expert advice in the video:
Rules and features of chimney installation
In real conditions, we usually purchase ready-made heating boilers that are made with sufficient quality and safety. The chimney is the most dangerous part of the heating system, because the health and even the life of household members depends on its operation. Therefore, it is necessary to strictly comply with all regulatory requirements for the installation of chimneys - this guarantees the safety of the house and your family.
If you plan to install a chimney yourself, then it is best to use a practical, lightweight and easy-to-install sandwich pipe made from ready-made, high-quality factory-made elements. Its only serious drawback is its high cost. But you can save money by carrying out the installation work yourself. Simple installation can guarantee you a device for the safe removal of flue gases from the heating unit.
The most important rules for installing chimneys:
- Correct selection of the internal diameter of sandwich pipes.
- Correct calculation of the chimney height.
- Compliance with standard distances from the pipe surface to walls and other structures.
- Sufficient insulation of the chimney duct.
- High-quality sealing.
- Reliable fastening to the wall.
- Mandatory installation of a container to collect condensate.
- Assembling elements by condensate (or use recently introduced modules that are simultaneously assembled by smoke and condensate).
General requirements for construction
Since you can remove the chimney correctly yourself, you should take into account the technological requirements. The cross-section of the smoke exhaust ducts depends on the power of the heating equipment. With lower parameters, draft will deteriorate and combustion products will be removed more slowly.
Placing the pipe inside the box Source petropech.ru
To create normal draft, it is better to use a round chimney. The number of bends should be reduced. The minimum allowed height of the structure is 5 m. If the roof covering is prone to ignition, then a spark arrestor is placed on it in the area of contact with the chimney.
High-quality ventilation is installed near the boiler. The length of the inner part is no more than 1 m, otherwise this area will quickly become clogged with soot and traction will deteriorate. The chimney is equipped with a reservoir to collect accumulated condensate and a window for maintenance. Do not make 90° bends.
Do-it-yourself chimney installation
Installing chimneys with your own hands is quite possible if you comply with the requirements of the regulatory documentation set out above. Of course, this work is not for a beginner, but if you live in a private house, then, willy-nilly, you will have to learn repair and installation work.
Drawing and diagrams
Before starting installation and purchasing materials, it is necessary to draw a drawing or at least a diagram, carefully consider all the nuances and regulatory requirements for the arrangement of elements, and determine the quantity and composition of the necessary components.
Size calculation
The length of the pipe is calculated taking into account regulatory requirements and the height of the roof (see above), but it should not be less than 5 m. It should be borne in mind that the higher the chimney, the greater the thickness of the thermal insulation layer must be, otherwise the cooling of the exhaust gases will be lead to a decrease and even overturning of traction.
The diameter is taken in accordance with the heat generator's passport. If the diameter of the boiler outlet pipe is non-standard, then choose the nearest larger pipe diameter. When installing a homemade or brick pipe, the diameter must comply with the standards (see above).
Selecting a place to exit through the wall
There are different types of walls - front and side. The side wall is located on the side of the roof slopes and under the roof overhangs; water flows onto it from the roof (or gutters are located on it). There is a small overhang of the roof above the front; water from the roof does not fall on it.
The ideal option for a chimney exiting from sandwich pipes through a wall is through the front wall and in such a way that there are no windows, balconies or other obstacles that will have to go around vertically above. The option when the chimney is laid along the side wall is worse - you will have to carry the structures through the roof overhang and pile up a drainage system around it (water pouring onto the chimney from the roof slope reduces the life of the sandwich sleeve, especially galvanized ones, and can lead to wetting/freezing of the insulation, increasing thermal conductivity sandwich, decreased cravings; heating and even fire of the wall of the house). Any rounding of windows and other obstacles reduces traction in the hog. But sometimes you can step back from the wall, go around the roof overhang and not make a passage through the overhang structures:
This is not the best option for installing a sandwich.
Homemade antenna mast
I want to install a mast at my dacha. The purchased one comes out like an airship to lift it. The minimum height (according to the height profile) should be 12 m, 15 is better, but this is for growth. I just don’t want a pole because of the difficulty of finding and delivering such a tree. I found an aluminum profile and made some calculations. P.S. the pipe, which is 1 piece in quantity, will be sawn into 3 parts and used for joining supporting pipes.
The antenna will be 5-7 el. Yaga at 98 MHz, for now. Next I’m planning a vertical for 2 and 70, just above the FM, a small one - about 2 m. I suspect that I will have to add another tier of synthetic cable to the very end of the mast. Perhaps in the future DVBT will be added (see Finns). The total weight of all antennas is no more than 10 kg. Wires. HZ.
Will a 40-45 mm mast be enough for them based on calculations with 3 tiers of guys? Maybe the first option will work, which is 30 mm and 4 tiers of guy wires? Or don’t bother and think about how to drag the “perch”?
P.S. I chose answers 2, 3, 4.
Those. Should I start with the thick one at the base and work my way down? Then it will be a telescope. I rejected this option, because When purchasing pipes at the base, the price tends to match the purchase price.
But how I wanted to connect it won’t work? Will it break at the connection point? I thought 3-4 tiers of guy wires and an arrow-type lift would save the father of Russian democracy. After all, the inner pipe will only be a guide and there should not be any special loads on it.
Can you be a little more detailed? Are the pipes metal? Somehow the difference in diameters is small, I didn’t find anything like that, except that the wall is 1 mm thick. Even 12m is not enough, but the trouble begins. It will hold up - I’ll continue to think about it.
I looked at Avito - 10 m reinforced steel mast D = 50mm - 4 tyres and 20 kg. Army telescope 8 m with latches - 4 tr. and also under 20 kg, but it is much easier to deploy the telescope alone. The only thing I didn’t like about the army one is that the upper elbow is about 22 mm in diameter. On the other hand, steel has a diameter of 50 mm - there is room to turn around up to 15 m.
I compared it with my calculations - if we take it as steel D = 50 mm, then it turns out to be 10 m approximately 17 kg. The weight gain of aluminum is not that big. And I looked towards aluminum precisely because of the weight - to lift it alone. A telescope made from aluminum is both expensive and heavy. Maybe it’s easier to buy one of them to begin with, and then build up?
Damn, aluminum is definitely metal! “Heavy Luminous,” so to speak.
Thank you. I can imagine the basis. I'll weld it from iron if I find the right thickness.
I plan to raise it using a system of blocks at the ridge of the roof - the antenna will be located near the house or summer kitchen. Both have their pros and cons. The house has full grounding and a buried steel pipe 120-150, protruding 70 cm from the ground. I can sit in the summer kitchen for 24 hours without disturbing anyone at night, plus I can drink (tea) and smoke “without leaving the cash register.”
6 meters is not a mast. The mast starts at 10. And 6 is a stick. Of course, I won’t strain myself - there is already an approximate design for how it will rise.
Yes, blocks are everything to us.
Only, here is a home-made antenna that is comparable in price to a purchased one, a little lighter and somewhat higher. Here is the calculation of a slightly lighter version of 12.5 (without the lowest pipe in the table) and 15 m. diameter, thickness, length, weight, price of 1 kg, cost of the whole, quantity, height in the mast, cost, weight.
In red are the height and price, to the right of the price is the weight. It's just a mast without anything.
I plan to extend the guy wires at 6, 10 and 12.5 m, and mount them in the ground 6 or 7 m from the mast. Do you think 3 tiers will be normal?
P.S. Today there will be a salary. I’ll estimate the cost and start purchasing the thinnest knees first and look at the strength. Depending on this, it will be clear where to move at the base. I hope that D=40 mm with a 3 mm wall will be enough for the lower part.
P.P.S. I have a base for a chair in a boat made of D=18 mm pipe and a 2 mm wall - it has withstood my 105 (in shorts) on any wave for a couple of seasons already. This one, in the lower right corner, is bent out of a solid pipe:
I bought it today. I calculated 4.890 from their price list, but in reality it turned out to be 5.680. Their price list on the website is confusing with the weight of the pipes.
In the evening I will try to collect and evaluate the difficulty of the climb in one. Labor D16t: F45x2x3000 - 3 pcs. Ф40х3х3000 – 1 pc. Design height
10.2 m. I will use the thin one to connect the thick one, an F40 insert at the base with rivets to “thicken” the place of the bolt in the rotation axis and fasten it through with M8 bolts. I will lift it on the axis below through a block on the ridge. There will be 2 tiers of guy wires - 6m and 10m. At 3m there will be a rod for attaching to the wall. The top will be extended over time with a 2m wooden beam (when I try vertical polarization.
New questions have appeared for the experienced ones: - how long to “block” the pipes? Is 30 cm in each direction enough? Maybe 25 cm will be enough? — Will M8 bolts be enough or M10? — for each connection I plan 2 bolts mutually perpendicular, i.e. one above the connection, the other below. Or do you need 2 below + 2 above?
I forgot the most important thing, which is why I messed everything up. The weight of the 10.2 m mast came out to 9.4 kg + the weight of the bolts! The same steel one - 20 kg and the price is almost the same! Except that it has a thrust bearing and one place for attaching guy wires.
P.S. By the way, are guy ropes or stretches correct?
Step-by-step installation
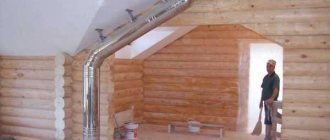
The installation of pipes begins by marking the passage through the wall. A horizontal monopipe without insulation is always attached to the heat generator pipe - the temperature of the exhaust gases in this place is high, the insulation will simply sinter and deform the pipe. The length of the horizontal part should not exceed 1 m. Then the transition element is attached to the sandwich. During installation, the modules are simply inserted into one another. All joints of elements are tightened with special crimp clamps. Then they make a passage through the wall, install a tee (through which condensate flows freely into the container), attach an element with an inspection, an element with a container for collecting condensate, and a plug.
Hole device
Before bringing the chimney through the wall, drill a hole in the wall. For this purpose, powerful hammer drills with special nozzles of large diameters are used, which do not drill, but rather cut out a piece of the wall. You can cut a hole in wooden walls.
To prevent each installer from inventing components and elements for passing the chimney through the wall, the designers came up with a special passage unit. A special steel flange with a pipe or box inside the wall is installed on the wall - first the outer part, a pipe is passed through it, the distances are measured so that the pipe runs strictly horizontally and in the center of the pipe, the pipe is secured. Attach the outer flange and fill the space between the pipe and the wall with insulation. Then the inner flange is attached. The flange on the outside (and inside as well) is sealed around the perimeter with a heat-resistant sealant. Insulation with a sealant on the street side must also be waterproof - so that precipitation does not get into the gap and insulation, and does not cause the wall to soak and rot the wood.
The shape of the flange - round or square - is not of fundamental importance.
Wall mount
The chimney should be secured to the walls using standard clamps and brackets for fastening sandwich structures. The optimal distance between fasteners is at least 500 mm. The lower part of the pipe must be installed on a strong bracket mounted on the wall or on a stand.
If the chimney rises above the roof slope by more than 1 m, it is necessary to secure the structure with guy wires; if more than 1.5 m, it is necessary to provide additional fasteners - for example, a strong rod securely fixed to the wall. The pipe is attached to the rod using the same clamps. The sandwich pipe itself, assembled from thin steel modules, does not have the necessary rigidity and strength and can bend and even collapse in strong winds.
Sealing
The joints of the elements are sealed by applying a heat-resistant sealant to both mating surfaces. To seal joints, it is better to use silicate sealant - it can withstand temperatures up to 850°C and higher. To seal the flange and flashings, use silicone sealant that can withstand up to 250°C.
How to arrange a pipe outlet
Let's consider how the pipe should be routed through the metal tile so that the risk of leaks at the junction areas is minimized.
Rectangular outlet
The organization of rectangular, in particular, and square output is carried out in two stages:
- installation of the internal apron before installation of the coating begins;
- installation of an external decorative and protective element after completion of the roof covering.
Schematically, installation of the output can be reduced to the sequential implementation of the following steps.
- Find out the location of the upper edge of the inner junction strip by attaching it to the chimney wall.
- Along the marked marking line, for example, using a grinder, make a groove with a depth of at least 150 mm. The groove should have a slight upward slope. At the end, it is cleaned well, it is advisable to even rinse it with water.
Attention It is imperative to inspect the rafter system, since due to leakage the wood may begin to rot or fungus may form on it, but, say, the new roofing material will weigh quite a lot
- The connection strip is first installed on the side of the chimney, on the eaves side, then the other three are mounted: on the sides and at the top.
- The planks are laid with an overlap of 150 mm and the edges are filled with silicone sealant. They are fixed using roofing screws.
- To form a “tie” through which water will flow, a metal sheet is placed under the bottom of the apron. It is directed either directly into the gutter or into the valley.
- Remove the waterproofing and, lifting it approximately 50 mm onto the chimney wall, secure it with special heat-resistant tape. This ensures additional reliability of the junction unit.
- After installing the coating, an external apron is installed, which is more necessary for decoration than protection.
- It is installed in the same way as the internal one, only the pipe walls are not tapped to secure the outer planks. In fact, the lower apron, bypassing the pipe with metal tiles, is sandwiched between its layers, preventing moisture from getting under the roof.
Round (oval) outlet
Providing reliable junction protection for a round exit is a more difficult task. Therefore, a special element was developed - the chimney passage. This is a combined element, which includes a flat steel base and an elastic cap on the chimney pipe. Transitional diameters are marked on it. The passage components are hermetically connected to each other.
Additionally, we recommend studying: The passage of a chimney through a wall.
Advice Pass-through elements are also suitable for arranging any part of a circular cross-section that is exposed to the roof, say, ventilation.
The process of installing the passage is performed in the following order:
- It is necessary to cut a hole of the appropriate diameter on the roofing.
- After wetting the element with liquid soap, it is pulled onto the pipe.
- The sealing element is given the shape of a metal tile by pressing against the base.
- To fix the element, use self-tapping screws, after applying sealant under its edges. The screws are placed at a distance of 35 cm from each other.
Advice
If desired, you can make a passage element for metal tiles yourself. However, it must be taken into account that the roof cutting performed in this way must comply with all building codes and regulations
https://youtube.com/watch?v=O4asQV68dpM%3F
Frequent errors and problems during installation
The most serious mistakes when installing sandwich pipes are installation at a small distance from the wall, lack of insulation at the point where the sandwich pipe passes through the wall, and assembly of elements according to smoke. A chimney in the wall of a wooden house requires particularly careful insulation of the space between the pipe and the wall.
During installation, it is important to check that there is a sufficient amount of insulation at the pipe junction - loose insulation will lead to heating of the outer part of the pipe with all the dangerous consequences. The joints should not be located where the pipe passes through the wall and roof overhang.
It is also important to securely and strictly vertically fasten the structure. Particular attention should be paid to the fastenings for the chimney to the wall if the wall surface is insulated with polystyrene foam or mineral wool - the dowels must be long enough and fit into the supporting structure (not into the plaster!) of the wall by at least 60 mm.
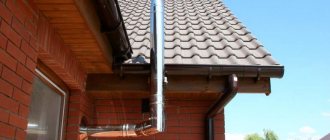
If the pipe passes through the side overhang of the roof, be sure to install a flashing so that precipitation from the slope does not fall on the sandwich (it can wet the insulation). On the front facade, it is also worth covering the place where the pipe passes through the protrusion of the roof covering with ebbs (although in this case the pipe often passes without touching the covering).
Direct path to fire.
Video description
How to pass a pipe through a wooden base is shown in this video:
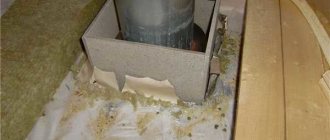
- Making a hole for the box. At this stage, the diameter of the product is taken into account, as well as the space for the insulating material (basalt wool inserts).
- Pipe installation. An asbestos sheet is laid between its walls and the box. The element is displayed strictly at a right angle. Any deviation will impair the operation of the boiler.
- Attaching a protective screen outdoors. This is a steel plate fixed to the outside of the wall. It protects the wood from overheating and reduces the risk of fire.
Pipe protection with insulating material Source petropech.ru
- Tee installation. A vessel for collecting condensate is attached to its lower part.
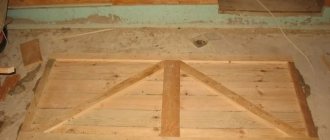
- Installation of support. It is screwed to the wall or rests on the ground. Its task is to maintain the vertical part of the structure.
- Chimney connection. Condensation should not get into internal joints. Every meter the structure is fixed to the wall with brackets. During fastening, a building level is used to maintain the strictly vertical position of the pipe. The last clamp is installed under the roof.
Lastly, a protective fungus is put on the pipe.
Expert advice
The chimney running outside the building should be collected using condensate. If you collect smoke, condensation can get inside the liner, wet the insulation - the pipe will be poorly insulated (the liquid conducts heat well), the outer liner will heat up, heat up the wall structures, which can lead to a fire. In addition, freezing of the liquid can lead to damage to the pipes, and the acid in the condensate can lead to faster burning of the stainless steel inner liner. At the same time, a small smoke leak in the open air is quite safe, but a large one is clearly visible and can be eliminated by additionally sealing the pipe joint with sealant.
Under no circumstances should you reduce the diameter of the chimney duct opening - this will lead to a decrease or stop of draft.
It is necessary to regularly (2 times a year) clean the chimney channel from soot, and the head from frozen condensate, ice and snow.
How to insulate
The sandwich pipe is already well insulated and does not require additional insulation. An exception is where the pipe passes through a wall or partition. For this purpose, different insulation materials are used, if possible fireproof. Glass wool with a low melting point cannot be used for chimneys; basalt wool cannot be used for coal boilers.
The place where the pipe passes through the wall (sometimes through the wooden structure of the roof overhang) must be insulated with basalt or ceramic wool, foamed vermiculite, or asbestos.
Do not think that asbestos is super harmful - the finished products do not generate dust or emit harmful substances, and the asbestos itself will be closed and isolated from the room with a flange.
Features of working with wooden walls
The peculiarity of wooden walls is their flammability. Therefore, installing a chimney in a wooden house is more difficult than in a stone one. When venting a chimney through a wooden wall, it is necessary to very strictly maintain the distance from the wall to the pipe (at least 260 mm) and perform high-quality thermal insulation of the passage through the wall. It is also important to pay attention to treating the walls with an antipyretic.
The installation of a chimney in a wooden house requires insulation of the wall surface near the outlet pipe of the heat generator and the first mounted monopipe. Insulation is carried out with non-combustible materials - plaster, tiles (porcelain stoneware), stone, fiber cement sheets, sheet metal with an asbestos sheet underneath.
Features of brick and concrete walls
Brick and concrete are resistant to fire - this is a big plus. But nevertheless, insulation in the place where the pipe passes is mandatory, the distance to the wall is at least 130 mm. The rules for installing chimneys were invented for the safety of people, and they should be followed in any case.
Fire safety rules
The distance from the brick wall to the chimney is 130 mm. If the structure is wooden, then this parameter increases to 260 mm. When pipes pass in close proximity to rafters or through flammable materials, these places must be insulated.
Fire protection of a chimney Source petropech.ru
When using solid fuel equipment, the chimney is equipped with a mesh metal spark arrester, regardless of the material from which the building is constructed. The cell size does not exceed 5*5 mm. In addition, there are other rules:
- the chimney head must be positioned correctly relative to the roof;
- to reduce moisture condensation, the temperature at the outlet of the structure should be 15°C higher than the dew point temperature (60°C);
- if the chimney height is less than 5 m, then the installation of an electrically driven smoke exhaust is required.
The outer wall is separated from the structure by an asbestos-cement sheet or basalt overlay.