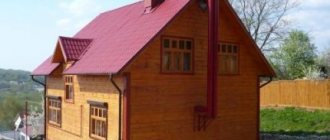
Car owners know firsthand what an unheated car garage is like in the Russian winter, when it’s warmer in the refrigerator. An icy engine does not tend to turn on the first time, the oil freezes, doors and windows are difficult to open, and repair work on the car becomes hard labor. If the user uses his garage as a workshop, then installing a heating system is simply necessary. Making a chimney in a garage professionally and safely for others is not so difficult and will not require a lot of time and money if you listen to the advice of experts.
Types of chimney pipes
Various materials are used to make smoke exhaust pipes.
Initially, depending on the material of manufacture, there are 2 options:
- Take ready-made pipes made at the factory;
- Make pipes from stainless steel sheets or other sheet metal.
https://www.youtube.com/watch?v=qt-N4MB7Zek
The cheapest way is to make your own pipes
The undoubted advantage here is that the pipe will be of the required diameter, which is especially important for homemade potbelly stoves
The second advantage of homemade pipes is cost. To make them, you can use improvised material, or purchase metal sheets with a thickness of 0.6 mm. Or better yet, 1 mm.
An elementary option for assembling a chimney for a potbelly stove involves the use of ready-made steel pipes and a corner element. A smoke channel is assembled from them and welded to a homemade stove:
- A pipe is welded to the top of the stove, constructed from a used gas cylinder. The inner diameter of the nozzle must be equal to the outer diameter of the pipe installed in it
- The smoke channel is assembled according to the design dimensions. The assembly uses a 108 mm pipe and an elbow pipe, the components in the example are connected by welding
- An assembled chimney is installed on the potbelly stove. The outer part of the pipe is connected through a hole in the wall and welded to the main one
The outer part of the pipe is assembled from individual links, taking into account the standard height. The pipe must be at least 50 cm higher than the roof, nearby tall buildings or trees.
Step 2: Assembling the Smoke Channel
Step 3: Bringing the potbelly stove chimney out
Step 4: Construction of the outer part of the pipe
The most common materials are:
In addition to such options, the market offers many other products. Thus, you can find pipes made of heat-resistant glass, from which it is quite possible to build an exotic chimney. But this is done extremely rarely - skill is required to install and connect individual structural elements to each other.
Quite often it happens that the chimney pipe heats up to incredibly high temperatures.
This entails danger, since the risk of fire increases several times!
In order to minimize it, you first need to isolate all combustible elements nearby.
Next, the insulation is laid around the chimney pipe.
This must be done without fail, since without a high-quality thermal insulation layer around the chimney, you risk your life and health every day.
So, let's look at the main reasons for the problem:
- The chimney is made of a single-walled metal pipe without a heat insulator, which is completely unacceptable. It is imperative to replace single-layer chimney sections with sandwich pipes, or simply supplement them with a heat-insulating layer;
- There may be errors in the design of the sandwich pipe. It should be remembered that this design is installed in such a way that condensation formed inside cannot reach the outer surface of the chimney.
Pipes for the chimney system can be made with your own hands or purchased at a specialized store. The main advantage of self-made pipes is low cost. In addition, it becomes possible to make a pipe of the required diameter, which will fit perfectly into any homemade stove.
For manufacturing you will need a metal sheet 0.6-1 mm thick. A sheet of metal is rolled into a tube and secured along the seam using rivets and heat-resistant sealant. However, it is much easier to purchase a finished product. Chimney pipes made of various materials are available on the market:
- become;
- bricks;
- ceramics;
- vermiculite;
- asbestos cement.
You should not opt for inexpensive asbestos cement pipes, since asbestos cement is not intended for use at temperatures above 300°C. A pipe made from this material is heavy, which will cause inconvenience when assembling the system. In addition, the asbestos-cement product absorbs condensation, due to which the functionality of the chimney may be impaired.
The construction of a brick chimney will entail significant costs. Making the correct installation of a chimney for a potbelly stove with your own hands is very problematic, so you will need to contact specialists. The brick structure has considerable weight, which will require additional reinforcement of the foundation.
To construct a potbelly stove, metal pipes made of stainless steel or alloy steel are best suited. Metal products have a number of advantages:
- light weight;
- ease of assembly;
- long service life.
Recommendations
The chimney running outside the building should be collected using condensate. If you collect smoke, condensation can get inside the liner, wet the insulation - the pipe will be poorly insulated (the liquid conducts heat well), the outer liner will heat up, heat up the wall structures, which can lead to a fire.
In addition, freezing of the liquid can lead to damage to the pipes, and the acid in the condensate can lead to faster burning of the stainless steel inner liner.
At the same time, a small smoke leak in the open air is quite safe, but a large one is clearly visible and can be eliminated by additionally sealing the pipe joint with sealant.
Under no circumstances should you reduce the diameter of the chimney duct opening - this will lead to a decrease or stop of draft.
It is necessary to regularly (2 times a year) clean the chimney channel from soot, and the head from frozen condensate, ice and snow.
Insulation of external chimney
The sandwich pipe is already well insulated and does not require additional insulation. An exception is where the pipe passes through a wall or partition. For this purpose, different insulation materials are used, if possible fireproof.
Glass wool with a low melting point cannot be used for chimneys; basalt wool cannot be used for coal boilers.
The place where the pipe passes through the wall (sometimes through the wooden structure of the roof overhang) must be insulated with basalt or ceramic wool, foamed vermiculite, or asbestos.
Do not think that asbestos is super harmful - the finished products do not generate dust or emit harmful substances, and the asbestos itself will be closed and isolated from the room with a flange.
Wooden walls
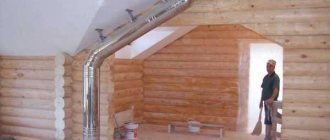
The peculiarity of wooden walls is their flammability. Therefore, installing a chimney in a wooden house is more difficult than in a stone one.
When venting a chimney through a wooden wall, it is necessary to very strictly maintain the distance from the wall to the pipe (at least 260 mm) and perform high-quality thermal insulation of the passage through the wall
It is also important to pay attention to the treatment of walls with antipyretic
The installation of a chimney in a wooden house requires insulation of the wall surface near the outlet pipe of the heat generator and the first mounted monopipe. Insulation is carried out with non-combustible materials - plaster, tiles (porcelain stoneware), stone, fiber cement sheets, sheet metal with an asbestos sheet underneath.
Brick and concrete walls
Brick and concrete are resistant to fire - this is a big plus. But nevertheless, insulation in the place where the pipe passes is mandatory, the distance to the wall is at least 130 mm. The rules for installing chimneys were invented for the safety of people, and they should be followed in any case.
Warm brick
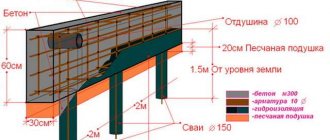
A potbelly stove using wood, coal and other types of fuel can significantly increase its efficiency. To do this, it is enough to build a screen of baked clay bricks around it with your own hands. If you look carefully at the drawings of such a mini-building, you will see that the bricks are laid at a short distance from the walls of the stove (about 10-15 cm), and, if desired, around the chimney.
Bricks require a foundation. Do you want the masonry to last a long time? Then fill the base one at a time to form a monolith. It is better to take concrete as the material for the foundation, which should be reinforced with steel reinforcement yourself. It is advisable to place the reinforcement layer at a distance of approximately 5 cm from the surface of the concrete pad.
Ventilation holes are made at the bottom and top of the brickwork, which will ensure air movement (heated masses will go up, cold air flows will come from below). Ventilation also prolongs the life of the metal walls of the potbelly stove, delaying the moment of their burning due to cooling by circulating air.
Bricks laid around the stove accumulate heat and then release it for a long time, warming the air in the room even after the stove goes out. In addition, brickwork additionally protects objects surrounding the stove from fire.
If desired, you can completely lay out the stove from brick. Such a structure is advantageous in that it will last for many years without additional effort on the part of the owner. However, there are also certain disadvantages. The disadvantages of this option include the following:
- the process of laying out such a stove is quite labor-intensive and is suitable only for those people who have experience in masonry with their own hands;
- a brick stove is quite expensive, as it requires the use of fireproof materials, including fireclay bricks and special clay for mortar.
In order to get a small potbelly stove with wood, it is enough to lay out a cone measuring 2 by 2.5 bricks, 9 bricks high. In the combustion chamber, rows 2-4 are laid out of fireclay bricks. An ordinary fired clay brick is suitable for a chimney, into which you must remember to insert a stainless steel sleeve.
Whatever the method of making a miniature stove or potbelly fireplace with your own hands, whether you make them according to a drawing or by eye, the main thing is that at the end you get an effective heating device, and in an expanded configuration also a hob for cooking. Look around for suitable materials (barrels, sheet iron, etc.) and go ahead to your own homemade stove or even a potbelly stove!
How to make a wood splitter with your own hands? How to install a sandwich chimney with your own hands It’s not difficult to build a chimney for a boiler with your own hands Do-it-yourself metal stove How to make a smokehouse yourself at home or in the country
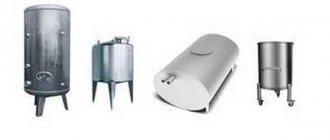
The need to install a heat exchanger
If the stove pipe through which hot gases pass becomes excessively hot, you can cool it by installing a heat exchanger . In this case, excess heat will be used rationally. Such a device can operate in two modes. In the first case, a container filled with cold water is connected to it. As a result of the formation of a temperature difference, condensation occurs, which helps to warm up the device with steam. In this mode, the pipe walls heat up to 100 °C.
Another option for the heat exchanger to operate is to avoid steam condensation and increase the heating temperature of the pipe. According to the recommendations of experts, the heat exchange device in this case should function as a register for heating the liquid.
Nuances of insulation and diagrams of wood-burning stoves for the garage
To maintain a comfortable household temperature inside a single garage, you will need to install a furnace capable of producing 2-2.5 kW of thermal energy; for an operating temperature of 16-18 degrees, 1.8-2 kW will be sufficient.
Wall insulation helps to significantly increase heating efficiency. Usually the thermal insulation layer is placed on the outside, but this is expensive and technically impossible when the garages are wall to wall.
For internal insulation, self-extinguishing types of fiberboard and chipboard are suitable, but not plastic - when heated, it can emit toxic gases, which means this material is incompatible with wood-burning stoves.
Brick garage wood stoves
Brick stoves are rarely installed in garages due to their bulky design. The devices take up a lot of space, and the large internal heat capacity increases the loss of time for heating the oven to operating temperature by 1-1.5 hours. However, in some cases, installing a brick kiln is justified. Here are the most common ones:
- the garage is used as a workshop or semi-residential space;
- the building has sufficient area and high ceilings;
- there are no other garages, residential or household buildings nearby;
- there is no excess moisture in the garage that could harm the solution if the stove is left idle for a long time.
For laying a wood-burning stove, fire-resistant and fireclay bricks are used, and fire-resistant clay is added to the binding solution.
The fuel chamber is equipped at the bottom, usually at the level of the third row; if necessary, windows for the cleaning and ash chamber are provided
Particular attention should be paid to the chimney - its design must ensure effective removal of smoke and soot into the external environment
The design of a classic wood-burning stove made of brick with a cleaning window and without a blower ensures long-term burning of wood and high heat transfer. Due to the relative ease of installation, the devices are often found in practice.
Sheet metal products
Metal wood-burning stoves are popularly known as “potbelly stoves”.
They are a single-chamber structure made of sheet steel, equipped with a chimney pipe and an ash pan in which solid combustion products accumulate.
Often a potbelly stove is supplemented with a platform for cooking. Compared to brick stoves, metal devices have the following advantages:
- compactness and mobility;
- low cost of raw materials;
- high rate of room heating;
- ease of implementation of the chimney, removal of ash and ashes.
To make a potbelly stove yourself, it is enough to have basic skills in working with a welding machine and plumbing tools. Designs designed for installation in single garages are very simple.
In modern hypermarkets of construction and household goods you can find industrial-made potbelly stoves. Obviously, their price will be higher than homemade devices, but such products are reliable and durable.
Use of waste cylinders, device drawings
Empty gas cylinders can be used to make a very convenient wood stove in just a few days. This design combines the advantages of brick stoves and potbelly stoves, allowing you to create a not too bulky, convenient device with long-lasting and intense heat transfer.
Photo 1. Drawing of a stove-stove for a garage from a gas cylinder. Represents the horizontal design type.
If assembled correctly, such a stove provides a thermal power of more than 5 kW, which is enough to heat a large garage. One full load of firewood guarantees 3-4 hours of stable combustion - this indicates the efficiency of the stove. The structure can be easily equipped with a cooking area if desired. Among the types of wood stoves considered, it is the balloon stove that has the optimal ratio of price of materials, efficiency of use and ease of manufacture.
Photo 2. Drawing of a wood-burning stove from a gas cylinder. The design is vertical, the dimensions of the device are indicated.
Which one is better to choose?
Factors:
- type of potbelly stove;
- volume of the furnace section;
- method of connection to the structure;
- indoor location;
- the need to carry the stove;
- chimney material;
- requirements for pipe design.
In fact, the chimney is selected for a specific type of stove, and not vice versa. Otherwise, the heating system will not operate properly. This especially applies to the requirement for a minimum pipe diameter.
If you have experience, you can make the required type of chimney yourself. But all basic rules for calculation and design must be strictly observed. If there is no experience or it is not enough to fully comply with all manufacturing and installation conditions, then it is better to order.
It is worth considering that installation work with existing material also has its own nuances and features.
The choice of material depends on the stove itself, as well as their availability. The choice of material is based on the required design features and the nature of the heating system, that is, whether it is stationary or mobile.
Stone or brickwork is used for permanent installations. A cheaper material would be a galvanized pipe, which has improved properties compared to ordinary sheet metal. It is this material that should be used for collapsible design options, as well as when it is necessary to conveniently replace segments.
The cheapest material is considered to be ordinary tin. There is a nuance here in the form of a requirement for the size of the wall. The pipe must be thicker than 0.5 cm, since otherwise it cannot be installed indoors according to fire safety regulations.
Drawing and diagrams
A drawing is a preliminary diagram in the form of a drawing. But it must indicate the actual required dimensions, which will help to carry out the correct installation based on all the rules and instructions. The drawing is made in any form before installation begins. It is required for installing a chimney according to the regulations of a mini construction project.
The entire system is built on the basis of a proportion of 1 to 2.7, since this is a prerequisite for full traction.
The volume is multiplied by 2.7 and we get the result in millimeters. Example: the oven has a volume of 50 liters. We multiply 50 by 2.7 = 135 mm. For convenience, you can add up to 5 mm, that is, a pipe diameter of 13.5 to 14 cm is suitable.
Installation features
Among the installation, there are several features that are taken into account when working. Rules:
- installation begins from the lower sections;
- the passage through the walls is treated with insulating materials until the pipe is installed there;
- the regulations for the location of joints relative to the walls and ceiling are observed;
- one diameter is used for the pipes of the entire chimney.
The main rule of installation is full compliance with all construction work and safety regulations.
Failure to comply with all regulations for the construction and arrangement of the heating system is also considered a problem. All these miscalculations affect the final result.
Step-by-step instructions for making a potbelly stove for your garage with your own hands
The method of making a potbelly stove depends on its shape and the material used.
Classic stove-stove
To manufacture such a structure, you must have certain skills in working with a welding machine. All work consists of several steps:
- Make 5 blanks from sheet metal.
- Weld the side surfaces to the bottom. Make sure that they are positioned strictly vertically relative to each other, which will be helped by using a level or a building square.
- Weld the back wall.
- The internal space is conditionally divided into three parts: smoke circulation, combustion part and ash pit. In the last two, install a grate. To do this, at a height of 10–15 cm, you need to weld the corners along the entire length. For the grill itself, it is recommended to use thick sheet steel 25–30 mm wide, from which strips must be cut. The distance between the plates should be 5 cm. The rods themselves must be welded to two rods, which give the grille rigidity.
- It is necessary to weld two metal rods on top, which are needed to position the reflector (the sheet that separates the firebox and the smoke circulation); the reflector must be positioned in such a way that a channel for smoke is formed.
- Weld the lid of the potbelly stove, not forgetting the hole for the pipe. Cut and weld the top bridge. Do the same with the narrower part.
- Make a door. It is recommended to do it across the entire width of the stove, so that the grate bars and reflector can be removed without problems during cleaning and repairs. Don't forget that the door should be equipped with a handle, latch and curtains.
- Install the structure on legs, which can be made from a metal pipe with a diameter of 2–3 cm. You should not make them too high. 8–10 cm will be enough. If desired, you can equip them with bolts, which will allow you to adjust the height.
- Make a chimney from a pipe with a diameter of 15–18 cm. To remove it, you need to make a hole in the wall of the appropriate size. The pipe consists of three parts, which are connected to each other at an angle of 45°.
- A rotating damper must be made at the lower end of the chimney pipe. It can also be made from sheet metal, but the diameter should be slightly smaller than the hole in the pipe. It is also necessary to provide a handle that would move this damper.
- The pipe must be fixed on a sleeve measuring 15–20 cm, which is welded along the hole to the top cover.
- Install the stove and adjust its height.
Video: original potbelly stove for the garage with your own hands
Milk can oven
Making such a stove is quite easy, you just need to follow the step-by-step instructions:
- Carefully prepare the container that will serve as the furnace firebox. To do this, you need to clean the inner walls of the can from dirt and rust, if there is any there.
- Knock out a hole in the body of the future potbelly stove through which fuel will be loaded. This can be done using a chisel and a hammer.
- Secure the door hinges to the body, after which you can install the door. Don't forget to make a hook that will hold the door closed.
- It is necessary to make a round hole in the bottom of the container, which will serve as a chimney pipe. The diameter of this hole should be about 10 cm.
- Install a grate made of snake-shaped wire (in this case it is recommended to choose this kind). You can make it yourself. Why bend the steel wire several times and insert it inside the prepared milk can. First you need to take care of supports made of reinforcing rods for the grate bars, which need to be welded to the walls of the container.
- Weld the chimney.
- Install the potbelly stove in the prepared place. A foundation is not required for this, but a small support can be made from red bricks without using cement mortar.
- Place a screen made of refractory bricks around the stove. This will increase the efficiency of the potbelly stove.
Why increase efficiency?
The compact dimensions of the stove mean that the surface that heats up during operation is small. Not much heat flows outside and the room quickly cools down. Sometimes it seems that the return from the potbelly stove is weak.
To help it increase efficiency, several tasks are solved:
- the duration of combustion and smoldering increases;
- a sufficiently high combustion temperature is ensured;
- a high level of traction is achieved.
Standard potbelly stove efficiency
We can talk about the efficiency factor in relation to a potbelly stove in a conditional manner. This parameter is approximately 65-70%.
What can a chimney be made from?
To use a potbelly stove, you will need to take care of smoke removal. To do this, you have to build a chimney, selecting the optimal material.
You can invite specialists to carry out the work, or you can do everything on your own, especially since the amount of work is small.
Types of chimney pipes
Various materials are used to make smoke exhaust pipes. Initially, depending on the material of manufacture, there are 2 options:
- Take ready-made pipes made at the factory;
- Make pipes from stainless steel sheets or other sheet metal.
The cheapest way is to make your own pipes
The undoubted advantage here is that the pipe will be of the required diameter, which is especially important for homemade potbelly stoves
For the chimney of a potbelly stove, you can independently make not only ordinary pipes, but also double ones - sandwich pipes. To do this you will need 2 pipes of different diameters and heat-resistant insulation.
The second advantage of homemade pipes is cost. To make them, you can use improvised material, or purchase metal sheets with a thickness of 0.6 mm. Or better yet, 1 mm.
Moreover, you can also make an insulated chimney pipe by making 2 pipes of different diameters from sheets. Or take ready-made metal ones of different diameters.
In addition to making chimney pipes yourself, you can opt for a simpler and faster option - buy ready-made pipes from the required material. The most common materials are:
In addition to these options, the market offers many other products. Thus, you can find pipes made of heat-resistant glass, from which it is quite possible to build an exotic chimney. But this is done extremely rarely - skill is required to install and connect individual structural elements to each other.
It is not advisable to buy expensive pipes for a potbelly stove. To make a chimney, it is enough to buy metal heat-resistant pipes and adapters for installing the entire structure
The right pipe for a potbelly stove
To make a chimney for a potbelly stove, it is not necessary to construct pipes from metal sheets with your own hands. This will require some skill and time. After all, the sheets will first need to be rolled into a tube of the required diameter, and then the seam must be tightly secured using rivets and heat-resistant sealant. It is much easier and faster to buy the necessary products produced at the factory.
To assemble the entire chimney structure and tightly fasten its individual components, you need to use a heat-resistant sealant that can withstand temperatures from 1000 degrees Celsius
As for the material, it is not worth taking cheap asbestos-cement pipes for these purposes - this material will not withstand if the temperature during the combustion process rises above 300 degrees Celsius. And the pipe itself is quite heavy. It will also absorb condensation. But making a hole to clean out soot or remove condensation will be problematic.
Making a chimney for a potbelly stove out of brick is an unreasonably high expense. Firstly, rarely do any home craftsmen know how to do proper masonry. And secondly, this is a bulky structure that requires additional strengthening of the foundation. A potbelly stove is a temporary heating equipment.
It is optimal to take metal pipes made of stainless steel, or better yet, alloy steel. A structure made of such material can serve as a chimney for 7-10 years. This is provided that the pipes are of sufficient thickness - 6-10 mm or more. And the quality of assembly of all elements of the smoke exhaust system plays an important role.
Another undoubted advantage of metal pipes is their lightness. The light weight allows you to carry out all the work on constructing a chimney for a potbelly stove alone.
Image gallery Photos from Brick is a good material for a chimney, but not for a potbelly stove. This stove requires a simpler and lighter design to remove smoke
When choosing between asbestos-cement and metal pipes, you should give preference to the latter - alloyed metal can last about 10 years
The length of the chimney and the material of the pipes will depend on the type of fuel that will presumably be burned in the firebox. If it is waste oil, but you should forget about asbestos pipes
For a potbelly stove installed in a residential area, you should especially carefully construct the chimney, following all safety rules
Chimney brick
Metal pipe
Potbelly stoves using waste oil
Chimney for potbelly stove indoors
Having decided on the material for the future chimney, you can begin purchasing all the components and constructing a correct and functional structure.
Long-lasting care
To ensure reliable operation of the unit, before each new season it is necessary to carry out simple manipulations to care for the chimney, namely:
- Carry out a visual inspection for possible damage due to rust or any other harmful effects;
- And also clean the pipe from soot. It is better to use special chemical additives added to the burned fuel. When burned, they enter into a chemical reaction with soot deposited on the walls of the pipe, thereby cleaning it.
By following the simple rules for chimney production during installation, as well as periodically checking it, you will get a good heating system for the garage that will serve you for a long time.
Calculation of basic parameters (with drawings and dimensions)
High efficiency of a potbelly stove can only be achieved if all the main design parameters are correctly calculated.
Pipe
In this case, the diameter of this element is very important. The throughput of the chimney should be less than the productivity of the furnace firebox, which is the main distinguishing feature of a potbelly stove. This will allow warm air not to immediately leave the stove, but to linger in it and heat the surrounding air.
It is very important to make an accurate calculation for it. The diameter should be 2.7 times the volume of the firebox
In this case, the diameter is determined in millimeters, and the volume of the firebox in liters. For example, the volume of the combustion chamber is 40 liters, which means that the chimney diameter should be about 106 mm.
If the potbelly stove provides for the installation of grates, then the height of the firebox is calculated without taking into account the volume of this part, that is, from the top of the grate.
It is very important to correctly calculate the diameter of the stove pipe
Screen
It is very important to force the hot gases not to cool, but to burn out completely. In addition, the fuel must burn through partial pyrolysis, which requires extremely high temperatures
A metal screen located on three sides of the stove will help to achieve a similar effect. It should be placed at a distance of 50–70 mm from the stove walls, due to which most of the heat will return to the stove. This air movement will give the necessary high temperature and protect against fire.
The screen of a potbelly stove made of red brick is capable of accumulating heat
Litter
It definitely has to be there. There are two reasons for this:
- some of the heat is radiated downwards;
- the floor on which the stove stands gets hot, which means there is a risk of fire.
The litter solves these two problems at once. As such, you can use a metal sheet with a projection of 350 mm (ideally 600 mm) beyond the contour of the furnace itself. There are also more modern materials that do an excellent job of this task, for example, a sheet of asbestos or kaolin cardboard, at least 6 mm thick.
You can use an asbestos sheet for bedding under a potbelly stove.
Chimney
Despite all the calculations, gases sometimes escape into the chimney not completely burned out. Therefore, it must be done in a special way. The chimney consists of:
- the vertical part (1–1.2 m), which is recommended to be wrapped in thermal insulation material;
- hog (slightly inclined part or completely horizontal), 2.5–4.5 m long, which should be 1.2 m from the ceiling, which is not protected with heat-resistant materials (1.5 m from the wooden surface), from the floor - by 2.2 m.
The chimney must be vented to the street
Fire safety rules
Many people ignore safe installation rules, thereby endangering people and property around them. To ensure safety during operation of the stove, you should strictly adhere to fire protection rules and observe the correct installation of the stove in the garage.
To avoid a possible fire, you should adhere to the rules given below:
- The floor and nearby walls must be made of non-combustible material: concrete, brick, metal or ceramics. Special heat-resistant plates made of fire-resistant material are also used.
- The stove itself must be made of reliable and proven materials.
- Under no circumstances should there be any substances or materials near the stove that are easily flammable or may explode.
- The garage must have normal ventilation to ensure removal of combustion products in case of smoke.
- You should not install the stove close to the car; the distance should be no less than 1.5 meters.
In fact, garage ventilation should be a top priority. Due to insufficient oxygen, a fire can burn weakly, causing serious carbon monoxide poisoning or other serious and tragic consequences.
Exhaust ventilation must be present and in good condition. This will protect the garage from fire and prevent people present from getting hurt.
Principle of operation
Let's take a closer look at the operation diagram of a homemade potbelly stove:
- Combustion air is supplied through the ash pan to the furnace firebox;
- During the combustion process, heat is released, which heats the bricks and walls of the furnace;
- smoke, soot and combustion products are drawn out through the chimney;
- combustion regulation to obtain the necessary heat transfer is carried out by increasing/decreasing the open gap of the blower door;
- a potbelly stove is heated using various types of both liquid and solid fuel (firewood, mining, diesel fuel, coal, peat).
Potbelly stove under development
A potbelly stove, the fuel for which is not wood, but waste oil, has its own characteristics. It can be either a small stove for a regular garage or a device designed for heating large areas. In any case, all models work on the same principle and have similar designs and operating principles.
- The potbelly stove has 2 parts. Used oil is poured into the lower part, where it is heated and brought to a boil.
- The vapors are drawn through a perforated pipe for oxygen access, where their initial afterburning occurs.
- The vapors are completely oxidized and burned in the upper part connected to the chimney.
- The temperature in the lower container is relatively low; the upper chamber heats up to the maximum, heating the room. Its walls can even glow from the heat. Accordingly, this affects the choice of material for making cameras.
Drawing diagram of a potbelly stove during testing with conventional dimensions and proportions.
Let's consider the advantages of potbelly stoves during testing.
- Unpretentiousness and “independence”. There is no need to constantly add firewood or perform any actions; the main requirement is the correct adjustment of the filler neck gap (10-15 mm).
- Efficient heat dissipation.
- There is no soot from the chimney, the stove does not smoke.
- Relative fire safety, since waste fuel is difficult to ignite, and only oil vapors burn.
Flaws:
- noisiness;
- a characteristic odor (sometimes it is eliminated by installing a water circuit or an air heat exchanger with a supercharged fan, which directs part of the air from the chimney to another room for heating);
- the combustion chamber (connecting pipe with perforation) and the chimney have to be cleaned quite often;
- the coked layer of burnt oil in the lower chamber is also quite problematic to remove.
When using a potbelly stove with waste fuel, you must adhere to the mandatory rules.
- It is not allowed to use waste oil with gasoline or other flammable impurities.
- Filtration of waste from solid particles is required.
- Water should not be allowed to enter the mining area.
- Strong drafts are not allowed.
- Compliance with all fire safety regulations when installing a stove indoors.
- Reliable ventilation is a must.
- It is strictly forbidden to leave the stove unattended or sleep while the stove is running.
- Do not use water for extinguishing!
- Horizontal sections of the chimney hood are prohibited. The permissible angle of inclination of the chimney is 45°.
- The chimney should have a length of 4 to 7 m.
- It is recommended to pour waste into the furnace to a height of less than ? volume of the lower chamber.
- It is necessary to have a powder fire extinguisher and/or sand in the immediate vicinity of such a stove.
Materials used
Since we are considering potbelly stoves made of metal, the removal of combustion products should be organized using insulated steel pipes. Brick chimneys are unsuitable for such stoves - due to the roughness of the walls, soot accumulates quite quickly, and the masonry is destroyed by freezing condensate.
It is recommended to make the chimney of a metal stove from the following materials:
- the section of the flue connected to the potbelly stove indoors is made of a stainless pipe with a wall thickness of at least 0.8 mm;
- passage through walls and ceilings, the street part is made of insulated sandwich pipes;
- It is allowed to make a chimney with your own hands from black thin-walled pipes with subsequent insulation.
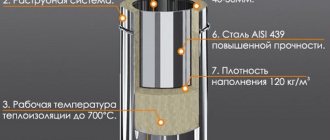
Reference. Modular sandwich chimneys are a three-layer structure - an internal stainless pipe, on top - thermal insulation with basalt fiber and a galvanized lining (a more expensive version of the external lining is stainless steel). The assembly and installation of sandwiches are described in detail in our instructions.
When using thin-walled pipes (3-4 mm) of ferrous metal, sections of the flue will have to be hermetically welded. For insulation, buy basalt fiber in the form of slabs with the following parameters:
- density – not less than 80 kg/m³;
- maximum operating temperature – 600 °C;
- thickness – at least 40 mm.
An ordinary iron pipe must be insulated
Calculation and selection of materials for a potbelly stove chimney is carried out as follows:
- The minimum diameter of the channel is equal to the cross-section of the pipe leaving the stove.
- Calculation of diameter for homemade heaters: the volume of the combustion chamber, expressed in liters, is multiplied by a factor of 2.7, but not less than Ø100 mm.
- The height of the pipe is assumed to be 5 m, counting from the heater grate.
- If the head falls into the leeward zone of the roof, the flue is extended to the height shown in the diagram.
- The length of the chimney is determined taking into account all turns and bypasses of the roof overhang.
To lay it in a dacha through a wall or ceiling made of flammable materials, you need to make passage units - fireproof cuttings. You will need galvanized steel 0.8-1 mm thick and fire-resistant insulation - stone wool.
How to securely ensure tightness?
It is especially important to ensure that all conditions for tightness are met if the chimney pipe is installed vertically upward. For this purpose, a glass is mounted in the ceiling covering, and all seams are carefully treated with an effective sealant
You can use bitumen. It is applied in a thin layer directly to the outside of the chimney pipe. A special protective umbrella, the so-called “mushroom,” helps protect the pipe from moisture and precipitation.
Video: fixing a leak on the roof near the pipe
Leaks appear on roofs near chimney pipes. In order for everything to be sealed and moisture not to get inside the garage, the leak must be properly eliminated. The following video will help you do this efficiently.
https://youtube.com/watch?v=YK8P7vyiWD0
What is needed for installation? Simple tips
Here are simple instructions for installing a chimney for a potbelly stove in the garage with your own hands. You will need three elbows to connect the structural elements, as well as a tee and protection for the chimney opening.
The chimney consists of an outer and an inner part, which are connected to each other. To bring the pipe outside, a special hole is cut in the ceiling. It is also important not to forget to carefully treat all seams with a sealing compound. When there is sealant on the ceiling in the area where the pipe passes, it is removed to ensure fire safety. It is very important to take care of the desired level of traction. And here it is best to get advice from a specialist.
Economical and energy-efficient furnaces for the waste garage
A waste oil furnace is considered the most economical, as it eliminates additional fuel costs. If you correctly calculate the materials and strictly follow the manufacturing instructions, then it will not smoke and excessively pollute the air. Such furnaces are designed to operate on transmission, machine or transformer oil. A diesel furnace for a garage operates on the same principle.
Structurally, the unit consists of two containers that are connected to each other by a perforated pipe with many holes. If a decision is made in favor of installing a waste furnace in the garage, then it is necessary that it meets the following requirements:
- maximum weight – 30 kg;
- capacity – up to 12 liters;
- standard size – 70x50x30 cm;
- average fuel consumption – 1 l/hour;
- the diameter of the exhaust pipe is 100 mm.
A wood-burning garage stove made from two gas cylinders is very economical and easy to maintain
It is quite simple to build such a structure. To create it, you don’t need nozzles or droppers, so you don’t need any special knowledge, skills or experience to make it.
Directly for the manufacture of the furnace you will need the following materials:
- steel pipe;
- two metal containers;
- steel corner.
The container can be the housing of an old, unusable refrigerator compressor or a gas cylinder. A furnace for a garage for mining must be made of a material with a thickness of at least 4 mm, since it is expected to heat up to 900 ° C, so thin metal will simply burn out.
The sequence of manufacturing a stove for a garage that operates during mining
A furnace for a mining garage is beneficial if there are large reserves of it.
The process of creating this type of stove for a garage with your own hands includes the following steps:
- Installing the lower container on the legs. For this purpose, parts 20 cm in size are produced from a metal corner, onto which the container is welded in a horizontal position.
- Cutting a hole in the middle of the lower part of the body, which serves as the firebox and fuel tank, welding to it a vertical pipe connecting both tanks. It is advisable that the top part is removable. This is necessary to clean the burner.
- Drilling about a dozen holes in the pipe at a height of half a meter. The first hole should be located at least 10 cm from the main body of the oven.
- Making a hole on the top of the combustion tank for pouring oil and a lid, which will help regulate the heating level of the room and the combustion process itself.
- Welding the pipe on the upper tank.
- Construction of a galvanized steel exhaust pipe at least 4 meters long and its fastening to the branch pipe.
Painting will give your garage stove a presentable look. For this purpose, a mixture of silicate glue, chalk and aluminum powder is used.
Disadvantages of a furnace for a garage during mining, operating features
In order to avoid emergency situations, it is necessary to use such a stove in accordance with clear instructions. To do this, using the bottom hole of the stove, you need to put a small amount of kindling paper into the fuel tank. Next, approximately 1 liter of used oil is poured in. Set the paper on fire and wait a couple of minutes until the oil boils. When the oil begins to burn slowly, it must be added as needed in an amount of 3-4 liters.
Despite the many advantages of this type of garage oven, it is necessary to mention their disadvantages, in particular:
- a very long chimney, which must be at least 4 meters in height;
- it is required that the chimney device be strictly vertical, without bends or horizontal sections;
- Oil containers and the chimney must be cleaned regularly - approximately once a week.
The oil consumption in the furnace during processing is regulated by an air supply damper and is 0.3 - 1 liter. at one o'clock
The process of creating a heating system in a garage must be approached responsibly so that structures such as a waste boiler, a brick stove, or a DIY potbelly stove are profitable and bring maximum heat. It should be noted that economical options must be carefully looked after, and brick structures require some time for kindling. To create a long-burning metal stove, you will need certain skills and knowledge. At the same time, any of the options considered, under conditions of proper construction and subject to operating rules, will make the garage warm and comfortable.
Traditional methods of furnace modification
Solution #1
The first thing you need to do to modify a homemade or purchased stove is to install side screens. To do this, sheets of metal (not painted) are applied to the furnace body and secured with self-tapping screws or bolts. The thickness of the sheets can be any (standard roofing iron will do). The screens should be located at a distance of 5-6 cm from the stove itself.
This DIY design changes the principle of heat transfer. Thermal energy is now transferred to the room not through radiation, but through convection. Air circulates in the space formed between the surface of the oven and the screens. This technique allows you to increase the rate of warming up the room and save on fuel consumption.
Solution #2
The next step is to modify the stove's chimney - one of the necessary structural elements. Most heating problems occur here. The chimney is usually the cause of large heat losses. In a standard potbelly stove, the chimney pipe is straight and smoke immediately enters it when leaving the room. In order to somehow “retain” hot air in the pipe and thereby increase heat transfer, it is necessary to add several elbows to the straight path of the pipe. For example, two bends at 90 degrees are purchased and connected to each other in the English letter S. Thus, rising hot air and smoke will be trapped in the bends, the pipe will heat up more, thereby increasing heat transfer. And if you add a fan and a blowing chimney at the knee points to such a design, the heat transfer will increase even more.
Solution #3
Now we are modifying the stove in order to save fuel. Partially, the lack of “gluttony” of the potbelly stove has already been eliminated due to the convector, the addition of elbows and a fan. In stoves with a high level of efficiency, heating of the room occurs not due to the combustion of fuel, but, for the most part, due to its smoldering. There is no provision for adjusting the combustion intensity in a classic potbelly stove. But this is easily solved. As is known, oxygen promotes combustion, that is, the intensity of combustion can be regulated by increasing the supply of oxygen.
Why not use this opportunity by changing the design yourself? The function of supplying air to the firebox is carried out by an element of the potbelly stove - the blower. This part of the oven can be modified by making the door as tight as possible. The air supply to the firebox is regulated by opening and closing the door.
Solution #4
The last interesting engineering solution is useful for those cases when the fuel source is exclusively firewood. The design features of the potbelly stove allow the wood to burn out quickly. To save fuel, it is more profitable to burn it with short wood, thus reducing the volume of the firebox. But even in this case, the firewood burns out quite quickly and it becomes necessary to constantly refill it. If you add a number of design additions to the design of the potbelly stove, made on your own and with your own hands, you can extend the burning time of the fuel and increase the heat retention time.
To do this, it is necessary to prepare a blind sealed cylinder (approximate height 400 mm) by welding it from a sheet of steel. The cylinder, which serves as a cassette, is filled with long firewood and installed in the burner hole of the top stove of the potbelly stove. Next, it is necessary to provide the cylinder with reliable support, for example, a welded thrust flange.
After the cassette cylinder is installed upside down on the burner hole, the cut of the housing should be 5-10 mm below the stove. For ease of use, handles can be welded to the cylinder.
When filling the cassette with firewood, you should not overdo it. It is necessary to ensure their free movement when tipping over. Before using the cassette, you need to light the stove and wait for a certain supply of coals to appear. Firewood knocked over from the cylinder will begin to flare up. The main thing in this process is that only part of the firewood pushed into the firebox will burn intensely, while the remaining part will dry out due to the movement of smoke, and then, under the weight of its mass and the mass of the upper layers, will fall into the firebox, where the first ones will gradually burn out. layers.
The cylinder will also heat up from the smoke, releasing heat into the room. Due to this, the heat transfer surface of the potbelly stove increases, i.e. its efficiency increases.
Fuel selection
The size of the potbelly stove can be very different, but the mechanism of operation is similar for all. The combustion material is placed in the firebox.
The cheapest option is to heat the room with wood:
- In the firebox of a potbelly stove, logs are placed in a cage or in rows.
- Then wood chips or paper are placed in the very bottom row to light the logs.
- The door is closed and the intensity of combustion is controlled by blowing.
- Wood fuel smolders for several hours, so the room warms up completely and for a long time.
When installing some models of potbelly stoves, the use of waste oil as fuel is allowed.
Conclusion
Installing an exhaust pipe for a potbelly stove is not a complicated process and can be done independently, without the involvement of specialists. The main thing is to follow fire safety rules, not allow the chimney to come into contact with easily flammable materials and monitor the tightness of the structure.
With a responsible approach to the installation of the potbelly stove and the installation of the chimney, as well as proper operation, no problems will arise when using the heating system. If the entire system is installed incorrectly, then like a boiler or fireplace, a potbelly stove can cause a fire.