Installation features
What needs to be done to ensure that there are no leaks at the points where the pipe joins the corrugated sheet?
To do this, it is necessary to properly seal the joints . Experienced installers note that when solving the problem, it is important to take into account the location of the chimney. The closer the chimney pipe is located to the ridge, the less water gets to its junction with the chimney
In this case, the risk of leaks is reduced.
In addition, the pipe installed as high as possible along the slope has the smallest section located in the cold air zone. This allows you to minimize the formation of condensation, which contributes to the growth of soot inside the chimney. In addition, if condensation constantly forms in the pipe, the walls of the pipe are exposed to acid, which corrodes the metal.
You should separately consider different designs of chimney pipes in order to figure out how to design their joint with a corrugated roofing.
Waterproofing a square chimney pipe
From a technological point of view, for the correct organization of work with your own hands, what is important is not the nature of the roofing material - metal tiles, ondulin, but the cross-section of the chimney - rectangular or round.
Waterproofing the chimney is carried out together with laying a waterproofing membrane on the roof.
- The film web in this area is cut so that the material overlaps the chimney. The film is glued to the walls of the chimney using polymer-bitumen mastic.
- A layer of bitumen mastic is again applied over the tightly pressed edges of the membrane. This waterproofing is already quite reliable, but is not very durable.
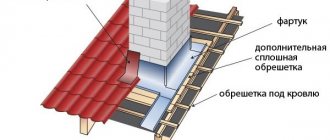
- A sheathing under the apron is fixed on top of the membrane - the second waterproofing element on the roof. The distance between the wall and the slats is 5–10 cm. It is recommended to treat the bars with fire retardants.
- An apron is installed around the chimney, starting from the bottom element. The apron is located 10–15 cm above the roof and covers an area of 20–30 cm around the perimeter of the chimney. Fastening - dowel-nails in increments of 15–20 cm.
- The joints between the elements and the chimney are treated with heat-resistant sealant.
- Then the roofing material is laid over the lower apron. Roof elements made of metal tiles or ondulin are laid end-to-end, making sure that the gaps are as small as possible.
If we are talking about a roof made of corrugated sheets, then a hole is formed in the sheet under the chimney with dimensions 1.5–2 cm smaller than the parameters of the chimney. Cuts are made in the corners of the hole, and the edges of the sheet are carefully folded back. At the stage of laying the roofing, this fragment is put on the chimney and the bent edges are aligned, trying to reduce the joints to a minimum. For waterproofing, a special device is used, such as bitumen waterproofing tape, or roofing felt and water-repellent sealant.
- A metal upper apron, similar to the lower one, is mounted on top of the roof made of corrugated sheets, metal tiles and other materials. You can use adhesive materials like Wakaflex, Master Flash, Onduflesh, etc.
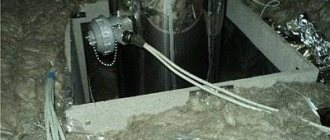
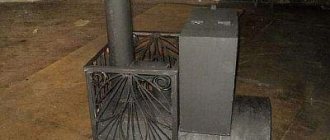
In the photo you can see the installation of an apron around the stove chimney on the roof.
Waterproofing of a round chimney
This need arose due to the widespread use of sandwich pipes, which are very practical and more affordable. It’s even easier to do it yourself, since here the waterproofing is provided by a special device - pipe penetration.
The penetration looks like a box made of steel or aluminum with a cap made of polymer material.
- A wooden sheathing is installed around the chimney, just as was done in the previous case. Roofing material is laid.
- A hole with the required diameter is cut out in the flexible polymer part of the penetration. The device is put on the pipe and pressed against the roofing material.
- The joints are treated with a special heat-resistant sealant. The penetration is secured with self-tapping screws to the sheathing in increments of 7–10 cm.
The video discusses the waterproofing of round and rectangular pipes.
Video description
Watch the video on how to line a pipe:
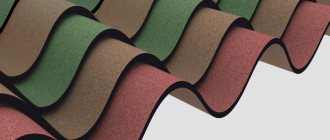
Corrugated sheeting is considered one of the best. Due to its positive qualities, low price and the ability to accept any color from a range of options, it is extremely common. But this material also has a negative side, like any other metal - low sound insulation.
Metal tiles have the same disadvantage. In all other parameters, this material is in no way inferior to corrugated sheeting.
Ceramic tiles are only suitable for cladding inside a building. For this material it is necessary to carry out high-quality preparatory work. Installation must be carried out on a flat surface. But the tiles look great.
Clinker brick is suitable for those who value durability and strength. But not everyone will like its appearance. The main disadvantage is the high cost and weight. Due to the last drawback, reinforcement structures are installed during construction.
Rectangular or square pipe
The brick chimney of a classic stove usually has a rectangular or square cross-section, as this is the simplest shape for installation. The outer casing of a ceramic stove chimney looks similar.
In the standard version, the chimney duct is located strictly vertically, but on the attic floor you can arrange a horizontal section of short length in order to adjust the location of the chimney exit to the roof.
A hole is cut in the roofing pie and the wooden structure mentioned above is installed. After the laying of the pipeline passing through the roof is completed, it is necessary to ensure reliable protection of the passage unit from precipitation. From the inside, from the attic side, a steel sheet is attached to design the penetration area (a hole in it is cut to the size of the pipe, the sheet is put on the chimney in advance). The protective and decorative plate is attached to the edges of the support box using self-tapping screws, and the joint around the perimeter of the pipe is filled with fire-resistant sealant. The inside of the box is lined with asbestos sheets, or the gap between it and the pipe is filled with basalt wool.
Rectangular pipe
From the outside, the edges of the waterproofing, in which a cross-shaped cut was previously made, are placed on the brick pipe. Each of the resulting triangles is cut so that the overlap on the chimney wall is 10–12 cm. The waterproofing is glued to the brick using a special material - an elastic metallized tape with an adhesive layer.
Then the inner apron is installed. The design consists of four strips made of galvanized steel. The upper curved edge of each plank is inserted into a groove made along the brick, and not into a masonry seam. At the corners, the planks are joined with an overlap of 15 mm. All connections are treated with heat-resistant sealant. The side strips should have sides that will direct the flow of water downwards. A metal sheet with sides is placed under the bottom strip - a tie, which ensures water drainage to the lower edge of the roof or to the near valley.
To decorate the exhaust chimney through the roof, install an external apron made of galvanized sheet metal. The material can be painted to match the color of the roof. The method of fastening is the same as for the internal structure, but you can do without fines by treating the joint with a heat-resistant sealant for external use. The edges of the apron, laid on top of the roofing, are secured with galvanized self-tapping screws.
Causes of leaks
On the roof, many holes are made from corrugated sheeting, through which the chimney and ventilation ducts exit; they violate the integrity of the waterproofing layer, leading to leaks. The most difficult thing to do is to waterproof the joint between the pipe and the roofing pie, if the installation is carried out after the roofing work has been completed, in which case it is extremely problematic to ensure a tight fit of the corrugated sheeting to the chimney wall. If the finishing of the pipe passage on the roof is done poorly, the following problems arise in the design:
- Leaks. If the chimney is installed on the roof and the joint between it and the corrugated sheeting is not properly sealed, leaks will occur in the structure.
- Rotting of the rafter frame. The flow of water through the joint between the corrugated sheet and the chimney leads to dampness of the wooden structural elements, and then to rotting and deformation of the rafters.
- Roofing corrosion. When moisture appears under the corrugated sheet, it begins to corrode, since the protection on the inside of the material is not as reliable as on the outside, since the outside of the profiled sheet is covered with a polymer protective film, and the bottom only with varnish.
- Damp insulation. If you do not seal the joint on the roof where the chimney exits, moisture penetrates into the thermal insulation material, reducing the effectiveness of insulation by half.
Installation of pipe passage through the roof
Note! High-quality finishing of the joint between the corrugated sheet and the stove or ventilation pipe is considered the key to long-term operation and reliability of the roofing. To seal this seam, use silicone sealant, a galvanized steel apron, self-adhesive waterproofing tapes, silicone or rubber elastic penetrations
The main difficulties of installing a chimney
The chimney pipe is used to remove combustion products of various types of fuel (gas, coal, firewood, oil products, etc.). Its installation through the roof of the house must be carried out in accordance with the requirements of SNiP 41-01-2003, which are partially outdated. However, this document is guided by supervisory services, so it is necessary to follow the standards specified in it.
The chimney outlet through the roof may be required in the following cases
:
- when building a new house;
- in the process of reconstruction of the roofing system in the presence of a heating unit;
- when installing an autonomous heat supply source in an already operating building.
If the construction of a building or reconstruction of the roof makes it possible to design a chimney outlet taking into account all the requirements, then installing a chimney pipe through a finished roof will create many problems. Typically, this situation arises when the owners of the house want to install a fireplace or stove in an already completed building. If we are talking about an automatic boiler, it is recommended to create a separate extension for the boiler room, or lead the chimney pipe through the wall of the building.
The main difficulty in installing a chimney is that the roofing pie through which the pipe passes largely consists of materials that are not designed for close contact with highly heated objects. The composition of the roofing cake includes
:
- roofing;
- sheathing;
- counter-lattice;
- waterproofing;
- rafters;
- insulation;
- vapor barrier layer;
- internal lining.
Wood, bitumen and polymer materials are sensitive to high temperatures, therefore, according to SNiP, the clearance between a brick, concrete or ceramic chimney pipe insulation and the elements of the roofing pie must be at least 130 mm. If the ceramic pipe is not equipped with insulation, the clearance must be at least 250 mm
. It should also be taken into account that at the point where it passes through the roof, the pipe must have a special thickening - an indentation. Accordingly, a hole of considerable size must be made in the roofing pie. The gap between the pipe and the roof after installing the gas duct needs to be reliably heat and waterproofed in some way.
Negative consequences
A through hole in the roofing pie significantly reduces its performance and durability, since
:
- violation of the integrity of the waterproofing and vapor barrier layers leads to moistening of the insulation, while the thermal insulation characteristics of cotton materials are significantly deteriorated;
- due to the rupture of the thermal insulation layer, the heat loss of the house increases;
- in the under-roof space, air exchange may be disrupted, which provokes the accumulation of moisture and subsequent rotting of the wooden elements of the roof structure;
- the resulting gap not only facilitates the penetration of rainwater into the building, but also the formation of snow pockets in winter;
- if the rafter system is damaged during the hole making process, this significantly affects the strength of the roof.
To avoid problems, the passage of the chimney through the roof should be arranged by erecting its own rafter system (box) around it or installing a standard modular chimney
.
Fire safety
The wooden rafter system and some layers of the roofing pie (waterproofing, vapor barrier) cannot withstand heat and can ignite or melt. The safety of system elements that are not fire resistant is ensured by installing a special box around the perimeter of the hole in the roof.
Violation of safety rules
The box is mounted from a wooden block; it should be located flush with the sheathing, on the outside of the roof. Along the perimeter of the box, on the outside, the edges of the vapor barrier are fixed - a carpet made of roofing felt or other waterproofing material, as well as the edges of the vapor barrier membrane on the room side, if we are talking about an insulated roof. In both cases, a cross-shaped cut is made in the panel and triangular fragments of material are tucked inside. For fastening, nails with wide heads or staples are used, and sealant or adhesive tape allows you to achieve a tight seal between the materials around the perimeter of the wooden box.
The passage through the roof of the chimney provides for thermal insulation of the chimney with basalt wool or other non-combustible materials. If possible, an air gap of 5–7 cm wide is left between the insulation layer and the chimney itself.
Box insulation with basalt wool
If the installation of a chimney involves the use of a special element - a penetration, when choosing it, first of all, make sure that the element is made of a material that is resistant to temperature changes.
Materials for sealing gaps around pipes
To seal cracks, a variety of available materials are used, divided into two categories:
- Elements that serve to close the space between the pipe and the roof. To do this, they use various decorative aprons and collars, which you can buy ready-made in the store or make yourself. For production, non-corrosive materials are used - galvanized steel, silicone or rubber. The functional purpose of such additional elements is rough sealing of gaps.
- A variety of sealants for filling joints left after rough sealing. This category includes waterproof mixtures based on cement and mastic. Today, many modern sealing materials have appeared on the market, which are much easier to work with and the result of the work is of better quality, for example, adhesive-based tape.
The most commonly used sealants for sealing joints around a chimney are:
- Silicone sealant is a waterproof, frost-resistant material, easy to use and inexpensive. It can withstand temperatures up to 150˚C, so it is often used to seal seams near pipes in baths and steam rooms.
- Bitumen mastic. Before applying it, the base is thoroughly cleaned of dust and dried. The mastic is applied in a layer of 3-4 mm; if the gap around the chimney is too wide, then it is first filled with polyurethane foam.
- Ecobit is a modern waterproofing material that provides high-quality sealing. It is a durable aluminum tape with an adhesive base; modified bitumen serves as a sealing layer. The ecobit tape is glued along the perimeter of the chimney pipe. To achieve maximum effect, the top is covered with a metal skirt.
- Enkryl is a German acrylic-based mastic for sealing problematic seams. The process of waterproofing a pipe is carried out in several stages. The surface of the chimney is degreased using a solvent and the first layer of sealant is applied with a brush. Then the pipe is wrapped with a viscose-based reinforcing fabric and, after impregnation, the next layer is applied. Manufacturers guarantee that a seam sealed in this way will last 10 years.
The method of sealing the seams between the chimney and the roof depends on their size, the roofing used and the shape of the pipe. If the gap is less than 5 mm, then it will be enough to seal it with silicone sealant. To seal wide gaps, more complex methods of sealing seams on the roof are used.
Sealing with rubber aprons
Construction stores suggest using Master Flash rubber aprons or Wakaflex sealing tapes to seal gaps where pipes pass through a roof made of any material:
Master Flash is an elastic penetration on a rubber base in the form of a stepped funnel, reinforced with aluminum mesh inside. It is suitable for roofs with any slope and any roofing material. The rubber apron reliably protects the gap from liquid penetration. To adjust the apron to the size of the pipe, it is cut to the required diameter. The apron is fixed to the slope with self-tapping screws, and to the pipe using a steel clamp. Wakaflex is a rubber tape with an adhesive base. It is used to seal the joints of a soft roof with pipe walls. The inner side is reinforced with aluminum mesh. It has high elasticity, takes any shape, and is easily fixed to the slope. Wakaflex tape is used in combination with decorative aprons and collars.
Note! To eliminate large gaps, a fiber sealant is first compacted into them, and then filled with bitumen mastic or filled with foam. After this, the passage area is decorated with a decorative collar
Please note that collars are produced with a standard angle, which is selected in accordance with the slope of the roof slope and the diameter of the chimney. The main condition for long-term operation of the roof is maximum tightness, which is achieved by isolating even minor gaps. Whatever sealing method you choose, remember that reliable protection against moisture penetration is more important than an attractive appearance.
Sealing a square pipe on a slate roof
A slate roof adds its own nuances when it comes to creating a sealed pipe. Because of the slate, it is impossible to use any other parts for insulation, so the protection effect was achieved through a cement-sand apron, which was created as follows:
- All cracks must be covered with
galvanized steel collars. This material does not corrode and can last a long time. - The cement-sand mortar is poured
so that it is above the roof level. If a cardboard cylinder was used in the process, then the procedure will be easier and simpler. - Water drainage
must be carried out using an inclined ledge, which must be located on the side of the ridge.
When sealing a chimney, do not forget about water outlets Source dom.dacha-dom.ru
If, for convenience, when pouring, a cardboard cylinder with plastic film or a plastic side was used, then these parts must be removed after the mass has hardened. Despite its appearance, this method of sealing is in no way inferior to alternative ones, which cannot be used on a slate roof.
Sealing round multi-layer chimneys
It is much easier to install sealing on modern round chimneys. The simplicity of the process is due to the fact that no additional equipment is required, since the pipe is already equipped with everything necessary. Installation takes place in three stages:
- Prime the edge of the pipe
where the waterproofing will be attached. - Make a hole in the waterproofing
, then glue it to the pipe using mastic. - The sheet must be attached to the sheathing
. The pipe is passed through a cap, between which a clamp with a heat-resistant gasket should be located.
Round metal chimneys Source pinterest.com
If there are no caps, then flexible elastic seals for pipes are used instead. The sealant can also be used anywhere else where roof insulation needs to be improved.
Sealing a pipe on a bitumen roof
In this case, the chimney must be sealed using Wakaflex tape. In this case, the following procedure
:
- Creating
a cutting from tape. - The cutting
is pressed using the case. - Any gaps
that appear must be sealed using bitumen mastic.
Bitumen mastic best protects against bad weather Source www.drive2.ru
The process of chimney waterproofing in the video:
Sealing on the roof made of metal tiles and corrugated sheets
Sealing on a roof with such a roof is only possible when using an abutment strip. When sealing a chimney on a corrugated roof, the following procedure
:
- Decide
on the installation location of the chimney. - Partially remove
the waterproofing membrane in this area. - Create
a metal apron, which should be assembled from the outer and lower abutment plans. - Lay
roofing material on top. - The resulting joints must be treated with sealant
.
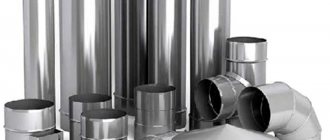
Sandwich pipe design
Everything related to heating equipment is associated with the risk of fires, especially in wooden houses. Statistics say that more than half of fires occur because homeowners did not install the chimney correctly with their own hands. To facilitate this task and protect the house from fire, sandwich chimney pipes are used. At first glance, they look like ordinary stainless steel products, but in fact they have a three-layer structure:
Sandwich pipe design
- Inner circuit. A round cylinder made of high-strength stainless steel with a thickness of at least 1 mm with the addition of zinc or molybdenum. The inner pipe is made of a sheet of metal, using welding to obtain a sealed seam. Due to its high anti-corrosion properties, alloy steel is not damaged by interaction with water.
- Insulating layer. Between the inner and outer contours there is an insulating layer that performs two important functions: it “locks” the heat inside the pipe, preventing it from heating the surrounding materials, and it does not allow the smoke to cool down while passing through the pipe, so that soot does not settle on its walls. As thermal insulation, fibrous materials with the highest fire resistance class with an operating temperature of up to 700 degrees are used, for example, basalt-based mineral wool. The insulation layer between the contours is 40-60 mm, and the insulation density is 12o kg per cubic m.
- External casing. The outer shell of a sandwich pipe is made of stainless steel or another type of metal. The seam of the casing is made using laser welding, which does not damage the galvanic layer of stainless steel, which protects it from corrosion. The cost of brass and copper pipes greatly increases the cost of laying a chimney, and the installation is justified by its spectacular appearance.
Sandwich pipes consist of additional elements: straight sections, bends, tees. The diameter of the products depends on the manufacturer, so it is necessary to buy all the parts of the chimney from the same company, which are ideally suited to each other.
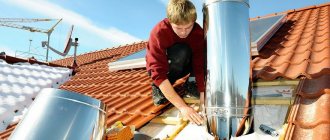
Installation of Master Flash on corrugated sheets
It is recommended to additionally use a rubberized insulation nozzle, Master Flash, which will prevent moisture from entering the chimney.
What does the device look like?
The penetration vaguely resembles a pyramid with rounded edges or even round, made of silicone material or synthetic elastomers.
- A rubber pad is appropriate when operating temperatures do not exceed a threshold of 110. Above this threshold, the material begins to melt and subsequently ignite. Does not react very well to chemical compounds that contain mineral oils or fat.
- Silicone pads are more popular due to high operating temperature thresholds, because... the material can easily withstand even heating up to 200 and above. However, Master Flash made of silicone has one drawback - weakness to sunlight. Therefore, in the southern regions, where it is warm and sunny most of the time, owners of private houses abandon silicone insulation in favor of rubber insulation due to the frequent replacement of the roofing penetration.
On average, the passage is replaced once every 10-15 years, and its installation will not take more than half an hour:
- the pipe is threaded into the penetration;
- Master Flash is adjusted to the profiled roofing sheet;
- fixed with fire-resistant sealant;
- additionally secured with self-tapping screws.
After sealing the chimney, all that remains is to bring it to the desired height and complete the external finishing of the apron.
Workflow - step-by-step technology
Surely you are wondering whether it is possible to install high-quality and reliable ventilation (chimney) yourself and at the same time save not only money, but also time - our answer is positive. The sections below will describe detailed instructions to confirm that this process is possible for independent mastery.
Stage one - preparatory
Initially, you should prepare everything necessary for subsequent work:
- Purchase a pipe, if not available, and fire retardant material.
- Fastening materials.
- Tool: Building level.
- Welding machine - in case the pipe has to be joined.
- Screwdriver.
- Hammer.
- Jigsaw and grinder.
- Wooden beam.
- Finishing material.
Stage two - roof preparation
Now let's move on to the process where you already need to work with your own hands:
- To begin with, on the roof we measure the distance from any rafter beam, which is half a meter plus the diameter of the ventilation pipe.
- We build another beam in the indicated place to increase the stability of the roof.
- Using a regular plumb line from the center of the measured distance, we measure a point on the floor of the attic or attic.
- Around this point we attach a vertical and horizontal beam so that there is an equal distance from each edge to the pipe (its center is the measured point).
Instead of timber, you can use a metal profile
We drill a hole through in the indicated place so that a hole is formed on the ceiling of the first floor. According to the plan, this should be exactly above the stove or half a meter from this place.
As a result, we should get a reinforced box inside which a chimney will be laid. At the same time, it should be installed only in the attic or attic space; in the living room, it is enough to decorate the pipe with finishing materials.
You can avoid the box if you purchase a galvanized pipe casing
The box is necessary for the safe operation of the ventilation system, which often heats up to critical temperatures - protection for both those living in the house and for flammable materials.
Stage three - through hole
Now let's move on to preparing a specific place for the passage of the ventilation pipe in the ceiling of the first floor/floor of the attic:
- If the ceiling is made of wood, you can cut a circle of the required diameter using a chainsaw. We remind you that you need to add 15-20 sms on each side to the diameter of the pipe itself.
- If you have to work with a concrete slab, then a long drill and a hammer drill will help you with this - the tool drills many holes in a circle. A very weakened piece of the slab is knocked out with a sledgehammer.
It is wooden floors that need to be given more attention, for example, the chimney in a bathhouse is the most dangerous area
Let's move on to opening the roof. The best option is when the roofing material has not yet been laid, but this is only possible if the house is at the construction stage.
We will deal with the process of installing a chimney after the facility is put into operation:
- Before removing the pipe through the roof from the corrugated sheet, we cut the material so that it can be bent and left in this position for a while.
- If you are faced with tiles, then all that remains is to carry out only partial dismantling in the place where, according to the plan, the pipe will come out (with a small margin).
- Now that we have a through hole, we can insert the ventilation pipe into the “hole” on the roof.
- Fixation of the chimney itself is carried out by installing collapsible clamps, which in turn are attached to the protective box we built.
- We close the hole in the roof, from the attic side, with an asbestos sheet that will not heat up.
- Now, using the steam film, we attach it to the walls of the pipe box using furniture staples.
The place where the stove stands and connects to the chimney must also be secured using fire-retardant materials
We connect the free end of the pipe to the furnace; it is better to use a welding machine for this; this method ensures the tightness of the connection. You can also use a connecting clamp, but here everything depends on the ideal shape of the products - if there are no defects, then the tightness will be decent. (See also the article Metal pipe clamps: features.)
Roof cutting of round pipes
To seal sandwich-type pipes made of stainless steel or round ceramic pipes, roof penetrations with a metal or polymer cap are used. In addition, to protect wooden structures from overheating, it is necessary to install a thermal insulating box made of non-combustible material at the place where the pipe passes through the roof, and fill the space between the walls of the box and the pipe with a non-flammable heat insulator. Stone or basalt wool is used as a heat insulator; their melting point is significantly higher than that of the chimney in operating mode.
Exiting the pipe to the roof and installing the cutting
Purchase or make your own pipe from thin-walled metal. Its dimensions must provide a fire-prevention distance from the pipe to flammable structures - at least 25 cm in any direction. The pipe has the form of a box with a lid, with holes on both sides equal to the diameter of the pipe. The pipe must be finished with fireproof insulation - the figure shows finishing with basalt wool with a heat-reflecting layer. You can secure it using heat-resistant sealant and metallized tape.
Pipe for passage through ceilings
Mark the place where the pipe passes through the ceilings and cut a hole in it to the size of the pipe using a jigsaw to cover the entire thickness of the heat-insulating “pie”. Install the pipe.
Hole in the ceiling for the pipe
The chimney is removed from sandwich-type pipes through a hole in the pipe, the gaps are treated with heat-resistant sealant with an operating temperature of up to 1000 degrees. Insulation – basalt wool – is placed between the walls of the box and the pipe. The passage is closed from below and above with lids and secured with self-tapping screws.
Installation of pipes in ceilings
Mark the place where the pipe passes through the roof and cut it out in the same way. In this case, the hole will not have a square, but a rectangular shape due to the slope of the roof. Install the lower cutting apron. It is chosen depending on the slope of the roof - the steeper the slope, the more elongated the hole will be.
Hole for pipe exit to roof
Continue installing the pipe through the cut hole; the apron can be temporarily lowered down. The pipe must be tightened with clamps and secured to the roof structural elements with brackets.
Pipe outlet to the roof
Bring the pipe to the roof to the required height
In this case, it is important to follow the rule: the connection of the elements should not be located in the place of passage through the roof or ceiling; if the dimensions of the pipe do not allow it to be made, it is necessary to trim one or more elements. It is better to install clamps securing the pipe at the joints, and seal the joints - this ensures maximum stability of the pipe and fire safety
Roof pipe installation
After the pipe is installed and brought out, the lower apron is secured, and the roof groove of the selected type is put on the pipe. The figure shows a roof section with a metal apron laid on top of the roofing covering - corrugated sheeting. The upper edge of the apron is placed under the overlying sheet of corrugated sheet, and its side parts are cut so that they are in the upper part of the wave of the metal sheet. With such a design and a large roof slope, water will not flow under the apron.
Installation of apron and cutting
For other types of roofing, roof sections of a different type can be used, for example, metal-polymer or with a lead apron.
Different types of roof grooves for round pipes
When using a flexible cutting made of silicone or rubber, a hole is cut in the cap 1/5 smaller than its diameter. The cap is pulled over the pipe and the flexible apron is given the shape of a sheet. They are secured with self-tapping screws, having previously been coated with sealant. For a more durable fastening, it is sometimes necessary to strengthen the roof sheathing - this is done at the stage of cutting out a hole in it.
Installation of silicone groove
A flexible lead apron can also be bent to the shape of a roofing sheet, but when purchasing it, you should take into account the angle of inclination of the slope. The upper edge of the apron must be placed under the overlying sheet of slate or metal.
Cutting with flexible lead apron
Ondulin roofing
Making a chimney passage through an ondulin roof is not easy, but you can still do the job yourself. The fact is that the ondulin coating is flammable. Therefore, in order to organize the outlet of the chimney pipe, you need to make a large hole in the ondulin coating.
To prevent the hole in the ondulin coating from becoming a leak site, the roofing parts are installed through passages, that is, the exit is organized through a metal roof groove with an apron. The cutting angle is selected depending on the steepness of the ondulin roof slopes. When installing the cutting, its ends are inserted under the located sheets of ondulin
Chimney box
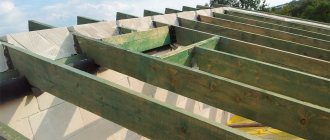
In order to properly remove the chimney through the roofing pie, you should install your own rafter system around the pipe. It must be separated from the chimney at the distance specified in SNiP. The structure consists of side rafter legs and horizontal transverse beams at the bottom and top, which are made of timber of the same section as the rafters.
To insulate the structure, it is necessary to use non-flammable heat-insulating materials, such as glass wool or stone wool - it is stuffed between the pipe and the wooden structural elements.
When passing a chimney through the roofing pie of a roof in use, the vapor and waterproofing is cut crosswise, like an envelope, the edges should be tucked in and attached with nails or staples to the rafter system.
Waterproofing a chimney on a roof requires special attention. When installing a duct for a pitched roof chimney, the vapor barrier and waterproofing membrane are fastened as follows: the edges of the films are folded up and tightly fixed with brackets to the duct; in addition, the fastening points should be additionally sealed using sealing tape or some other adhesive material. On the outside, protective elements are installed on top of the roofing covering to prevent moisture from entering the joints between the box and the roofing pie.
It is important to consider that installing a duct can negatively affect air exchange in the under-roof space. To avoid deterioration of moisture removal, you can install additional ventilation systems, for example, roof tiles, roof aeration grilles, etc.
The slope is a small roof of its own that drains water and snow from the pipe. Its installation is quite complicated, since the slope includes all layers of insulation; in addition, it must be properly combined with the main roof using shaped elements. To avoid installing a bend, it is worth making a smaller pipe.
Using ready-made kits
Standard modular chimneys (“sandwich”) can significantly simplify the process of running a pipe through the roof. A wide range of materials are used for the manufacture of structures, including
:
The choice of a modular chimney depends on the fuel used, since they differ significantly in their technical characteristics. The advantage of such systems is the ability to install the pipe not at a right angle. This is especially true when installing a chimney in a building in use and allows you to choose almost any place to install a fireplace, stove or automatic boiler.
A modular chimney passes directly through the roof, consisting of parts such as
:
- deflector (a device that increases draft in the chimney by using a flow of hot air);
- clamp for guy wires (allows you to additionally secure a tall pipe on the roof);
- skirt (an element protecting the place where the pipe exits through the roof);
- roofing passage (an element with a fixed apron, which is directly mounted into the roofing pie).
Modular chimneys have an attractive appearance.
Steel chimneys can be installed if the temperature of the exhaust gases is no more than 500 °C. Prohibited for installation on coal-fired stoves. For asbestos-cement pipes, this parameter is 300 degrees; such chimneys are also unsuitable for coal stoves.
If the chimney is made of concrete or brick, or a prefabricated passage is installed, the structure should not be rigidly attached to the roofing system. Under the influence of external factors, the roof may be deformed, and these forces will be transferred to the chimney, which may lead to its destruction. When the chimney exits through the roof, all connections between the chimney and the roof are made using flexible elements.
Carrying out penetration depending on different types of roofing
The roof penetration will vary depending on the shape of the chimney and the material that covers the roof. Thus, to install a sandwich pipe, installation of a heat-insulating box is not required, since the insulation here is laid during manufacture. To penetrate the roof of a brick or ceramic chimney, it is necessary to construct a thermal insulation box to protect the building from fire.
Elastic penetration for round pipe
The simplest but most universal penetration exists for a sandwich pipe. It is a rubber or silicone pyramid that is put on the pipe and fixed to the roof. Moreover, the smoothness of the roof covering in this case does not matter much - the elastic insulating apron is equally hermetically attached to the ribbed surface of the profile, wavy tiles, and soft ondulin. Manufacturers offer ready-made flexible penetrations for sandwich chimneys of any cross-section.
Installation of elastic penetration is carried out as follows:
- A hole is cut in the roof for the pipe outlet so that at least 38 cm remains from the pipe wall to the combustible roofing materials.
- A galvanized metal sheet with a hole for the chimney is fixed to the inside of the roof. The distance from the outer wall of the pipe to the edge of the sheet hole is at least 14 cm.
- Remove the pipe and secure it in the desired position.
- The elastic penetration pyramid is cut to a level corresponding to the diameter of the pipe and put it on the pipe through the top.
- The protective apron of the penetration is applied to the chimney passage, having previously coated the edges with fire-resistant sealant.
- A metal mounting ring (flange) with holes is placed on top and secured with self-tapping screws.
For roofs with a steep slope angle, manufacturers produce special elastic penetrations, where the slope of the pyramid and apron is more pronounced.
Metal penetration for round pipe and smooth roof
A metal feedthrough for a round pipe can also be purchased ready-made. It is a metal cone, the upper hole of which corresponds to the diameter of the chimney pipe. When choosing a metal penetration, you need to know the angle of inclination of your roof.
Installation diagram for metal penetration:
- the hole in the roof and the inside of the protective structure are designed as for elastic penetration;
- a passage pipe is put on the chimney, the edges of the lower part are coated with fire-resistant sealant;
- secure the protection with self-tapping screws with rubber caps to seal the mounting holes.
Penetration for rectangular pipe
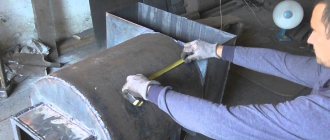
Exiting a brick chimney through the roof has its own characteristics. To complete the penetration you will need a grinder, a screwdriver, metal scissors and galvanized iron sheets or stainless steel.
The installation of the brick chimney penetration begins with the construction of a box for thermal insulation. Its size is calculated based on the cross-sectional size of the chimney plus 15 cm on each side. The material for the box must be non-flammable. Sheet iron or asbestos is used.
The space between the pipe and the walls of the box is filled with basalt wool. This material can withstand significant temperatures and has excellent thermal insulation properties. The lower part of the box is decorated with a metal sheet.
Street protection has a complex composite design. The roofing material for a brick pipe is not of great importance, since in any case it has to be removed when removing it. The drainage tie is installed on top of the roofing covering, regardless of its type.
The penetration-casing consists of the following elements:
- four (according to the number of sides) internal protective wall profiles;
- four external decorative elements;
- drainage tie.
If the protection is installed on top of a flat roofing material, then it is glued with a fire-resistant sealant. When installing under a corrugated pipe (profile, slate, tile), a wall profile is installed on the pipe, securing it into a pre-made groove on the pipe. The upper parts of the apron are placed under the roofing material, the lower parts are secured on top.
Where is the best place to install the pipe?
SNiP 41-01-2003 “Heating, ventilation and air conditioning” contains the main provisions for the installation of chimneys. The height of the pipe directly depends on its location:
- 30 cm from the roof if the chimney is located 1.5 m from the ridge;
- at the level of the roof height, if it is placed 1.5-3 m from the ridge;
- 12 degrees below the ridge level if the chimney is 3-10 m from the ridge.
It is worth adhering to these recommendations, since the traction force depends on this, and condensation can form, which has a destructive effect on the brick.
According to the advice of experts, it is best to install the pipe on the ridge or as close to it as possible, for several reasons:
- this way the smoke will not get into the attic;
- Since a small part of the pipe is in the cold, condensation does not form.
Expert advice
Before purchasing the necessary materials for arranging an external chimney, the power of the equipment is determined. It affects the diameter of the pipes. You can also use these expert tips:
- if the heating equipment is equipped with forced draft, then it is not necessary to increase the vertical section of the structure; it is enough to remove the horizontal pipe;
- a horizontal section that is too long helps slow down the smoke flow (the value should not exceed 1-1.5 m);
Rules for installing chimney pipes Source krovgid.com
Inspection holes are installed not only on the outer part of the structure, but also on the internal horizontal element.
Selecting an output location
Choosing a convenient place to make a hole in the roof from corrugated sheets for the chimney pipe is half the success. Naturally, the decisive factor in this matter is the location of the stove. Professional stove makers recommend positioning the chimney strictly vertically, but there are more subtle nuances:
Scheme of the chimney outlet through the corrugated roof
- It is best to place the hole for the chimney outlet at the highest point of the roof, that is, closer to the ridge. The optimal distance from the ridge to the pipe is 50-80 cm.
- It is advisable that the hole in the corrugated roof for the pipe does not fall on the elements of the rafter system. To bypass them, use bends and corner sections of the chimney. Using them, you can set the rotation to 90 or 45 degrees.
- The length of the chimney pipe segments is calculated so that the joints are located above or below the places where the ceilings and corrugated roofing pass. Otherwise, making a quality connection will be problematic.
- To ensure good traction, the system should be 1-1.5 larger than the roof ridge. If the pipe is too high, the flow of smoke will have time to cool while passing through it, which leads to the appearance of condensation.
To check whether you have correctly identified the exit location of the future chimney, draw a mark on the corrugated roof with a marker and check its temperature at the end of the day - the pipe should be located in the “cold zone”, that is, remain in the shade for almost the entire day.
Preparatory stage of work
To avoid any difficulties during the pipe installation process, you need to prepare the work site and tools in advance. A hole from corrugated sheeting is cut according to the following technology:
After determining the configuration of the chimney, they plan where the exit to the roof will be located. Let us remind you that it is better to place the pipe vertically. The cross-sectional size of the chimney pipes is selected based on the recommendations of the heating device manufacturer. The thicker and higher the pipe, the better smoke removal from the stove
It is important that all segments are of the same cross-section and fit each other, and are inserted without creating a gap. On a corrugated roof, mark the outline of the pipe using a permanent marker. Using a grinder with a thin metal cutter, cut out a hole, moving a couple of centimeters inward from the intended line. You should work with corrugated sheeting carefully and slowly so that the edge of the cut is smooth, without jagged edges that could cause injury during the pipe removal process. You need to make short cuts in the corners of the hole to bend the edges of the corrugated board upward. They cut out the same thing in the ceiling, weigh it
A metal box is installed that will connect the pipe to the rafters. The chimney will pass through the hole inside the box; the distance between their walls should be at least 15 cm.
The insulation, waterproofing film, and vapor barrier membrane are removed from the hole made in the roof. It is necessary that the hole goes through.
Norms and requirements
High-quality installation of the chimney passage through the roof is so important for the safety of the building and residents that the state has officially established the rules and regulations for its arrangement. A document that takes into account sanitary, hygienic, fire, corrosion and other loads on the structure and materials is called SNiP 41-03-2003 “Thermal insulation of equipment and pipelines”.
The pipe installation through the roof is planned during the construction phase. If the stove is reconstructed, replaced or repaired during operation, the chimney is usually left in its old place. The fundamental condition for a high-quality chimney is the location of the pipe relative to the roof ridge.
To ensure optimal traction, the best place to bring the pipe to the roof is its highest point - the ridge. This allows the main part of the pipe to be routed through the attic, which protects it from moisture and cold. The difficulty lies in the fact that it is necessary to violate the integrity of the horizontal beam by installing additional supports on both sides of the chimney. More often, the pipe is installed at a short distance, which makes it possible to limit the street part of the pipe to a minimum of fifty centimeters.
There is the following dependence of the height of the chimney on its distance from the ridge:
- the distance to the ridge does not exceed 1.5 m - the pipe rises 50 cm above it;
- distance from 1.5 to 3 m - it is enough to bring the chimney flush with the ridge;
- when the chimney outlet is more than 3 m away from the ridge, the height of the pipe may be lower than the top point of the roof (the difference should be an angle of 10 degrees).
The optimal pipe height is from 0.5 m to 1.5 m. The outlet is located between the rafters, so as not to violate their integrity and leave a distance of 15-25 cm to them.
If the direct vertical exit of the pipe occurs at such a merger of two roofs, then the roof penetration should be shifted half a meter to the side, adding a horizontal section to the chimney (up to 1 m). Snow and ice accumulate in the recess in winter, which creates an additional threat for leaks.
An unfortunate location for the roof penetration for the chimney is the lower part of the roof. Here the pipe can be damaged when masses of snow and ice melt. In addition, a large section of the pipe has to be taken outside to ensure normal draft, which contributes to its freezing and the formation of condensation on the internal walls.