A modern dousing device with a simple design can be found in almost any bathhouse today. This is an inexpensive but very useful accessory, with the help of which bath procedures become more complete. Many users prefer a bucket-waterfall rather than, say, a cold shower or a pool.
general characteristics
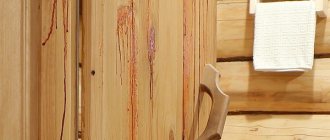
So what is a waterfall for a bath? This is a wooden bucket held together with metal rings. Its volume can be very different, but most often there are buckets of 12-20 liters. It is attached to the wall with brackets. A hose passes over it, from which cool water flows into the container. Usually the bucket is filled before visiting the steam room. It is recommended to choose containers made from environmentally friendly, high-quality material. The most popular materials include stained oak, which is strong and durable.
If there is a pool, then after leaving the steam room they cool down in it. But if such luxury is not available, then a waterfall bucket is perfect for this purpose. This procedure is not only a tradition, but also a way to strengthen the body, while receiving a sea of positive emotions.
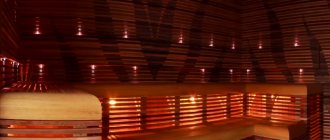
The waterfall system was invented thousands of years ago, but has not yet lost its relevance. For a complete relaxation in the bathhouse, you need all the attributes, not just a steam room and a stove. The pouring bucket has long been present in all baths. The essence of this procedure is to instantly cool the body after warming up in the steam room. The original appearance of the waterfall will decorate the interior of the bathhouse, creating a special atmosphere. In addition, such a structure can be installed not only in a steam room, but in the courtyard of a private house in order to be able to cool down in the hot summer.
The principle of operation of the dousing device
The device, called a dousing device, is a modernized version of a wooden bucket. It was invented by ancient Russian bathhouse attendants. In the old days it was made from birch bark or from a solid log by chiseling a cavity. Later, bathhouses and other containers were made by coopers from neatly planed and polished wooden dies, tightly intercepted by two turns of rope or metal strip.
Two holes were made in the opposite walls of the wooden dousing bucket into which a wooden pin was inserted. A kind of brackets were made from bars or thin logs. They served as a support for the pin along with a dousing container rotating around it. To control the water supply, the bucket was equipped with a rope or a thin chain. In order to trigger a cooling waterfall, you had to simply “pull the string.” If they pulled harder, all the icy contents would fall onto the steamed body in an icy stream. If you weakened the applied force, refreshed yourself slightly - and adjusted the “parameters” of the water supply.
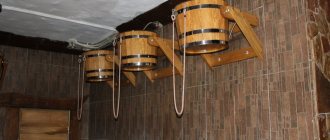
The dousing device was suspended from the ceiling of the bathhouse so that a person standing at full height could fit under it. There were no special rules for its location: they focused on convenience. To keep the water in the dousing bucket pleasantly cool, they tried not to install it next to the steam room. The difficult part was the process of filling the high-hanging container. Nowadays this difficult work is entrusted to a flexible hose connected to the bath water supply. The loud term “device” was obtained due to the installation of a signal-overriding system such as a toilet float. Other radical changes bypassed the main structural elements. Those. The dousing device remained a bucket suspended from the bathhouse ceiling, but much more advanced in terms of comfortable use.
Let us summarize and at the same time describe the main design components:
- A modernized dousing bucket for a bathhouse is a wooden container secured with brackets on the wall with a float system through which water is supplied. Sometimes a plastic or galvanized liner is rigidly inserted inside a wooden container to protect the wood from damage;
- The device is equipped with a float, which spontaneously shuts off the flow of water when the bucket is completely filled with water. When emptying, access to the stream opens again;
- the container is connected to the bath water supply or to a separate storage tank installed specifically for this mini-shower;
- The float valve is connected to the water supply through a pipe with a flexible hose that does not interfere with the rotation of the bucket around the axis of the metal pin, which is used most often; bolted fastenings are less commonly used;
- A ball valve is installed at the entrance to the device to shut off the water supply in order to preserve the bath water supply system.
The presence of water supply in the bathhouse is a favorable condition, but not at all necessary for installing a dousing device. Nobody forbids you to periodically fill it manually.
The container can generally be installed outside to spontaneously collect very useful and soft rainwater. Mandatory for the internal location is a drain ladder through which water will be discharged into the sewer. However, there are exceptions: these are bathhouses with pouring floors and, of course, installing a pouring bucket in an open area outside the room.
Types of construction
Waterfalls come in several models and shapes. Typically, such an attribute is made of wood, since it can withstand temperature changes and is an environmentally friendly material. In addition, the aroma of wood gives this procedure even more pleasant moments. However, not all types of raw materials are suitable for making a waterfall bucket. Most often they are made from the following tree species:
- natural oak;
- bog oak;
- Linden;
- cedar.
Waterfalls come in two shapes - round and oval. Each of them has its own characteristics and advantages. For a small bathhouse, it is recommended to choose a round bucket for dousing. But an oval bucket provides a longer pouring time, since it has a protracted process of pouring water, in contrast to the instantaneous turning over of a round bucket. Another difference between these two forms of waterfalls is where they are installed. An oval bucket requires more space, so the axis for it is installed in the center of the pouring area.
When choosing this bath attribute, you should pay attention to its volume. This can be either 10 or 30 liters. The required volume is determined based on personal preferences and the dimensions of the bath.
Also, when choosing a waterfall, you need to take into account its color so that it fits harmoniously into the interior of the bathhouse. It is best to select a bucket from the same wood from which the interior decoration of the room is made. The most practical and durable are buckets lined with plastic inside, which will reduce the likelihood of leakage and increase its service life.
Choosing the right waterfall bucket
A dousing bucket is a practical, durable and inexpensive device that replaces a cold water pool. It performs the same function: it cools after a steam room, hardens the body, and trains the cardiovascular system. The compact bucket is suitable for a home sauna and takes up minimal space: it can be installed in a washroom or shower corner.
The cost of a sauna sprinkler depends on the following factors:
- volume (10 – 30 l);
- manufacturing materials (the best are solid oak, cedar or larch - types of wood that are not subject to rotting under the influence of water, the most durable and durable);
- accessories (products with a cord are cheaper, but stainless steel chains are more reliable);
- internal coating (stainless steel makes the structure heavier and more expensive, so models with two-component PVC inserts are a smart choice in favor of affordable quality).
Waterfall buckets are not always equipped with an internal coating, but if you don’t want to save as much as possible, pay attention to options with inserts. Models with a protective coating do not dry out or deform for many years, since they are protected from direct contact with water. The design, color and shape of the buckets are varied. The shade depends on the wood (stained oak models are dark brown, ash models are whitish-beige, birch models are golden yellow). Water containers are round, oval and barrel-shaped. Choosing the best option, taking into account the area and design of the bathhouse, will not be difficult.
How to use it correctly
The procedure of dousing with a waterfall bucket begins with psychological preparation for a sharp flow of cold water. After the person is emotionally ready, he should quickly enter the place of dousing and simply pull the rope sharply. The strength of the flow depends on the sharpness of the movement turning the bucket over. If you tug lightly, the cold water will pour out gradually, and with a strong tug, the entire volume of water pours out immediately, instantly cooling the hot body. It is the sharp temperature contrast that provides the healing effect. This procedure should be completed by wiping with a towel.
Methods for making a wooden bucket
You need to start the process of making a bucket for dousing in a bathhouse with a drawing or at least a simple sketch with calculations of the geometric parameters of the future product. The traditional shape of this container is considered to be an upside-down truncated cone with a not too noticeable bell. It should look like a tall tub, only without handles. The volume of the bucket is determined individually according to the size and needs of the family.
Based on preliminary calculations, you should purchase material. To make a container, you need wood that does not react to intense exposure to moisture:
- stained or regular oak;
- larch is also stained or conventionally dried;
- linden, cedar, aspen of ordinary drying.
Stained wood is characterized by optimized resistance and increased hardness due to many years of immersion in water. However, its cost makes you wonder. For DIY processing, it is better to choose inexpensive raw lumber because it is softer.
Option #1 - wooden container made from boards
To make a dousing device with your own hands, you will need a 1st grade radial cut board 10mm thick. You will also need an iron strip with the expectation that it will be enough for two rims with an overlap of 7-10 cm. You need hot-rolled steel up to 2 mm thick, the width depends on the preferences of the master: usually from 30 to 50 mm.
Let's assume that to begin with, we will start making a 10-liter bucket, the height of which will be approximately 40 cm. Its bottom can be made from a solid piece Ø 20-25 cm, 2 cm thick, and not from two or three rivets knocked together. Armed with a hacksaw, a carpenter's drill, a plane with a sherhebel and other tools, let's start making:
- In order not to destroy the wood with inept actions, we will make a template for the bottom and rivets from which the walls of the bucket will be made.
- We saw the boards into pieces of the required length. If they are not smooth enough, we first process them with a plane, then “white” them with Sherhebel.
- Using the template, we trim off the excess from each section of the board so that a slightly trapezoidal riveting is obtained.
- We decide on the outer side of the rivets and mark it with a pencil. At an angle of approximately 3º, we grind the ends of the rivets with a plane so that when connected to each other they can create a circle.
- Stepping back 4 cm from the bottom line of each plank, we cut out a recess. This groove will be needed to install the bottom. There is no need to go deeper into the riveting than 4 mm.
- We carry out the first fitting, holding the planks with a loop of twine. We measure the approximate size of the bottom. Then we number the prepared elements and put them aside.
- Using the template, we cut out the bottom for the bucket from a solid piece. Because The thickness of the workpiece is 2 cm, and the dies will fit to it at an angle; we chamfer along the circumference so that the diameter of the lower and upper surfaces of the bottom becomes less than the preliminary diameter by about 1 cm.
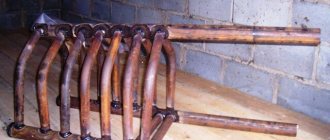
- Cut off the strip for the lower metal rim. Its length will be equal to the sum of the bottom size obtained during fitting and an allowance equal to the width of the strip multiplied by two.
- Using a hammer, we carefully bend the steel strip into a ring, and drill or punch holes at both ends. We insert a five-piece wire into them, from which we make rivets.
- We flare one edge of the hoop we made to give it a slightly cone-shaped shape. Rolling is carried out using the pointed end of a hammer, placing the workpiece on a massive metal stand.
- We prepare two clips from strip scraps - they will serve as a kind of paper clips.
- We fix two rivets with paper clips on opposite sides of the steel rim, turning them towards the rim with the lower truncated part. It is more convenient to hold the future product so that the imaginary bottom is on top.
- Carefully insert the side planks between them. We sharpen the parts if they do not fit into the rim. They all don't have to be symmetrical.
- By analogy, we fill the second side of the bucket with side rivets.
- We turn the workpiece over, insert the bottom into it, and sharpen the parts if necessary.
- Having stepped back about 10 cm from the upper edge, we again measure the circumference and make the upper hoop in the same way as the lower one, and push it down until it stops.
You don't have to pay attention to small cracks. After filling the container with water, the wood will swell and any minor holes will fill in on their own. If a gap has formed of a noticeable size, it is recommended to cut out an additional die.
I must admit: cooperage technology is not very simple, but not particularly complicated either. The video tutorial below should help you figure out how to properly make a practical dousing device. The main thing is to remain patient and carefully adjust the elements of the product, trimming off the excess from the blanks.