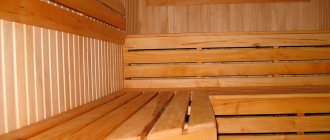
The key to the pleasure you get in a bathhouse is always thoroughly warming it up to the desired temperature. Otherwise, the procedure itself loses all meaning, wouldn’t you agree? The entire load for this part falls on the oven, which must be properly prepared. You can, of course, save yourself the headache about this and turn to specialists. Or you can put in a minimum of effort, but as a reward you will receive a well-prepared oven and a significant amount of savings. How to make a sauna stove from a pipe with your own hands? In fact, using such material as a source allows you to reduce time costs to a minimum - and not at all to the detriment of the final result. The main thing is the availability of the necessary materials and a drawing, according to which you can successfully implement the plan and avoid mistakes that undermine safety.
Vertical or horizontal format?
One of the key issues that you will have to decide if you intend to make a sauna stove from a pipe. Of course, it directly depends on the size of the steam room.
Vertical - ideal for small spaces. The grate bars and the direct firebox are placed in steps, one above the other, which ultimately allows you to save useful space around. The use of this format has recently become noticeably more frequent, especially among professionals. It is better to avoid disputes about which stove is best suited for a bath: make a decision based on your specific situation.
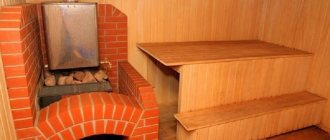
Horizontal is a solution that fits well into the format of spacious bath rooms. At the same time, this is the classic version that is used almost everywhere. Characterized by a slightly enlarged firebox compartment. Often, for practicality, part of it goes into the dressing room, which allows you to speed up the sometimes rather tedious process of kindling.
Agree that it is much more convenient to regulate the temperature from it without wasting time moving from one room to another. In addition, during such “raids” the air actively circulates throughout the bathhouse and prevents its full heating.
What metal is suitable
When selecting and inspecting metal pipes for a future furnace, it is important to pay attention to the following details:
- strength of the metal workpiece;
- pipe thickness;
- no defects or severe metal corrosion.
To eliminate defects, you need to weld patches of a suitable size in problem areas with a small margin.
As for the composition of the metal, it is not recommended to use alloy steel or steel with a high carbon content. The permissible carbon content in steel should not exceed 2%.
You can determine whether a metal is high-carbon or not by the appearance of sparks when grinding with sandpaper or an attachment on a grinder or drill. A high carbon content is indicated by white sparks like stars that pour in different directions. Low carbon content is indicated by yellow sparks that fall in a straight line. Alloy steel produces orange, bright red sparks.
The stove can be made either from a round pipe for a bath or from sheet metal. If in the first case the shape will be close to cylindrical, then in the second the furnace unit will be rectangular.
By choosing a round pipe as a blank, bathhouse owners receive a number of advantages:
- The pipe is easier to work with. Essentially, you have a ready-made firebox at your disposal that does not need to be cut.
- Economical material consumption allows you to reduce money expenses.
- In a round oven, the process of heat and air exchange is many times more efficient.
- The service life of a round stove is longer than a rectangular one made of sheet metal.
In addition to selecting the material, it is important to develop a drawing, a diagram of the future product, indicate the location and method of fastening all structural elements. This will simplify the assembly process of the unit.
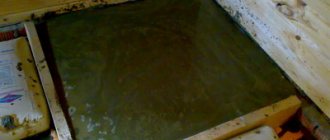
Preparing the foundation
- in the place where you plan to place the stove, make a hole 0.5 meters deep, the length and width can be increased to 0.7 meters;
- approximately 0.3 meters high, fill the prepared hole with very fine crushed stone and carry out thorough compaction;
- prepare a cement composition based on cement-sand in a ratio of 1 to 4, dilute the mixture with water and pour it onto the crushed stone;
- within 24 hours the base will dry and become hard - place several sheets of roofing material on top for reliable protection from moisture;
- prepare a concrete composition of cement, sand, fine gravel and water in a ratio of 1:2:4 and pour it onto the roofing material;
- carefully level the base using a building level;
- after drying, make a brick platform approximately 0.7 meters in width and height;
- also arrange a protective brick screen up to 1.2 meters high - in the future the stove will be located in close proximity to it, approximately at a distance of 0.2 meters.
Important Tips
- To prevent heat from leaving the stove container, an opening valve is installed on the edge of the chimney.
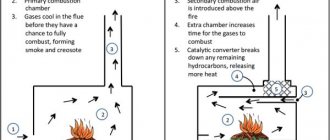
- A fire can be caused by a huge accumulation of soot. To do this, two holes are drilled in the pipe. Steel tubes are inserted into them and turned towards the pipe. This prevents the appearance of soot. The fuel will burn completely, and soot accumulation will be minimal.
- After completing the construction, it must be checked for holes, gaps and cracks.
- There should be no objects around the stove that are susceptible to fire: synthetics, wood and fabric.
- All cut edges of pipes and metal sheets must be cleaned of sharp edges to avoid cuts. If you do not have experience in correctly installing a chimney, then it is better to contact specialists.
- The installation of this furnace should be done on a finished concrete foundation, its height is 250-300 mm. Brickwork with clay mortar is laid on it in one or two rows. A brick screen will protect the walls from overheating.
Horizontal oven - step by step
- prepare a working piece of pipe 0.7-0.9 meters long;
- thoroughly clean all edges;
- cut a fragment measuring 0.8 by 0.4 meters from the prepared metal sheet;
- Weld rods horizontally to the opening in the middle, and a grate in the lower part of the pipe;
- make a remote-type firebox from a metal sheet and make cutouts;
- weld this facade to the base pipe;
- to decorate the back wall, cut out a circle equal to the diameter of the pipe and weld it to the main structure;
- You can make a hole for the chimney in the upper part - a small size, approximately 0.16x0.16 meters, will be enough;
- weld the main vault and the pipe that will be used as a chimney;
- all that remains is to install the doors for the combustion chamber and the blower;
- finishing comes down to careful sanding of the entire body, and then treating it with durable polymer-based paint.
Here are some drawings and pictures that will help you in making a horizontal type oven.
Chimney installation
The chimney is an important component for removing combustion products.
They come in three types:
- Ceramic. A ceramic chimney has the longest shelf life. Maximum resistance to high temperatures.
- Brick. Due to its rough surface, a brick chimney quickly accumulates soot and slows down air draft.
- Steel. A steel chimney is most suitable for a bathhouse due to its affordable price. Also, due to the rapid heating of the metal, a tank is installed and then used for procedures. A stainless steel chimney is the most current. This material is not afraid of water, high temperatures, is not susceptible to corrosion, is lightweight, durable and cheap.
Build process:
- Before installation, you need to mark the location for making the hole.
- A galvanized steel casing is installed on the pipe, after which rings are put on and fixed to the ceiling. The lower pipe is secured with self-tapping screws. The clamps securely fix the chimney.
- The second part is installed on the roof. The holes between the roof and the chimney are filled with expanded clay, clay or asbestos.
Drawings and photos of a horizontal stove made of pipe 530
Very often, a 530 diameter pipe is used to make a sauna stove. It allows for longer combustion of wood, significantly increases the performance of the stove, and is generally more convenient to work with. Therefore, photos and drawings of a stove for a bathhouse made of pipe 530 in horizontal format will be useful to you if you decide to build this type of building. Below we offer you popular options that have been tested in practice.
Design features of a chimney for a steam room
- The chimney is a vertical structure mounted inside the bathhouse or on the facade of the building. Its main task is to remove fuel combustion products at a speed sufficient to maintain natural draft in the furnace.
- A well-designed design ensures quick heating of the bath, maintaining the necessary microclimate in the steam room and economical fuel consumption.
- The most common problems with smoke exhaust ducts: Extremely strong draft, which will lead to rapid burning of fuel without adequate heating of the steam room. Traction too weak. An inadequate amount of oxygen enters the firebox, as a result of which the combustion process is interrupted, and then the thermal conductivity of the stove decreases.
- Proper installation of the chimney is a guarantee of your own safety and the longest possible service life.
Vertical oven - step by step
- prepare the base - a pipe fragment up to approximately 0.9 meters;
- Weld a circle of metal sheet to the bottom of the pipe - it should be equal to the diameter of the pipe;
- cut a hole for the ash pan, its maximum width is no more than 0.2 meters;
- weld a round plate with a pipe diameter, cut out the middle and weld rods onto the hole - this will be the grate;
- decorate the combustion chamber by cutting out a small rectangle above the grate and seal it with a metal door;
- Again, cut a hole above the firebox, weld rods for the grate and hang the door;
- weld the body with a round piece of metal, do not forget about the holes for the chimney and ash pan;
- The traditional finale is sequential sanding of the entire body and painting.
To help you, there are drawings and photos that will help you make your own stove for a bathhouse from a pipe in full compliance with all safety standards. By the way, don’t forget to do the first warm-up in the fresh air - this way you will avoid fumes from the paint you used getting into your respiratory tract. After all, many polymer compounds are frankly harmful to your health. Remember that an iron stove made of pipe is best lined with brick. This way it will be better to retain heat in the steam room, and the air will be protected from those substances that are released into it when the iron warms up.
Decorative finishing
A stove in a bathhouse is not only a source of heat, steam, and increased danger, it can also be a decoration for the room.
If you only care about the safety of the stove, then it is enough to paint it with modern paint to protect the metal from corrosion. The use of heat-resistant enamel based on silicone paints is no different from conventional enamels, but protects metal at temperatures up to +800 degrees. The metal is degreased and then paint is applied. After the first layer has dried, the next layer is applied. It is recommended to paint those metal elements that will be covered with brick and insulation.
The decoration of the stove in the bathhouse can perform a purely decorative function in the form of forged decorations and additional decorative elements of the stove itself. You can use heat-resistant paints of various colors with an antique effect. Decoration can also be used to eliminate the increased danger of a sauna stove.
The stove can be lined with red brick masonry (we have already considered this method), but the masonry on the sides can be decorative, in the form of a grid. On the firebox side, the stove can be covered with a screen made of forged elements or simply with a beautiful mesh fixed in the frame.
It can be covered with a beautiful casing, also covered with heat-resistant paint, in the color you like.
A stove lined with heat-resistant stone will look impressive; this will not only give a noble look to your product, but will also improve the quality of the stove itself.
The decorative decoration of your bathhouse stove depends only on your desire, taste and wallet size.
Drawings and photos of a vertical stove made of pipe 530
As with the horizontal format, the 530-diameter labor is ideal for use if you are making the oven yourself rather than enlisting the help of a professional. A stove for a bathhouse made from pipe 530 vertically will help you make drawings with all the necessary markings. Needless to say, this makes your work much easier, because the most difficult thing is to make the necessary markings. Of course, the proposed options are not an axiom. You are also free to make necessary changes to them. With one condition - if you really know what you are doing!
Possible errors during the manufacturing process
If the finished design does not work as desired, most likely an error was made during the manufacturing and installation of the stove.
If there is a rapid removal of heat from the stove, a movable valve must be installed inside the chimney pipe.
A large accumulation of soot inside a horizontal oven can cause it to catch fire. An afterburner in the form of two metal tubes bent towards the pipe and installed on one of the walls of the structure will help solve the problem. As a result, the amount of soot will be reduced, and the firebox will be better saturated with oxygen, resulting in complete combustion of the wood.
What should you pay attention to when installing a chimney in a bathhouse?
Below are guidelines on what to focus on first.
How to choose the size and shape of a chimney
The small cross-sectional size will prevent the removal of fuel products in the required quantity. The volumetric section, on the contrary, contributes to the movement of smoke too quickly, which will not allow the bathhouse room to be properly heated. This, in turn, will increase fuel costs. You should take this point seriously, since the result will depend on it.
Deciding on the form is easy if you take into account the basic principle of its operation. Chimneys tend to heat up unevenly, as a result of which smoke comes out to the roof surface along the central axis. It follows that the correct shape is a circle. Cylindrical structures heat the room much faster and do not require unnecessary financial costs.
A chimney with a rectangular cross-section provokes turbulence that interferes with the necessary draft. A rectangular configuration is permissible only when we are talking about heating devices that do not require powerful traction.
Pipe diameter
The scale is determined by the degree of power draft of the sauna stove and is located in the intermediate range from 115 to 270 (mm). However, in order to accurately determine the diameter, you need to familiarize yourself with some of the requirements specified by the manufacturer in the instructions. If you do not have a diagram for installing a chimney for a bathhouse with your own hands, then it will be enough to know the ratio of the cross-sectional diameters of different shapes. It looks like this:
- cylindrical – 1 to 10;
- rectangular - 1 to 1.5.
For brick chimneys, the minimum cross-sectional diameter should be 140x140 mm.
The successful operation of a chimney system primarily depends on how accurately the pipe size is determined.
Flue height
According to the standard, its height should be at least 5 meters. The calculation of the height of the chimney is carried out in accordance with the basic technical characteristics of the materials.
The channel should be located at least half a meter above the roof ridge and not below its level. In this case, it is worth taking into account the thickness of the roofing covering and the angle of inclination of the roof slope. The height is selected without taking into account the chimney “umbrella”.
Boiler installation rules
For the construction of a bathhouse, a flammable material is usually used - wood, so compliance with the following fire safety rules is the main requirement when installing a heating device:
- The boiler cannot be placed directly on a wooden floor; it needs a support made of non-combustible material - a brick base, a concrete slab or a thick sheet of metal.
- The room where the boiler is installed must have good ventilation to prevent combustion products from accumulating inside the room.
- To protect the boiler chimney from condensation, it is recommended to carry out thermal insulation measures using mineral insulation.
Advantages and disadvantages of a homemade boiler
The main advantage of a device made from scrap materials is its low cost. An out-of-use gas cylinder, metal barrel and other available materials can be used for the main part of the device.
There may be costs associated with purchasing pipe or sheet steel for housing assembly, fasteners or finished doors, but their total cost is still less than the price of a factory model. Non-ore building materials, cement and brick for constructing a base plate or lining the combustion chamber are required in small quantities and usually remain on the site after the construction of the bathhouse building.
The advantages of a homemade device include its individual dimensions. The layout and small area of the bathhouse may not allow the installation of ready-made factory equipment, but a homemade small boiler will fit well into any small room.
The disadvantages of such a device are:
- Inability to accumulate and retain heat for a long time. The metal body heats up quickly and gives off heat, but immediately cools down as soon as the fuel burns in it.
- The need to install a high pipe to remove smoke and ensure a sufficient level of draft.
- The need for regular cleaning of all departments, and especially often the chimney pipe.
Boiler structure
The boiler design must include the following components:
- The firebox is a thick-walled metal chamber where the fuel combustion process occurs. The bottom of the firebox is a grate through which the ash is poured into the ash pit.
- The ash pan is the space under the combustion chamber. It is used to collect and conveniently remove ash waste, as well as to draw air into the furnace necessary for fuel combustion.
- Kamenka is a special container filled with stones. Carries out redistribution and removal of heat.
- The water heating tank is located just above the firebox.
- A heat exchanger is a small container designed to transfer the energy of burning fuel to a coolant.
- Chimney is a channel necessary for removing smoke. It starts from the combustion chamber, then passes through the tank or heater, heating them and ends with a chimney. To adjust the draft it is equipped with a valve or gate.
Types of structures
Sauna boilers usually have the shape of a metal cylinder or rectangle. In front they have a furnace and blower door, in the back there are heating circuit outlets, and on the side there is a heater door located on the protruding neck.
Cylindrical shape
To make a cylindrical boiler, you can use metal pipes with a diameter of at least 50 cm, barrels with a volume of up to 200 liters, 50-liter cylinders for transporting propane. These products are seamless and already have a cylindrical shape, which is more preferable than rectangular in terms of aerodynamics (air flow) and heat transfer. The orientation of cylindrical boilers can be either vertical or horizontal.
Rectangular
Devices of this shape have a large number of seams, and the cutting of their parts must be carried out with extreme precision. For a person without welding skills, assembling such a structure will be problematic. The orientation of a rectangular boiler does not play a significant role. For greater stability, it can be placed horizontally, if the area allows, of course. A vertical arrangement will save space, but will require additional measures for securing.
conclusions
The level of tilt of the body does not affect the operation of the stove. Therefore, you can install it arbitrarily. It is possible to treat the chimney with a high-temperature compound. This will help eliminate the metallic smell. After several fires, the pipe burns out and turns red. No further oxidation of the metal occurs.
As you can see, you can build a horizontal stove for a bathhouse yourself, if you get acquainted with the main stages of work and the features of preparation. It is important to choose the right materials and find all the necessary tools. If you have basic welding skills, you can make an effective structure that will last for decades.
Recommended Posts
DIY cellar
Wall mounted metal shelves
How to make a birdhouse with your own hands
How to make a swing nest with your own hands
How to make a cellar lid with your own hands
How to make a fountain in your country house
Where can the stove be used?
Homemade stoves, which operate mainly on solid fuel (wood, coal, pellets, briquettes) or waste engine oil, have a wide range of applications. Typically, the following structures are used:
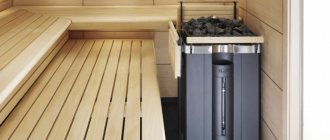
Option for a bath
- In the baths. A sauna stove does not have to be large in size, since hot stones placed in a special box are usually responsible for maintaining the temperature. It is for this reason that the product can be quite simple and compact - the main thing is that its design ensures tightness and high heating efficiency.
- In garages. A pipe stove for a garage can operate on both solid and liquid fuels. The use of such a stove allows you to maintain the optimal temperature in an unheated room, which is sometimes critically important both when performing long-term repairs and when trying to start in the cold.
- In greenhouses. To heat a small greenhouse, it is a pity to buy a professional wood or coal stove - the price is too high. But a simple product made of steel pipes, in which you can burn any wooden waste, will do an excellent job of heating protected soil and protecting seedlings from spring frosts.
The simplest model for heating a greenhouse
- In the kitchens of country houses. For a cottage or country house in which you live permanently, it is better to buy a cast-iron stove with an industrial stove, or build a permanent brick structure. But you can equip a country house with a homemade one: in the warm season we will use it for cooking, and in spring and autumn it will also warm the house quite effectively.
In addition, such heating devices of the simplest design are often used to heat industrial premises - warehouses, workshops, etc. Of course, they are inferior in efficiency to heat guns and buleryans, but if there is an abundance of firewood, and the whole task is to ensure that the worker in an insulated jacket does not get cold and his fingers do not stick to the metal, then they cope with the job.
If necessary, you can also make tea!
Assembly instructions
The entire assembly must be carried out in accordance with the drawings to avoid complications and errors. This design may cause slight difficulties during assembly, since there will be a section for laying stone in the firebox compartment.
- The bottom of the pipe is welded with a piece of sheet metal.
- At a distance of 1-2 cm from the bottom, a 24×8 rectangular window is cut out for the blower. This will give oxygen access to the fuel combustion compartment and where the ash is removed.
- At a distance of 15-20 cm from the upper part of the ash pan, another hole is cut for placing fuel. Its size will be 20-24 cm. Special thin disks are used.
- On top of the firebox there is a chamber into which stones are placed. A round hole is cut at a distance of 12-18 cm from the top of the combustion compartment. Note: the round hole should be 35 cm in diameter, the offset around the circumference of the pipe will be 900.
- The other, with a diameter of 35 cm, is cut to a length that is equal to the outer diameter of the larger pipe. The upper segment is cut by ¾ in the form of a “scapula”, to the border of the anterior edge.
- A blank wall is welded to the rear end, and a plug with a door is welded at the bottom to the front end. Stones will be laid through it and water will be poured in to create steam.
- The cut “blade” is inserted into the hole in the main pipe. Its outer protrusion should be 2-3 cm. There should be a gap inside along the entire perimeter that is completely welded. To enhance the stability of the structure, rods are welded to the body.
- Based on the diameter of the main pipe, a rounded piece is cut out of sheet steel. To fix the grate bars, rectangular holes are cut in a cut out round piece of steel;
- The firebox is welded into the main pipe, parallel to the floor, 2 cm above the upper edge of the vent hole.
- The base of the blower is cut out of metal, based on the outer diameter of the main pipe. Legs are welded under the heater to hold it. Then weld to the bottom.
- The main pipe is the wall for the water heating tank.
- In the cut out bottom of the tank, a compartment is made for the chimney from the edge 3-5 cm.
- A piece of chimney pipe is welded into the hole, protruding at a distance of 10-12 cm.
- The bottom of the tank is installed on the main pipe. Then it is welded 10-12 cm above the stone compartment. The chimney should be located to the side of the “blade”.
- The bottom of the tank is completely scalded. A hole is drilled at the bottom for supplying a water pipe.
- To make a double tank lid, 2 semicircular parts are cut out. One is completely welded, and the other serves to open the tank and is attached to hinges.
- The result should be a stove like this: