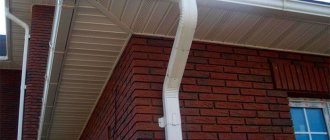
Recently, corrugated sheeting has become often used in the construction of private residential or garden houses. A roof made of this material is not afraid of corrosion, temperature changes, and is not susceptible to fire or rotting. It is considered the most practical, provides maximum waterproofing at a relatively low price. Installation of corrugated roofing is carried out with an overlap; it usually does not cause difficulties. The finishing of the junction of the pipe and the roofing material deserves special attention. In this article we will tell you how to properly and efficiently seal the joint between these elements with your own hands.
The main difficulties of installing a chimney
The chimney pipe is used to remove combustion products of various types of fuel (gas, coal, firewood, oil products, etc.). Its installation through the roof of the house must be carried out in accordance with the requirements of SNiP 41-01-2003, which are partially outdated. However, this document is guided by supervisory services, so it is necessary to follow the standards specified in it.
The chimney outlet through the roof may be required in the following cases
:
- when building a new house;
- in the process of reconstruction of the roofing system in the presence of a heating unit;
- when installing an autonomous heat supply source in an already operating building.
If the construction of a building or reconstruction of the roof makes it possible to design a chimney outlet taking into account all the requirements, then installing a chimney pipe through a finished roof will create many problems. Typically, this situation arises when the owners of the house want to install a fireplace or stove in an already completed building. If we are talking about an automatic boiler, it is recommended to create a separate extension for the boiler room, or lead the chimney pipe through the wall of the building.
The main difficulty in installing a chimney is that the roofing pie through which the pipe passes largely consists of materials that are not designed for close contact with highly heated objects. The composition of the roofing cake includes
:
- roofing;
- sheathing;
- counter-lattice;
- waterproofing;
- rafters;
- insulation;
- vapor barrier layer;
- internal lining.
Wood, bitumen and polymer materials are sensitive to high temperatures, therefore, according to SNiP, the clearance between a brick, concrete or ceramic chimney pipe insulation and the elements of the roofing pie must be at least 130 mm. If the ceramic pipe is not equipped with insulation, the clearance must be at least 250 mm
. It should also be taken into account that at the point where it passes through the roof, the pipe must have a special thickening - an indentation. Accordingly, a hole of considerable size must be made in the roofing pie. The gap between the pipe and the roof after installing the gas duct needs to be reliably heat and waterproofed in some way.
Negative consequences
A through hole in the roofing pie significantly reduces its performance and durability, since
:
- violation of the integrity of the waterproofing and vapor barrier layers leads to moistening of the insulation, while the thermal insulation characteristics of cotton materials are significantly deteriorated;
- due to the rupture of the thermal insulation layer, the heat loss of the house increases;
- in the under-roof space, air exchange may be disrupted, which provokes the accumulation of moisture and subsequent rotting of the wooden elements of the roof structure;
- the resulting gap not only facilitates the penetration of rainwater into the building, but also the formation of snow pockets in winter;
- if the rafter system is damaged during the hole making process, this significantly affects the strength of the roof.
To avoid problems, the passage of the chimney through the roof should be arranged by erecting its own rafter system (box) around it or installing a standard modular chimney
.
Installation of Master Flash on corrugated sheets
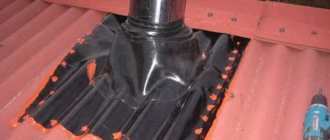
It is recommended to additionally use a rubberized insulation nozzle, Master Flash, which will prevent moisture from entering the chimney.
What does the device look like?
The penetration vaguely resembles a pyramid with rounded edges or even round, made of silicone material or synthetic elastomers.
- A rubber pad is appropriate when operating temperatures do not exceed a threshold of 110. Above this threshold, the material begins to melt and subsequently ignite. Does not react very well to chemical compounds that contain mineral oils or fat.
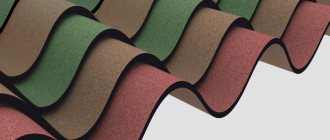
- Silicone pads are more popular due to high operating temperature thresholds, because... the material can easily withstand even heating up to 200 and above. However, Master Flash made of silicone has one drawback - weakness to sunlight. Therefore, in the southern regions, where it is warm and sunny most of the time, owners of private houses abandon silicone insulation in favor of rubber insulation due to the frequent replacement of the roofing penetration.
On average, the passage is replaced once every 10-15 years, and its installation will not take more than half an hour:
- the pipe is threaded into the penetration;
- Master Flash is adjusted to the profiled roofing sheet;
- fixed with fire-resistant sealant;
- additionally secured with self-tapping screws.
After sealing the chimney, all that remains is to bring it to the desired height and complete the external finishing of the apron.
Pros and cons of sealing compound
Homemade polymer sealant is practically not inferior to factory-made analogues intended for roof repair in a private house. Advantages of a composition made from polystyrene foam:
- The price of adhesive-sealant tends to zero. You buy gasoline, use a maximum of 0.5 liters, pour the rest into the car tank or use it in another way on the farm. Any polystyrene foam will do, even small waste.
- The roofing sealant is frost-resistant and suitable for any outdoor work. You can seal roof leaks, cracks on the balcony of an apartment, cracks between the blind area and the wall of a private house.
- If the roof of the house leaks in the middle of winter, the composition can be applied at subzero temperatures.
- High adhesion to various surfaces. The main thing is to remove the dust.
Addition. Home craftsmen use polystyrene foam dissolved in gasoline as glue for joining various materials - wood, plastic, metal.
The junction of roofing iron to a brick wall. Shown on the right is last year's sealant, which is holding quite tightly.
The lifespan of the sealing solution is limited. After 1–2 years, the polymer putty may crack and peel off at the edges. Factory sealants also suffer from a similar drawback, so leaking roofs should be thoroughly repaired - replacing cracked slate, covering it with galvanization, and so on. Covering up is a temporary measure.
Other disadvantages of homemade glue-sealant:
- during the process of preparation and application, the solution emits a strong smell of gasoline, therefore, it is not recommended to seal cracks inside the house;
- the composition cannot be prepared in advance, as it thickens;
- prolonged hardening, after which the crust becomes brittle;
- preparing liquid polymer takes time (30...60 minutes);
- After sealing, the defect site looks ugly.
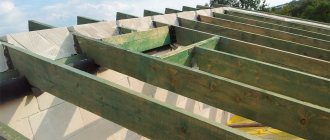
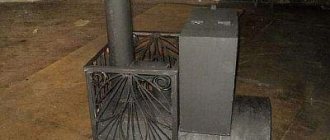
Making boxes
How to insulate an iron chimney pipe was discussed earlier. Now you can move on to the next step. Many people think that making a chimney box is too difficult a task. In reality this is not the case. It is enough to approach the work responsibly and competently.
Required tools:
- Drill;
- Metal scissors;
- Compass;
- Metal sheets;
- Self-tapping screws.
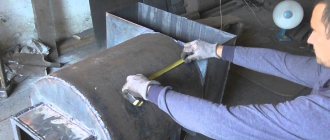
Stages of work:
- Preparing the hole. Along the edges it is necessary to secure the bars, which will act as a support for the body.
- Two blanks are cut from a metal sheet. They are given a U-shape. Then the finished parts are screwed to the ceiling using self-tapping screws.
- Again, two blanks are made, but they are already secured to standing sheets with a small spade. This results in a seamless frame in the ceiling.
- Now the bottom for the box is made from a metal sheet. There should be a hole for the chimney in the center of the workpiece; a compass will be needed here.
- The box contains four two-centimeter fasteners. They are cut out and bent perpendicular to the bottom.
- Walls are attached to the bottom. Now the chimney is inserted into the box, it is additionally secured with clamps. The voids are filled with an insulating layer.
Many people are afraid to make a metal box for the chimney pipe themselves. But it doesn't contain much complexity.
When making a box you need the following tools:
- Metal scissors.
- Galvanized sheet.
- Self-tapping screws.
- Compass.
- Drill.
Further sequence of actions:
- The hole is being prepared. Its edges need to be secured with support beams. They will create support for the box.
- A couple of parts are cut from a galvanized sheet. Along their edges, at a distance of five centimeters, a 90-degree bend is made. These U-shaped parts are fastened with self-tapping screws to prepared holes in the ceiling covering.
- Two more U-shaped blanks are prepared in the same way, and they are overlapped onto the existing sheets. The result is a solid frame for the exit made in the ceiling covering.
- The next part of the action is the bottom for the box. An element is cut out from the same galvanized sheet, the dimensions corresponding to the opening made. In its center, draw a circle with a compass for the entrance of the smoke exhaust billet.
- From the central part of the bottom of the box, 4 fasteners are placed (each of them has a two-centimeter width). Next, they are cut out and bent at an angle of 90 degrees. As a result, a base is formed with a hole and 4 strips for fastening.
- The bottom is attached to the walls. A chimney is inserted through the exit and secured with a clamp. The empty space is filled with an insulating layer.
Using the suggested instructions, making a box is not difficult. If you follow everything exactly, the work will not be difficult even for an inexperienced layman.
How to remove a pipe through a roof made of corrugated sheets
In the sheet of corrugated sheets that will surround the chimney, contours are outlined with length and width parameters corresponding to the dimensions of the chimney. Then, using a grinder, you need to cut a hole with a slight indentation from the contours.
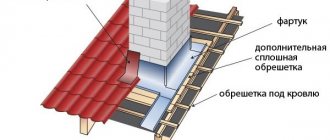
- Holes are also made in the elements of the roofing pie; when calculating their width, it is necessary to take into account not only the pipe’s own dimensions, but also the dimensions of the protective box that will separate the chimney from the contents of the pie. The sheathing at the junction must be continuous.
- How to make a pipe passage through a corrugated roof? The pipe must be tightly surrounded by external and internal aprons. The inner apron is located under the corrugated sheets (with the exception of the part that fits the pipe wall), it is attached to the sheathing. A stainless steel groove extends from it, which should go around the chimney on all sides and goes directly to the ends of the slopes to the eaves strip. Precipitation and condensation will flow down it.
- If the pipe is made of brick, then the edges of the apron adjacent to it must be bent at the ends and inserted into the grooves. Grooves are small holes in the bricks (but not in the seams between them), which are made using a grinder.
There should be a layer of waterproofing under the bottom apron. Waterproofing a pipe on a corrugated roof is carried out in the following order:
- The outer apron is installed on a sheet of corrugated sheeting and is also attached to the sheathing. For the most part, it performs a decorative function, making the joint between the chimney and the roof smoother, but this element also provides additional protection.
- You can make aprons yourself from a solid zinc sheet, or you can purchase a set of ready-made flashing strips. The first option is more complicated, since it requires cutting and bending the edges of the hole in the sheet yourself. But the second option involves additional spending of money.
Sectional installation diagram
Parts of the apron adjacent to the chimney must be sealed with sealant.
It is more difficult to cut holes in corrugated sheeting and in the roofing pie for pipes with a round cross-section than for rectangular chimneys, but their insulation can be done using simple methods. Master-Flash attachments are used for this. These are rubber or silicone products in the shape of a stepped pyramid with a circular cross-section. They fit the chimney tightly and are securely attached to the corrugated sheet.
The base of the nozzle is made of aluminum. The reverse side of the product has a corrugated surface, which increases its tightness.
Installation of a round pipe
So, how to sheathe a pipe on the roof with corrugated sheeting if it is round? Before installing the nozzle, it is necessary to cut off such a number of pyramid rings that will ensure the hole diameter is 20% smaller than the diameter of the pipe. The Master Flush is then pulled down the pipe from top to bottom. The base is glued to the corrugated sheet using silicone and attached to it with screws. The area where the rings of the product meet the pipe is sealed with silicone.
IMPORTANT!
You can only pull the product by its cone. If you apply force to its base, it may become unusable. You can also seal round pipes using self-adhesive lead tapes
You can also seal round pipes using self-adhesive lead tapes.
Basic methods and materials for sealing a chimney
There are several effective methods for sealing a pipe on a corrugated roof, each of which has a number of advantages and disadvantages. Sealing a chimney on the roof is most often done using protective aprons and elastic caps.
Elastic cap
To waterproof circular passages, it is recommended to use an elastic cap. For its production, strong and durable latex is used, which must withstand significant temperature changes and constant exposure to direct sunlight.
The cap is installed in the following sequence:
- The narrow part of the hood must be cut so that the latex fits snugly into the passage.
- Pull the rubber cap onto the pipe until it connects to the roof.
- Attach the base of the cap to the corrugated sheet using a self-adhesive backing. You must first remove the protective layer, and then tightly attach the cap to the roof. Before installing waterproofing, the surface of the corrugated sheet should be thoroughly cleaned of dust and other contaminants.
- The cap is strengthened with self-tapping screws, and the cracks on the roof made of corrugated sheets are sealed using sealant.
- For additional protection, an apron is mounted on top. It can be made in different colors, which allows you to match it to the color of the roof.
Waterproofing a chimney with a round cross-section
Installing the cap is not difficult. The main thing is to purchase this building element of the correct cross-section depending on the diameter of the chimney opening.
Protective aprons
To protect the chimney, not only rubber caps can be used, but also aprons made of various materials. To waterproof a round chimney, it is recommended to use protective aprons made of galvanized steel. In this case, the junction of the apron with the roof is additionally protected with a steel clamp, and all cracks are sealed with sealant.
It is more difficult to seal a chimney with a rectangular cross-section. In this case, the apron should consist of several parts. Sealing in this case occurs according to the following scheme:
- The roof waterproofing is attached to the apron using construction tape.
- It is necessary to make a shallow groove around the perimeter of the chimney.
- The top edge of the strip must be attached to the groove using sealant.
- The protective apron consists of four parts. A separate part is used on each side of the rectangular pipe. The lower part of the apron is tightly attached to the passage. This must be done with an overlap of 10 cm. To fasten the parts, use special self-tapping screws for corrugated sheets.
- To prevent leaks, it is recommended to place a tie under the bottom apron.
- The remaining parts of the chimney seal should be installed using the same principle.
Waterproofing a chimney on a corrugated roof
Waterproofing a corrugated roof is a simple but mandatory process.
It is extremely important to properly seal the joints, as well as choose the optimal material for protective aprons
What installation errors cause a corrugated roof to leak?
Errors when installing a profile sheet roof can result in the roof leaking. At the same time, it doesn’t have to be in the rain; a leak can start in winter, when, it would seem, nothing threatens you. Usually, defects or omissions can be corrected during repairs, but sometimes installation defects are so significant that they require replacement of the roofing material.
When and why?
The corrugated sheet itself is a fairly durable roofing material with a long service life. If the roof has leaked, we start by identifying the situation. There are not many of them:
- A period of heavy, prolonged rain;
- During rains with a certain wind direction;
- In spring, when the snow melts;
- In winter.
After we have recorded specific weather circumstances, we look for the cause in the design. Moreover, sometimes a mistake can be made even at the design stage.
We offer the most private options to choose from:
Ondulin roofing
Making a chimney passage through an ondulin roof is not easy, but you can still do the job yourself. The fact is that the ondulin coating is flammable. Therefore, in order to organize the outlet of the chimney pipe, you need to make a large hole in the ondulin coating.
To prevent the hole in the ondulin coating from becoming a leak site, the roofing parts are installed through passages, that is, the exit is organized through a metal roof groove with an apron. The cutting angle is selected depending on the steepness of the ondulin roof slopes. When installing the cutting, its ends are inserted under the located sheets of ondulin
Sealing with a metal pipe - how to secure it correctly
In addition to elastic penetrations, you can use metal passage pipes, which also help solve the problem of how to attach a chimney to the roof. They can be purchased at construction stores. This element is used to arrange the passage of a chimney through a flat roof. Most often, the pipes are made of alloy steel; they are selected in accordance with the angle of the roof.
Installation of a metal passage pipe is carried out as follows:
- Mark a mark on the roof surface with a marker and cut out a hole of the required size for the chimney to exit onto the roof. For cutting, you can use a grinder or special scissors, retreating 1-2 cm inside the circle.
- Clear the passage for the chimney by removing waterproofing material and insulation. If necessary, cut down elements of the rafter system.
- A fire-resistant material with a hole for the pipe and a size that exceeds the diameter of the chimney by 15-20 cm is fixed on the roof from the attic side.
- Insert the pipe into the hole and connect it to the laid chimney; the joint is tightened with a clamp.
- The pipe is placed on the chimney and fixed to the roof surface using sealant or self-tapping screws.
- The pipe is extended with new segments until the required height is reached.
Sealing with rubber aprons
Construction stores suggest using Master Flash rubber aprons or Wakaflex sealing tapes to seal gaps where pipes pass through a roof made of any material:
Master Flash is an elastic penetration on a rubber base in the form of a stepped funnel, reinforced with aluminum mesh inside. It is suitable for roofs with any slope and any roofing material. The rubber apron reliably protects the gap from liquid penetration. To adjust the apron to the size of the pipe, it is cut to the required diameter. The apron is fixed to the slope with self-tapping screws, and to the pipe using a steel clamp. Wakaflex is a rubber tape with an adhesive base. It is used to seal the joints of a soft roof with pipe walls. The inner side is reinforced with aluminum mesh. It has high elasticity, takes any shape, and is easily fixed to the slope. Wakaflex tape is used in combination with decorative aprons and collars.
Note! To eliminate large gaps, a fiber sealant is first compacted into them, and then filled with bitumen mastic or filled with foam. After this, the passage area is decorated with a decorative collar
Please note that collars are produced with a standard angle, which is selected in accordance with the slope of the roof slope and the diameter of the chimney. The main condition for long-term operation of the roof is maximum tightness, which is achieved by isolating even minor gaps. Whatever sealing method you choose, remember that reliable protection against moisture penetration is more important than an attractive appearance.
Sealing a square pipe on a slate roof
A slate roof adds its own nuances when it comes to creating a sealed pipe. Because of the slate, it is impossible to use any other parts for insulation, so the protection effect was achieved through a cement-sand apron, which was created as follows:
- All cracks must be covered with
galvanized steel collars. This material does not corrode and can last a long time. - The cement-sand mortar is poured
so that it is above the roof level. If a cardboard cylinder was used in the process, then the procedure will be easier and simpler. - Water drainage
must be carried out using an inclined ledge, which must be located on the side of the ridge.
When sealing a chimney, do not forget about water outlets Source dom.dacha-dom.ru
If, for convenience, when pouring, a cardboard cylinder with plastic film or a plastic side was used, then these parts must be removed after the mass has hardened. Despite its appearance, this method of sealing is in no way inferior to alternative ones, which cannot be used on a slate roof.
Sealing round multi-layer chimneys
It is much easier to install sealing on modern round chimneys. The simplicity of the process is due to the fact that no additional equipment is required, since the pipe is already equipped with everything necessary. Installation takes place in three stages:
- Prime the edge of the pipe
where the waterproofing will be attached. - Make a hole in the waterproofing
, then glue it to the pipe using mastic. - The sheet must be attached to the sheathing
. The pipe is passed through a cap, between which a clamp with a heat-resistant gasket should be located.
Round metal chimneys Source pinterest.com
If there are no caps, then flexible elastic seals for pipes are used instead. The sealant can also be used anywhere else where roof insulation needs to be improved.
Sealing a pipe on a bitumen roof
In this case, the chimney must be sealed using Wakaflex tape. In this case, the following procedure
:
- Creating
a cutting from tape. - The cutting
is pressed using the case. - Any gaps
that appear must be sealed using bitumen mastic.
Bitumen mastic best protects against bad weather Source www.drive2.ru
The process of chimney waterproofing in the video:
Sealing on the roof made of metal tiles and corrugated sheets
Sealing on a roof with such a roof is only possible when using an abutment strip. When sealing a chimney on a corrugated roof, the following procedure
:
- Decide
on the installation location of the chimney. - Partially remove
the waterproofing membrane in this area. - Create
a metal apron, which should be assembled from the outer and lower abutment plans. - Lay
roofing material on top. - The resulting joints must be treated with sealant
.
Rectangular or square pipe
The brick chimney of a classic stove usually has a rectangular or square cross-section, as this is the simplest shape for installation. The outer casing of a ceramic stove chimney looks similar.
In the standard version, the chimney duct is located strictly vertically, but on the attic floor you can arrange a horizontal section of short length in order to adjust the location of the chimney exit to the roof.
A hole is cut in the roofing pie and the wooden structure mentioned above is installed. After the laying of the pipeline passing through the roof is completed, it is necessary to ensure reliable protection of the passage unit from precipitation. From the inside, from the attic side, a steel sheet is attached to design the penetration area (a hole in it is cut to the size of the pipe, the sheet is put on the chimney in advance). The protective and decorative plate is attached to the edges of the support box using self-tapping screws, and the joint around the perimeter of the pipe is filled with fire-resistant sealant. The inside of the box is lined with asbestos sheets, or the gap between it and the pipe is filled with basalt wool.
Rectangular pipe
From the outside, the edges of the waterproofing, in which a cross-shaped cut was previously made, are placed on the brick pipe. Each of the resulting triangles is cut so that the overlap on the chimney wall is 10–12 cm. The waterproofing is glued to the brick using a special material - an elastic metallized tape with an adhesive layer.
Then the inner apron is installed. The design consists of four strips made of galvanized steel. The upper curved edge of each plank is inserted into a groove made along the brick, and not into a masonry seam. At the corners, the planks are joined with an overlap of 15 mm. All connections are treated with heat-resistant sealant. The side strips should have sides that will direct the flow of water downwards. A metal sheet with sides is placed under the bottom strip - a tie, which ensures water drainage to the lower edge of the roof or to the near valley.
To decorate the exhaust chimney through the roof, install an external apron made of galvanized sheet metal. The material can be painted to match the color of the roof. The method of fastening is the same as for the internal structure, but you can do without fines by treating the joint with a heat-resistant sealant for external use. The edges of the apron, laid on top of the roofing, are secured with galvanized self-tapping screws.
Causes of leaks
On the roof, many holes are made from corrugated sheeting, through which the chimney and ventilation ducts exit; they violate the integrity of the waterproofing layer, leading to leaks. The most difficult thing to do is to waterproof the joint between the pipe and the roofing pie, if the installation is carried out after the roofing work has been completed, in which case it is extremely problematic to ensure a tight fit of the corrugated sheeting to the chimney wall. If the finishing of the pipe passage on the roof is done poorly, the following problems arise in the design:
- Leaks. If the chimney is installed on the roof and the joint between it and the corrugated sheeting is not properly sealed, leaks will occur in the structure.
- Rotting of the rafter frame. The flow of water through the joint between the corrugated sheet and the chimney leads to dampness of the wooden structural elements, and then to rotting and deformation of the rafters.
- Roofing corrosion. When moisture appears under the corrugated sheet, it begins to corrode, since the protection on the inside of the material is not as reliable as on the outside, since the outside of the profiled sheet is covered with a polymer protective film, and the bottom only with varnish.
- Damp insulation. If you do not seal the joint on the roof where the chimney exits, moisture penetrates into the thermal insulation material, reducing the effectiveness of insulation by half.
Installation of pipe passage through the roof
Note! High-quality finishing of the joint between the corrugated sheet and the stove or ventilation pipe is considered the key to long-term operation and reliability of the roofing. To seal this seam, use silicone sealant, a galvanized steel apron, self-adhesive waterproofing tapes, silicone or rubber elastic penetrations
Getting rid of cracks on a tiled roof
On a tile roof, it is best to seal the cracks with a solution of sand and cement, which will best protect the inside of the building from moisture and precipitation.
To achieve the best moisture insulation, you will need:
- Install a galvanized collar on the roof, thus creating a place for pouring the solution.
- Pour a solution of cement and sand, making sure that it clearly fills the entire space between the roof and the chimney.
- In addition, you will need to make a surface and place it at an angle so that excess liquid flows down it.
Roof cutting: types and options
But we are also interested in protection from water. If we had a modular steel chimney made from a sandwich pipe, we would use a special roof cut.
Currently, there are many different types of roof cuts depending on the method of execution, material and angle of inclination. As a rule, they generally come with a slope of 15-35° or 35-55°, depending on the angle of the roof slope.
Metal cutting
Is it possible to apply this method in our case? You can, or you can use self-adhesive tape for the junction.
Tile roofing - a special approach
What if we have a tile roof and a chimney lined with brick? The treatment of the external chimney is carried out with special care. To treat the chimney, corrugated, self-adhesive sheet aluminum or self-adhesive sheet lead is used.
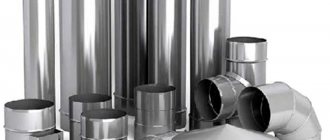
Varieties
The elements differ from each other according to the material of manufacture:
- Brick chimneys. This is a classic option that is reliable and undemanding in terms of finishing. Red brick is used for the production of products. To lay bricks, you must use a special fire-resistant mortar. Lime mortar works well.
- Steel chimneys. This is a budget option, characterized by ease of installation, light weight and a large selection of section sizes. But steel pipes burn out quickly, and their safe service life is relatively short.
- Sandwiches. These chimneys consist of several metal pipes of different sizes placed inside each other. Between them there are layers of thermal insulation. Sandwiches retain the advantages of simple steel chimneys without their disadvantages. The main disadvantages of such structures are the high price and the possibility of depressurization during sudden temperature changes, which can render the pipe completely unusable.
- Modular chimneys. Like sandwiches, these chimneys are multi-layered. They consist of layers of metal and fireclay (fireclay). Between them there is a layer of basalt insulation. The pipe body is made of lightweight concrete. If there is a layer of clay inside, then the chimneys are called fireclay; if there is a metal pipe inside, then the design is called modular.
Steel chimney
Sandwich
Brick chimney
Modular chimney
There are complex pipe designs that cost a lot of money to produce and install. They are rarely used in construction. This includes glass structures.
CAREFULLY!
It is strictly not recommended to use asbestos cement pipes. Their fire resistance is low, and when heated they release carcinogens that poison the surrounding air.
Selecting an output location
Choosing a convenient place to make a hole in the roof from corrugated sheets for the chimney pipe is half the success. Naturally, the decisive factor in this matter is the location of the stove. Professional stove makers recommend positioning the chimney strictly vertically, but there are more subtle nuances:
Scheme of the chimney outlet through the corrugated roof
- It is best to place the hole for the chimney outlet at the highest point of the roof, that is, closer to the ridge. The optimal distance from the ridge to the pipe is 50-80 cm.
- It is advisable that the hole in the corrugated roof for the pipe does not fall on the elements of the rafter system. To bypass them, use bends and corner sections of the chimney. Using them, you can set the rotation to 90 or 45 degrees.
- The length of the chimney pipe segments is calculated so that the joints are located above or below the places where the ceilings and corrugated roofing pass. Otherwise, making a quality connection will be problematic.
- To ensure good traction, the system should be 1-1.5 larger than the roof ridge. If the pipe is too high, the flow of smoke will have time to cool while passing through it, which leads to the appearance of condensation.
To check whether you have correctly identified the exit location of the future chimney, draw a mark on the corrugated roof with a marker and check its temperature at the end of the day - the pipe should be located in the “cold zone”, that is, remain in the shade for almost the entire day.
Preparatory stage of work
To avoid any difficulties during the pipe installation process, you need to prepare the work site and tools in advance. A hole from corrugated sheeting is cut according to the following technology:
After determining the configuration of the chimney, they plan where the exit to the roof will be located. Let us remind you that it is better to place the pipe vertically. The cross-sectional size of the chimney pipes is selected based on the recommendations of the heating device manufacturer. The thicker and higher the pipe, the better smoke removal from the stove
It is important that all segments are of the same cross-section and fit each other, and are inserted without creating a gap. On a corrugated roof, mark the outline of the pipe using a permanent marker. Using a grinder with a thin metal cutter, cut out a hole, moving a couple of centimeters inward from the intended line. You should work with corrugated sheeting carefully and slowly so that the edge of the cut is smooth, without jagged edges that could cause injury during the pipe removal process. You need to make short cuts in the corners of the hole to bend the edges of the corrugated board upward. They cut out the same thing in the ceiling, weigh it
A metal box is installed that will connect the pipe to the rafters. The chimney will pass through the hole inside the box; the distance between their walls should be at least 15 cm.
The insulation, waterproofing film, and vapor barrier membrane are removed from the hole made in the roof. It is necessary that the hole goes through.
Workflow - step-by-step technology
Surely you are wondering whether it is possible to install high-quality and reliable ventilation (chimney) yourself and at the same time save not only money, but also time - our answer is positive. The sections below will describe detailed instructions to confirm that this process is possible for independent mastery.
Stage one - preparatory
Initially, you should prepare everything necessary for subsequent work:
- Purchase a pipe, if not available, and fire retardant material.
- Fastening materials.
- Tool: Building level.
- Welding machine - in case the pipe has to be joined.
- Screwdriver.
- Hammer.
- Jigsaw and grinder.
- Wooden beam.
- Finishing material.
Stage two - roof preparation
Now let's move on to the process where you already need to work with your own hands:
- To begin with, on the roof we measure the distance from any rafter beam, which is half a meter plus the diameter of the ventilation pipe.
- We build another beam in the indicated place to increase the stability of the roof.
- Using a regular plumb line from the center of the measured distance, we measure a point on the floor of the attic or attic.
- Around this point we attach a vertical and horizontal beam so that there is an equal distance from each edge to the pipe (its center is the measured point).
Instead of timber, you can use a metal profile
We drill a hole through in the indicated place so that a hole is formed on the ceiling of the first floor. According to the plan, this should be exactly above the stove or half a meter from this place.
As a result, we should get a reinforced box inside which a chimney will be laid. At the same time, it should be installed only in the attic or attic space; in the living room, it is enough to decorate the pipe with finishing materials.
You can avoid the box if you purchase a galvanized pipe casing
The box is necessary for the safe operation of the ventilation system, which often heats up to critical temperatures - protection for both those living in the house and for flammable materials.
Stage three - through hole
Now let's move on to preparing a specific place for the passage of the ventilation pipe in the ceiling of the first floor/floor of the attic:
- If the ceiling is made of wood, you can cut a circle of the required diameter using a chainsaw. We remind you that you need to add 15-20 sms on each side to the diameter of the pipe itself.
- If you have to work with a concrete slab, then a long drill and a hammer drill will help you with this - the tool drills many holes in a circle. A very weakened piece of the slab is knocked out with a sledgehammer.
It is wooden floors that need to be given more attention, for example, the chimney in a bathhouse is the most dangerous area
Let's move on to opening the roof. The best option is when the roofing material has not yet been laid, but this is only possible if the house is at the construction stage.
We will deal with the process of installing a chimney after the facility is put into operation:
- Before removing the pipe through the roof from the corrugated sheet, we cut the material so that it can be bent and left in this position for a while.
- If you are faced with tiles, then all that remains is to carry out only partial dismantling in the place where, according to the plan, the pipe will come out (with a small margin).
- Now that we have a through hole, we can insert the ventilation pipe into the “hole” on the roof.
- Fixation of the chimney itself is carried out by installing collapsible clamps, which in turn are attached to the protective box we built.
- We close the hole in the roof, from the attic side, with an asbestos sheet that will not heat up.
- Now, using the steam film, we attach it to the walls of the pipe box using furniture staples.
The place where the stove stands and connects to the chimney must also be secured using fire-retardant materials
We connect the free end of the pipe to the furnace; it is better to use a welding machine for this; this method ensures the tightness of the connection. You can also use a connecting clamp, but here everything depends on the ideal shape of the products - if there are no defects, then the tightness will be decent. (See also the article Metal pipe clamps: features.)