Errors when installing a roof are unacceptable. This affects the integrity of the structure and its durability. Ondulin has earned trust with its qualities and characteristics. And if you managed to install the roofing material, then another problem arises: how to remove the pipe through the roof from the ondulin. After all, you will have to make a hole in it that needs to be properly sealed.
In fact, the work is not difficult, since the manufacturers themselves provide detailed instructions and videos on how to do the job. With them, the pipe on the roof made of ondulin will not violate the integrity of the roof. We will look at the features of ondulin and the technology itself for removing pipes, ventilation or chimneys.
Features of using ondulin for roofing
An ondulin roof has its own characteristics, among which there are both positive and negative aspects. Positive characteristics include:
- High technological and operational characteristics, which are ensured by the components included in the composition - bitumen, organic fibers, various fillers that increase strength and durability;
- In addition to the coating itself, the industry also produces ready-made solutions - ridges, valleys, seals, fasteners;
- Long service life;
- Environmental friendliness;
- Easy installation;
- Various colors.
Disadvantages include average strength and fading of colored elements in the sun.
On the roof, the pipe from the ondulin must be removed correctly, and it must also be ensured that the sealing is carried out accordingly.
Rules for arranging a chimney
On an ondulin roof, special attention should be paid to the pipe, the junction of which to the covering material should be sealed, taking into account the characteristics of the material.
The chimney should be routed through the roof according to the following rules:
- Place the chimney on the roof as close to the ridge as possible;
- Make the height of the pipe slightly protruding above the roof surface;
- Adjacent to the pipe of attic window structures is prohibited;
- It is not recommended to install protective reinforcements for a chimney pipe made of too hard materials on the roof;
- The passage of the pipe through the roof structure must be arranged taking into account factors such as the material from which the chimney is made and the finishing material of the outer part of the chimney.
Installation features
To ensure a high degree of fire safety and tightness, a separate duct is installed on the roof to provide a chimney passage.
In most cases, this applies to both round-diameter pipes and square or rectangular cross-sections.
How to pass a sandwich pipe through ondulin is shown in the video:
Such chimneys are practical, economical and do not cause installation difficulties.
During installation, all connections should be hermetically sealed to prevent moisture or condensation from entering the chimney and attic. As it settles on the walls, it can lead to the formation of mold or mildew and contribute to the development of rotting processes.
The following recommendations from the video will tell you how to remove a chimney from a brick:
- Installation of additional sheathing is in progress;
- A special covering apron for ondulin is attached, which will cover one wave on each side of the pipe;
- The apron is laid and nailed to the roof covering;
- Sealing of joints is carried out using Onduflesh-Super tape.
Answers from experts
The material is resistant to tin
roofing felt
Bitumen-based sealant for such purposes.
fiberglass material and rubberized with special rubber mastic
buy a ready-made metal “apron”, according to the size of the pipe.
Covering apron Ondulin and self-adhesive insulating tapes Onduflesh.
Here is information about Ondulin components. There are also special Onduflesh self-adhesive tapes, which are used for waterproofing the joints of the roof with the chimney, roof window and roof superstructures. Also, ONDUFLESH tapes can improve the waterproofing of eaves and can be used when decorating roof valleys. .unikma/tiles/onduline_teh2.shtml
It is necessary to overlap Ondulin onto the pipe by at least 15 cm, and glue it to bitumen mastic! Or if ondulin is already laid, make a surface layer that extends onto the pipe and the existing ondulin by 10-15 cm, and fasten everything with the same bitumen mastic.
This is a typical unit, look in any roofing system it is there. You need to make a type of metal apron where you need to run it under the andulin or on top, or use the andulin instead of the apron.
What determines the method of arranging the pipe passage?
First of all, it depends on the type of pipe and the material of its manufacture. Each of the materials common in construction (brick, concrete, metal, etc.) has its own nuances for installing a passage.
If the stove installed in the house uses wood, coal or peat as fuel, then the chimney is not made of metal, as it will heat up too much. And this can be dangerous.
Depending on what kind of external finishing it is decided to do for the pipe, the choice of sealing the junctions will also be made.
Depending on the size of the pipe, in some cases it is possible to select standard standard elements produced specifically for such purposes, which can be included with the roofing material.
A correctly installed passage for a chimney, taking into account fire safety rules and the operational characteristics of the coating (ondulin), can protect yourself for many years from problems with leaks in this section of the roof, as well as make home heating, regardless of the type of heating, safe and efficient . In addition, according to the recommendations of the roofing material manufacturer, specific building materials that are most suitable for these types of work should be used.
Slate roof: system output
Slate has not been used as often lately as other, more modern and popular ones. But nevertheless, its relevance in construction remains high in demand. The smoke hole is drawn out using a special circle to ensure even edges. The most popular materials for making a slate roof are fire bricks or pre-fabricated ceramic pipes.
Returning to the question of how to seal a joint with a roofing material that uses slate sheets, it would be appropriate to use a ready-made connector that provides maximum sealing quality. In all other matters concerning the organization of installation work for the construction of a device on a slate roof, they are not much different from installation options with other types of roofs.
What is the difficulty of passing a pipe through an ondulin roof?
It would seem – what’s wrong with running a pipe through the roof?! But no! There are problems. The cause of all the problems that arise when removing a chimney through an ondulin roof is the composition of the roofing pie. Most types of thermal insulation are made from synthetics, and hydro- and vapor barriers are made from polymer films. Obviously, they are all flammable materials.
As a rule, the roof frame and ceiling in bathhouses are made of wood, which is also a flammable material.
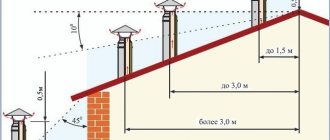
Meanwhile, the corresponding SNiP prohibits the placement of flammable roof elements closer than 130 mm in the light of brick, concrete, or ceramic insulated pipes. For pipes without thermal insulation, the distance is even greater - 250 mm. If we take into account that this distance must be maintained on all sides of the pipe, we get a very large hole in the roof.
The presence of such a large hole in the roof can lead to moisture entering the insulation, both from the atmosphere and from the bathhouse room. In addition, the organization of ventilation of the under-roof space becomes problematic.
Fighting joint leaks
To create the maximum possible tightness of the junction of the roofing material and the pipe at the points of contact, an internal apron is made using the lower strips.
Installation of a chimney passage through the roof.
To make an internal apron, you need the following tools:
- marker;
- long metal ruler;
- grinder with a disk 2 mm thick;
- pliers;
- hammer.
In order to do this, the plank is applied to the walls of the chimney pipe, making marks for the top of the plank. The next step is to punch a groove along the previously marked line.
Installation of the inner apron should start from the bottom wall. The edge of the apron is inserted into the groove, after which it is installed on the remaining walls. The overlap should be 15 cm. Then the edge of the film inserted into the groove is sealed. Having trimmed the lower strips, they are installed and then secured with self-tapping screws.
After installing the lower apron, you can begin installing the tie, which is a sheet of waterproofing material placed under the elements of the inner apron from below. The main function of a tie is to drain water.
After completing the installation of the tie and apron that protect the joints, the roofing material is laid. Then the outer apron is installed. To do this, use the upper abutment strips.
The installation of the apron on the outside is similar to the installation of the apron on the inside. The difference is the absence of a groove and the upper edge is fixed directly to the chimney wall.
Important: today the building materials market offers products that are designed specifically for chimneys with a round cross-section. They are roofing passages that consist of a base (flat steel sheet) and an apron cap
A circular chimney is installed inside the passage.
How to remove a pipe through the roof from ondulin
Errors when installing a roof are unacceptable. This affects the integrity of the structure and its durability. Ondulin has earned trust with its qualities and characteristics. And if you managed to install the roofing material, then another problem arises: how to remove the pipe through the roof from the ondulin. After all, you will have to make a hole in it that needs to be properly sealed.
In fact, the work is not difficult, since the manufacturers themselves provide detailed instructions and videos on how to do the job. With them, the pipe on the roof made of ondulin will not violate the integrity of the roof. We will look at the features of ondulin and the technology itself for removing pipes, ventilation or chimneys.
How to solve a problem
There are two ways to reduce the problems that arise when leading a pipe through an ondulin roof to a minimum, or even avoid them altogether.
The first method is to install your own rafter system around the chimney. The gap between the pipe and this system must be filled with any non-flammable insulating material (for example, basalt mineral wool).
With this method, the chimney pipe is placed in an insulated channel. Around the rafter system created for the pipe, layers of steam and waterproofing are tucked in and secured with staples or nails. For reliability, it is worth sealing the joints with sealing tapes. The Ondulin company produces high-quality Ondufresh tapes.
In order to avoid disruption of air circulation under the roof, it is necessary to install the necessary ventilation components above and below the pipe exit point.
The second method is to install special mass-produced metal kits on the roof. However, there are a number of limitations:
1. Steel pipes for furnaces can be used if the temperature of the exhaust gases does not exceed 500 degrees Celsius.
2. The use of metal pipes for furnaces that burn coal is prohibited.
3. Chimneys must be equipped with spark arresters.
Advice. Do not attach the pipe rigidly to the roof structure. Any deformation of the roof can destroy the pipe.
There are technical solutions for how to remove a chimney through the roof of a bathhouse covered with ondulin. All you have to do is choose the one that suits you.
Source
Benefits of ondulin
Roofing made from this material gained popularity for a reason. Ondulin is a type of roofing material, classified as soft, based on bitumen. Externally, its shape resembles slate, however, that’s where all the similarities end. Thanks to its special composition, it has a lot of advantages and is easy to work with. The material is made from cellulose fibers, bitumen compositions, mineral components, dyes and hardening resins.
What does this give? It is easy to cut, it does not crumble or crack like a cipher, so a ventilation or chimney pipe can easily pass through the hole made. Ondulin has the following positive qualities:
- Excellent performance characteristics and high quality due to the composition.
- Manufacturers produce additional elements: ridge, valley, sealing materials and clamps. They make roofing even easier. Therefore, anyone can work with roofing material.
- Ondulin is lightweight and easy to transport.
- A long service life, along with an average cost, raises the position of the product.
- It is safe for humans and environmentally friendly.
- Installation will not be difficult. Fixation is carried out using roofing nails, and the presence of waves makes the process even easier. You can navigate by them.
- Large assortment of products in different colors.
- It suppresses rain noise. If we talk about metal roofing, residents complain about terrible noise when it rains. This is not observed with ondulin.
- The material can be cut using a hacksaw, mounting knife or jigsaw. No high-tech tools are required.
As for the disadvantages, these are average strength, color fading under UV rays and lack of fire protection. Since the material is soft, it is not difficult to pass the pipe through the ondulin. And thanks to additional materials, it is easy to make it airtight.
Nuances of installing ventilation systems
There are two types of ventilation systems: natural and forced. In the first case, no special devices will be installed on the roof surface; everything happens naturally. The air enters along the perimeter of the eaves overhangs, under which the vents are located. They are small gaps and are calculated based on the area of the roof slope; the larger this value, the higher they should be. The air exits through the ridge element or the so-called cold triangle.
If the roofing pie contains heat-insulating boards, then small bars are laid on top of them and covered with waterproofing. They create an air layer inside the slope and the air masses calmly remove condensation from it.
In cases where natural ventilation cannot cope with the processing of supply air and the removal of excess moisture from the attic, special devices are installed that create forced ventilation. These elements can often be purchased along with roofing material. In this way, maximum docking can be achieved.
This ventilation system is extremely easy to install; the main thing is to understand its operating principle. The pipe and ondulin must be combined with each other as much as possible, otherwise small gaps will appear, and through them moisture will enter the roofing pie, gradually destroying the waterproofing.
Pipes for forced ventilation are created with standard dimensions, where the length is 86 centimeters and the height is 47. ABS copolymer is used as the main raw material.
You can install a pipe on an already used ondulin coating using the following technology:
- The covering sheet into which the pipe will be installed is equipped with additional fasteners in order to give it greater stability, and the top sheet is removed.
- A special lining is installed into the cut material, which will serve as a base. We fasten it using suitable hardware; in this case, self-tapping screws with a lining are suitable. Hardware must be included for each wave of ondulin, so relatively many of them will be needed.
- After completing this work, we move on to the removed sheet. It is put back with a slightly larger overlap so that precipitation cannot flow under the base of the pipe.
At the last stages, the pipe is mounted and fixed near the base. It is worth noting that its location must be strictly vertical. Special plastic pins are used as fasteners.
IMPORTANT: You can choose a pipe with a higher quality and carry out the installation work yourself. This way you will get a good device for a small amount
Tags: smoke, ondulin, pipe, through
« Previous entry
Features of pipe exit through ondulin
There are some rules to follow. They are related to the properties of the material. Professionals know that a residential building requires several pipes to be installed through the roof. This includes a chimney and a ventilation passage through the roof made of ondulin, which have a corresponding weight. When working, the following is taken into account:
- ondulin, unlike slate, is afraid of fire, so it must be protected from elevated temperatures from the chimney pipe and sparks flying from it;
- Since the material has average mechanical strength, it is important to create full supports for the edges. If this is not done, it may become deformed;
- high temperature from the chimney can soften the material, it loses its strength.
How to seal the gaps between the pipe and slate
Slate is the most affordable roofing material available. Therefore, solutions for sealing the gap between the pipe and the roof should also be cheap, as well as simple and quick to implement.
So, if you are looking for something to seal the gap between the chimney and the slate roof, then asbestos mortar is best suited for this purpose. If you need a more technologically advanced and durable method of sealing the joint, then place a steel apron on the pipe.
Mortar of cement with asbestos
Sealing a pipe on a slate roof with a mixture of cement and asbestos is a makeshift, but no less effective method. After all, it is not for nothing that asbestos continues to be used to create fire-resistant coatings and materials, despite its tarnished reputation.
The method itself is simple: asbestos soaked in water is mixed with cement and the resulting solution is used to cover the joints between the chimney pipe and the slate. The main thing is not to forget about latex gloves and a respirator. Still, the reputation of this material is spoiled for a reason - it is classified as a first-degree carcinogen, that is, it reliably causes cancer. And asbestos is especially dangerous if it gets into the lungs. However, if you follow simple safety measures, the risk is almost zero.
Now we’ll tell you step by step how to seal the gap between the pipe and the roof with asbestos mortar:
- Asbestos is soaked in water in a ratio of 1 to 1. It is better if the asbestos is in the form of fibers or powder, but crushed asbestos sheets can also be used.
- Soaked asbestos in a ratio of 1 to 1 is mixed with M400 cement.
- Before covering the pipe on the roof, the slate around it and 100-150 mm of the chimney are thoroughly cleaned of dirt and degreased.
- The resulting solution is used to cover the gap between the pipe and the slate. Everything is standard on the bottom and sides: the solution should extend slightly onto the pipe in order to better adhere to it. But at the back you need to fashion a small hump from the mixture with a sharp “ridge” in the center and smooth slopes. This is necessary so that the snow does not accumulate behind the pipe, but appears to be cut and slides down the sides.
- With hands dipped in water, smooth out the solution so that there are no ledges or roughness that could interfere with water drainage or snow removal.
Asbestos mortar is very cheap and can easily withstand temperatures of more than 1000 °C, so it can be used to cover the gap between the pipe and the roof of the bathhouse without fear that the mixture will crack due to heating. In addition, asbestos mortar has excellent adhesion to slate and is resistant to caustic substances and temperature changes. But it has three main disadvantages.
Firstly, the joint between the pipe and the roof should not be very wide. Otherwise, when puttying, the mixture will simply fall through the gap. Even if you manage to hammer a wide gap, the solution will begin to crumble over time, which will lead to leakage.
Secondly, the solution stuck to the pipe looks ugly. If we are talking about a bathhouse or an outbuilding, then this may not matter, but sealing a chimney on the roof of a house is a completely different matter.
Thirdly, the knot is not very reliable. A small mistake in mixing the solution or applying it is enough for the roof to leak at the first rain. But even if the technology is followed, the service life of the connection is unlikely to exceed 15 years. Again, this is acceptable for a bathhouse, but not for the roof of the main house.
Apron made of galvanized metal or stainless steel
Another inexpensive way to seal the gap between a slate roof and a round chimney. However, unlike asbestos mortar, this method is suitable for all types of non-metallic roofing.
A steel apron or pipe penetration is a base made of a flat steel sheet to which a cone with a cut off top is welded. The cone is placed on a round chimney and sealed, and the base is attached to the roofing. The result is a reliable and durable unit, which, if installed correctly, can maintain tightness for decades.
This is what a stainless steel apron looks like for sealing the passage of a round pipe through a pitched roof
Sealing a roof pipe with a steel flashing is done in seven steps:
- The slate and pipe are cleaned of contaminants and, if the roofing pie with insulation has not yet been installed, washed with a stream of water.
- An apron is placed on the pipe so that the base is pressed tightly against the roofing and goes under the ridge. If the pipe outlet is far from the ridge, then the steel sheet is increased to bring its upper edge under the ridge strip by at least 60 mm. This must be done, otherwise the joint between the pipe and the roof will leak, no matter how much sealant you use.
- The base is screwed to the sheathing using roofing screws with an EPDM rubber gasket to protect the joints from leaks. For the same reason, screws are screwed into the top of the wave. Before screwing in the screws, it is necessary to drill holes in the slate so that it does not crack.
- The side edges of the base of the apron are bent with a mallet so that they fit snugly against the slate and coated with polyurethane or silicone sealant.
- A clamp is installed on the pipe and clamped at the transition point between the apron and the chimney.
- The clamp is carefully sealed. For better protection, you can place a collar with a “skirt” close to the clamp, which will cut off water from the connection.
- A sealant is placed or foam is blown into the holes formed between the base and the slate waves.
Like asbestos mortar, this sealing method is also suitable for sealing joints between the chimney pipe and slate. The main thing in this case is to use a high-temperature sealant.
It is advisable that the apron be made of stainless steel - this way its service life will be counted for decades. Galvanized steel is also acceptable, but then the pipe passage through the roof will most likely have to be repaired or redone in 15-20 years.
Advantages of a steel apron for sealing slate roofing:
- cheapness;
- durability;
- relative ease of installation;
- resistance to high temperatures;
- ease of repair and restoration.
Disadvantages of this method:
- Insects, birds and rodents can settle in the lower part of the pipe between the base of the apron and the slate;
- without placing a base under the ridge, leakage is guaranteed;
- increased likelihood of freezing due to the difference in thermal conductivity between slate and metal.
Ventilation pipe outlet method
There is a method to make things easier for yourself. For this, not just an ordinary pipe is used, but a special proprietary transition element made of polyvinyl chloride. In construction stores, for example, STD Petrovich, there is an ondulin roof ventilation transition that you can buy. And then the process of removal through the roof can be divided into several stages.
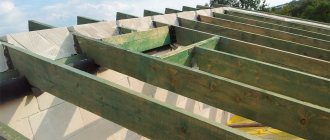
First you need to determine the point from which the pipe will be led through the roof of the ondulin. Most often they are placed in the last row of roofing material. The installation of the passage element in the desired place is carried out so that its lower edge is overlapped and secured to the ondulin sheet of the bottom row. This overlap on the bottom row is 17 cm.
However, there are some nuances. If the work is carried out while laying ondulin, then it is enough not to lay the last row to the end, leaving space for the passage element. If the roof is already finished, then you will have to make a hole of the appropriate diameter and continue the process.
Elements used for terminals and sealing
Most often, chimneys have the shape of a circle; this complicates the making of holes in the roofing material, which can subsequently affect the tightness of the joints of the two systems: the roof and the chimney. In order to improve the quality of penetrations with further fastening to the roof structure and maintaining the required sealing quality, builders use ready-made penetrations, which differ in the form of manufacture and the method of creating elasticity at the joints. For convenience, there are several varieties of this element, which is also used when installing ventilation piping.
Instructions for removing the pipe when laying ondulin
If the removal is carried out at the roof installation stage, then the instructions are as follows:
- The passage element is installed with an overlap of 17 cm, and is nailed to the sheathing at the bottom in each wave, except for the waves for the overlap. Special nails for ondulin are used.
- The next sheet is measured so that the side overlap is equal to 1 wave, and on top, the same 17 cm. The excess is cut off with a jigsaw or saw, if we talk about cutting across, and the work is done along the assembly knife.
- The sheet is placed in place and secured with nails in each wave to the sheathing.
- Ventilation is being assembled. an ondulin pipe passes through the ondulin and is installed in the passage element.
- It remains to lay the last sheet in contact with the passage element, just like the previous one.
Job is done. The ventilation pipe is routed through the surface of the ondulin roof. Detailed video instructions will help you cope with the task:
Installation on a finished roof
- A hole is made for the pipe in the selected location.
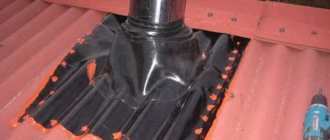
- Now you can install the pipe through a special apron. The edges of the apron are tucked under the ondulin sheet, and the gaps at the junction points are sealed using Onduflesh tape.
- The apron is nailed to the sheathing slats and reinforced with a flashing from the inside of the roof.
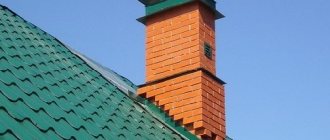
We arrange the junction area for the chimney
There are several rules that must be followed when it comes to working with a chimney or stove pipe. These are the rules:
- the chimney is installed closer to the roof ridge;
- The height of the pipe is important. It should rise above the ridge;
- It is prohibited to adjoin the window structure of the attic room to the pipe;
- It is better to make protective screens for pipes on the roof from materials that are not too hard;
- the arrangement of the pipe passage depends on the material used for the chimney.
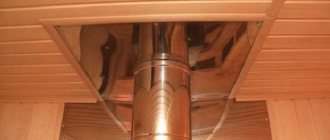
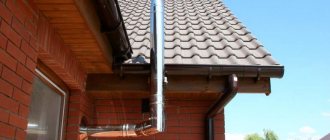
Fire safety when removing the chimney is given special attention. Although the fire source is low in the stove, the combustion products heat the chimney to an impressive temperature. In this case, sandwich pipes through ondulin are used. Their body can be seen in this photo.
It's like a thermos that holds hot liquid on the inside while keeping the outside cold. Thus. the chimney will not harm ondulin. As for chimneys made of brick or other material, they are covered in a protective metal casing with a layer of thermal insulation. Then the outer shell will heat up no more than 30–40 degrees.
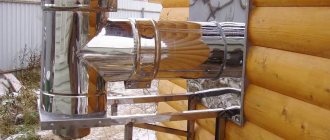
Sandwich pipe design
Everything related to heating equipment is associated with the risk of fires, especially in wooden houses. Statistics say that more than half of fires occur because homeowners did not install the chimney correctly with their own hands. To facilitate this task and protect the house from fire, sandwich chimney pipes are used. At first glance, they look like ordinary stainless steel products, but in fact they have a three-layer structure:
Sandwich pipe design
- Inner circuit. A round cylinder made of high-strength stainless steel with a thickness of at least 1 mm with the addition of zinc or molybdenum. The inner pipe is made of a sheet of metal, using welding to obtain a sealed seam. Due to its high anti-corrosion properties, alloy steel is not damaged by interaction with water.
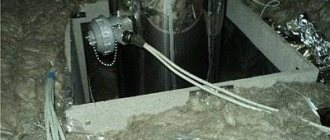
- Insulating layer. Between the inner and outer contours there is an insulating layer that performs two important functions: it “locks” the heat inside the pipe, preventing it from heating the surrounding materials, and it does not allow the smoke to cool down while passing through the pipe, so that soot does not settle on its walls. As thermal insulation, fibrous materials with the highest fire resistance class with an operating temperature of up to 700 degrees are used, for example, basalt-based mineral wool. The insulation layer between the contours is 40-60 mm, and the insulation density is 12o kg per cubic m.
- External casing. The outer shell of a sandwich pipe is made of stainless steel or another type of metal. The seam of the casing is made using laser welding, which does not damage the galvanic layer of stainless steel, which protects it from corrosion. The cost of brass and copper pipes greatly increases the cost of laying a chimney, and the installation is justified by its spectacular appearance.
Additional elements of a double-circuit chimney
Sandwich pipes consist of additional elements: straight sections, bends, tees. The diameter of the products depends on the manufacturer, so it is necessary to buy all the parts of the chimney from the same company, which are ideally suited to each other.
Let's sum it up
The removal of a ventilation pipe or chimney is an important part of the roofing installation. We looked at several options for how to put everything into practice. The main task is to ensure high-quality waterproofing of ondulin at the junction of the pipe. If this is not done, the area will become a weak point of the entire structure. Moisture will penetrate there, destroying the insulation layer, if any, and the entire structure as a whole. Therefore, following the instructions, it is important to carry out the work correctly so as not to shorten the service life of the roof.
vote
Article rating