It is difficult to imagine a bathhouse without a stove, because in addition to heating the room, it is also the key to comfort and pleasure from the bathing procedure.
It is easy to make a stove for a bathhouse with your own hands; it will function well and will not require a lot of money and time investment. The simplest model is a sauna stove made from a pipe with a large diameter. Its production does not require special experience and knowledge in this area.
Pros and cons of such ovens
The required properties for the material used in the manufacture of the furnace are heat resistance, strength, durability, and corrosion resistance. In addition, it must withstand sudden temperature changes and have good thermal conductivity.
The ferrous metal from which a thick-walled pipe with a diameter of 500-600 mm is made cannot be called completely corrosion-resistant. But it is precisely this type that is optimally suited for the independent production of a sauna stove, as it meets almost all of the requirements listed above.
Having a wall thickness of at least 8 mm, it makes the stove in the bathhouse quite heat-intensive, in which heat is retained when the fuel has already burned out. And the round cross-section inside it allows heat to spread efficiently.
The use of a round-shaped pipe for a stove in a bathhouse reduces the length of welding seams - these are the very first places for corrosion to form , and it is through them that carbon monoxide escapes. In addition, this option remains the cheapest, although prices for ferrous metal are rising.
Video instructions: how to weld a metal sauna stove with your own hands
Calculation of tank volume for a sauna stove
The volume of a water tank is calculated by taking from seven to ten liters of water with a temperature of at least fifty degrees per person. So, if you plan to visit a steam room with 3-4 people at the same time, you should choose a tank with a volume of at least 40 liters.
How to calculate the volume of the steam room and firebox of the stove?
It is not enough to measure the dimensions of the room. You also need to take into account the material of the surfaces. If the room has windows, a glass door, surfaces made of tiles, bricks, concrete, their area should be measured. For each square meter of area of such surfaces, add one and a half cubic meters to the volume of the room, which will be taken into account when choosing the size of the stove. The minimum power of a sauna stove is 8-10 kW.
Oven requirements
A sauna stove must be safe (both in terms of fires and for human health - not cause burns if accidentally touched and prevent smoke from entering the room), the temperature must be regulated, and the dimensions must correspond to the volume of the room.
Types of furnaces - horizontal and vertical, features of choice, pros and cons
A self-assembled stove for a bathhouse made from a pipe, although it looks unpretentious, does an excellent job of heating the steam room. Available in vertical or horizontal form. The choice directly depends on the area of the steam room and on the desires of the owner.
Vertical
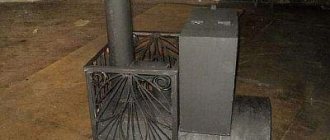
Externally, such a stove resembles a common potbelly stove, but differs in its design features. In addition to the firebox and the compartment where the stones are placed, there is a special tank where the water is heated. This type is ideal for a small bath.
The firebox and grate are located one above the other in steps, which makes it possible to save space. Therefore, this model is gaining popularity for installation in bathhouses.
However, it is worth noting that it is less effective, since the heat goes up and the walls do not have time to warm up. In addition, fuel burns faster in a vertical design. And the main disadvantage is the presence of a firebox and a compartment to enhance traction in the steam room of the bath.
Horizontal
The horizontal shape is recommended for bath rooms with a large area. Equipped with a compartment where stones are placed and a water tank. The firebox is more voluminous, and its doors and the vent are located at the end of the pipe; they often open into the room in front of the steam room, which speeds up the heating process. In addition, this arrangement is more convenient, since when lighting, there is no need to enter the steam room, and it does not cool down.
Unlike the vertical type, this type of heater requires more space, but since the firebox is longer and located at the bottom, this significantly increases the heating area and improves the natural exchange of warm air in the bathhouse. Therefore, experts recommend this particular model, if the bath area allows.
How to finish the stove depending on its type
External decoration will help to give the sauna stove individuality. It can be done in various ways - from simple jointing of brickwork to cladding with marble or granite slabs. It all depends on the taste and financial capabilities of the owner.
Photo gallery: examples of finishing stone and iron stoves of different sizes
The stove, lined with glossy slabs, looks like a fireplace
Finishing with natural stone can be very unusual
The firebox in the form of a fireplace portal looks unusual
Granite is ideal for lining a sauna stove
Flat stone can be used to decorate not only the stove itself, but also the adjacent wall
A wooden fence, although not a full-fledged finish, can protect against burns
A large structure can be built from facing bricks and simply unstitched seams
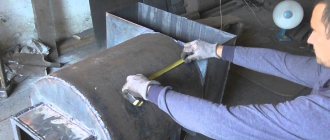
What we need - tools and materials
Before you start making your own sauna stove from a 530 pipe, you should prepare a place to work and stock up on the necessary tools:
- welding machine;
- grinder with different attachments;
- electric drill;
- metalworking tools;
- door handles;
- mortise tap;
- asbestos cord.
In addition to tools, you will need the following material:
- Thick-walled metal pipes for fireboxes and water tanks, having a diameter of 500 to 650, a wall thickness of 8-16 mm, and a length of 1.2 to 1.5 meters. Also the pipe through which carbon monoxide will escape, its diameter is 120 - 150, and the wall thickness is 2 - 4 mm.
- A steel pipe where the stones will be placed. The thickness of its walls is 5-8 mm, and the diameter is 350.
- Sheet metal, size 600 by 800 mm, having a thickness of 8 - 12.
- Hinged steel hinges.
- Water pipe - a small piece, suitable diameter ½ or ¾ inch, length 50 - 80 mm, and a ball valve with a similar thread.
- Metal reinforcing bars - 500 mm, diameter 12 - 18.
- Cement.
- Brick.
- Sand.
Installation of elements
During the work process, it will be necessary to install individual elements:
- A grate is installed between the ash pan and the firebox, which can be welded from reinforcement with a cross-section of about 11 mm with a gap of 10 mm.
- The heater is located in the uppermost sector; a pipe needs to be welded to it to remove combustion products from the combustion chamber.
- The oven doors (ash pan and firebox) must be equipped with hinges and latches (latches).
- Cover 1/3 of the back of the heater with a sheet of metal 300x600mm, with a hole in the center for the pipe, which must be lowered into the compartment 120mm and welded.
- The heater must be equipped with a lid to allow combustion products to escape into the chimney.
- Make another lid from millimeter metal, which is needed to cover the heater while the stove is heating. This ensures long-term heat retention in the steam room and heating of the stones.
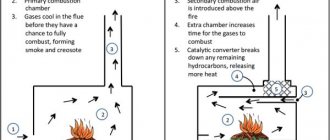
Schemes and dimensions of vertical and horizontal furnaces
After choosing a model, before making a sauna stove with your own hands, a drawing is drawn; it must reflect all the parameters and configuration of the stove. A correctly drawn up drawing will not only facilitate the installation process, but also eliminate operational problems.
The diagram should show the main parts of the furnace. If this is your first time making a stove for a bathhouse, then it is better to use a ready-made diagram.
Horizontal model diagrams
It is the model in which the horizontal pipe is most often installed in bathhouses, if space allows.
Vertical furnace diagrams
As with a horizontal stove, a pipe with a diameter of 530 is also ideal for a vertical model.
An example of a drawing of a stove for a vertical bathhouse, which is easy to install yourself.
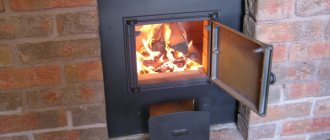
How to heat a stove with wood
Before heating the stove, it is necessary to close the heater channel and open the direct flue damper. This will significantly increase traction. Then firewood is placed in the firebox and afterburning is done using paper or rags soaked in kerosene or barbecue liquid.
It is best to burn the stove with hardwood wood
After the firewood has ignited, it is necessary to open the valve of the channel that connects the firebox to the heater and close the direct gas duct. At this time, the stones should be covered with a lid.
The stove is heated until the temperature in the steam room rises above 60°C. After the firewood has completely burned out with a poker, be sure to check whether there is any unburnt wood in the corners of the firebox. If such pieces of logs are found, then you need to throw them away, otherwise they will smoke. The heat must be checked for the presence of blue flames. If they are, then you still can’t take a steam bath, because you might get burned.
Burning coals are thrown away in the same way as unburnt wood. After this, water is poured onto the heater, which will remove soot from its surface, and the walls and shelves of the bathhouse are washed from soot.
Assembling a horizontal model
The stove is made from a horizontal pipe for a bath, has a heater located on the outside, and the tank is mounted. The advantage of this device is that it has a compact size and a large firebox depth. In it, the fuel burns completely and, therefore, more heat enters the bathhouse.
The instructions for independently producing a horizontal stove for a bathhouse are as follows:
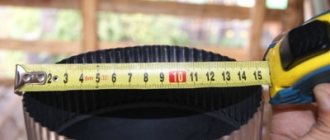
- You will need a 2-meter pipe with a diameter of 500 mm, which has thick walls; marks must be placed on it. To do this, it lies on a flat surface on its side, is fixed and, making an indentation of 1/3 of the diameter from the bottom, two lines are drawn on it in the horizontal direction, located parallel.
- A base for a round firebox is cut out of metal, the size equal to the length of the pipe, and the width corresponding to the distance between the lines.
A rectangular or square window is made in the middle of the circle, into which a grate must be mounted. Perhaps you can simply weld reinforcing bars in the form of a lattice to the bottom of the window.
- The base is inserted into the main pipe of the stove strictly according to the marks and fixed by welding inside it.
- Two blanks are made from a metal sheet with thick walls, so that their lower part serves as the legs of the device. And the width of the walls should be 20 mm greater than the diameter of the pipe. To give an aesthetic appearance, the front wall is rounded, but the back wall remains rectangular; a water tank will be mounted to it.
- On the front wall of the stove there is a window for the firebox and a compartment to enhance draft. The lower level of the firebox opening is located 0.03 meters up from the base of the firebox. And the upper edge of the blower is 0.01 meters lower than the container with stones.
- Doors are made from cut parts. They are welded to the front side of the stove with loops near the openings. Handles and latches are attached to them.
- Each end strip is attached to the base of the pipe and fixed with a weld seam over the entire area.
- To increase the heat transfer of the stove, it is recommended to install an additional chamber between the firebox windows and the chimney, in which the accumulated heat is transferred to the stone. You will need a 350 mm pipe, with a length of 0.35 - 0.45 meters. It needs to be cut in half horizontally. One edge is welded with a plug shaped like a semicircle.
- A hole is cut in the upper part of this device, slightly offset from the middle. The size of the opening should be equal to the diameter of the chimney. A 0.1 meter pipe is inserted into it to connect the chimney.
- At the top of the main structure, not far from the rear wall, a round hole measuring 150 mm is made. Next, the prepared dome is installed in the furnace pipe so that both openings are slightly offset in relation to each other. It is then welded to the main pipe.
- The final stage is a metal basket made from welded reinforcing bars around the additional chamber; it will hold the stones. And a water tank is attached to the wall at the back, and you can begin to test a sauna stove from a pipe that you assembled with your own hands.
Advice! Since the firebox and the window to enhance draft are brought into the room in front of the steam room, it is recommended to decorate the wall around the door with metal plates for protection.
Watch the video
eternal sauna stove
Conclusion
In the video presented in this article you will find additional information on this topic. Also, based on the text presented above, we can conclude that the principle of making metal stoves is quite simple. At the same time, there are a lot of different designs that have their own specific features and characteristics (see also the article “Drawings of a metal stove for a bath with your own hands: how to build a heater in a steam room with high efficiency”).
Special attention should be paid to some factory products, which are presented in the form of doors, chimneys and grilles. They will significantly simplify the manufacturing process, which means it is worth developing drawings on their basis.
Did you like the article? Subscribe to our Yandex.Zen channel
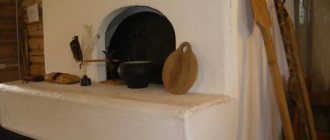
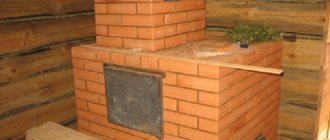
Making a bath unit
One of the best options for a heating device for a bath is a metal stove made of sheet steel, lined with brick. Such a homemade sauna stove is not mobile, but it is fireproof, which means it can be installed in a residential building and even in a wooden sauna building.
To build it, you will need the following tools:
- welding equipment;
- Bulgarian;
- diodes 3-4 millimeters.
You also need to have sheets of iron 2–3 millimeters thick, and reinforcement 8–10 millimeters.
An important point is that when arranging such a stove, it is necessary to choose the correct cross-section for the chimney, since the draft force depends on this, which is also influenced by weather conditions: the warmer and more humid the air, the weaker it is.
If the chimney is not wide enough, gases and air will begin to mix before they have time to escape. This creates a smoke plug. If the diameter of the pipe is too large, then the gases in it will move too slowly, and the surface of the inner walls will quickly become clogged.
Do-it-yourself iron sauna stoves are built like this:
- First of all, the foundation is laid out. For it, a wooden formwork 20 centimeters high is built so that a square measuring 1x1 meter is formed.
- The reinforcement is mounted in one layer, making a mesh of rods with cells measuring 20x20 centimeters. It is necessary that the reinforcement does not touch the ground, so it is supported on pre-installed pegs and tied in weight.
- Prepare a cement-sand mortar in a ratio of 1:3. For it, take 1 part of cement no lower than grade M400 and 3 parts of fine river sand. To add strength, some crushed stone is added to the mixture.
- The solution is poured into the formwork, covered with polyethylene film and left to dry for 4 weeks. Once a day, the concrete must be sprayed with cold water and covered again, otherwise it will begin to crack.
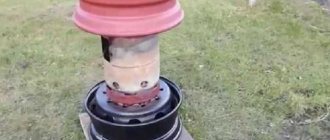
- Next, you need to take the rear wheel rim and weld all the holes on it, leaving only the central one.
- The convex top is cut off from the second rim, the first one is inserted into it and welded. The main thing is to create a tight connection, because there will be hot liquid inside.
- On the inside of the second rim, at an equal distance from one another, reinforcement is welded on three sides. It needs to rest against the pipe to give the structure rigidity.
- A round 25 mm hole is created at the bottom of the first rim and a pipe of the appropriate cross-section is welded to it. A faucet is screwed into it to drain water.
- Next, exact copies of the two rims are made. A copy of the second of them is placed on the pipe, the copy of the first rim is turned over and welded to the end of the pipe. A second copy of the second rim is attached to the top and reinforced with reinforcement for rigidity.
- When the foundation mortar has hardened, the formwork is removed and bricks are laid using a clay-based mixture.
- The location of the furnace is completely covered with bricks to protect against fire.
- The base is made of brick, and from the second row they begin to lay out an ash pit with a blower. By means of it, ash is removed and thereby ensures the flow of air inside, which helps the appearance of good draft. The length of the ash chamber should be less than that of the firebox.
- Install the blower door, line it with bricks and lay another row. A grate is placed on the ash pit shaft.
- After the grate, two rows of bricks are laid out, leaving space for the firebox door. Two more rows are created on top.
- The masonry is allowed to dry for 2 weeks, ensuring air circulation. Then the stove needs to be heated with wood chips for 1.5 - 2 hours.
- The finished pipe is installed on the brick structure. There is a heater and a container for hot water on it.
- The weight and dimensions of the stove are quite large, so it is better to divide it into its component parts and assemble it inside the bathhouse on site.
- The top of the chimney is reinforced with reinforcement rods, welding one end to the pipe and resting the other against the wall. To attach it to the wall, use a metal plate or a steel angle.