Materials for laying stoves and chimneys.
When laying stoves
the following
materials
:
- for the main masonry of the walls of furnaces, hearths, chimneys
and
channels in the walls
-
fired solid red brick
of the first grade (
GOST 530-71
); - for lining (internal lining) - use refractory refractory brick
; - for portal cladding (external) - tiles, roofing and rolled steel, asbestos plywood
; - for cutting smoke circulation, fire-retardant insulation and cladding - solid bricks, asbestos cardboard, asbestos-cement insulating boards, inorganic mineral wool products on a synthetic basis
(mats, semi-rigid boards),
construction felt
soaked in a clay solution should be used.
NOTE: Use of mineral products with a bitumen binder
NOT ALLOWED for fireproof insulation.
Brick
They are selected of
the correct shape, the same size, without cracks, inclusions of stones and dummies, and normal firing
.
NOTE: Bricks from dismantling buildings or old furnaces
, subject to careful selection and cleaning of the solution, it can be used for laying
pipes, cutting
and the lower parts
of furnaces and hearths
.
ATTENTION! Brick from dismantling stoves, impregnated with flue gas condensate, is PROHIBITED for re-laying fireplaces. The following solutions are used in furnace work: The following solutions are used in furnace work:
During furnace work
The following
solutions
:
- for laying stoves and kitchen stoves
from ordinary bricks -
clay-sand
; - for masonry made of refractory bricks - refractory clay with sand
; - for masonry made of refractory bricks - refractory clay with fireclay powder
; - for laying chimneys, ventilation and smoke ducts
in the walls of buildings -
lime-sand or lime-cement
; - for laying chimneys above the attic floor
-
lime-cement
, and on top of the roof -
cement
.
Quantitative ratio of clay-sand mortar
, depends on the fat content of the clay, and should ensure drying of the solution
without a noticeable change in its volume and without cracking
.
ATTENTION! The solution is prepared at least DAYS before the start of work. When laying ordinary bricks, plastic clay is used, mostly red, not contaminated with random impurities. Before use, the clay is soaked in solution and rubbed through a mesh with 3-4 mm holes.
Before use, the clay is soaked in solution and rubbed through a mesh with 3-4 mm holes.
When laying ordinary bricks, plastic clay
, predominantly red, not contaminated with random impurities.
Before use, the clay is soaked in solution and rubbed through a mesh with 3-4 mm
.
To prepare the solution
As a rule,
mountain sand
, without foreign impurities and plant residues,
fine-grained, sifted
through a sieve with holes of
1.0-1.5 mm
.
Water
must be clean to prepare the solution.
When using sea water,
the cement rate must be increased
by 10-15%
.
Table 5: Clay mortar compositions.
| Brand of solution | Type of solution | Type of additive | Composition of the solution, (clay dough + additive + sand), in volume parts | |
| in dry climates | in moderately humid climates | |||
| Clay solution: | ||||
| 10 | 2 | 1- on oily clay | without additive | 1+0+4 |
| 10 | 2 | 2- on clay of medium fat content | without additive | 1+0+3 |
| 10 | 2 | 3- on lean clay or loam | without additive | 1+0+2,5 |
| 4 | 4 | Clay with black binders | black binders (tar, bitumen, pitch) | 1+(0,05…0,1)+(2,5…4) |
Note:
- Clay mortars
are used in summer conditions for finishing work, mainly in dry climates with normal indoor air humidity. - The amount of sand in clay solutions with black binders
depends on the fat content of the clay. - When using hard black binders,
an emulsion of clay
with black binders is pre-prepared in a heated state
.
NOTE: Masonry mortars
must be used before setting begins. “Rejuvenating” (diluting with water) “set” solutions is PROHIBITED.
For insulation
materials with low thermal conductivity are used:
ordinary clay brick, felt, as well as asbestos in the form of sheets and cord
.
Felt
, usually made
5 mm
, conducts heat poorly and serves as a good heat-insulating material.
It smolders and with its pungent, suffocating odor
signals the outbreak of a fire.
To make the felt more resistant to fire, it is impregnated with a liquid clay solution before laying it in place
.
Features of repair work
It is easier to repair roof junctions with roof structural elements using the flashing method, the technology of which is described above.
The basis of this method is the one-component mastic Hyperdesmo - RV-1K, consisting of bitumen-polyurethane substances. Its advantage is that it can be applied to any surface of a wide variety of shapes, creating reliable waterproofing everywhere that will serve for many years. In addition, the mastic is easy to apply and does not require special knowledge or equipment. There is no need to light an open fire on the roof, exposing both the roof itself and the workers to the risk of fire.
Repairing joints to various roof structures using traditional roll materials and hot bitumen is much more expensive than using mastic. You can also repair the roof at its junction points in another way.
If the roofing material has just peeled off from the wall, but is still in good condition, it is pressed with a strip, which is fixed with self-tapping screws. The junction of the slats and the wall is sealed with Emfimastica PU-25 polyurethane sealant.
Strengthening the rafter system
In the simplest case, the opening is limited by two spacers installed between the rafters. Thus, a square is formed in the roofing pie, the walls of which are spaced at a distance no less than the standard one. Light metal roofs are characterized by a sparse rafter pitch, so usually the horizontal dimension of the opening turns out to be excessively large. It can be shortened by inserting a couple more vertical struts between the horizontal struts. This is desirable not only from the point of view of reducing the gap in thermal insulation: even in a cold roof, an opening of the minimum permissible size will cause fewer difficulties with the installation of non-combustible sheathing and fastening the metal tiles in place.
In difficult cases, the rafter leg has to be cut. Depending on the height of the passage, a tightening, a crossbar, or several purlins are also dismantled. The general method of strengthening the rafter system is as follows: at the cut site, the rafter leg at the top and bottom is fastened to its neighbors by means of horizontal struts. Next, vertical beams are inserted between these spacers, replacing the rafter leg at the passage point. The same method can be applied to other elements of the supporting system located in parallel: purlins or, for example, high puffs.
Reinforcement with the help of supporting posts is rarely practiced. This is mainly advisable when the slope is above 35°, when it is necessary to cut out fairly long fragments of the rafter system. In such cases, the opening is equipped with its own supporting system, often of a hanging type. To ensure sufficient strength, it is customary to connect the opposite legs with ties on which the racks will rest.
How to seal a pipe on a roof made of corrugated sheets with your own hands
If you correctly lay corrugated sheeting on the roof, then this is a 100% guarantee to avoid leaks. And this is the most important criterion for the reliability of a roofing covering. However, it should be noted that in any roof structure there are several elements that create an abutment to the profiled sheets. These are ridge, valleys, front strips and so on. But, as practice shows, the most dangerous element where leaks can occur is the pipe sticking out of the roof. Most often these are chimneys.
Old stove makers, knowing about this problem, made a special thickening when erecting a brick chimney. Nowadays, almost no one remembers this, especially since modern pipes have a round cross-section and are often made of metal or other materials, but not brick. Because the latter option is difficult to execute and requires knowledge of certain nuances of the structure, which young craftsmen do not even know about.
What needs to be done to ensure that leaks do not occur at the junction of the pipe and corrugated sheeting? Good sealing of joints is required. Although experts note that the location of the chimney will also affect this problem, because installing it closer to the overhang (eaves) creates conditions for increasing the volume of water that flows down the roof slope. The more water there is, the more likely it is to leak.
But that's not all. Experts note that the chimney installed higher up the slope has the shortest length, which is located in the cold air zone. And this is minimal condensation of moist air, which causes the growth of soot and dust on the internal surfaces of the pipe structure. Plus, when the exhaust gases condense, acid forms on the walls of the pipe, which corrodes the material (brick, metal, etc.). By the way, in SNiP number 41-01-2003 under the title “Heating, ventilation and air conditioning” the installation height of the chimney is precisely indicated, but nothing is said about the exact installation location.
Let's look separately at several designs of chimney pipes passing through a corrugated roof. And let’s decide how to seal the joints between them.
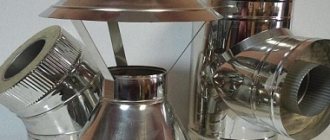
Pass-through unit: structure and dimensions of the box
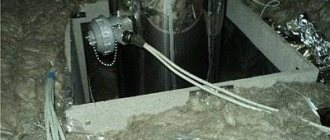
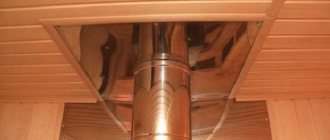
There are several names for a box that is installed in the gap of a hole cut in the ceiling: these are “pass-through unit”, and “cutting box” and “ceiling cutting”, and PPU (ceiling pass-through unit).
What is he? Quite simply, it is a box with insulating material that should fit into the hole you cut, and also keep the chimney pipe exactly in the center.
Box for the passage of the chimney through the ceiling for installing a stove in a steam room
In addition to this, there is also the finishing of the hole itself, which is very desirable to be reinforced with a material that can withstand high temperatures, is non-flammable and has low heat transfer. Below we will talk about specific materials, but the problems that should be solved by them are exactly the same.
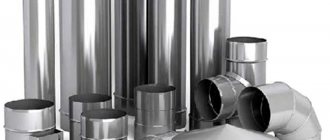
The pass-through unit is made of metal. In particular, it can be stainless steel. In any case, the part that is visible from the steam room is usually made of stainless steel. On sale you can find boxes made entirely of stainless steel, and entirely of galvanized steel, and combinations thereof.
The boxes vary in size. And not only the box itself, but also the internal hole through which the chimney must pass. Diameter varies from 115 to 300 mm.
As for external dimensions, everyone interprets GOST in their own way. We already understand why this happens - some believe that a box with a side of 1 meter corresponds to GOST, others that 26 cm + pipe diameter is quite enough. And all this is based on technical standards.
IMPORTANT! If there is any discrepancy, one has to rely on common sense.
What is the main limitation when passing through the ceiling? Ceiling beams if the ceiling is false. If the dimensions of the box are greater than the distance between the beams, you will have to cut the beam and insert the cross member in another place. This will affect the load-bearing capacity of this beam. That is why they try to fit the box between the existing beams without additional waste of effort and time.
The ceiling in the bathhouse and the chimney. Photo StroyDom
Of course, if the position of the furnace had been thought out at the design stage, then the beams could have been positioned so that the foam would pass between them. Consequently, the size of the PPU would need to be thought out in advance.
On the other hand, there are now materials with low heat transfer that can withstand heating up to 1000-1100 degrees. If you use them, there is no need to cut out a large piece of the ceiling. For example, watch a video showing a test test of a calcium silicate slab. We then looked at the technical characteristics of this refractory - they are simply excellent! Find out for yourself (we do not advertise or sell).
For now, let’s summarize the data. It turned out that, according to SNiP and other standards, there are the following options:
- radius of ceramic pipe + insulation + 13 cm;
- ceramic pipe radius + 25 cm;
- pipe radius + 38 cm;
- pipe radius + 50 cm.
ATTENTION! There are no data for steel pipes in the first two cases.
As for the device, everything is simple: the metal box has the height of the ceiling, and is closed at the top and bottom with lids with holes for the diameter of the pipe. The lids are larger than the size of the box.
The box itself is lined on all external surfaces with a heat insulator - mineralite or basalt cardboard. Expanded clay is poured inside the box or basalt wool is laid. This is the standard option and is done most often. But in the video you saw that you can get by with a calcium silicate slab and use it to insulate the pipe in the bathhouse from the ceiling.
Carrying out cutting
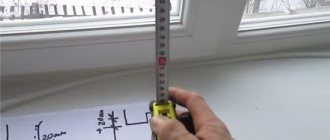
If desired, the purchased structure can be replaced with a home-made one according to the following instructions:
- The hole is covered with a pre-cut element from a stainless steel sheet;
- We cut out a round passage in the center, the diameter of which is 12 millimeters larger than the pipe itself;
- we cut out an opening similar in shape and size in the ceiling;
- The passage is sealed at each edge with basalt fiber;
- For additional protection of the thermal insulation layer, it is covered with steel strips;
- During the assembly process, we attach the first elbow to the stove and complement the structure with a stainless steel sheet;
- This section of the system must be vertical. We secure the element to the attic;
- We fix a special plate and lay a layer of heat-insulating material in the space formed between it and the ceiling;
- We fix the plate with self-tapping screws;
- We insulate the passage.
High-quality insulation of the ceiling, with the installation and fastening of several steel sheets at once
It is important that the chimney is well insulated - this will not allow condensation to accumulate and form on its inner surface
Insulation is carried out over the entire thickness of the ceiling
Laying tile sheets
correct laying of sheets
Before starting to lay the material, assemble the logs that are necessary to lift the sheets onto the roof. Metal tiles are allowed to be laid on both sides of the first sheet. If the next sheet is placed on the left side, then the last wave is covered on top. When this is done on the right side, the subsequent material is overlapped under the previous sheet. Regardless of whether a hip roof is created from metal tiles or it will have a different shape, it is customary to align the sheets of material horizontally along the eaves. There are several ways to install this roofing material. The operating procedure is as follows:
- the first sheet is placed on the slope and the material is leveled along the cornice and end;
- this sheet is attached to the ridge with one self-tapping screw - it is screwed into the center of the strip of material;
- the next sheet is laid next to an overlap of 15 centimeters, it is aligned with the cornice and connected with a self-tapping screw to the first;
- Similarly, several sheets are mounted and fastened together;
- the block formed from fastened sheets is once again aligned along the eaves and attached to the sheathing, except for the last of them, which is used to create the next blocks of metal tiles.
The technology for creating a roof covering looks like this:
- the first sheet is placed on the slope and aligned along the cornice and end;
- the second sheet is placed above the first and secured with one screw at the ridge - the screw is placed in the center;
- both of these sheets are connected to each other using screws;
- the third sheet is placed next to the first, and the fourth is placed above the third;
- the prepared block, consisting of four sheets, is leveled and mounted to the sheathing.
To implement it:
- on a triangular slope, find the center and draw a line along it;
- a similar line is marked on the first sheet in the center;
- the first sheet is placed on the slope, aligning the axes, and secured with one screw at the ridge;
- further installation is carried out on the right and left sides of the first sheet;
- On a triangular slope, when installing metal tiles, the sheets will have to be cut, which will require a special tool called a “devil” - a standard tool for a tin roofer. You can make it yourself from 10-centimeter boards. They are assembled into a rectangle, the elements of which are held in place using hinged fasteners. This tool will help you mark sheets of material directly on the roof (see also the article: “Installing a metal tile roof - features and rules”).
Installation and operation of a metal tile roof, detailed in the video:
The process of arranging waterproofing
Let's consider the sequence of the technological process of arranging waterproofing.
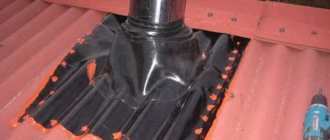
For a round chimney made of galvanized steel, the space between the pipe and the roof covering is much easier to seal. In this option, factory-made elastic penetrations are used, which are as close as possible to the profiled sheet.
The gaskets are an aluminum flange with a connecting part made of silicone or EPDM rubber. They can be of different sizes from 3 to 600 mm and designed at different angles, solid and split. Their service life is long. Such devices can be used for flat roofs and at an angle.
Sealing with such penetrations is the simplest method of insulation at the junction of the roof and the outlet.
So how does the process work?
- First, determine the size of the hole on the roof and cut the rubber corrugation according to these parameters. When organizing a chimney outlet on pitched roofs, a hole of 2-5 centimeters in diameter is required.
- Then they put on a pad.
- For the flange, select the desired shape.
- The grooves on the underside of the flange are filled with sealant and pressed tightly against the roof deck, and additionally secured with self-tapping screws with rubber heads, which are flattened during the tightening process. They are used for roofing work to prevent water from getting inside. When working with conventional self-tapping screws, rubber gaskets are used.
Important: the surface of the penetration and roof must be dry and clean
Exiting the pipe through the roof: general recommendations
When wiring a chimney, including a double-walled one, through a slope structure, the following rules must first of all be observed:
- the pipe must rise high enough above the roof to create good traction;
- the pipe should be passed from the attic to the street in such a way that there is a distance of at least 5-7 cm between its walls and combustible roof structures;
- The gaps between the pipe and the elements of the roofing “pie” are supposed to be sealed with non-flammable insulating materials.
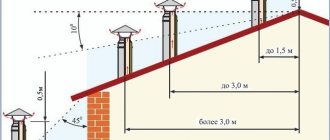
Chimneys of this type, according to SNiP standards, must rise above the roof of the roof by at least 50 cm when located at a distance of up to 1 m from the ridge.
Sealing a brick chimney - how to bypass and close it correctly
After lining the brick chimney with a stainless pipe, you need to seal it. The joints of the roof and brick chimney are more difficult to seal, so the process should be approached more responsibly. The fact is that the pipe and combustion products have different temperatures, as a result of which condensation can form in the pipe. It is known that when exposed to moisture, a brick pipe collapses very quickly, therefore, the protruding part of the pipe requires mandatory insulation
When choosing materials to decide how to cover a pipe on the roof with corrugated sheeting, it is important to take into account their appearance and resistance to certain conditions.
Direct insulation is carried out as follows:
The pipe is lined with clinker bricks. Then coated with plaster mortar or sheathed with suitable material
In this case, it is very important to use materials that are resistant to fire. In addition, the free space between the pipe and the roofing material is sealed using a cement collar, which has an increased moisture resistance coefficient
Further arrangement of such a chimney involves the use of a frame made of metal profiles and fastening of a decorative collar or sheet steel.
In addition, the free space between the pipe and the roofing material is sealed using a cement collar, which has an increased moisture resistance coefficient. Further arrangement of such a chimney involves the use of a frame made of metal profiles and fastening of a decorative collar or sheet steel.
In this situation, some features should be taken into account:
- The gap, the width of which does not exceed 0.5 cm, is filled with heat-resistant silicone sealant.
- Gaps larger than 1 cm are filled with cement mortar and an apron is placed over it.
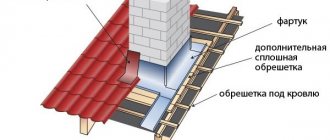
Selecting an output location
Choosing a convenient place to make a hole in the roof from corrugated sheets for the chimney pipe is half the success. Naturally, the decisive factor in this matter is the location of the stove. Professional stove makers recommend positioning the chimney strictly vertically, but there are more subtle nuances:
Scheme of the chimney outlet through the corrugated roof
- It is best to place the hole for the chimney outlet at the highest point of the roof, that is, closer to the ridge. The optimal distance from the ridge to the pipe is 50-80 cm.
- It is advisable that the hole in the corrugated roof for the pipe does not fall on the elements of the rafter system. To bypass them, use bends and corner sections of the chimney. Using them, you can set the rotation to 90 or 45 degrees.
- The length of the chimney pipe segments is calculated so that the joints are located above or below the places where the ceilings and corrugated roofing pass. Otherwise, making a quality connection will be problematic.
- To ensure good traction, the system should be 1-1.5 larger than the roof ridge. If the pipe is too high, the flow of smoke will have time to cool while passing through it, which leads to the appearance of condensation.
To check whether you have correctly identified the exit location of the future chimney, draw a mark on the corrugated roof with a marker and check its temperature at the end of the day - the pipe should be located in the “cold zone”, that is, remain in the shade for almost the entire day.
Preparatory stage of work
To avoid any difficulties during the pipe installation process, you need to prepare the work site and tools in advance. A hole from corrugated sheeting is cut according to the following technology:
After determining the configuration of the chimney, they plan where the exit to the roof will be located. Let us remind you that it is better to place the pipe vertically. The cross-sectional size of the chimney pipes is selected based on the recommendations of the heating device manufacturer. The thicker and higher the pipe, the better smoke removal from the stove
It is important that all segments are of the same cross-section and fit each other, and are inserted without creating a gap. On a corrugated roof, mark the outline of the pipe using a permanent marker. Using a grinder with a thin metal cutter, cut out a hole, moving a couple of centimeters inward from the intended line. You should work with corrugated sheeting carefully and slowly so that the edge of the cut is smooth, without jagged edges that could cause injury during the pipe removal process. You need to make short cuts in the corners of the hole to bend the edges of the corrugated board upward. They cut out the same thing in the ceiling, weigh it
A metal box is installed that will connect the pipe to the rafters. The chimney will pass through the hole inside the box; the distance between their walls should be at least 15 cm.
The insulation, waterproofing film, and vapor barrier membrane are removed from the hole made in the roof. It is necessary that the hole goes through.
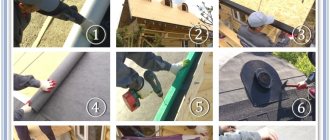
Arrangement of an apron made of aluminum tape
The second method of sealing a pipe is done by installing an apron made of aluminum tape. You should go around two layers of aluminum tape around the perimeter of the pipe, so that part of the tape is buried in the gap between the pipe wall and the roofing. What can I cover it with? It should be covered with bitumen mastic followed by gluing the tape. The lines connecting the apron to the pipe are fixed with a metal profile and covered with a waterproofing film.
Bypassing the pipe on the roof with corrugated sheeting can be done by arranging an apron using adjacent lower sheet strips. The installation principle boils down to organizing the first plank to the side wall of the chimney and fixing the upper level mark. A fine is made at the mark, followed by filling with sealant. The next work process is the organization of a metal tie with the arrangement of sides along the edge to drain water. Then the tie is attached to the top edge.
To ensure high-quality corrugated sheeting around the pipe, it is necessary to make a sheathing. It will ensure reliable fastening of the lower junction strip and the edge of the corrugated sheet along the walls of the chimney.
Adjacency
Tie:
- it is necessary to mark the pipe, to what height the protective building materials will be located;
- all debris and all foreign objects are removed, the surface must be washed with water;
- work starts from the bottom. The material must be cut;
- after the protective building material is installed from below, installation is carried out on the remaining sides; IMPORTANT. The material must be overlapped by 15-20 centimeters.
- then sealing is carried out;
- the apron of the tie is directed downward;
- After the work has been done, you can begin installing the roofing.
IMPORTANT. We must not forget about ventilation. It is necessary so that the pipe does not heat up to extremely high temperatures. It will also ventilate the roof space and dry it out.
Chimney bypass:
- It is necessary to leave a waterproofing coating of 5 centimeters, this is done if the material is heat-resistant. This building material is glued to the pipe.
- Then the frame is framed for protection.
- Storming is in progress. The seams should be smooth.
- Drainage is being done.
IMPORTANT. If tiles are used as roofing material, then the chimney is treated after laying the roof.
Consequences of poor installation
The passage unit must be reliably protected from moisture penetration, therefore compliance with installation technology and the use of reliable and durable materials are of great importance.
Poor waterproofing of pipes leading through the roof
:
- Leads to the destruction of the brick chimney due to weakening of the mortar, as a result of which flue gases can penetrate into the attic space. Fire danger also increases.
- It provokes the penetration of moisture into the brick chimney channel and the occurrence of fungus in the warm season.
- Promotes waterlogging and damage to the waterproofing carpet and vapor barrier membrane.
- Increases the heat loss of the building (accordingly, fuel costs increase).
- It disrupts the air circulation in the room under the roof, this leads to an increase in humidity levels and provokes rotting of wooden structures. In difficult cases, this leads to the need for major repairs to the rafter system of the house.
- Causes the formation of ice, causing cracks to expand and destruction of the roofing next to the chimney.
What can result from poor installation?
Often, the list of works of a stove maker or installer of a gas or electric heating boiler does not include work on installing a chimney. It is assumed that the passage of the chimney pipe through the roof is laid at the construction stage, or the homeowner will install the chimney on his own. The apparent simplicity of such work provokes owners to refuse to use professional roofers. They don’t think about what serious negative consequences a poor-quality chimney outlet to the roof can lead to.
Frequently encountered problems:
- through a poorly sealed pipe passage, dampness can enter the masonry, eventually destroying bricks and cement joints;
- increased humidity of the chimney pipe itself or the elements in contact with it provokes an increased spread of various microorganisms, mold, and mildew. The spores of some of them can pose a danger to human health and even human life. If traces of infection are visible on the pipe, it is not recommended to use it, and in special cases it is necessary to completely replace the entire smoke exhaust system;
- water seepage in places where the chimney passes through the roof elements leads to a reduction in the thermal insulation properties of the insulation by half. You need to understand that after such a layer dries, the insulation characteristics will no longer be able to return to their previous level;
- a poorly installed chimney affects the durability of the materials of the roofing elements and rafter system. Penetrating moisture accelerates the process of wood rotting, which will lead to the destruction of the power frame;
- large gaps near the passage of pipes lead to the cessation of normal circulation of warm and cold air in the room under the roof. This leads to additional energy losses, and hence to unnecessary heating costs;
- Poor-quality chimney lining significantly spoils the appearance of the entire building.
Not only chimneys from stoves, fireplaces and other solid fuel devices are raised above the roof. Exhaust pipes from gas heaters, as well as ventilation pipes, are also discharged there. When installing them, exactly the same methods are used as for chimneys.